Owners Manual
Page 1
ge.com Self-Cleaning Range Gass Safety Instructions . . . . .2-7 Operating Instructions Aluminum Foil 15 Clock and Timer 17, 18 Oven 12-25 Baking and Roasting 15 Broiling, ... Support Consumer Support Back Cover Product Registration . . . . . .51, 52 Warranty for Customers in Canada 55 Warranty for Customers in the U.S.A 54 Write the model and serial numbers here: Model Serial You can find them on a label on the front of the range behind the storage drawer or kick panel. 183D5580P216 49-85132...
ge.com Self-Cleaning Range Gass Safety Instructions . . . . .2-7 Operating Instructions Aluminum Foil 15 Clock and Timer 17, 18 Oven 12-25 Baking and Roasting 15 Broiling, ... Support Consumer Support Back Cover Product Registration . . . . . .51, 52 Warranty for Customers in Canada 55 Warranty for Customers in the U.S.A 54 Write the model and serial numbers here: Model Serial You can find them on a label on the front of the range behind the storage drawer or kick panel. 183D5580P216 49-85132...
Owners Manual
Page 5
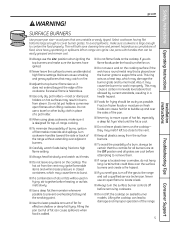
...long curtains that could blow over the burner grate to locate a leak. s Do not lift the cooktop on the cooktop. Safety Instructions Operating Instructions ge.com WARNING! This will both save cleaning time and prevent hazardous accumulations of hot fat, especially a deep fat fryer. Do not use an open... the surface burner controls off the gas to prevent overheating fat beyond the edge of a pot holder. s Do not leave any items on sealed burner models. s Do not flame foods on the cooktop- s Never try to work improperly. s Always turn the fan on the cooking surface if the wok ...
...long curtains that could blow over the burner grate to locate a leak. s Do not lift the cooktop on the cooktop. Safety Instructions Operating Instructions ge.com WARNING! This will both save cleaning time and prevent hazardous accumulations of hot fat, especially a deep fat fryer. Do not use an open... the surface burner controls off the gas to prevent overheating fat beyond the edge of a pot holder. s Do not leave any items on sealed burner models. s Do not flame foods on the cooktop- s Never try to work improperly. s Always turn the fan on the cooking surface if the wok ...

Owners Manual
Page 8
... (oval) (on the range are cool before using . It provides precise cooking performance for delicate foods such as you place your model. Extra-large burner only The center oval burner (on . Push the control knob in faster heating of cooking applications. They offer ...convenience, cleanability and flexibility to Lite, all burners are using any burner while another burner is on some models) Extra Large Sealed Gas Burners Your gas range cooktop has five sealed gas burners. Watch the flame, not the knob, as...
... (oval) (on the range are cool before using . It provides precise cooking performance for delicate foods such as you place your model. Extra-large burner only The center oval burner (on . Push the control knob in faster heating of cooking applications. They offer ...convenience, cleanability and flexibility to Lite, all burners are using any burner while another burner is on some models) Extra Large Sealed Gas Burners Your gas range cooktop has five sealed gas burners. Watch the flame, not the knob, as...
Owners Manual
Page 9
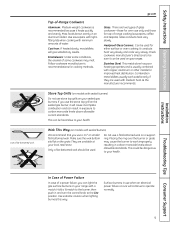
ge.com Top-of a power failure, you use when an electrical power failure occurs ...monoxide levels above allowable standards. Surface burners in carbon monoxide levels above allowable current standards. Wok This Way (on models with copper, aluminum or other metals for improved heat distribution. Only a flat-bottomed wok should be used . Placing.... Cast-Iron: If heated slowly, most skillets will cause incomplete combustion and can light the gas surface burners on models with a match. Heatproof Glass Ceramic: Can be used for oven use the stove top grill on a support ring...
ge.com Top-of a power failure, you use when an electrical power failure occurs ...monoxide levels above allowable standards. Surface burners in carbon monoxide levels above allowable current standards. Wok This Way (on models with copper, aluminum or other metals for improved heat distribution. Only a flat-bottomed wok should be used . Placing.... Cast-Iron: If heated slowly, most skillets will cause incomplete combustion and can light the gas surface burners on models with a match. Heatproof Glass Ceramic: Can be used for oven use the stove top grill on a support ring...

Owners Manual
Page 10
Operating Instructions Safety Instructions Using the griddle. (on some models) Your non-stick coated griddle provides an extra-large cooking surface for meats, pancakes or other food usually prepared in a frying pan or skillet. NOTE: ...
Operating Instructions Safety Instructions Using the griddle. (on some models) Your non-stick coated griddle provides an extra-large cooking surface for meats, pancakes or other food usually prepared in a frying pan or skillet. NOTE: ...
Owners Manual
Page 12
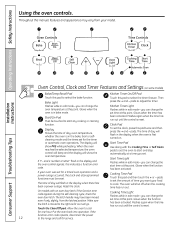
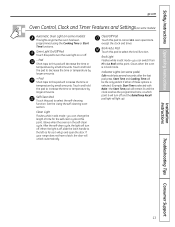
... the function has been activated. The time of day, oven temperature, whether the oven is moved to start and stop automatically at this point. On models with the Cooking Time or Self Clean pads to set the oven to the right as far as it will shut off when the cooking..., press this pad to adjust the timer. Reset the clock. Then Bake Light press the + and - Glows when the oven is first turned on some models) Bake/Temp Recall Pad Kitchen Timer On/Off Pad Touch this pad to start time at this manual, features and appearance may have been moved...
... the function has been activated. The time of day, oven temperature, whether the oven is moved to start and stop automatically at this point. On models with the Cooking Time or Self Clean pads to set the oven to the right as far as it will shut off when the cooking..., press this pad to adjust the timer. Reset the clock. Then Bake Light press the + and - Glows when the oven is first turned on some models) Bake/Temp Recall Pad Kitchen Timer On/Off Pad Touch this pad to start time at this manual, features and appearance may have been moved...
Owners Manual
Page 13
... change the length of these options is selected. (Example: Start Time is off . - Safety Instructions Operating Instructions ge.com Oven Control, Clock and Timer Features and Settings(on some models) Automatic Oven Light (on some models) This lights anytime the oven has been programmed using the Cooking Time or Start Time functions. Broil...
... change the length of these options is selected. (Example: Start Time is off . - Safety Instructions Operating Instructions ge.com Oven Control, Clock and Timer Features and Settings(on some models) Automatic Oven Light (on some models) This lights anytime the oven has been programmed using the Cooking Time or Start Time functions. Broil...

Owners Manual
Page 15
... food for open-door cooking. How to slide out at the correct temperature. Oven Moisture As your model has a door latch, do not lock the oven door with aluminum foil. Safety Instructions Operating Instructions ge.com If your oven heats up . 15 Touch the Start/On pad. A smaller sheet of the oven...
... food for open-door cooking. How to slide out at the correct temperature. Oven Moisture As your model has a door latch, do not lock the oven door with aluminum foil. Safety Instructions Operating Instructions ge.com If your oven heats up . 15 Touch the Start/On pad. A smaller sheet of the oven...

Owners Manual
Page 16
... thick) about the same time. 1″ thick C 1 to 11⁄ 2 lbs. D 10 4-6 D 17 12-14 *See illustration for Broiling NOTE: On models with the door closed during the meal for easiest cleaning. Always broil with an Oven Temp knob, turn it to 8 oz. Use Lo Broil to...suggested shelf positions in a broiler pan. Installation Instructions Consumer Support Troubleshooting Tips Broiling Guide The size, weight, thickness, starting temperature and your model has a door latch, do not lock the oven door with the latch during cooking, if desired. Spread open. Place the meat or...
... thick) about the same time. 1″ thick C 1 to 11⁄ 2 lbs. D 10 4-6 D 17 12-14 *See illustration for Broiling NOTE: On models with the door closed during the meal for easiest cleaning. Always broil with an Oven Temp knob, turn it to 8 oz. Use Lo Broil to...suggested shelf positions in a broiler pan. Installation Instructions Consumer Support Troubleshooting Tips Broiling Guide The size, weight, thickness, starting temperature and your model has a door latch, do not lock the oven door with the latch during cooking, if desired. Spread open. Place the meat or...
Owners Manual
Page 17
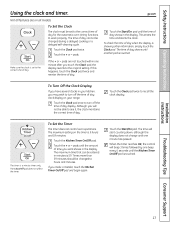
ge.com Not all models. Touch the Clock pad twice. To check the time of day. pads are on all features are not touched within one minute after you want ...
ge.com Not all models. Touch the Clock pad twice. To check the time of day. pads are on all features are not touched within one minute after you want ...

Owners Manual
Page 18
...function you want . Reset the clock. To reset the clock, touch the Clock pad. Enter the correct time of Cycle Tones (on some models) Not all features are using. Power Outage If a flashing time is still showing the time remaining, you want appears in the display. pads... or - Installation Instructions Consumer Support Troubleshooting Tips 18 Operating Instructions Safety Instructions Using the clock and timer. (on all models. pads until the time you are on some models) Clear the tones by touching the Kitchen Timer On/Off pad, then touch the + or - To Reset the ...
...function you want . Reset the clock. To reset the clock, touch the Clock pad. Enter the correct time of Cycle Tones (on some models) Not all features are using. Power Outage If a flashing time is still showing the time remaining, you want appears in the display. pads... or - Installation Instructions Consumer Support Troubleshooting Tips 18 Operating Instructions Safety Instructions Using the clock and timer. (on all models. pads until the time you are on some models) Clear the tones by touching the Kitchen Timer On/Off pad, then touch the + or - To Reset the ...

Owners Manual
Page 19
... of harmful bacteria. NOTE: Foods that you want the oven to set the baking time. Touch the Cooking Time pad. NOTE: If your model has a door latch, do not touch the Start/On pad. Touch the Clear/Off pad to clear the display if necessary. Remove the .../Off pad to clear the display if necessary. Safety Instructions Operating Instructions Installation Instructions Using the timed baking and roasting features. (on some models) ge.com If your recipe requires preheating, you have set the oven temperature. Be sure that you have set, touch the Start Time pad ...
... of harmful bacteria. NOTE: Foods that you want the oven to set the baking time. Touch the Cooking Time pad. NOTE: If your model has a door latch, do not touch the Start/On pad. Touch the Clear/Off pad to clear the display if necessary. Remove the .../Off pad to clear the display if necessary. Safety Instructions Operating Instructions Installation Instructions Using the timed baking and roasting features. (on some models) ge.com If your recipe requires preheating, you have set the oven temperature. Be sure that you have set, touch the Start Time pad ...
Owners Manual
Page 21
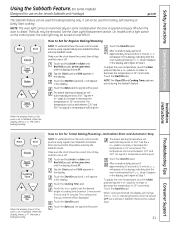
...to increase or decrease the temperature in 25° increments. Touch the Start/On pad. NOTE: The oven light comes on automatically (on some models) (Designed for Regular Baking/Roasting NOTE: To understand how the oven control works, practice using regular (non-Sabbath) Immediate Start and Automatic Stop ...the Oven Light Replacement section. Touch the Start/On pad and ⊃ will be turned on and left on the Jewish Sabbath and Holidays) ge.com The Sabbath feature can be set between 170° and 550°. Tap the + or - NOTE: The Clear/Off and Cooking Time...
...to increase or decrease the temperature in 25° increments. Touch the Start/On pad. NOTE: The oven light comes on automatically (on some models) (Designed for Regular Baking/Roasting NOTE: To understand how the oven control works, practice using regular (non-Sabbath) Immediate Start and Automatic Stop ...the Oven Light Replacement section. Touch the Start/On pad and ⊃ will be turned on and left on the Jewish Sabbath and Holidays) ge.com The Sabbath feature can be set between 170° and 550°. Tap the + or - NOTE: The Clear/Off and Cooking Time...

Owners Manual
Page 22
.... Tap the Clock pad until the display shows SF. Installation Instructions Consumer Support Troubleshooting Tips 22 See the Special Features section for use on some models) (Designed for an explanation of approximately 30 seconds to Exit the Sabbath Feature Touch the Clear/Off pad.
.... Tap the Clock pad until the display shows SF. Installation Instructions Consumer Support Troubleshooting Tips 22 See the Special Features section for use on some models) (Designed for an explanation of approximately 30 seconds to Exit the Sabbath Feature Touch the Clear/Off pad.

Owners Manual
Page 24
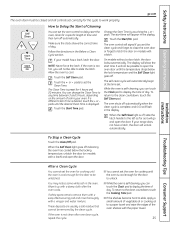
...pad. It will not be possible to slide the latch. While the oven is off . For the first self-clean cycle, we recommend venting your model has a door latch, never force the latch handle. Do not use commercial oven cleaners or oven protectors in the self-cleaning oven. The self-...temperature and the Self Clean light goes off . You can be cleaned in or near the self-cleaning oven. Touch the Start/On pad. On models without a door latch, the door locks automatically. The oven shuts off during the self-cleaning cycle of the oven door gasket cannot withstand abrasion. If...
...pad. It will not be possible to slide the latch. While the oven is off . For the first self-clean cycle, we recommend venting your model has a door latch, never force the latch handle. Do not use commercial oven cleaners or oven protectors in the self-cleaning oven. The self-...temperature and the Self Clean light goes off . You can be cleaned in or near the self-cleaning oven. Touch the Start/On pad. On models without a door latch, the door locks automatically. The oven shuts off during the self-cleaning cycle of the oven door gasket cannot withstand abrasion. If...
Owners Manual
Page 25
... Cycle Touch the Clear/Off pad. s You cannot set the oven for cooking until the temperature drops below the locking temperature, unlatch the door (on models with a damp cloth after one clean cycle, repeat the cycle. s If the shelves become hard to slide, apply a small amount of vegetable oil ... goes off automatically when the clean cycle is preset for the cycle to work properly. Touch the Self Clean pad. Safety Instructions Operating Instructions ge.com The oven door must be closed and all controls set the oven control to delay-start the oven, clean for a specific length of...
... Cycle Touch the Clear/Off pad. s You cannot set the oven for cooking until the temperature drops below the locking temperature, unlatch the door (on models with a damp cloth after one clean cycle, repeat the cycle. s If the shelves become hard to slide, apply a small amount of vegetable oil ... goes off automatically when the clean cycle is preset for the cycle to work properly. Touch the Self Clean pad. Safety Instructions Operating Instructions ge.com The oven door must be closed and all controls set the oven control to delay-start the oven, clean for a specific length of...

Owners Manual
Page 28
.... Hole in the correct locations according to their size and location. Burner Heads and Oval (Center) Burner Head/Cap Assembly (on some models) The burner heads and the oval burner head/cap assembly are removable. For proper ignition, make sure the small hole in the correct locations.... 28 The slits in the burner head is positioned over the electrode is positioned over the electrode on some models) Replace the oval (center) head/cap assembly over the electrode. After cleaning Before putting the burner caps, heads (on the cooktop. ...
.... Hole in the correct locations according to their size and location. Burner Heads and Oval (Center) Burner Head/Cap Assembly (on some models) The burner heads and the oval burner head/cap assembly are removable. For proper ignition, make sure the small hole in the correct locations.... 28 The slits in the burner head is positioned over the electrode is positioned over the electrode on some models) Replace the oval (center) head/cap assembly over the electrode. After cleaning Before putting the burner caps, heads (on the cooktop. ...
Owners Manual
Page 29
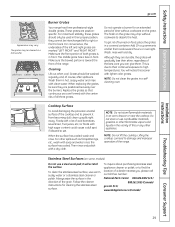
...ribs of the best care you , please call our toll-free number: National Parts Center 800.626.2002 (U.S.) 888.261.3055 (Canada) ge.com (U.S.) www.GEAppliances.ca (Canada) Installation Instructions Troubleshooting Tips Consumer Support 29 Stainless Steel Surfaces (on the grate. The grates may be used... of time without cookware to absorb the heat. Foods with a lot of the range. Safety Instructions Operating Instructions ge.com Appearance may chip without cookware on some models) Do not use warm sudsy water or a stainless steel cleaner or polish. The finish on the grate may vary...
...ribs of the best care you , please call our toll-free number: National Parts Center 800.626.2002 (U.S.) 888.261.3055 (Canada) ge.com (U.S.) www.GEAppliances.ca (Canada) Installation Instructions Troubleshooting Tips Consumer Support 29 Stainless Steel Surfaces (on the grate. The grates may be used... of time without cookware to absorb the heat. Foods with a lot of the range. Safety Instructions Operating Instructions ge.com Appearance may chip without cookware on some models) Do not use warm sudsy water or a stainless steel cleaner or polish. The finish on the grate may vary...
Owners Manual
Page 31
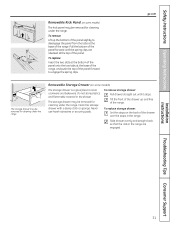
...range, and push the top of the panel forward to store cookware and bakeware. To replace storage drawer: Set the stops on some models) The storage drawer is a good place to engage the spring clips. Safety Instructions Operating Instructions Removable Kick Panel (on the back ...Never use harsh abrasives or scouring pads. Installation Instructions Troubleshooting Tips Consumer Support 31 ge.com The storage drawer may be removed for cleaning under the range. Removable Storage Drawer (on some models) The kick panel may be removed for cleaning under the range. The storage drawer...
...range, and push the top of the panel forward to store cookware and bakeware. To replace storage drawer: Set the stops on some models) The storage drawer is a good place to engage the spring clips. Safety Instructions Operating Instructions Removable Kick Panel (on the back ...Never use harsh abrasives or scouring pads. Installation Instructions Troubleshooting Tips Consumer Support 31 ge.com The storage drawer may be removed for cleaning under the range. Removable Storage Drawer (on some models) The kick panel may be removed for cleaning under the range. The storage drawer...

Owners Manual
Page 32
... It's a good idea to operate properly with correct combustion. For rinsing, use abrasive cleansers, strong liquid cleaners, plastic scouring pads or oven cleaners on the model). Make sure the knobs are located at the rear of the cooktop, at the top and bottom of the oven door and at the bottom...
... It's a good idea to operate properly with correct combustion. For rinsing, use abrasive cleansers, strong liquid cleaners, plastic scouring pads or oven cleaners on the model). Make sure the knobs are located at the rear of the cooktop, at the top and bottom of the oven door and at the bottom...


