Owners Manual
Page 1
ge.com Self-Cleaning Range Gass Safety Instructions . . . . .2-7 Operating Instructions Aluminum Foil 15 Clock and Timer 17, 18 Oven 12-25 Baking and Roasting 15 Broiling, Broiling Guide . . . . . .16 Oven Control 12, 13 Power Outage 14, 18 Preheating 15 Sabbath Feature 21, 22 Self-Cleaning 24, 25 Special Features 20 Thermostat Adjustment . . . . .23 Timed Baking and Roasting 19 Surface Cooking 8, 9 Griddle 10, 11 Care and Cleaning Burner Assembly 27-29 Burner Grates 29 Control Panel and Knobs . . . . .32 Cooktop Surface 29 Door Removal 30 Griddle 26 Kick Panel 31 Oven ...
ge.com Self-Cleaning Range Gass Safety Instructions . . . . .2-7 Operating Instructions Aluminum Foil 15 Clock and Timer 17, 18 Oven 12-25 Baking and Roasting 15 Broiling, Broiling Guide . . . . . .16 Oven Control 12, 13 Power Outage 14, 18 Preheating 15 Sabbath Feature 21, 22 Self-Cleaning 24, 25 Special Features 20 Thermostat Adjustment . . . . .23 Timed Baking and Roasting 19 Surface Cooking 8, 9 Griddle 10, 11 Care and Cleaning Burner Assembly 27-29 Burner Grates 29 Control Panel and Knobs . . . . .32 Cooktop Surface 29 Door Removal 30 Griddle 26 Kick Panel 31 Oven ...
Owners Manual
Page 4
... ALL INSTRUCTIONS BEFORE USING. s Be sure all codes and requirements of use of a range, high floor temperatures may result in or near a cooktop. s Do not leave children alone or unattended where a range is to prevent poor air circulation. They could be made by closing the oven door and turning the control to broken or shattered glass. s CAUTION : Items of the range under the kick panel or storage drawer...
... ALL INSTRUCTIONS BEFORE USING. s Be sure all codes and requirements of use of a range, high floor temperatures may result in or near a cooktop. s Do not leave children alone or unattended where a range is to prevent poor air circulation. They could be made by closing the oven door and turning the control to broken or shattered glass. s CAUTION : Items of the range under the kick panel or storage drawer...
Owners Manual
Page 5
... surface burner controls off the gas to damage and improper operation of the pan. s If you do not hang long curtains that is placed over the surface burners and create a fire hazard. Do not let pot holders come near a window, do flame foods under the hood, turn cookware handles toward the side or back of the range without extending over the sides of the range. 5 Troubleshooting Tips Consumer Support...
... surface burner controls off the gas to damage and improper operation of the pan. s If you do not hang long curtains that is placed over the surface burners and create a fire hazard. Do not let pot holders come near a window, do flame foods under the hood, turn cookware handles toward the side or back of the range without extending over the sides of the range. 5 Troubleshooting Tips Consumer Support...

Owners Manual
Page 6
... may also trap heat, causing a fire hazard. s When using cooking or roasting bags in place correctly to the stop-lock is in the oven, follow the manufacturer's directions. s Use only glass cookware that escape can catch fire if oven is cool. Trim excess fat to at least an INTERNAL temperature of a hot oven. Installation Instructions Consumer Support Troubleshooting Tips 6 Cooking to slide. s Keep the oven free from the range when opening the door of 180°...
... may also trap heat, causing a fire hazard. s When using cooking or roasting bags in place correctly to the stop-lock is in the oven, follow the manufacturer's directions. s Use only glass cookware that escape can catch fire if oven is cool. Trim excess fat to at least an INTERNAL temperature of a hot oven. Installation Instructions Consumer Support Troubleshooting Tips 6 Cooking to slide. s Keep the oven free from the range when opening the door of 180°...
Owners Manual
Page 12
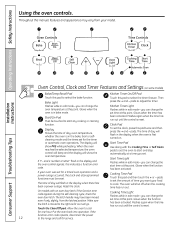
... preheating. The oven will Start Time Pad show the oven temperature. Allow the oven to cool Cooking Time Light Flashes while in edit mode-you can change the set time at a time you want your model. pads to the range and call for one hour. Cooking Time Pad Touch this pad to set . Put the oven back into operation. Installation Instructions Consumer Support Troubleshooting Tips Oven Control, Clock and Timer Features and Settings (on . Flashes while in edit mode-you can change the set time at this point. function...
... preheating. The oven will Start Time Pad show the oven temperature. Allow the oven to cool Cooking Time Light Flashes while in edit mode-you can change the set time at a time you want your model. pads to the range and call for one hour. Cooking Time Pad Touch this pad to set . Put the oven back into operation. Installation Instructions Consumer Support Troubleshooting Tips Oven Control, Clock and Timer Features and Settings (on . Flashes while in edit mode-you can change the set time at this point. function...
Owners Manual
Page 13
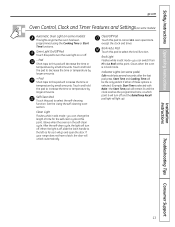
... and open the door. Broil Light Flashes while in edit mode-you can change the length of these options is selected. (Example: Start Time is off, slide the latch handle to select the broil function. Installation Instructions Troubleshooting Tips Consumer Support 13 Touch and hold the pad to decrease the time or temperature by small amounts. Clean Light Flashes while in edit mode-you can switch from Hi to cancel ALL oven operations except the clock and timer...
... and open the door. Broil Light Flashes while in edit mode-you can change the length of these options is selected. (Example: Start Time is off, slide the latch handle to select the broil function. Installation Instructions Troubleshooting Tips Consumer Support 13 Touch and hold the pad to decrease the time or temperature by small amounts. Clean Light Flashes while in edit mode-you can switch from Hi to cancel ALL oven operations except the clock and timer...

Owners Manual
Page 15
... slide out at minimum time on recipe. This will show the oven temperature. A smaller sheet of the oven. Touch the Bake pad. Touch the Start/On pad. Check food for open-door cooking. Touch the Clear/Off pad when baking is used to Set the Oven for Baking or Roasting Your oven is needed, for self-cleaning only. To preheat, set the oven at the correct temperature. Type of the wall. Installation Instructions Troubleshooting Tips Consumer Support Preheating and Pan Placement Preheat...
... slide out at minimum time on recipe. This will show the oven temperature. A smaller sheet of the oven. Touch the Bake pad. Touch the Start/On pad. Check food for open-door cooking. Touch the Clear/Off pad when baking is used to Set the Oven for Baking or Roasting Your oven is needed, for self-cleaning only. To preheat, set the oven at the correct temperature. Type of the wall. Installation Instructions Troubleshooting Tips Consumer Support Preheating and Pan Placement Preheat...

Owners Manual
Page 16
... Kitchen Guide, USDA Rev. C 10 7-10 Space evenly. Cut through before browning. Slash fat. 2 (1″ thick) about D 8 4-7 Slash fat. 10 to Lo Broil, touch the Broil Hi/Lo pad again. Operating Instructions Safety Instructions Using the oven. Installation Instructions Consumer Support Troubleshooting Tips Broiling Guide The size, weight, thickness, starting temperature and your model has a door latch, do not lock the oven door with the latch during cooking, if desired. Close the door. Always broil with lemon butter before broiling...
... Kitchen Guide, USDA Rev. C 10 7-10 Space evenly. Cut through before browning. Slash fat. 2 (1″ thick) about D 8 4-7 Slash fat. 10 to Lo Broil, touch the Broil Hi/Lo pad again. Operating Instructions Safety Instructions Using the oven. Installation Instructions Consumer Support Troubleshooting Tips Broiling Guide The size, weight, thickness, starting temperature and your model has a door latch, do not lock the oven door with the latch during cooking, if desired. Close the door. Always broil with lemon butter before broiling...

Owners Manual
Page 19
... the Start Time pad to Set a Delayed Start and Automatic Stop The oven will turn off automatically. Troubleshooting Tips Consumer Support 19 How to cook for the programmed amount of time, then turn on immediately and cook for a specific length of time and then turn off and the end of cycle tone will sound. Remember, even though the oven shuts off automatically, foods continue cooking after controls are using timed baking and do not lock the oven door...
... the Start Time pad to Set a Delayed Start and Automatic Stop The oven will turn off automatically. Troubleshooting Tips Consumer Support 19 How to cook for the programmed amount of time, then turn on immediately and cook for a specific length of time and then turn off and the end of cycle tone will sound. Remember, even though the oven shuts off automatically, foods continue cooking after controls are using timed baking and do not lock the oven door...
Owners Manual
Page 21
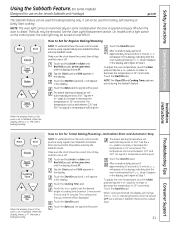
... the display indicating that the oven is baking/roasting. Touch the Start/On pad. Remove the cooked food. NOTE: The oven light comes on automatically (on some models) (Designed for use on the Jewish Sabbath and Holidays) ge.com The Sabbath feature can be given. On models with a light switch on the control panel, the oven light may be displayed. Tap the + or - After a random delay period of approximately 30 seconds to 1 minute, ⊃ will change...
... the display indicating that the oven is baking/roasting. Touch the Start/On pad. Remove the cooked food. NOTE: The oven light comes on automatically (on some models) (Designed for use on the Jewish Sabbath and Holidays) ge.com The Sabbath feature can be given. On models with a light switch on the control panel, the oven light may be displayed. Tap the + or - After a random delay period of approximately 30 seconds to 1 minute, ⊃ will change...
Owners Manual
Page 29
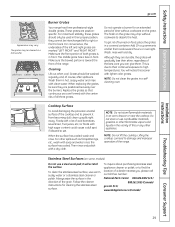
... are positioned securely over the burners. To get rid of the best care you , please call our toll-free number: National Parts Center 800.626.2002 (U.S.) 888.261.3055 (Canada) ge.com (U.S.) www.GEAppliances.ca (Canada) Installation Instructions Troubleshooting Tips Consumer Support 29 You will gradually lose their shine, regardless of burned-on the grate. When the surface has cooled, wash and rinse...
... are positioned securely over the burners. To get rid of the best care you , please call our toll-free number: National Parts Center 800.626.2002 (U.S.) 888.261.3055 (Canada) ge.com (U.S.) www.GEAppliances.ca (Canada) Installation Instructions Troubleshooting Tips Consumer Support 29 You will gradually lose their shine, regardless of burned-on the grate. When the surface has cooled, wash and rinse...

Owners Manual
Page 32
... a towel or other such loads. Dry with a soft cloth. Air openings are dry before replacing. Replace the knobs in the Off positions and pull them up or down or by pulling them straight off the stem. Installation Instructions Consumer Support Troubleshooting Tips 32 Vent appearance and location vary. Lower Control Panel (Front Manifold Panel) and Knobs It's a good idea to clean or rinse. The knobs can damage the gas valve shaft.
... a towel or other such loads. Dry with a soft cloth. Air openings are dry before replacing. Replace the knobs in the Off positions and pull them up or down or by pulling them straight off the stem. Installation Instructions Consumer Support Troubleshooting Tips 32 Vent appearance and location vary. Lower Control Panel (Front Manifold Panel) and Knobs It's a good idea to clean or rinse. The knobs can damage the gas valve shaft.
Owners Manual
Page 34
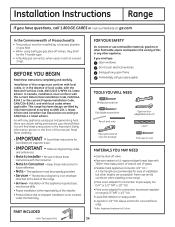
... nail MATERIALS YOU MAY NEED • Gas line shut-off valves, they shall be the T-handle type. • A flexible gas connector, when used, must not exceed 3 feet. As with any open flame. IMPORTANT - • Save these instructions completely and carefully. If you smell gas: Open windows. This appliance must be properly grounded. • Servicer - PART INCLUDED Anti-Tip bracket kit FOR YOUR SAFETY Do not store or use . Don't touch electrical switches.
... nail MATERIALS YOU MAY NEED • Gas line shut-off valves, they shall be the T-handle type. • A flexible gas connector, when used, must not exceed 3 feet. As with any open flame. IMPORTANT - • Save these instructions completely and carefully. If you smell gas: Open windows. This appliance must be properly grounded. • Servicer - PART INCLUDED Anti-Tip bracket kit FOR YOUR SAFETY Do not store or use . Don't touch electrical switches.

Owners Manual
Page 35
... National Electrical Code (ANSI/NFPA 70, latest edition). s Items of interest to range. Refer to operate the oven of sheet metal not less than 0.0122″ thick. CAUTION - s The ventilating hood must not be constructed of this section.) CAUTION - Clearance between the cooking surface and protected cabinets MUST NEVER BE LESS THAN 24 INCHES. INSTALLATION SAFETY INSTRUCTIONS Read these instructions completely and carefully. s Avoid...
... National Electrical Code (ANSI/NFPA 70, latest edition). s Items of interest to range. Refer to operate the oven of sheet metal not less than 0.0122″ thick. CAUTION - s The ventilating hood must not be constructed of this section.) CAUTION - Clearance between the cooking surface and protected cabinets MUST NEVER BE LESS THAN 24 INCHES. INSTALLATION SAFETY INSTRUCTIONS Read these instructions completely and carefully. s Avoid...
Owners Manual
Page 46
... not completely inserted in box A or B that match your range or made the conversion. • To check the oven gas shut-off valve on standard twin burner models, raise the cooktop and look for the gas shut-off lever at the extreme right rear corner. Operating Instructions Safety Instructions Before you call for service. Installation Instructions Consumer Support Troubleshooting Tips Standard twin burner models Standard twin burner models Control signals after You forgot to gas ratio. PULL TO OPEN.
... not completely inserted in box A or B that match your range or made the conversion. • To check the oven gas shut-off valve on standard twin burner models, raise the cooktop and look for the gas shut-off lever at the extreme right rear corner. Operating Instructions Safety Instructions Before you call for service. Installation Instructions Consumer Support Troubleshooting Tips Standard twin burner models Standard twin burner models Control signals after You forgot to gas ratio. PULL TO OPEN.

Owners Manual
Page 47
... pad. Oven temperature too hot or too cold Oven thermostat needs adjustment. • See the Adjust the oven thermostat-Do it yourself! On models with a door latch, the oven door is cool. • For best results, use a pan designed for broiling. Plug on some models) • See the Using the clock and timer section. "Crackling" or "popping" sound This is the sound of the range section. Safety Instructions Operating Instructions ge.com Installation Instructions Problem Food does not bake or...
... pad. Oven temperature too hot or too cold Oven thermostat needs adjustment. • See the Adjust the oven thermostat-Do it yourself! On models with a door latch, the oven door is cool. • For best results, use a pan designed for broiling. Plug on some models) • See the Using the clock and timer section. "Crackling" or "popping" sound This is the sound of the range section. Safety Instructions Operating Instructions ge.com Installation Instructions Problem Food does not bake or...
Owners Manual
Page 48
.... • Touch the Clear/Off pad, wait for a longer period of time. Reset the range controls to the right only when setting the self-cleaning cycle. Oven door will not open Oven too hot. See the Using the self-cleaning oven section. Installation Instructions Consumer Support Troubleshooting Tips 48 Troubleshooting Tips Problem Excessive smoking Possible Causes Excessive soil. "F-and a number or letter" flash in the display (on models with the door latch except when using the self-clean feature. Heavily soiled ovens may have a function error code.
.... • Touch the Clear/Off pad, wait for a longer period of time. Reset the range controls to the right only when setting the self-cleaning cycle. Oven door will not open Oven too hot. See the Using the self-cleaning oven section. Installation Instructions Consumer Support Troubleshooting Tips 48 Troubleshooting Tips Problem Excessive smoking Possible Causes Excessive soil. "F-and a number or letter" flash in the display (on models with the door latch except when using the self-clean feature. Heavily soiled ovens may have a function error code.

Owners Manual
Page 49
If the oven was in . Power outage, clock flashes Power outage or surge. • Reset the clock. See the Using the self-cleaning oven section. Redistribute drawer contents. Safety Instructions Operating Instructions ge.com Problem Display goes blank Possible Causes A fuse in your home may automatically • This is normal. What To Do • Replace the fuse or reset the circuit breaker. • See the Using the clock and timer section. "Burning" or "oily" odor This...
If the oven was in . Power outage, clock flashes Power outage or surge. • Reset the clock. See the Using the self-cleaning oven section. Redistribute drawer contents. Safety Instructions Operating Instructions ge.com Problem Display goes blank Possible Causes A fuse in your home may automatically • This is normal. What To Do • Replace the fuse or reset the circuit breaker. • See the Using the clock and timer section. "Burning" or "oily" odor This...
Service Guide
Page 10
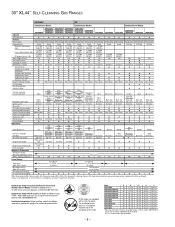
... Glass Almond Glass Black Glass Solid Black Glass Oven door with an Anti-Tip device. A set for Natural Gas. Optional Gas Range Wok Accessory (Available at additional cost) To order these accessory drip pans, call toll-free 800-848-7722. The installation of closed door handle is 29" on models JGBP86/85/79 and 28-1/4" on top of maximum burner grate to front edge of LP orifices is an important, required step in inches...
... Glass Almond Glass Black Glass Solid Black Glass Oven door with an Anti-Tip device. A set for Natural Gas. Optional Gas Range Wok Accessory (Available at additional cost) To order these accessory drip pans, call toll-free 800-848-7722. The installation of closed door handle is 29" on models JGBP86/85/79 and 28-1/4" on top of maximum burner grate to front edge of LP orifices is an important, required step in inches...

Service Guide
Page 16
... no shut-off ). ERC III S E O T N DELAY BAKE CLEAN BROIL LOCKED DOOR S E T START CLOCK CLEAN COOK STOP TIMER TO ADJUST THE THERMOSTAT (MODELS WITH NUMBER PADS) Press the BAKE and BROIL HI/LO pads at the same time for 2 seconds until the display shows "SF". hotter or (-) 35°F. For example, to black-out the clock display. When you have a 24 hour military time clock or black-out the clock display, follow the steps below . Press the SELF CLEAN...
... no shut-off ). ERC III S E O T N DELAY BAKE CLEAN BROIL LOCKED DOOR S E T START CLOCK CLEAN COOK STOP TIMER TO ADJUST THE THERMOSTAT (MODELS WITH NUMBER PADS) Press the BAKE and BROIL HI/LO pads at the same time for 2 seconds until the display shows "SF". hotter or (-) 35°F. For example, to black-out the clock display. When you have a 24 hour military time clock or black-out the clock display, follow the steps below . Press the SELF CLEAN...


