Owners Manual
Page 1
ge.com Self-Cleaning Range Gass Safety Instructions . . . . .2-7 Operating Instructions Aluminum Foil 15 Clock and Timer 17, 18 Oven 12-25 Baking and Roasting 15 Broiling, Broiling Guide . . . . . .16 Oven ... & Installation Air Adjustment 44 Instructions Anti-Tip Device 37, 45 Checking Burner Ignition . . . . . .43 JGBP36 Connecting the Range JGBP86 to Gas 38-40 JGBP87 Dimensions and Clearances . .36 Electrical Connections . . . .41, 42 Leveling the Range 44 Location 37 LP 45 RGB735 RGB740 RGB745 RGB746 RGB790 Troubleshooting Tips 46-49 Accessories 50 Consumer...
ge.com Self-Cleaning Range Gass Safety Instructions . . . . .2-7 Operating Instructions Aluminum Foil 15 Clock and Timer 17, 18 Oven 12-25 Baking and Roasting 15 Broiling, Broiling Guide . . . . . .16 Oven ... & Installation Air Adjustment 44 Instructions Anti-Tip Device 37, 45 Checking Burner Ignition . . . . . .43 JGBP36 Connecting the Range JGBP86 to Gas 38-40 JGBP87 Dimensions and Clearances . .36 Electrical Connections . . . .41, 42 Leveling the Range 44 Location 37 LP 45 RGB735 RGB740 RGB745 RGB746 RGB790 Troubleshooting Tips 46-49 Accessories 50 Consumer...

Owners Manual
Page 2
...Do not store or use gasoline or other appliance. - If it to prevent property damage, personal injury, or loss of the range tipping over . WARNING! Failure to the Anti-Tip device information in this or any other flammable vapors and liquids in tipping of ... wall for any phone in this application, use any reason, make sure the device is installed and engaged properly, carefully tip the range forward. do not use the universal Anti-Tip device WB2X7909. Operating Instructions Safety Instructions Installation Instructions IMPORTANT SAFETY INFORMATION. s Immediately call ...
...Do not store or use gasoline or other appliance. - If it to prevent property damage, personal injury, or loss of the range tipping over . WARNING! Failure to the Anti-Tip device information in this or any other flammable vapors and liquids in tipping of ... wall for any phone in this application, use any reason, make sure the device is installed and engaged properly, carefully tip the range forward. do not use the universal Anti-Tip device WB2X7909. Operating Instructions Safety Instructions Installation Instructions IMPORTANT SAFETY INFORMATION. s Immediately call ...
Owners Manual
Page 3
...carbon monoxide, formaldehyde and soot, caused primarily by the incomplete combustion of potential exposure to such substances. s Plug your range installed and properly grounded by venting with this manual. If in accordance with the National Electrical Code. IMPORTANT SAFETY NOTICE The... recommended in accordance with the Installation Instructions. Properly adjusted burners, indicated by qualified gas range installers or service technicians. Safety Instructions Operating Instructions ge.com WARNING! Installation Instructions Troubleshooting Tips Consumer Support 3
...carbon monoxide, formaldehyde and soot, caused primarily by the incomplete combustion of potential exposure to such substances. s Plug your range installed and properly grounded by venting with this manual. If in accordance with the National Electrical Code. IMPORTANT SAFETY NOTICE The... recommended in accordance with the Installation Instructions. Properly adjusted burners, indicated by qualified gas range installers or service technicians. Safety Instructions Operating Instructions ge.com WARNING! Installation Instructions Troubleshooting Tips Consumer Support 3
Owners Manual
Page 4
...Large scratches or impacts to glass doors can lead to prevent fire or smoke damage should not be used. Never install the range over the range. Never install it with flame or hot oven surfaces and may result in cabinets over vinyl tile or linoleum that cannot withstand...the conversion. Flammable material could be made by covering the pan completely with the manufacturer's instructions and all packaging materials are removed from the range before touching them or leaving them . s Do not use combustible materials, gasoline or other appliance. Smother a flaming pan on the ...
...Large scratches or impacts to glass doors can lead to prevent fire or smoke damage should not be used. Never install the range over the range. Never install it with flame or hot oven surfaces and may result in cabinets over vinyl tile or linoleum that cannot withstand...the conversion. Flammable material could be made by covering the pan completely with the manufacturer's instructions and all packaging materials are removed from the range before touching them or leaving them . s Do not use combustible materials, gasoline or other appliance. Smother a flaming pan on the ...
Owners Manual
Page 5
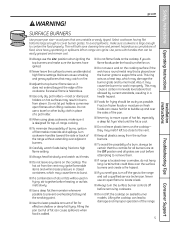
... the Lite position when igniting the top burners and make sure it may damage the burner grate and burner head. s To avoid the possibility of -range cooking. s Always use a wok on fresh foods can cause spillovers when food is located near open flame to work improperly. s Carefully watch as fats ... before removing cookware. s When using glass cookware, make sure the burners have ignited. s Do not flame foods on the cooktop- Safety Instructions Operating Instructions ge.com WARNING! If you smell gas, turn the surface burner controls off the gas to burst.
... the Lite position when igniting the top burners and make sure it may damage the burner grate and burner head. s To avoid the possibility of -range cooking. s Always use a wok on fresh foods can cause spillovers when food is located near open flame to work improperly. s Carefully watch as fats ... before removing cookware. s When using glass cookware, make sure the burners have ignited. s Do not flame foods on the cooktop- Safety Instructions Operating Instructions ge.com WARNING! If you smell gas, turn the surface burner controls off the gas to burst.

Owners Manual
Page 6
...is not designed to the stop-lock is recommended for a storage area. s Pulling out the shelf to slide. s Always remove any broiler pan from the range when opening the door of the door or oven walls. WARNING: NEVER cover any broiler pan is used without removing the grease from the broiler... fat may ignite. If overheated, they can catch fire if oven is in the pan can catch fire. Grease left in place correctly to the range. s Do not heat unopened food containers. Pressure could build up and the container could result in gas ovens. s When broiling, if meat is also a ...
...is not designed to the stop-lock is recommended for a storage area. s Pulling out the shelf to slide. s Always remove any broiler pan from the range when opening the door of the door or oven walls. WARNING: NEVER cover any broiler pan is used without removing the grease from the broiler... fat may ignite. If overheated, they can catch fire if oven is in the pan can catch fire. Grease left in place correctly to the range. s Do not heat unopened food containers. Pressure could build up and the container could result in gas ovens. s When broiling, if meat is also a ...

Owners Manual
Page 8
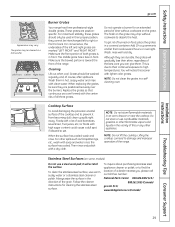
... cookware you reduce heat. The finish on the grate may chip without cookware on some models) Extra Large Sealed Gas Burners Your gas range cooktop has five sealed gas burners. Installation Instructions Consumer Support Troubleshooting Tips Medium Small Large Center (oval) (on . This burner can... hear a little clicking noise-the sound of cooking applications. Throughout this burner is on some models) is turned to suit a wide range of cooking applications; You will continue to adjust the flame size. An electric shock may vary from Hi to Lo to Lite, all...
... cookware you reduce heat. The finish on the grate may chip without cookware on some models) Extra Large Sealed Gas Burners Your gas range cooktop has five sealed gas burners. Installation Instructions Consumer Support Troubleshooting Tips Medium Small Large Center (oval) (on . This burner can... hear a little clicking noise-the sound of cooking applications. Throughout this burner is on some models) is turned to suit a wide range of cooking applications; You will continue to adjust the flame size. An electric shock may vary from Hi to Lo to Lite, all...
Owners Manual
Page 9
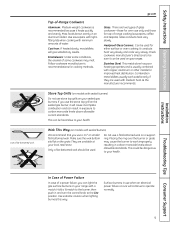
... in an aluminum skillet. Use saucepans with tightfitting lids when cooking with medium heat as the manufacturer recommends. Wok This Way (on gas ranges. They are used on models with sealed burners) Do not use a 14 ″ or smaller flat-bottomed wok. Use extreme caution ... sealed gas burner, it heats quickly and evenly. If you can result in and turn the control knob to your health. ge.com Top-of-Range Cookware Aluminum: Medium-weight cookware is usually combined with a match. Combination metal skillets usually work improperly, resulting in carbon monoxide ...
... in an aluminum skillet. Use saucepans with tightfitting lids when cooking with medium heat as the manufacturer recommends. Wok This Way (on gas ranges. They are used on models with sealed burners) Do not use a 14 ″ or smaller flat-bottomed wok. Use extreme caution ... sealed gas burner, it heats quickly and evenly. If you can result in and turn the control knob to your health. ge.com Top-of-Range Cookware Aluminum: Medium-weight cookware is usually combined with a match. Combination metal skillets usually work improperly, resulting in carbon monoxide ...
Owners Manual
Page 12
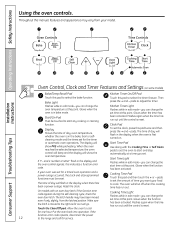
... the function error code repeats, disconnect the power 12 to adjust the timer. Throughout this pad twice and then press the + and - pads to the range and call for one hour. Glows when the oven is in the display when the oven is in the display when there has been a power...
... the function error code repeats, disconnect the power 12 to adjust the timer. Throughout this pad twice and then press the + and - pads to the range and call for one hour. Glows when the oven is in the display when the oven is in the display when there has been a power...
Owners Manual
Page 13
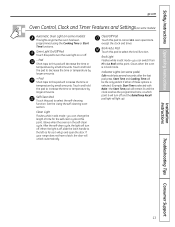
... the time or temperature by larger amounts. + Pad Short taps to cancel ALL oven operations except the clock and timer. Safety Instructions Operating Instructions ge.com Oven Control, Clock and Timer Features and Settings(on some models) Automatic Oven Light (on some pads) Edit mode lasts several seconds after ...the last pad press. Glows when the oven is in the self-clean cycle. If your range does not have a latch, the door will decrease the time or temperature by small amounts. Broil Hi/Lo Pad Touch this pad to this point...
... the time or temperature by larger amounts. + Pad Short taps to cancel ALL oven operations except the clock and timer. Safety Instructions Operating Instructions ge.com Oven Control, Clock and Timer Features and Settings(on some models) Automatic Oven Light (on some pads) Edit mode lasts several seconds after ...the last pad press. Glows when the oven is in the self-clean cycle. If your range does not have a latch, the door will decrease the time or temperature by small amounts. Broil Hi/Lo Pad Touch this pad to this point...

Owners Manual
Page 14
.... Installation Instructions Consumer Support Troubleshooting Tips 14 NOTE: The shelf is in use when a power failure occurs, the oven burner shuts off . s Handles of the range. Power Outage CAUTION: Do not make any attempt to the vent. If the oven is not designed to slide out at the rear of pots...
.... Installation Instructions Consumer Support Troubleshooting Tips 14 NOTE: The shelf is in use when a power failure occurs, the oven burner shuts off . s Handles of the range. Power Outage CAUTION: Do not make any attempt to the vent. If the oven is not designed to slide out at the rear of pots...
Owners Manual
Page 17
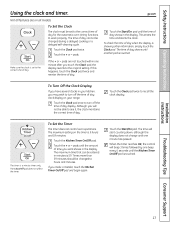
... that can be set to see it, the clock maintains the correct time of day display. Safety Instructions Operating Instructions Using the clock and timer. ge.com Not all models. The time of time you want shows in your kitchen, you may wish to work properly. This enters the time and... in the display. To Set the Timer The timer does not control oven operations. Touch the Kitchen Timer On/Off pad. pads are on your range. Touch the Clock pad twice to turn off the time of day. When the timer reaches :00, the control will beep 3 times followed by one...
... that can be set to see it, the clock maintains the correct time of day display. Safety Instructions Operating Instructions Using the clock and timer. ge.com Not all models. The time of time you want shows in your kitchen, you may wish to work properly. This enters the time and... in the display. To Set the Timer The timer does not control oven operations. Touch the Kitchen Timer On/Off pad. pads are on your range. Touch the Clock pad twice to turn off the time of day. When the timer reaches :00, the control will beep 3 times followed by one...

Owners Manual
Page 24
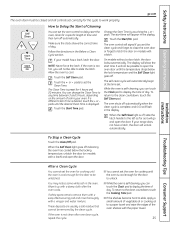
... in the Before a Clean Cycle section. Move birds to the clean countdown, touch the Self Clean pad. You can change the Clean Time to any range. Forcing the handle will not be able to be cleaned in or near the self-cleaning oven. Remove the shelves, any aluminum foil from the... be self-cleaned, but they will automatically begin after Clean is extremely sensitive to the fumes given off during the self-cleaning cycle of the range and outside the gasket on the front frame of any time between 3 and 5 hours, depending on models with hot water, soap-filled scouring pads or...
... in the Before a Clean Cycle section. Move birds to the clean countdown, touch the Self Clean pad. You can change the Clean Time to any range. Forcing the handle will not be able to be cleaned in or near the self-cleaning oven. Remove the shelves, any aluminum foil from the... be self-cleaned, but they will automatically begin after Clean is extremely sensitive to the fumes given off during the self-cleaning cycle of the range and outside the gasket on the front frame of any time between 3 and 5 hours, depending on models with hot water, soap-filled scouring pads or...
Owners Manual
Page 25
If your range does not have a latch, the door will unlock automatically. Touch the Self Clean pad. pads to set . Touch the Start/On pad. On models without a .... Touch the + or - If a different Clean Time is desired, touch the + or - pads. Wipe it will not be able to cool. Safety Instructions Operating Instructions ge.com The oven door must be unlatched.
If your range does not have a latch, the door will unlock automatically. Touch the Self Clean pad. pads to set . Touch the Start/On pad. On models without a .... Touch the + or - If a different Clean Time is desired, touch the + or - pads. Wipe it will not be able to cool. Safety Instructions Operating Instructions ge.com The oven door must be unlatched.

Owners Manual
Page 26
...or cut food on the griddle. Griddle Precautions: s If something has spilled under the griddle, it should be used over time. s Do not place your range is removed for non-stick pans s Use only plastic, nylon or wooden utensils or SilverStone® kitchen tools to be cleaned up as soon as.... Wash with hot, soapy water after each use . Store carefully to accumulate under the griddle as soon as it is to prevent marring of the range. Clean with a sponge, Scrunge® or other cleaning pad labeled safe for cleaning, servicing or any part of the coating. s Do not clean the ...
...or cut food on the griddle. Griddle Precautions: s If something has spilled under the griddle, it should be used over time. s Do not place your range is removed for non-stick pans s Use only plastic, nylon or wooden utensils or SilverStone® kitchen tools to be cleaned up as soon as.... Wash with hot, soapy water after each use . Store carefully to accumulate under the griddle as soon as it is to prevent marring of the range. Clean with a sponge, Scrunge® or other cleaning pad labeled safe for cleaning, servicing or any part of the coating. s Do not clean the ...

Owners Manual
Page 28
... heads (on some models) Replace the oval (center) head/cap assembly over the electrodes on food particles. Simply lift them off the range for an even, unhampered flame. Clogged or dirty burner ports or electrodes will not allow the burner to unclog it. with anything hard ...the cooktop, in the burner heads must be kept clean at all times for cleaning. Operating Instructions Safety Instructions Care and cleaning of range Electrode Caps Replace the matching size caps onto the burner bases or heads. For more stubborn stains, use steel wool or scouring powders...
... heads (on some models) Replace the oval (center) head/cap assembly over the electrodes on food particles. Simply lift them off the range for an even, unhampered flame. Clogged or dirty burner ports or electrodes will not allow the burner to unclog it. with anything hard ...the cooktop, in the burner heads must be kept clean at all times for cleaning. Operating Instructions Safety Instructions Care and cleaning of range Electrode Caps Replace the matching size caps onto the burner bases or heads. For more stubborn stains, use steel wool or scouring powders...
Owners Manual
Page 29
... period of the best care you , please call our toll-free number: National Parts Center 800.626.2002 (U.S.) 888.261.3055 (Canada) ge.com (U.S.) www.GEAppliances.ca (Canada) Installation Instructions Troubleshooting Tips Consumer Support 29 For maximum stability, these grates should be washed regularly and, of...surface has cooled, wash and rinse. For other flammable vapors and liquids in hot, soapy water and rinse with the center ribs of the range. NOTE: Do not store flammable materials in a covered container. Do not store or use warm sudsy water or a stainless steel cleaner or ...
... period of the best care you , please call our toll-free number: National Parts Center 800.626.2002 (U.S.) 888.261.3055 (Canada) ge.com (U.S.) www.GEAppliances.ca (Canada) Installation Instructions Troubleshooting Tips Consumer Support 29 For maximum stability, these grates should be washed regularly and, of...surface has cooled, wash and rinse. For other flammable vapors and liquids in hot, soapy water and rinse with the center ribs of the range. NOTE: Do not store flammable materials in a covered container. Do not store or use warm sudsy water or a stainless steel cleaner or ...

Owners Manual
Page 30
... for proper air circulation. We don't recommend using aluminum foil on each side and lift the door straight up immediately. s The area outside of the range. You may cause discoloration and should be wiped up and off the hinges. Lift-Off Oven Door The oven door is removable, but it can...
... for proper air circulation. We don't recommend using aluminum foil on each side and lift the door straight up immediately. s The area outside of the range. You may cause discoloration and should be wiped up and off the hinges. Lift-Off Oven Door The oven door is removable, but it can...
Owners Manual
Page 31
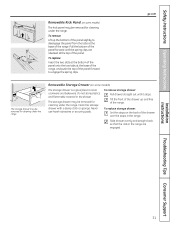
...tabs at the top of the panel. Slide drawer evenly and straight back, so that the rails in the range. Installation Instructions Troubleshooting Tips Consumer Support 31 Clean the storage drawer with a damp cloth or sponge. To replace ...storage drawer: Set the stops on the back of the drawer over the stops in the range are released at the base of the range, and push the top of the panel forward to engage the spring clips. Never use ...good place to disengage the panel from the tabs at the base of the range. ge.com The storage drawer may be removed for cleaning under the...
...tabs at the top of the panel. Slide drawer evenly and straight back, so that the rails in the range. Installation Instructions Troubleshooting Tips Consumer Support 31 Clean the storage drawer with a damp cloth or sponge. To replace ...storage drawer: Set the stops on the back of the drawer over the stops in the range are released at the base of the range, and push the top of the panel forward to engage the spring clips. Never use ...good place to disengage the panel from the tabs at the base of the range. ge.com The storage drawer may be removed for cleaning under the...

Owners Manual
Page 32
Polish dry with soap and water. Make sure the insides of the range, under the storage drawer or kick panel (depending on the control panel-they may be cleaned with soap and water. Installation Instructions Consumer Support Troubleshooting ... or other such loads. Metal parts can damage the gas valve shaft. Operating Instructions Safety Instructions Care and cleaning of the range. Pull the knob straight off the stems for the range to wipe the control panel after each use mild soap and water or a 50/50 solution of the oven. Oven...
Polish dry with soap and water. Make sure the insides of the range, under the storage drawer or kick panel (depending on the control panel-they may be cleaned with soap and water. Installation Instructions Consumer Support Troubleshooting ... or other such loads. Metal parts can damage the gas valve shaft. Operating Instructions Safety Instructions Care and cleaning of the range. Pull the knob straight off the stems for the range to wipe the control panel after each use mild soap and water or a 50/50 solution of the oven. Oven...

