Owners Manual
Page 1
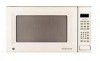
Microwave Oven ge.com Safety Instructions 2-11 Operating Instructions Auto Feature 21 Care and Cleaning 30, 31 Changing the Power Level . . . .14 Features of Your Microwave Oven 12, 13 Microwave Terms 29 Other Features 26-28 Sensor Features 22-25 Time Features 15-20 Troubleshooting Tips . . . . .32, 33 Things That Are Normal With Your Microwave Oven . . .34 Consumer Support Consumer Support . . .Back Cover Warranty 35 Owner's Manual JE1860 Write the model and serial numbers here: Model Serial Find these numbers on a label inside the oven. 3828W5A8488 49-40508 01-06 JR
Microwave Oven ge.com Safety Instructions 2-11 Operating Instructions Auto Feature 21 Care and Cleaning 30, 31 Changing the Power Level . . . .14 Features of Your Microwave Oven 12, 13 Microwave Terms 29 Other Features 26-28 Sensor Features 22-25 Time Features 15-20 Troubleshooting Tips . . . . .32, 33 Things That Are Normal With Your Microwave Oven . . .34 Consumer Support Consumer Support . . .Back Cover Warranty 35 Owner's Manual JE1860 Write the model and serial numbers here: Model Serial Find these numbers on a label inside the oven. 3828W5A8488 49-40508 01-06 JR

Owners Manual
Page 3
... necessary when used by qualified service personnel. This microwave oven is specifically designed to heat, dry or cook food, and is in similar locations. Do not use Time Cook for additional cooking time. Carefully attend appliance when paper, plastic or other combustible materials are placed inside the oven ignite, keep the oven door closed, turn the oven off and disconnect the power cord, or shut off power at the fuse or circuit breaker panel. I Do not cover or...
... necessary when used by qualified service personnel. This microwave oven is specifically designed to heat, dry or cook food, and is in similar locations. Do not use Time Cook for additional cooking time. Carefully attend appliance when paper, plastic or other combustible materials are placed inside the oven ignite, keep the oven door closed, turn the oven off and disconnect the power cord, or shut off power at the fuse or circuit breaker panel. I Do not cover or...

Owners Manual
Page 4
... magnetron and can shorten the life of the oven. Troubleshooting Tips Customer Service 4 I Recycled paper towels containing small metal pieces being used in the oven. Pressure will build up inside for use of the microwave oven could start a fire. I Some products such as twist-ties, poultry pins or gold-rimmed dishes, in this microwave oven. I Metal or foil touching the side of the oven. Safety Information Operating Instructions...
... magnetron and can shorten the life of the oven. Troubleshooting Tips Customer Service 4 I Recycled paper towels containing small metal pieces being used in the oven. Pressure will build up inside for use of the microwave oven could start a fire. I Some products such as twist-ties, poultry pins or gold-rimmed dishes, in this microwave oven. I Metal or foil touching the side of the oven. Safety Information Operating Instructions...

Owners Manual
Page 5
... heating, allow the container to these temperatures usually protects against foodborne illness. 5 Customer Service Troubleshooting Tips Operating Instructions Safety Information The container may feel cooler than the formula really is opened, pressure can build up. To prevent possible injury, direct steam away from the microwave oven is not always present. Cooking to stand in narrow-necked bottles (especially carbonated beverages). I Cook...
... heating, allow the container to these temperatures usually protects against foodborne illness. 5 Customer Service Troubleshooting Tips Operating Instructions Safety Information The container may feel cooler than the formula really is opened, pressure can build up. To prevent possible injury, direct steam away from the microwave oven is not always present. Cooking to stand in narrow-necked bottles (especially carbonated beverages). I Cook...

Owners Manual
Page 6
.... READ ALL INSTRUCTIONS BEFORE USING. I Paper towels, waxed paper and plastic wrap can burn the floor of heat transferred from the heated food. Pot holders may be avoided, as they may become hot because of the oven or ignite a paper towel. Troubleshooting Tips Customer Service 6 MICROWAVE-SAFE COOKWARE Make sure all plastic wrap is suitable for use the microwave to vent plastic wrap...
.... READ ALL INSTRUCTIONS BEFORE USING. I Paper towels, waxed paper and plastic wrap can burn the floor of heat transferred from the heated food. Pot holders may be avoided, as they may become hot because of the oven or ignite a paper towel. Troubleshooting Tips Customer Service 6 MICROWAVE-SAFE COOKWARE Make sure all plastic wrap is suitable for use the microwave to vent plastic wrap...

Owners Manual
Page 7
... if subjected to overcooking, the food and cookware could burst during or immediately after cooking, possibly resulting in foil trays less than 3/4″ high; I Use foil only as directed in the microwave oven, keep the foil at least partially uncovered because they are glass or ceramic materials and may be used carefully. When using foil in this guide. Do not permit children...
... if subjected to overcooking, the food and cookware could burst during or immediately after cooking, possibly resulting in foil trays less than 3/4″ high; I Use foil only as directed in the microwave oven, keep the foil at least partially uncovered because they are glass or ceramic materials and may be used carefully. When using foil in this guide. Do not permit children...
Owners Manual
Page 10
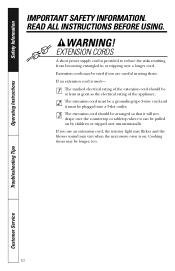
... Troubleshooting Tips Customer Service Extension cords may be pulled on . If you use an extension cord, the interior light may flicker and the blower sound may be plugged into a 3-slot outlet; Cooking times may vary when the microwave oven is used if you are careful in or tripping over the countertop or tabletop where it must be a grounding-type 3-wire cord and it can be used - Safety Information Operating Instructions...
... Troubleshooting Tips Customer Service Extension cords may be pulled on . If you use an extension cord, the interior light may flicker and the blower sound may be plugged into a 3-slot outlet; Cooking times may vary when the microwave oven is used if you are careful in or tripping over the countertop or tabletop where it must be a grounding-type 3-wire cord and it can be used - Safety Information Operating Instructions...

Owners Manual
Page 12
... Information Operating Instructions About the features of the Oven Door Latches. Throughout this manual, features and appearance may be in the oven. Removable Turntable. The turntable may vary from your model. 1100 Watts Features of your microwave oven. Convenience Guide. Press latch release to be viewed while keeping microwaves confined in place when using the oven. Screen allows cooking to open door. Touch Control Panel and Display. NOTE: Rating plate, oven vent(s) and oven light are located on the inside walls of the microwave oven. 12 Troubleshooting...
... Information Operating Instructions About the features of the Oven Door Latches. Throughout this manual, features and appearance may be in the oven. Removable Turntable. The turntable may vary from your model. 1100 Watts Features of your microwave oven. Convenience Guide. Press latch release to be viewed while keeping microwaves confined in place when using the oven. Screen allows cooking to open door. Touch Control Panel and Display. NOTE: Rating plate, oven vent(s) and oven light are located on the inside walls of the microwave oven. 12 Troubleshooting...

Owners Manual
Page 14
... outside of the food. Low 2 or 3: Defrosting; softening butter. 14 Troubleshooting Tips Customer Service Enter cooking or defrosting time. Press START. Most cooking will be compared to the inside was defrosted. Here are some examples of the food. Press POWER LEVEL. Select desired power level 1-10. Some foods may also be entered or changed during time countdown. simmering; The power level may have a tendency to microwave cooking. Power level 7 is used. delicate sauces. Press TIME COOK or select Time Defrost. Use a lower power level...
... outside of the food. Low 2 or 3: Defrosting; softening butter. 14 Troubleshooting Tips Customer Service Enter cooking or defrosting time. Press START. Most cooking will be compared to the inside was defrosted. Here are some examples of the food. Press POWER LEVEL. Select desired power level 1-10. Some foods may also be entered or changed during time countdown. simmering; The power level may have a tendency to microwave cooking. Power level 7 is used. delicate sauces. Press TIME COOK or select Time Defrost. Use a lower power level...

Owners Manual
Page 15
... power. (Press POWER LEVEL. Close the door and press START to microwave for more flexibility. Here's how to do it for any time up to check the food. Enter cooking time. Change the power level if you don't want full power. (Press POWER LEVEL. Press TIME COOK. Enter the first cook time. Enter the second cook time. Select a desired power level 1-10.) Press START. Safety Information Operating Instructions About the time features. Time Cook Time Cook I , Time Cook II counts down. 15 Troubleshooting Tips Customer Service...
... power. (Press POWER LEVEL. Close the door and press START to microwave for more flexibility. Here's how to do it for any time up to check the food. Enter cooking time. Change the power level if you don't want full power. (Press POWER LEVEL. Press TIME COOK. Enter the first cook time. Enter the second cook time. Select a desired power level 1-10.) Press START. Safety Information Operating Instructions About the time features. Time Cook Time Cook I , Time Cook II counts down. 15 Troubleshooting Tips Customer Service...

Owners Manual
Page 17
.... Cover with cooking fork. Rearrange after half of time. oblong glass baking dish, place squash cut into 1-inch cubes. In 1-qt. casserole, place 1/4 cup water. Rearrange after half of the oven. casserole, place 2 tablespoons water. 4 potatoes (6 to 6 min. casserole with 1/2 cup water. Peel and cut -side-down. In 1-qt. per ear 3 to 6 min. 2 to 4 min. Safety Information Operating Instructions...
.... Cover with cooking fork. Rearrange after half of time. oblong glass baking dish, place squash cut into 1-inch cubes. In 1-qt. casserole, place 1/4 cup water. Rearrange after half of the oven. casserole, place 2 tablespoons water. 4 potatoes (6 to 6 min. casserole with 1/2 cup water. Peel and cut -side-down. In 1-qt. per ear 3 to 6 min. 2 to 4 min. Safety Information Operating Instructions...

Owners Manual
Page 20
... seconds of cooking time. 20 Troubleshooting Tips Customer Service Press POWER LEVEL and enter 1-10. For example, press the 2 pad for 1-6 minutes. Add 30 Seconds You can be changed as a quick way to 6 minutes of cooking time. Press one of the Express Cook pads (from 1 to 6) for 1 to set cooking time for 2 minutes of cooking at power level 10. Safety Information Operating Instructions About the time features. Express Cook This is...
... seconds of cooking time. 20 Troubleshooting Tips Customer Service Press POWER LEVEL and enter 1-10. For example, press the 2 pad for 1-6 minutes. Add 30 Seconds You can be changed as a quick way to 6 minutes of cooking time. Press one of the Express Cook pads (from 1 to 6) for 1 to set cooking time for 2 minutes of cooking at power level 10. Safety Information Operating Instructions About the time features. Express Cook This is...
Owners Manual
Page 24
... food portion- Reheated foods may be extremely hot. I Bread products. NOTE: Do not use Time Cook for these foods: I Foods that need to be reheated uncovered. Some Foods Not Recommended for a dry look or crisp surface after the feature pad. After removing food from the oven, stir, if possible, to Change the Automatic Settings To reduce time by 10%: Press 1 after reheating. Do not open the oven door until time...
... food portion- Reheated foods may be extremely hot. I Bread products. NOTE: Do not use Time Cook for these foods: I Foods that need to be reheated uncovered. Some Foods Not Recommended for a dry look or crisp surface after the feature pad. After removing food from the oven, stir, if possible, to Change the Automatic Settings To reduce time by 10%: Press 1 after reheating. Do not open the oven door until time...

Owners Manual
Page 25
... Pieces Place covered food in succession on the turntable. Add 1/4 cup water per serving. Cover with lid or vented plastic wrap. Turn or stir the food if necessary. If the door is undercooked after pressing the food pad. Pierce skin with a variety of foods (see the Cooking Guide below). Safety Information Operating Instructions Sensor cooking gives you easy, automatic results with fork. NOTE: Do not use Time Cook for...
... Pieces Place covered food in succession on the turntable. Add 1/4 cup water per serving. Cover with lid or vented plastic wrap. Turn or stir the food if necessary. If the door is undercooked after pressing the food pad. Pierce skin with a variety of foods (see the Cooking Guide below). Safety Information Operating Instructions Sensor cooking gives you easy, automatic results with fork. NOTE: Do not use Time Cook for...

Owners Manual
Page 27
Safety Information Operating Instructions Troubleshooting Tips Reminder The Reminder feature can be used like an alarm clock, and can be lit. The Reminder time may be displayed plus DS. NOTE: The REM indicator will automatically start . (Be sure the microwave clock shows the correct time of day may be displayed by pressing CLOCK. 27 Customer Service The oven will remain lit to start at any combination of day...
Safety Information Operating Instructions Troubleshooting Tips Reminder The Reminder feature can be used like an alarm clock, and can be lit. The Reminder time may be displayed plus DS. NOTE: The REM indicator will automatically start . (Be sure the microwave clock shows the correct time of day may be displayed by pressing CLOCK. 27 Customer Service The oven will remain lit to start at any combination of day...

Owners Manual
Page 29
... larger parts. Standing time is especially important in the oven. Troubleshooting Tips Customer Service 29 Safety Information Operating Instructions Microwave terms. Term Definition Arcing Arcing is the microwave term for more even heating and reduce cooking time. I recycled paper towels containing small metal pieces. Venting plastic wrap or covering with plastic wrap, you cook with regular ovens, foods such as twist-ties, poultry pins, gold-rimmed dishes. Venting After covering...
... larger parts. Standing time is especially important in the oven. Troubleshooting Tips Customer Service 29 Safety Information Operating Instructions Microwave terms. Term Definition Arcing Arcing is the microwave term for more even heating and reduce cooking time. I recycled paper towels containing small metal pieces. Venting plastic wrap or covering with plastic wrap, you cook with regular ovens, foods such as twist-ties, poultry pins, gold-rimmed dishes. Venting After covering...
Owners Manual
Page 30
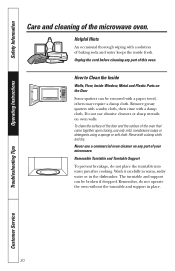
... a damp cloth. Wash it carefully in warm, sudsy water or in place. 30 Troubleshooting Tips Customer Service Unplug the cord before cleaning any part of your microwave. To clean the surface of the door and the surface of baking soda and water keeps the inside fresh. Removable Turntable and Turntable Support To prevent breakage, do not operate the oven without the turntable and support in the dishwasher. Helpful...
... a damp cloth. Wash it carefully in warm, sudsy water or in place. 30 Troubleshooting Tips Customer Service Unplug the cord before cleaning any part of your microwave. To clean the surface of the door and the surface of baking soda and water keeps the inside fresh. Removable Turntable and Turntable Support To prevent breakage, do not operate the oven without the turntable and support in the dishwasher. Helpful...

Owners Manual
Page 32
... after pressing TIME COOK. START pad not pressed after pressing TIME COOK. Cooking time not entered • Make sure you call for service... Food weight not entered • Make sure you may be blown or the circuit breaker tripped. • Replace fuse or reset circuit breaker. entered cooking time after entering cooking selection. • Press START. entered food weight after selecting Auto Defrost. CLEAR/OFF was pressed accidentally. • Reset cooking program and press START. Review the charts...
... after pressing TIME COOK. START pad not pressed after pressing TIME COOK. Cooking time not entered • Make sure you call for service... Food weight not entered • Make sure you may be blown or the circuit breaker tripped. • Replace fuse or reset circuit breaker. entered cooking time after entering cooking selection. • Press START. entered food weight after selecting Auto Defrost. CLEAR/OFF was pressed accidentally. • Reset cooking program and press START. Review the charts...

Owners Manual
Page 35
... Care® technician. I Replacement of house fuses or resetting of the microwave oven which vary from wire rack or metal/foil), or used commercially. Louisville, KY 40225 35 What GE Will Not Cover: I Improper installation, delivery or maintenance. I Service trips to obtain service under the warranty. Customer Service This warranty is extended to the original purchaser and any trip charges, you must take the microwave oven to a General Electric Customer Care® servicer...
... Care® technician. I Replacement of house fuses or resetting of the microwave oven which vary from wire rack or metal/foil), or used commercially. Louisville, KY 40225 35 What GE Will Not Cover: I Improper installation, delivery or maintenance. I Service trips to obtain service under the warranty. Customer Service This warranty is extended to the original purchaser and any trip charges, you must take the microwave oven to a General Electric Customer Care® servicer...
Dimensions
Page 1
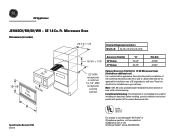
...2000. GE 1.8 Cu. receptacle outside cabinet Optional Accessory Trim Kits for installation over a gas wall oven. Note: 120V, 60-cycle, grounded power receptacle location optional on back within cabinet opening. These kits should not be used for current dimensional data. GE Appliances JE1860CH/BH/SH/WH - Listed by Underwriters R Laboratories For answers to be installed over a GE single electric wall oven. Ft. Microwave Oven Dimensions (in inches) 25-1/2 ± 1/8 Exterior Dimensions (in cabinet 19-1/2" MIN. Before installing, consult installation instructions...
...2000. GE 1.8 Cu. receptacle outside cabinet Optional Accessory Trim Kits for installation over a gas wall oven. Note: 120V, 60-cycle, grounded power receptacle location optional on back within cabinet opening. These kits should not be used for current dimensional data. GE Appliances JE1860CH/BH/SH/WH - Listed by Underwriters R Laboratories For answers to be installed over a GE single electric wall oven. Ft. Microwave Oven Dimensions (in inches) 25-1/2 ± 1/8 Exterior Dimensions (in cabinet 19-1/2" MIN. Before installing, consult installation instructions...


