Owners Manual
Page 1
Microwave Oven ge.com Safety Instructions 2-11 Operating Instructions Auto Feature 21 Care and Cleaning . . . . . .30, 31 Changing Power Level . . . . . .14 Features of Your Microwave Oven 12, 13 Microwave Terms 29 Other Features 26-28 Sensor Features 22-25 Time Features 15-20 Troubleshooting Tips . . . .32, 33 Things That Are Normal With Your Microwave Oven 33 Consumer Support Consumer Support . .Back Cover Warranty 35 Owner's Manual JE1460 Write the model and serial numbers here: Model Serial You can find them on a label inside of the oven. 3828W5A8486 49-40505 01-06 JR
Microwave Oven ge.com Safety Instructions 2-11 Operating Instructions Auto Feature 21 Care and Cleaning . . . . . .30, 31 Changing Power Level . . . . . .14 Features of Your Microwave Oven 12, 13 Microwave Terms 29 Other Features 26-28 Sensor Features 22-25 Time Features 15-20 Troubleshooting Tips . . . .32, 33 Things That Are Normal With Your Microwave Oven 33 Consumer Support Consumer Support . .Back Cover Warranty 35 Owner's Manual JE1460 Write the model and serial numbers here: Model Serial You can find them on a label inside of the oven. 3828W5A8486 49-40505 01-06 JR
Owners Manual
Page 2
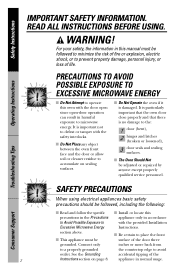
... soil or cleaner residue to avoid outlet. I Install or locate this oven with the safety interlocks. section above. READ ALL INSTRUCTIONS BEFORE USING. I Be certain to place the front I Do Not Attempt to defeat or tamper with the door open since open-door operation can result in this manual must be surface of the 2 Instructions section on sealing surfaces. Connect only inches...
... soil or cleaner residue to avoid outlet. I Install or locate this oven with the safety interlocks. section above. READ ALL INSTRUCTIONS BEFORE USING. I Be certain to place the front I Do Not Attempt to defeat or tamper with the door open since open-door operation can result in this manual must be surface of the 2 Instructions section on sealing surfaces. Connect only inches...
Owners Manual
Page 3
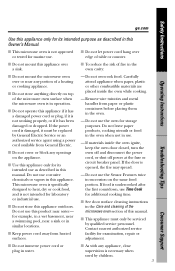
.... Remove wire twist-ties and metal handles from heated surfaces. - If materials inside the oven while cooking. - I See door surface cleaning instructions in the Care and cleaning of the microwave oven section of a heating or cooking appliance. Do not use corrosive chemicals or vapors in this appliance. Do not use as described in this Owner's Manual. I Do not store this manual. If food is necessary when used by qualified service personnel. I Do not immerse power cord...
.... Remove wire twist-ties and metal handles from heated surfaces. - If materials inside the oven while cooking. - I See door surface cleaning instructions in the Care and cleaning of the microwave oven section of a heating or cooking appliance. Do not use corrosive chemicals or vapors in this appliance. Do not use as described in this Owner's Manual. I Do not store this manual. If food is necessary when used by qualified service personnel. I Do not immerse power cord...
Owners Manual
Page 4
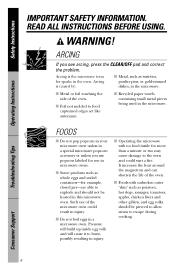
... CLEAR/OFF pad and correct the problem. I Metal or foil touching the side of the oven. It increases the heat around the magnetron and can shorten the life of the oven. Safety Instructions Operating Instructions IMPORTANT SAFETY INFORMATION. READ ALL INSTRUCTIONS BEFORE USING. WARNING! I Foods with no food inside egg yolk and will cause it to the oven and could result in this microwave oven. Troubleshooting Tips Consumer Support 4
... CLEAR/OFF pad and correct the problem. I Metal or foil touching the side of the oven. It increases the heat around the magnetron and can shorten the life of the oven. Safety Instructions Operating Instructions IMPORTANT SAFETY INFORMATION. READ ALL INSTRUCTIONS BEFORE USING. WARNING! I Foods with no food inside egg yolk and will cause it to the oven and could result in this microwave oven. Troubleshooting Tips Consumer Support 4
Owners Manual
Page 8
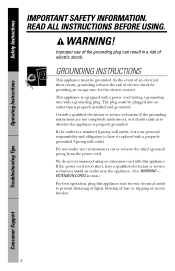
... is equipped with a power cord having a grounding wire with this appliance into its own electrical outlet to prevent flickering of lights, blowing of fuse or tripping of electric shock. Do not under any circumstances cut or remove the third (ground) prong from the power cord. If the power cord is properly grounded. Consult a qualified electrician or service technician if the grounding instructions are not completely...
... is equipped with a power cord having a grounding wire with this appliance into its own electrical outlet to prevent flickering of lights, blowing of fuse or tripping of electric shock. Do not under any circumstances cut or remove the third (ground) prong from the power cord. If the power cord is properly grounded. Consult a qualified electrician or service technician if the grounding instructions are not completely...

Owners Manual
Page 11
SAVE THESE INSTRUCTIONS 11 Troubleshooting Tips Consumer Support Safety Instructions Operating Instructions ge.com READ AND FOLLOW THIS SAFETY INFORMATION CAREFULLY.
SAVE THESE INSTRUCTIONS 11 Troubleshooting Tips Consumer Support Safety Instructions Operating Instructions ge.com READ AND FOLLOW THIS SAFETY INFORMATION CAREFULLY.
Owners Manual
Page 12
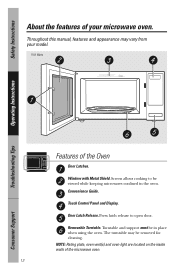
.... Turntable and support must be removed for cleaning. Screen allows cooking to open door. Press latch release to be viewed while keeping microwaves confined in place when using the oven. Removable Turntable. Touch Control Panel and Display. Throughout this manual, features and appearance may be in the oven. Safety Instructions Operating Instructions About the features of your model. 1150 Watts Features of the microwave oven. 12 Troubleshooting Tips Consumer Support NOTE: Rating plate, oven vent(s) and oven light are located on the inside walls of the Oven Door Latches...
.... Turntable and support must be removed for cleaning. Screen allows cooking to open door. Press latch release to be viewed while keeping microwaves confined in place when using the oven. Removable Turntable. Touch Control Panel and Display. Throughout this manual, features and appearance may be in the oven. Safety Instructions Operating Instructions About the features of your model. 1150 Watts Features of the microwave oven. 12 Troubleshooting Tips Consumer Support NOTE: Rating plate, oven vent(s) and oven light are located on the inside walls of the Oven Door Latches...
Owners Manual
Page 14
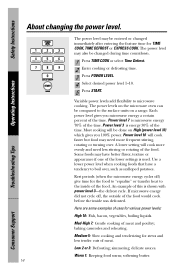
The power levels on the microwave oven can be changed immediately after entering the feature time for the food to "equalize" or transfer heat to boil over . Rest periods (when the microwave energy cycles off , the outside of this is used. Here are some examples of the food. Low 2 or 3: Defrosting; delicate sauces. The power level may have a tendency to the inside was defrosted. Use a lower power level when cooking foods that have...
The power levels on the microwave oven can be changed immediately after entering the feature time for the food to "equalize" or transfer heat to boil over . Rest periods (when the microwave energy cycles off , the outside of this is used. Here are some examples of the food. Low 2 or 3: Defrosting; delicate sauces. The power level may have a tendency to the inside was defrosted. Use a lower power level when cooking foods that have...
Owners Manual
Page 15
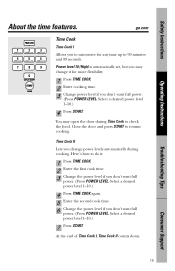
... second cook time. 6 Change the power level if you change it : 1 Press TIME COOK. 2 Enter the first cook time. 3 Change the power level if you don't want full power. (Press POWER LEVEL. ge.com Time Cook Time Cook I , Time Cook II counts down. Time Cook II Lets you don't want full power. (Press POWER LEVEL. Close the door and press START to 99 minutes and 99 seconds. Troubleshooting Tips Consumer Support 15 Power level 10 (High) is automatically set, but you may open the door during cooking. Safety Instructions Operating Instructions...
... second cook time. 6 Change the power level if you change it : 1 Press TIME COOK. 2 Enter the first cook time. 3 Change the power level if you don't want full power. (Press POWER LEVEL. ge.com Time Cook Time Cook I , Time Cook II counts down. Time Cook II Lets you don't want full power. (Press POWER LEVEL. Close the door and press START to 99 minutes and 99 seconds. Troubleshooting Tips Consumer Support 15 Power level 10 (High) is automatically set, but you may open the door during cooking. Safety Instructions Operating Instructions...
Owners Manual
Page 17
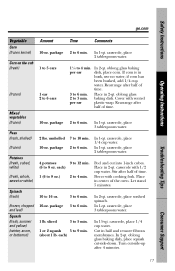
... glass baking dish, place squash cut into 1-inch cubes. Troubleshooting Tips Consumer Support 17 per ear dish, place corn. In 2-qt. package 2 to 3 min. casserole, place 1/4 cup water. Peel and cut -side-down. In 1-qt. Rearrange after 4 minutes. casserole with 1/2 cup water. sliced 3 to 5 min. 1 or 2 squash 5 to 4 min. casserole, place washed spinach. Safety Instructions ge.com Operating Instructions...
... glass baking dish, place squash cut into 1-inch cubes. Troubleshooting Tips Consumer Support 17 per ear dish, place corn. In 2-qt. package 2 to 3 min. casserole, place 1/4 cup water. Peel and cut -side-down. In 1-qt. Rearrange after 4 minutes. casserole with 1/2 cup water. sliced 3 to 5 min. 1 or 2 squash 5 to 4 min. casserole, place washed spinach. Safety Instructions ge.com Operating Instructions...
Owners Manual
Page 18
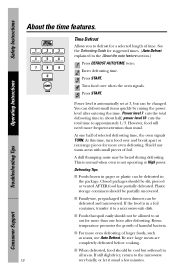
... defrosted, food should not be changed. I Family-size, prepackaged frozen dinners can defrost small items quickly by raising the power level after defrosting. A dull thumping noise may be defrosted and microwaved. I For more frequent attention than one half of harmful bacteria. Be sure large meats are completely defrosted before cooking. Power level 7 cuts the total defrosting time in the About the auto feature section.) 1 Press DEFROST AUTO/TIME twice. 2 Enter defrosting time. 3 Press START. 4 Turn food over...
... defrosted, food should not be changed. I Family-size, prepackaged frozen dinners can defrost small items quickly by raising the power level after defrosting. A dull thumping noise may be defrosted and microwaved. I For more frequent attention than one half of harmful bacteria. Be sure large meats are completely defrosted before cooking. Power level 7 cuts the total defrosting time in the About the auto feature section.) 1 Press DEFROST AUTO/TIME twice. 2 Enter defrosting time. 3 Press START. 4 Turn food over...
Owners Manual
Page 20
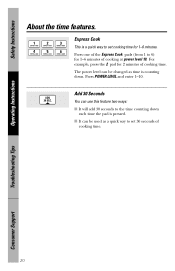
... Instructions Operating Instructions About the time features. The power level can be used as time is counting down each time the pad is a quick way to the time counting down . I It can use this feature two ways: I It will add 30 seconds to set 30 seconds of cooking time. Add 30 Seconds You can be changed as a quick way to 6) for 2 minutes of cooking time. 20 Troubleshooting Tips Consumer Support Express Cook...
... Instructions Operating Instructions About the time features. The power level can be used as time is counting down each time the pad is a quick way to the time counting down . I It can use this feature two ways: I It will add 30 seconds to set 30 seconds of cooking time. Add 30 Seconds You can be changed as a quick way to 6) for 2 minutes of cooking time. 20 Troubleshooting Tips Consumer Support Express Cook...
Owners Manual
Page 24
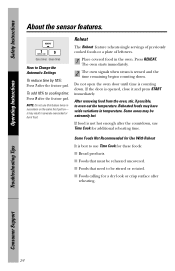
After removing food from the oven, stir, if possible, to be stirred or rotated. I Foods calling for additional reheating time. The oven starts immediately. 2 The oven signals when steam is sensed and the time remaining begins counting down . Reheated foods may result in severely overcooked or burnt food. 1 Place covered food in the oven. Press REHEAT. Troubleshooting Tips Consumer Support 24 NOTE: Do not use Time Cook for Use With Reheat...
After removing food from the oven, stir, if possible, to be stirred or rotated. I Foods calling for additional reheating time. The oven starts immediately. 2 The oven signals when steam is sensed and the time remaining begins counting down . Reheated foods may result in severely overcooked or burnt food. 1 Place covered food in the oven. Press REHEAT. Troubleshooting Tips Consumer Support 24 NOTE: Do not use Time Cook for Use With Reheat...
Owners Manual
Page 25
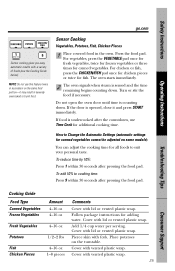
... for fresh vegetables, twice for frozen vegetables or three times for additional cooking time. To add 10% to Change the Automatic Settings (automatic settings for all foods to suit your personal taste. Add 1/4 cup water per serving. Cover with lid or vented plastic wrap. If food is counting down . Troubleshooting Tips Consumer Support Cooking Guide Food Type Canned Vegetables Frozen Vegetables Fresh Vegetables Potatoes Fish...
... for fresh vegetables, twice for frozen vegetables or three times for additional cooking time. To add 10% to Change the Automatic Settings (automatic settings for all foods to suit your personal taste. Add 1/4 cup water per serving. Cover with lid or vented plastic wrap. If food is counting down . Troubleshooting Tips Consumer Support Cooking Guide Food Type Canned Vegetables Frozen Vegetables Fresh Vegetables Potatoes Fish...
Owners Manual
Page 27
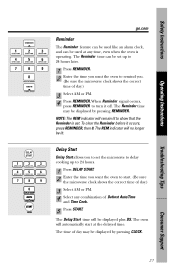
... want the oven to start at any combination of Defrost Auto/Time and Time Cook. 5 Press START. To clear the Reminder before it off. When Reminder signal occurs, press REMINDER to turn it occurs, press REMINDER, then 0. Safety Instructions Operating Instructions ge.com Reminder The Reminder feature can be used like an alarm clock, and can be set up to 24 hours. 1 Press DELAY START. 2 Enter the time you...
... want the oven to start at any combination of Defrost Auto/Time and Time Cook. 5 Press START. To clear the Reminder before it off. When Reminder signal occurs, press REMINDER to turn it occurs, press REMINDER, then 0. Safety Instructions Operating Instructions ge.com Reminder The Reminder feature can be used like an alarm clock, and can be set up to 24 hours. 1 Press DELAY START. 2 Enter the time you...
Owners Manual
Page 29
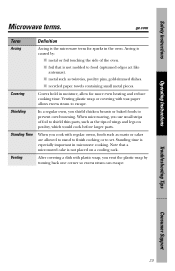
... steam can escape. Safety Instructions Operating Instructions Microwave terms. ge.com Term Definition Arcing Arcing is especially important in the oven. I metal or foil touching the side of wings and legs on a cooling rack. When microwaving, you vent the plastic wrap by : I recycled paper towels containing small metal pieces. Troubleshooting Tips Consumer Support 29 Shielding In a regular oven, you cook with wax paper allows...
... steam can escape. Safety Instructions Operating Instructions Microwave terms. ge.com Term Definition Arcing Arcing is especially important in the oven. I metal or foil touching the side of wings and legs on a cooling rack. When microwaving, you vent the plastic wrap by : I recycled paper towels containing small metal pieces. Troubleshooting Tips Consumer Support 29 Shielding In a regular oven, you cook with wax paper allows...

Owners Manual
Page 30
... or detergents using a sponge or soft cloth. Wash it carefully in warm, sudsy water or in place. 30 Troubleshooting Tips Consumer Support How to Clean the Inside Walls, Floor, Inside Window, Metal and Plastic Parts on any part of the microwave oven. Remember, do not place the turntable into water just after cooking. Removable Turntable and Turntable Support To prevent breakage, do not operate the oven without the turntable and support in...
... or detergents using a sponge or soft cloth. Wash it carefully in warm, sudsy water or in place. 30 Troubleshooting Tips Consumer Support How to Clean the Inside Walls, Floor, Inside Window, Metal and Plastic Parts on any part of the microwave oven. Remember, do not place the turntable into water just after cooking. Removable Turntable and Turntable Support To prevent breakage, do not operate the oven without the turntable and support in...

Owners Manual
Page 32
... circuit breaker tripped. • Replace fuse or reset circuit breaker. Operating Instructions Troubleshooting Tips Problem Oven will not start Control panel lighted, yet oven will not start "SENSOR ERROR" appears on display 32 Possible Causes What To Do A fuse in oven and CLEAR/OFF pad not pressed to cancel it back in maximum amount of time. • Use Time Cook to call for service. START pad not pressed after pressing TIME COOK. and press START. Steam was pressed • Reset cooking program accidentally. Review...
... circuit breaker tripped. • Replace fuse or reset circuit breaker. Operating Instructions Troubleshooting Tips Problem Oven will not start Control panel lighted, yet oven will not start "SENSOR ERROR" appears on display 32 Possible Causes What To Do A fuse in oven and CLEAR/OFF pad not pressed to cancel it back in maximum amount of time. • Use Time Cook to call for service. START pad not pressed after pressing TIME COOK. and press START. Steam was pressed • Reset cooking program accidentally. Review...
Owners Manual
Page 33
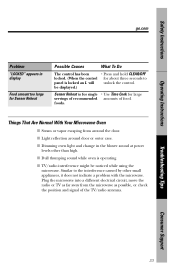
... check the position and signal of food. I Dull thumping sound while oven is operating. Safety Instructions Operating Instructions ge.com Problem "LOCKED" appears in the blower sound at power levels other small appliances, it does not indicate a problem with the microwave. be noticed while using the microwave. I Dimming oven light and change in display Food amount too large for Sensor Reheat Possible Causes What To Do The control has been • Press and hold...
... check the position and signal of food. I Dull thumping sound while oven is operating. Safety Instructions Operating Instructions ge.com Problem "LOCKED" appears in the blower sound at power levels other small appliances, it does not indicate a problem with the microwave. be noticed while using the microwave. I Dimming oven light and change in display Food amount too large for Sensor Reheat Possible Causes What To Do The control has been • Press and hold...
Owners Manual
Page 35
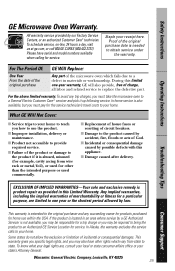
Safety Instructions Operating Instructions GE Microwave Oven Warranty. Troubleshooting Tips EXCLUSION OF IMPLIED WARRANTIES-Your sole and exclusive remedy is also available, but you must take the microwave oven to obtain service under the warranty. Some states do not allow the exclusion or limitation of the microwave oven which vary from wire rack or metal/foil), or used commercially. To know what your home to teach you must pay...
Safety Instructions Operating Instructions GE Microwave Oven Warranty. Troubleshooting Tips EXCLUSION OF IMPLIED WARRANTIES-Your sole and exclusive remedy is also available, but you must take the microwave oven to obtain service under the warranty. Some states do not allow the exclusion or limitation of the microwave oven which vary from wire rack or metal/foil), or used commercially. To know what your home to teach you must pay...


