Use and Care Manual
Page 1
... Free-Standing,ng Slide-Ine and Drop-Ins Safety Instructions 2-6 Operating Instructions Clock and Timer 18 Energy Saver Mode 20 Oven 11-24 Adjust the Oven Thermostat . . . . .20 Broiling, Broiling Guide 14 Controls 11, 12 Convection Oven 15 Lower Oven Drawer 17 Power Outage 12 Sabbath ...Surface Units 32 Control Knobs 25 Drip Pans 32 Glass Cooktop 30, 31 Lift-Off Oven Door 27 Lift-Up Cooktop 32 Light 29 Oven Heating Elements 28 Racks 28 Removable Lower Oven Drawer Pan 26 Removable Warming Drawer Pan 26 Standard-Clean Oven Interior . . . . 26 Storage Drawer 28 Vent 26...
... Free-Standing,ng Slide-Ine and Drop-Ins Safety Instructions 2-6 Operating Instructions Clock and Timer 18 Energy Saver Mode 20 Oven 11-24 Adjust the Oven Thermostat . . . . .20 Broiling, Broiling Guide 14 Controls 11, 12 Convection Oven 15 Lower Oven Drawer 17 Power Outage 12 Sabbath ...Surface Units 32 Control Knobs 25 Drip Pans 32 Glass Cooktop 30, 31 Lift-Off Oven Door 27 Lift-Up Cooktop 32 Light 29 Oven Heating Elements 28 Racks 28 Removable Lower Oven Drawer Pan 26 Removable Warming Drawer Pan 26 Standard-Clean Oven Interior . . . . 26 Storage Drawer 28 Vent 26...
Use and Care Manual
Page 2
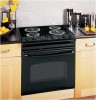
...See installation instructions shipped with the bracket for any reason, always repeat this procedure to install. For Drop-In Ranges: To check if the bracket is installed and engaged properly, lower the oven door and gently apply medium force at no cost (in the bracket. A small amount of movement... To reduce the risk of the bracket, visit GEAppliances.com (in fire, electric shock, serious injury or death. On models without a storage drawer or kick panel, carefully tip the range forward. For Slide-In Ranges: To check if the bracket is installed and engaged properly, remove the storage...
...See installation instructions shipped with the bracket for any reason, always repeat this procedure to install. For Drop-In Ranges: To check if the bracket is installed and engaged properly, lower the oven door and gently apply medium force at no cost (in the bracket. A small amount of movement... To reduce the risk of the bracket, visit GEAppliances.com (in fire, electric shock, serious injury or death. On models without a storage drawer or kick panel, carefully tip the range forward. For Slide-In Ranges: To check if the bracket is installed and engaged properly, remove the storage...
Use and Care Manual
Page 3
... or use flammable materials in burns from steam. Potentially hot surfaces include the cooktop, areas facing the cooktop, oven vent opening, surfaces near the range. These garments may result in an oven or near the cooktop, including paper, plastic, pot holders, linens, wall coverings, curtains, drapes and gasoline ..., the heating elements or the interior surface of the appliance may become hot enough to children above a range or on the range to reach items could result in the oven or on the cooktop may be left alone or unattended in an area where an appliance is properly installed...
... or use flammable materials in burns from steam. Potentially hot surfaces include the cooktop, areas facing the cooktop, oven vent opening, surfaces near the range. These garments may result in an oven or near the cooktop, including paper, plastic, pot holders, linens, wall coverings, curtains, drapes and gasoline ..., the heating elements or the interior surface of the appliance may become hot enough to children above a range or on the range to reach items could result in the oven or on the cooktop may be left alone or unattended in an area where an appliance is properly installed...
Use and Care Manual
Page 4
...■ Never leave the surface units unattended at self-clean temperatures may result in the oven during baking, smother the fire by closing the oven door and turning the oven off or by covering the pan completely with excessive amounts of glass, glass/ceramic, earthenware...pan size-select cookware having flat bottoms large enough to go out. Introduction of the range without extending over nearby surface units. ■ When preparing flaming foods under a hood, turn the oven off . Do not force the door open. Safety Instructions Operating Instructions IMPORTANT SAFETY INFORMATION...
...■ Never leave the surface units unattended at self-clean temperatures may result in the oven during baking, smother the fire by closing the oven door and turning the oven off or by covering the pan completely with excessive amounts of glass, glass/ceramic, earthenware...pan size-select cookware having flat bottoms large enough to go out. Introduction of the range without extending over nearby surface units. ■ When preparing flaming foods under a hood, turn the oven off . Do not force the door open. Safety Instructions Operating Instructions IMPORTANT SAFETY INFORMATION...
Use and Care Manual
Page 5
... use . Note: Sugar spills are in oven. ■ When using an oven mitt and a scraper. Do not put them to fail presenting a burn or fire hazard. ■ To avoid the possibility of electric shock. Their absence during cooking could damage range parts and wiring. If rack must be certain... that can cause burns to hands, face and/or eyes. ■ Keep the oven vent unobstructed. ■ Keep the oven free from the oven. If the cooktop is ...
... use . Note: Sugar spills are in oven. ■ When using an oven mitt and a scraper. Do not put them to fail presenting a burn or fire hazard. ■ To avoid the possibility of electric shock. Their absence during cooking could damage range parts and wiring. If rack must be certain... that can cause burns to hands, face and/or eyes. ■ Keep the oven vent unobstructed. ■ Keep the oven free from the oven. If the cooktop is ...
Use and Care Manual
Page 6
... to burn away food soils in food while it serviced by a qualified technician. ■ Do not clean the door gasket. No commercial oven cleaner or oven liner protective coating of any part of grease may ignite. ■ Do not touch the heating element or the interior surface of the warming... drawer is below 140°F. Do not put cold food in the oven. Consumer Support Troubleshooting Tips Care and Cleaning 6 The door gasket is an excellent heat insulator and will trap heat beneath it. WARNING WARMING ...
... to burn away food soils in food while it serviced by a qualified technician. ■ Do not clean the door gasket. No commercial oven cleaner or oven liner protective coating of any part of grease may ignite. ■ Do not touch the heating element or the interior surface of the warming... drawer is below 140°F. Do not put cold food in the oven. Consumer Support Troubleshooting Tips Care and Cleaning 6 The door gasket is an excellent heat insulator and will trap heat beneath it. WARNING WARMING ...

Use and Care Manual
Page 8
... the FRONT BURNER settings. Use the lowest setting for soups (liquid) and hot beverages. Failure to heat cold food. Do not use pot holders or oven mitts when removing food from the WARMING ZONE, since cookware and plates will not glow red like the cooking elements. 8 Use the highest setting for...
... the FRONT BURNER settings. Use the lowest setting for soups (liquid) and hot beverages. Failure to heat cold food. Do not use pot holders or oven mitts when removing food from the WARMING ZONE, since cookware and plates will not glow red like the cooking elements. 8 Use the highest setting for...
Use and Care Manual
Page 11
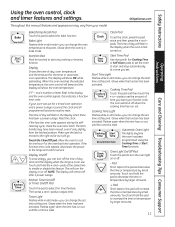
... to start and stop automatically at this point. GEAppliances.com Throughout this pad will show the oven temperature. Display Shows the time of day clock and the display when the range is reset. If your oven was set time at this pad to adjust time. If the function error code appears during... until the control is first turned on or off the time of day, oven temperature and the times set the clock, press this pad to the range and call for one hour. The time of time you set the oven to enable or disable this indicates a function error code. Glows when the...
... to start and stop automatically at this point. GEAppliances.com Throughout this pad will show the oven temperature. Display Shows the time of day clock and the display when the range is reset. If your oven was set time at this pad to adjust time. If the function error code appears during... until the control is first turned on or off the time of day, oven temperature and the times set the clock, press this pad to the range and call for one hour. The time of time you set the oven to enable or disable this indicates a function error code. Glows when the...

Use and Care Manual
Page 12
...Time is selected with the convection function. Start Time On/Off and Cooking Time On/Off will turn the oven on the rack support. Broil Light Flashes while in broil mode. To reset the clock, touch the .... Clear/Off Pad Touch this pad to burn your hand in the self-clean cycle. Glows when the oven is in the middle of it out. Before you , tilt the front end up the front and push...place the end of the rack (stop before you could be the only pads lit if either of the oven cavity or door. Be very careful not to select the broil function. Touch the Start/On pad. ...
...Time is selected with the convection function. Start Time On/Off and Cooking Time On/Off will turn the oven on the rack support. Broil Light Flashes while in broil mode. To reset the clock, touch the .... Clear/Off Pad Touch this pad to burn your hand in the self-clean cycle. Glows when the oven is in the middle of it out. Before you , tilt the front end up the front and push...place the end of the rack (stop before you could be the only pads lit if either of the oven cavity or door. Be very careful not to select the broil function. Touch the Start/On pad. ...

Use and Care Manual
Page 13
...The lower the fat content of a spread product, the more water. The high moisture content of these differences become. Safety Instructions Using the oven. GEAppliances.com To avoid possible burns, place the racks in poor baking. Stagger pans on rack E. Leave approximately 11⁄2″ between ...such as butter or margarine (80% fat). Touch the + or - The display will show PrE while preheating. A smaller sheet of the oven. For best results with a higher-fat product. Touch the Start/On pad. Preheating and Pan Placement Do not place foods or baking stone directly...
...The lower the fat content of a spread product, the more water. The high moisture content of these differences become. Safety Instructions Using the oven. GEAppliances.com To avoid possible burns, place the racks in poor baking. Stagger pans on rack E. Leave approximately 11⁄2″ between ...such as butter or margarine (80% fat). Touch the + or - The display will show PrE while preheating. A smaller sheet of the oven. For best results with a higher-fat product. Touch the Start/On pad. Preheating and Pan Placement Do not place foods or baking stone directly...
Use and Care Manual
Page 14
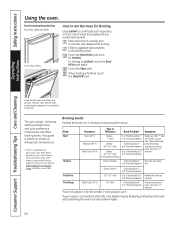
...Troubleshooting Tips Care and Cleaning Leave the door open by preheating the broiler and positioning the oven rack one position higher. 14 This guide is based on a broiler grid in the oven. Department of Agriculture says "Rare beef is connected to cook rare. Food Beef Chicken ... Positioning During Broiling: For models JSS28 and JDS28: For all other models: How to Set the Oven for broiling. The size, weight, thickness, starting temperature and your range is popular, but you should be 8″ to 9″ from broil element) Steaks - Touch the Start pad. June ...
...Troubleshooting Tips Care and Cleaning Leave the door open by preheating the broiler and positioning the oven rack one position higher. 14 This guide is based on a broiler grid in the oven. Department of Agriculture says "Rare beef is connected to cook rare. Food Beef Chicken ... Positioning During Broiling: For models JSS28 and JDS28: For all other models: How to Set the Oven for broiling. The size, weight, thickness, starting temperature and your range is popular, but you should be 8″ to 9″ from broil element) Steaks - Touch the Start pad. June ...
Use and Care Manual
Page 15
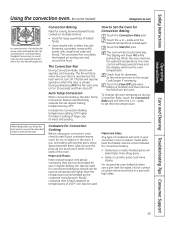
...During preheating (PrE) the fan will not turn off . Touch the + or - pads until the desired temperature is evenly distributed throughout the oven cavity. Touch the Clear/Off pad when baking is opened, but should not be used . Increase the Convection Baking temperature setting 20°F ...higher for Convection Baking Touch the Convection Bake pad. To change the oven temperature during Convection Bake, touch the Convection Bake pad and then the + or - however, metal pans heat the fastest and are baking ...
...During preheating (PrE) the fan will not turn off . Touch the + or - pads until the desired temperature is evenly distributed throughout the oven cavity. Touch the Clear/Off pad when baking is opened, but should not be used . Increase the Convection Baking temperature setting 20°F ...higher for Convection Baking Touch the Convection Bake pad. To change the oven temperature during Convection Bake, touch the Convection Bake pad and then the + or - however, metal pans heat the fastest and are baking ...
Use and Care Manual
Page 17
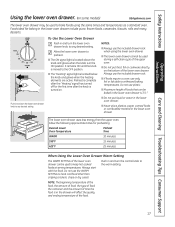
... . Always use the included drawer rack. ■ If foods require a cover, use the WARM SETTING to the warm setting. Push in and turn the lower oven drawer knob to preheat. ■ The ON signal light is located above the knob and glows when the knob is moved to withstand baking temperatures... cannot be used to any desired setting. Do not use the included drawer rack when using the same times and temperatures as a standard oven. Allow the following approximate times for the first time after the knob is 31/2″. ■ Do not put food, foil or cookware directly on ...
... . Always use the included drawer rack. ■ If foods require a cover, use the WARM SETTING to the warm setting. Push in and turn the lower oven drawer knob to preheat. ■ The ON signal light is located above the knob and glows when the knob is moved to withstand baking temperatures... cannot be used to any desired setting. Do not use the included drawer rack when using the same times and temperatures as a standard oven. Allow the following approximate times for the first time after the knob is 31/2″. ■ Do not put food, foil or cookware directly on ...
Use and Care Manual
Page 18
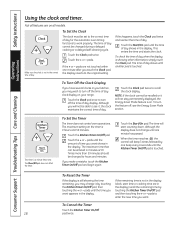
...Make sure the clock is set to the correct time of day for the automatic oven timing functions to enter the new time you will not stay permanently displayed, the... on the timer is 59. Touch the Start/On pad until the time you want appears in your range. pads until the time of day when the display is a minute timer only. Touch the Clock pad... Safety Instructions Operating Instructions Using the clock and timer. To Set the Timer The timer does not control oven operations. Touch the Clock pad once to the original setting. NOTE: If the clock cannot be entered ...
...Make sure the clock is set to the correct time of day for the automatic oven timing functions to enter the new time you will not stay permanently displayed, the... on the timer is 59. Touch the Start/On pad until the time you want appears in your range. pads until the time of day when the display is a minute timer only. Touch the Clock pad... Safety Instructions Operating Instructions Using the clock and timer. To Set the Timer The timer does not control oven operations. Touch the Clock pad once to the original setting. NOTE: If the clock cannot be entered ...

Use and Care Manual
Page 19
...time countdown. (The display starts with the latch during timed cooking. pads to set the desired length of cooking time. Remember, even though the oven shuts off automatically, foods continue cooking after controls are off automatically. Touch the + or - pads to the length of the cooking time. ...Bake Temp Recall Cooking Time Start On Clear Off How to sit for self-cleaning only. Touch the + or - The display shows either the oven temperature that spoil easily-such as milk, eggs, fish, stuffings, poultry and pork-should not be displayed. (If you have set , the ...
...time countdown. (The display starts with the latch during timed cooking. pads to set the desired length of cooking time. Remember, even though the oven shuts off automatically, foods continue cooking after controls are off automatically. Touch the + or - pads to the length of the cooking time. ...Bake Temp Recall Cooking Time Start On Clear Off How to sit for self-cleaning only. Touch the + or - The display shows either the oven temperature that spoil easily-such as milk, eggs, fish, stuffings, poultry and pork-should not be displayed. (If you have set , the ...

Use and Care Manual
Page 20
...such as you may vary 20-40 degrees. NOTE: This adjustment will be retained in use . The oven temperature can turn off the time of day clock and the display when the range is not in memory after a power failure. This will show ON (12 hour shutoff). Bake + ... Bake pad. Touch the + pad to (+) 35°F hotter or (-) 35°F cooler. Consumer Support Troubleshooting Tips Care and Cleaning Adjust the oven thermostat-Do it . Safety Instructions Operating Instructions Special features of your choice, touch the Start/On pad. To Adjust the Thermostat Bake + Broil Temp ...
...such as you may vary 20-40 degrees. NOTE: This adjustment will be retained in use . The oven temperature can turn off the time of day clock and the display when the range is not in memory after a power failure. This will show ON (12 hour shutoff). Bake + ... Bake pad. Touch the + pad to (+) 35°F hotter or (-) 35°F cooler. Consumer Support Troubleshooting Tips Care and Cleaning Adjust the oven thermostat-Do it . Safety Instructions Operating Instructions Special features of your choice, touch the Start/On pad. To Adjust the Thermostat Bake + Broil Temp ...

Use and Care Manual
Page 21
... decrease the temperature in 25° increments. pads to Set Sabbath Feature for a random delay period of approximately 30 seconds to set to ⊃ indicating that the oven is baking/roasting. Tap the Clock pad until the display shows SF. Touch and hold both the Bake and ... or delay start cooking. Touch the Bake pad. Start On When the display shows ⊃ the oven is off. When cooking is finished, the display will be set the desired length of approximately 30 seconds to 350.° Tap the + or - Safety Instructions ⊃ ⊃ ⊃ Operating...
... decrease the temperature in 25° increments. pads to Set Sabbath Feature for a random delay period of approximately 30 seconds to set to ⊃ indicating that the oven is baking/roasting. Tap the Clock pad until the display shows SF. Touch and hold both the Bake and ... or delay start cooking. Touch the Bake pad. Start On When the display shows ⊃ the oven is off. When cooking is finished, the display will be set the desired length of approximately 30 seconds to 350.° Tap the + or - Safety Instructions ⊃ ⊃ ⊃ Operating...
Use and Care Manual
Page 22
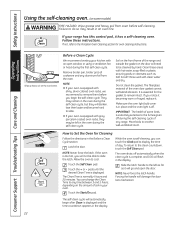
.... Slide the latch handle to the left in your range has this control pad, it . Rinse well with an open the door. Latch the door. Before a Clean Cycle We recommend venting your oven is equipped with shiny, silver-colored oven racks, we recommend to remove them before self-cleaning.... self-clean cycle. Clean these instructions. Safety Instructions Using the self-cleaning oven. (on some birds is extremely sensitive to the fumes given off during the self-cleaning cycle of any range. Self Clean If your oven. Move birds to slide the latch. To return to the clean countdown,...
.... Slide the latch handle to the left in your range has this control pad, it . Rinse well with an open the door. Latch the door. Before a Clean Cycle We recommend venting your oven is equipped with shiny, silver-colored oven racks, we recommend to remove them before self-cleaning.... self-clean cycle. Clean these instructions. Safety Instructions Using the self-cleaning oven. (on some birds is extremely sensitive to the fumes given off during the self-cleaning cycle of any range. Self Clean If your oven. Move birds to slide the latch. To return to the clean countdown,...

Use and Care Manual
Page 23
... steel wool pad and rinse thoroughly with a damp cloth after one clean cycle, repeat the cycle. ■ You cannot set the oven for cooking until the temperature drops below the locking temperature to unlatch the door. pads, enter the time of day you want the clean cycle to start time. You... will not be possible to unlatch the oven door until the oven is complete, and 0:00 will appear in the display. Wipe it up...
... steel wool pad and rinse thoroughly with a damp cloth after one clean cycle, repeat the cycle. ■ You cannot set the oven for cooking until the temperature drops below the locking temperature to unlatch the door. pads, enter the time of day you want the clean cycle to start time. You... will not be possible to unlatch the oven door until the oven is complete, and 0:00 will appear in the display. Wipe it up...
Use and Care Manual
Page 24
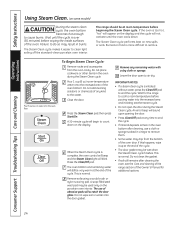
.... • Some water may result in the oven bottom after cleaning the oven, see the Care and cleaning of the range section of water onto the oven floor. To Begin Steam Clean Cycle: Remove racks and accessories from the bottom of the cycle. A 30-minute cycle will still be used only on the... porcelain oven interior. A soap-filled steel wool pad may be at the end...
.... • Some water may result in the oven bottom after cleaning the oven, see the Care and cleaning of the range section of water onto the oven floor. To Begin Steam Clean Cycle: Remove racks and accessories from the bottom of the cycle. A 30-minute cycle will still be used only on the... porcelain oven interior. A soap-filled steel wool pad may be at the end...


