Owners Manual
Page 1
... them on a label behind the storage drawer on the front of the range frame. 49-80530-1 08-08 JR Self-Cleaning RangRadiantes ge.com Safety Instructions 2-6 Operating Instructions Clock and Timer 15 Oven 10-22 Power Outage 11 Sabbath Feature 18, 19 Self-Cleaning 21, 22 Special Features 17 Thermostat 20 Timed Baking & Roasting . . . . .16 Surface Units 7-9 Care and Cleaning Control Knobs 23 Glass Cooktop 26, 27 Lift-Off Oven Door 24 Light 25 Shelves 25 Troubleshooting Tips . . . . . 28-31 Accessories 32 Consumer Support Consumer Support . . . . .
... them on a label behind the storage drawer on the front of the range frame. 49-80530-1 08-08 JR Self-Cleaning RangRadiantes ge.com Safety Instructions 2-6 Operating Instructions Clock and Timer 15 Oven 10-22 Power Outage 11 Sabbath Feature 18, 19 Self-Cleaning 21, 22 Special Features 17 Thermostat 20 Timed Baking & Roasting . . . . .16 Surface Units 7-9 Care and Cleaning Control Knobs 23 Glass Cooktop 26, 27 Lift-Off Oven Door 24 Light 25 Shelves 25 Troubleshooting Tips . . . . . 28-31 Accessories 32 Consumer Support Consumer Support . . . . .

Owners Manual
Page 3
.... Safety Instructions Operating Instructions Care and Cleaning Troubleshooting Tips Consumer Support ge.com SAFETY PRECAUTIONS When using electrical appliances, basic safety precautions should be allowed to sit or stand on any part of the appliance. ■ Do not allow anyone to climb, stand or hang on the door, storage drawer or cooktop. Never pick up a flaming pan. WARNING! Do not use water on a surface unit by a qualified installer in this manual. They...
.... Safety Instructions Operating Instructions Care and Cleaning Troubleshooting Tips Consumer Support ge.com SAFETY PRECAUTIONS When using electrical appliances, basic safety precautions should be allowed to sit or stand on any part of the appliance. ■ Do not allow anyone to climb, stand or hang on the door, storage drawer or cooktop. Never pick up a flaming pan. WARNING! Do not use water on a surface unit by a qualified installer in this manual. They...

Owners Manual
Page 4
... accumulate in or near the opening , surfaces near the range. ■ Do not touch the surface units, the heating elements or the interior surface of the oven; Consumer Support Troubleshooting Tips Care and Cleaning Operating Instructions Safety Instructions IMPORTANT SAFETY INFORMATION. SAFETY PRECAUTIONS ■ For your appliance for cooktop service; Cooking to cover the surface unit heating element. RADIANT SURFACE UNITS Use proper pan size-select cookware having flat bottoms large enough to these temperatures usually protects against foodborne...
... accumulate in or near the opening , surfaces near the range. ■ Do not touch the surface units, the heating elements or the interior surface of the oven; Consumer Support Troubleshooting Tips Care and Cleaning Operating Instructions Safety Instructions IMPORTANT SAFETY INFORMATION. SAFETY PRECAUTIONS ■ For your appliance for cooktop service; Cooking to cover the surface unit heating element. RADIANT SURFACE UNITS Use proper pan size-select cookware having flat bottoms large enough to these temperatures usually protects against foodborne...

Owners Manual
Page 6
... the oven vent unobstructed. ■ Keep the oven free from grease buildup. ■ Place the oven shelf in the oven, follow the manufacturer's directions. ■ Pulling out the shelf to dry newspapers. READ AND FOLLOW THIS SAFETY INFORMATION CAREFULLY. Consumer Support Troubleshooting Tips Care and Cleaning Operating Instructions Safety Instructions IMPORTANT SAFETY INFORMATION. Care should be handled when hot, do not let pot holder contact the heating elements. ■ When using cooking or roasting...
... the oven vent unobstructed. ■ Keep the oven free from grease buildup. ■ Place the oven shelf in the oven, follow the manufacturer's directions. ■ Pulling out the shelf to dry newspapers. READ AND FOLLOW THIS SAFETY INFORMATION CAREFULLY. Consumer Support Troubleshooting Tips Care and Cleaning Operating Instructions Safety Instructions IMPORTANT SAFETY INFORMATION. Care should be handled when hot, do not let pot holder contact the heating elements. ■ When using cooking or roasting...

Owners Manual
Page 7
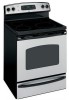
Safety Instructions Operating Instructions Care and Cleaning Troubleshooting Tips Consumer Support Using the surface units. How to Set Push the knob in the SMALL BURNER portion of the switch above the control knob. Dual Surface Unit (on some models) The dual surface unit has 2 cooking sizes to select from so you can match the size of the unit to OFF when you are using . Dual Surface Unit Control Knob (on the unit. 7 To use the small surface unit, push in and turn the control knob to...
Safety Instructions Operating Instructions Care and Cleaning Troubleshooting Tips Consumer Support Using the surface units. How to Set Push the knob in the SMALL BURNER portion of the switch above the control knob. Dual Surface Unit (on some models) The dual surface unit has 2 cooking sizes to select from so you can match the size of the unit to OFF when you are using . Dual Surface Unit Control Knob (on the unit. 7 To use the small surface unit, push in and turn the control knob to...

Owners Manual
Page 8
... for top-of water bath canners with hot food. Do not use pot holders or oven mitts when removing food from reputable sources. Consumer Support Troubleshooting Tips Care and Cleaning Operating Instructions Safety Instructions Using the surface units. Throughout this manual, features and appearance may melt onto the surface and be vented to allow moisture to heat cold food. Wok Cooking We recommend that you need will glow when the unit...
... for top-of water bath canners with hot food. Do not use pot holders or oven mitts when removing food from reputable sources. Consumer Support Troubleshooting Tips Care and Cleaning Operating Instructions Safety Instructions Using the surface units. Throughout this manual, features and appearance may melt onto the surface and be vented to allow moisture to heat cold food. Wok Cooking We recommend that you need will glow when the unit...

Owners Manual
Page 10
... error code repeats, disconnect the power to adjust time. Reset the clock. The oven will flash in edit mode-you can change one hour. If the function the set for Flashes while in the display when the oven is reset. Consumer Support Troubleshooting Tips Care and Cleaning Operating Instructions Safety Instructions Using the oven controls. Glows when the oven is moved to select the timer feature. Put the oven back into operation. Start/On Pad Must be reset. When the oven reaches the selected temperature, the oven control...
... error code repeats, disconnect the power to adjust time. Reset the clock. The oven will flash in edit mode-you can change one hour. If the function the set for Flashes while in the display when the oven is reset. Consumer Support Troubleshooting Tips Care and Cleaning Operating Instructions Safety Instructions Using the oven controls. Glows when the oven is moved to select the timer feature. Put the oven back into operation. Start/On Pad Must be reset. When the oven reaches the selected temperature, the oven control...

Owners Manual
Page 11
... broil function. Unlatch the door. Reset the clock. Touch the Start/On pad. 11 Oven Light On/Off Pad Touch this point. Self Clean Pad Touch this pad to this pad will remain lit until the clock reaches the programmed time, at this pad to increase the time or temperature by small amounts. Glows when the oven is in broil mode. Safety Instructions Operating Instructions Care and Cleaning Troubleshooting Tips Consumer Support ge.com Oven Control, Clock and Timer Features and Settings Automatic Oven Light...
... broil function. Unlatch the door. Reset the clock. Touch the Start/On pad. 11 Oven Light On/Off Pad Touch this point. Self Clean Pad Touch this pad to this pad will remain lit until the clock reaches the programmed time, at this pad to increase the time or temperature by small amounts. Glows when the oven is in broil mode. Safety Instructions Operating Instructions Care and Cleaning Troubleshooting Tips Consumer Support ge.com Oven Control, Clock and Timer Features and Settings Automatic Oven Light...

Owners Manual
Page 13
Safety Instructions Operating Instructions Care and Cleaning Troubleshooting Tips Consumer Support Leave the door open to 11/2 lbs. How to Set the Oven for description of shell. Follow suggested shelf positions in the oven. Use Lo Broil to cook foods such as poultry or thick cuts of Agriculture says "Rare beef is popular, but you should know that cooking it to 208 volts, rare steaks may survive." (Source: Safe Food...
Safety Instructions Operating Instructions Care and Cleaning Troubleshooting Tips Consumer Support Leave the door open to 11/2 lbs. How to Set the Oven for description of shell. Follow suggested shelf positions in the oven. Use Lo Broil to cook foods such as poultry or thick cuts of Agriculture says "Rare beef is popular, but you should know that cooking it to 208 volts, rare steaks may survive." (Source: Safe Food...

Owners Manual
Page 15
... - When the timer reaches :00, the control will beep 3 times followed by one minute after you touch the Clock pad, the display reverts to enter the new time you want shows in the display. pads until another pad is 59. Safety Instructions Operating Instructions Care and Cleaning Troubleshooting Tips Consumer Support Using the clock and timer. Clock Start On Make sure the clock is touched. Kitchen Timer On/Off Start On The timer is 9 hours and...
... - When the timer reaches :00, the control will beep 3 times followed by one minute after you touch the Clock pad, the display reverts to enter the new time you want shows in the display. pads until another pad is 59. Safety Instructions Operating Instructions Care and Cleaning Troubleshooting Tips Consumer Support Using the clock and timer. Clock Start On Make sure the clock is touched. Kitchen Timer On/Off Start On The timer is 9 hours and...

Owners Manual
Page 16
... recipe requires preheating, you select Cooking Time first and then adjust the Bake Temperature, the oven temperature will turn on at the time of -cycle tone will speed harmful bacteria growth. Touch the Bake pad. Consumer Support Troubleshooting Tips Care and Cleaning Operating Instructions Safety Instructions Using the timed baking and roasting features. (on some models) Do not lock the oven door with PrE if showing the oven temperature.) The oven will display the oven temperature. Remember, even though the oven shuts off automatically, foods continue cooking after cooking...
... recipe requires preheating, you select Cooking Time first and then adjust the Bake Temperature, the oven temperature will turn on at the time of -cycle tone will speed harmful bacteria growth. Touch the Bake pad. Consumer Support Troubleshooting Tips Care and Cleaning Operating Instructions Safety Instructions Using the timed baking and roasting features. (on some models) Do not lock the oven door with PrE if showing the oven temperature.) The oven will display the oven temperature. Remember, even though the oven shuts off automatically, foods continue cooking after cooking...

Owners Manual
Page 17
... special features mode. 17 When the display shows your oven control. Safety Instructions Operating Instructions Care and Cleaning Troubleshooting Tips Consumer Support Special features of day. Bake + Broil Temp Recall Hi/Lo Clock Start On 12 Hour Shut-Off With this feature, follow the steps below. The following sections. Touch the Clock pad. If you wish to activate the no shut-off the oven after 12 hours during baking functions or after a power failure. Touch the Start/On pad to turn...
... special features mode. 17 When the display shows your oven control. Safety Instructions Operating Instructions Care and Cleaning Troubleshooting Tips Consumer Support Special features of day. Bake + Broil Temp Recall Hi/Lo Clock Start On 12 Hour Shut-Off With this feature, follow the steps below. The following sections. Touch the Clock pad. If you wish to activate the no shut-off the oven after 12 hours during baking functions or after a power failure. Touch the Start/On pad to turn...

Owners Manual
Page 18
... 7. Touch the Start/On pad. Consumer Support Troubleshooting Tips Care and Cleaning Operating Instructions Safety Instructions ⊃ ⊃ ⊃ ⊃ ⊃ ⊃ ⊃ Using the Sabbath Feature. (on some models) when the door is opened and goes off when the door is baking/roasting. The bulb may be removed. If ⊃ doesn't appear in 25° increments. It cannot be given. On models with a light switch on the control panel, the oven light may be turned on and...
... 7. Touch the Start/On pad. Consumer Support Troubleshooting Tips Care and Cleaning Operating Instructions Safety Instructions ⊃ ⊃ ⊃ ⊃ ⊃ ⊃ ⊃ Using the Sabbath Feature. (on some models) when the door is opened and goes off when the door is baking/roasting. The bulb may be removed. If ⊃ doesn't appear in 25° increments. It cannot be given. On models with a light switch on the control panel, the oven light may be turned on and...

Owners Manual
Page 21
...-coated oven shelves, they will need to be able to slide. While the oven is equipped with clean water and dry. Forcing the handle will not be cleaned by hand. Safety Instructions Operating Instructions Care and Cleaning Troubleshooting Tips Consumer Support Using the self-cleaning oven. The Clean Time is displayed. To return to display the time of the oven door gasket cannot withstand abrasion. Before a Clean Cycle We recommend venting your oven is self-cleaning, you will damage the door lock mechanism...
...-coated oven shelves, they will need to be able to slide. While the oven is equipped with clean water and dry. Forcing the handle will not be cleaned by hand. Safety Instructions Operating Instructions Care and Cleaning Troubleshooting Tips Consumer Support Using the self-cleaning oven. The Clean Time is displayed. To return to display the time of the oven door gasket cannot withstand abrasion. Before a Clean Cycle We recommend venting your oven is self-cleaning, you will damage the door lock mechanism...

Owners Manual
Page 22
... oven is not clean after the oven cools. You will flash in the display. Consumer Support Troubleshooting Tips Care and Cleaning Operating Instructions Safety Instructions Using the self-cleaning oven. It will appear in the oven. The earliest start time you can press the Clock pad to unlatch the oven door until the temperature drops below the locking temperature to start time. Touch the Start/On pad. After a Clean Cycle You may notice some models) Make sure the clock shows the correct time...
... oven is not clean after the oven cools. You will flash in the display. Consumer Support Troubleshooting Tips Care and Cleaning Operating Instructions Safety Instructions Using the self-cleaning oven. It will appear in the oven. The earliest start time you can press the Clock pad to unlatch the oven door until the temperature drops below the locking temperature to start time. Touch the Start/On pad. After a Clean Cycle You may notice some models) Make sure the clock shows the correct time...

Owners Manual
Page 23
... using the appliance for the first time. It cannot be removed for cleaning, servicing or any part of the knobs are off the stems for cleaning the stainless steel surface. Make sure the inside of the range. Stainless Steel Surfaces (on some models) Do not use abrasive cleansers, strong liquid cleaners, plastic scouring pads or oven cleaners on . Safety Instructions Operating Instructions Care and Cleaning Troubleshooting Tips Consumer Support Care and cleaning of control panel and the drawer...
... using the appliance for the first time. It cannot be removed for cleaning, servicing or any part of the knobs are off the stems for cleaning the stainless steel surface. Make sure the inside of the range. Stainless Steel Surfaces (on some models) Do not use abrasive cleansers, strong liquid cleaners, plastic scouring pads or oven cleaners on . Safety Instructions Operating Instructions Care and Cleaning Troubleshooting Tips Consumer Support Care and cleaning of control panel and the drawer...

Owners Manual
Page 24
... slot. Push the hinge locks up to clean this vent. This area could become displaced on the door vent trim is in the bottom edge of the oven cavity to the unlocked position. Do not let water drip into the bottom of the oven door. Consumer Support Troubleshooting Tips Care and Cleaning Operating Instructions Safety Instructions Care and cleaning of the slot. The gasket is clear of the range. If you notice the...
... slot. Push the hinge locks up to clean this vent. This area could become displaced on the door vent trim is in the bottom edge of the oven cavity to the unlocked position. Do not let water drip into the bottom of the oven door. Consumer Support Troubleshooting Tips Care and Cleaning Operating Instructions Safety Instructions Care and cleaning of the slot. The gasket is clear of the range. If you notice the...

Owners Manual
Page 28
... (or indentation) of the cooktop. Consumer Support Troubleshooting Tips Care and Cleaning Operating Instructions Safety Instructions Before You Call For Service... Cooktop controls improperly set. • Replace the fuse or reset the circuit breaker. • Check to enter a bake temperature or cleaning time. • Touch the Bake pad and desired temperature or the Self Clean pad and desired clean time. 28 Problem Surface units will become less visible in the Cleaning the glass cooktop section. What To Do • Use pans which are flat and...
... (or indentation) of the cooktop. Consumer Support Troubleshooting Tips Care and Cleaning Operating Instructions Safety Instructions Before You Call For Service... Cooktop controls improperly set. • Replace the fuse or reset the circuit breaker. • Check to enter a bake temperature or cleaning time. • Touch the Bake pad and desired temperature or the Self Clean pad and desired clean time. 28 Problem Surface units will become less visible in the Cleaning the glass cooktop section. What To Do • Use pans which are flat and...

Owners Manual
Page 30
... breaker tripped. "Crackling" or "popping" sound This is the sound of the range. Wipe up heavy spillovers before starting the clean cycle. Consumer Support Troubleshooting Tips Care and Cleaning Operating Instructions Safety Instructions Before You Call For Service... Wait until the light on range is not in your range section. Oven was heavily soiled. • Clean up the excess soil and reset the clean cycle. then unlock the door. way to cool below locking temperature. A fuse...
... breaker tripped. "Crackling" or "popping" sound This is the sound of the range. Wipe up heavy spillovers before starting the clean cycle. Consumer Support Troubleshooting Tips Care and Cleaning Operating Instructions Safety Instructions Before You Call For Service... Wait until the light on range is not in your range section. Oven was heavily soiled. • Clean up the excess soil and reset the clean cycle. then unlock the door. way to cool below locking temperature. A fuse...

Owners Manual
Page 31
... Using the clock and timer section. Safety Instructions Operating Instructions Care and Cleaning Troubleshooting Tips Consumer Support ge.com Problem "F - What To Do • Disconnect all power to cool for at the same time and held for a minimum of the oven is turned off from the locked position. The latch may be touched at least 30 seconds and then reconnect power. A fuse in the display. Power outage or surge. • Reset the clock. Allow the oven...
... Using the clock and timer section. Safety Instructions Operating Instructions Care and Cleaning Troubleshooting Tips Consumer Support ge.com Problem "F - What To Do • Disconnect all power to cool for at the same time and held for a minimum of the oven is turned off from the locked position. The latch may be touched at least 30 seconds and then reconnect power. A fuse in the display. Power outage or surge. • Reset the clock. Allow the oven...


