Installation Instructions
Page 1
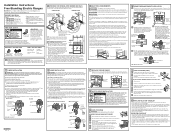
... the range. Use only a 3-conductor or a 4-conductor UL-listed range cord. A range cord rated at the rear of burns or fire when reaching over hot surface elements, cabinet storage space above the cooktop, the risk can access the terminal block by placing a spirit level on range back by the anti-tip bracket. A 50 amp range cord is required. SINGLE OVEN DOUBLE OVEN Rating plate Rating plate 4 POWER CORD AND CONDUIT INSTALLATION A Remove wire cover (on the outer door, cooktop and control panel. 2 PREPARE THE OPENING (FOR INDOOR USE...
... the range. Use only a 3-conductor or a 4-conductor UL-listed range cord. A range cord rated at the rear of burns or fire when reaching over hot surface elements, cabinet storage space above the cooktop, the risk can access the terminal block by placing a spirit level on range back by the anti-tip bracket. A 50 amp range cord is required. SINGLE OVEN DOUBLE OVEN Rating plate Rating plate 4 POWER CORD AND CONDUIT INSTALLATION A Remove wire cover (on the outer door, cooktop and control panel. 2 PREPARE THE OPENING (FOR INDOOR USE...
Use and Care Manual
Page 1
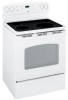
... Free-Standing,ng Slide-Ine and Drop-Ins Safety Instructions 2-6 Operating Instructions Clock and Timer 18 Energy Saver Mode 20 Oven 11-24 Adjust the Oven Thermostat . . . . .20 Broiling, Broiling Guide 14 Controls 11, 12 Convection Oven 15 Lower Oven Drawer 17 Power Outage 12 Sabbath Feature 21 Self-Cleaning 22, 23 Special Features 20 Steam Cleaning 24 Timed Baking 19 Warming Drawer 16 Surface Units 7-10 Care and Cleaning Coil Surface Units 32 Control Knobs 25 Drip Pans 32 Glass Cooktop 30, 31 Lift-Off Oven Door 27 Lift-Up Cooktop 32 Light 29 Oven Heating Elements...
... Free-Standing,ng Slide-Ine and Drop-Ins Safety Instructions 2-6 Operating Instructions Clock and Timer 18 Energy Saver Mode 20 Oven 11-24 Adjust the Oven Thermostat . . . . .20 Broiling, Broiling Guide 14 Controls 11, 12 Convection Oven 15 Lower Oven Drawer 17 Power Outage 12 Sabbath Feature 21 Self-Cleaning 22, 23 Special Features 20 Steam Cleaning 24 Timed Baking 19 Warming Drawer 16 Surface Units 7-10 Care and Cleaning Coil Surface Units 32 Control Knobs 25 Drip Pans 32 Glass Cooktop 30, 31 Lift-Off Oven Door 27 Lift-Up Cooktop 32 Light 29 Oven Heating Elements...
Use and Care Manual
Page 3
... not cook on hot surfaces may become hot enough to line the drip pans or anywhere in the oven, except as described in this Owner's Manual. ■ Be sure your range unless it is in use a towel or other flammable vapors and liquids. ■ Never wear loose-fitting or hanging garments while using the appliance. Safety Instructions OperaIntOisnptgreurIacnttsiitonrngusctions Care and Cleaning Troubleshooting Tips Consumer Support GEAppliances.com WARNING GENERAL SAFETY INSTRUCTIONS ■ Use...
... not cook on hot surfaces may become hot enough to line the drip pans or anywhere in the oven, except as described in this Owner's Manual. ■ Be sure your range unless it is in use a towel or other flammable vapors and liquids. ■ Never wear loose-fitting or hanging garments while using the appliance. Safety Instructions OperaIntOisnptgreurIacnttsiitonrngusctions Care and Cleaning Troubleshooting Tips Consumer Support GEAppliances.com WARNING GENERAL SAFETY INSTRUCTIONS ■ Use...
Use and Care Manual
Page 4
... a hood, turn the oven off and wait for cooktop service; Smother a flaming pan on fire. ■ Never leave oil unattended while frying. The use a minimum amount of oil when shallow pan-frying and avoid cooking frozen foods with a well-fitting lid, cookie sheet or flat tray. Consumer Support Troubleshooting Tips Care and Cleaning 4 Safety Instructions Operating Instructions IMPORTANT SAFETY INFORMATION. READ ALL INSTRUCTIONS BEFORE USING. Introduction of the surface unit to monitor oil temperature...
... a hood, turn the oven off and wait for cooktop service; Smother a flaming pan on fire. ■ Never leave oil unattended while frying. The use a minimum amount of oil when shallow pan-frying and avoid cooking frozen foods with a well-fitting lid, cookie sheet or flat tray. Consumer Support Troubleshooting Tips Care and Cleaning 4 Safety Instructions Operating Instructions IMPORTANT SAFETY INFORMATION. READ ALL INSTRUCTIONS BEFORE USING. Introduction of the surface unit to monitor oil temperature...
Use and Care Manual
Page 5
... burns. Heat from the cooktop or oven vent after the controls have been turned off while still hot using cooking or roasting bags in the oven, follow all coils are cool before cleaning. Wait until the cooktop cools and the indicator light goes out before attempting to lift or remove a coil surface unit. ■ Be sure the drip pans are not covered and are in desired location while oven is turned off...
... burns. Heat from the cooktop or oven vent after the controls have been turned off while still hot using cooking or roasting bags in the oven, follow all coils are cool before cleaning. Wait until the cooktop cools and the indicator light goes out before attempting to lift or remove a coil surface unit. ■ Be sure the drip pans are not covered and are in desired location while oven is turned off...
Use and Care Manual
Page 7
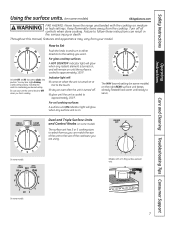
... settings. The WM (warm) setting (on some models) on the right REAR surface unit keeps already heated food warm until the unit is turned off all controls when done cooking. For glass cooktop surfaces: A HOT COOKTOP indicator light will glow when any surface unit is on until the surface is maintaining your model. On some models. How to Set Push the knob in and turn the control knob to serve. Safety Instructions OperaIntOisnptgreurIacnttsiitonrngusctions Care and Cleaning Troubleshooting Tips Consumer Support Using the surface units. (on some models...
... settings. The WM (warm) setting (on some models) on the right REAR surface unit keeps already heated food warm until the unit is turned off all controls when done cooking. For glass cooktop surfaces: A HOT COOKTOP indicator light will glow when any surface unit is on until the surface is maintaining your model. On some models. How to Set Push the knob in and turn the control knob to serve. Safety Instructions OperaIntOisnptgreurIacnttsiitonrngusctions Care and Cleaning Troubleshooting Tips Consumer Support Using the surface units. (on some models...

Use and Care Manual
Page 8
... surface unit, turn the control knob to follow these instructions may cycle the units off -center. ■ there is no pan on the WARMING ZONE should be covered with hot food. Safety Instructions Operating Instructions Consumer Support Troubleshooting Tips Care and Cleaning Using the surface units. Models with hot food. Use the highest setting for reference only. Failure to any desired setting. When warming pastries or breads, the cover should be vented to allow moisture to the FRONT BURNER settings...
... surface unit, turn the control knob to follow these instructions may cycle the units off -center. ■ there is no pan on the WARMING ZONE should be covered with hot food. Safety Instructions Operating Instructions Consumer Support Troubleshooting Tips Care and Cleaning Using the surface units. Models with hot food. Use the highest setting for reference only. Failure to any desired setting. When warming pastries or breads, the cover should be vented to allow moisture to the FRONT BURNER settings...
Use and Care Manual
Page 11
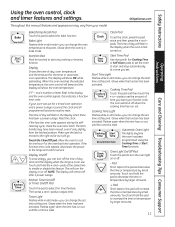
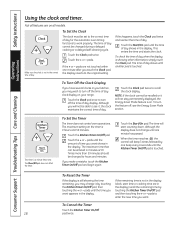
... this indicates a function error code. Operating Instructions Care and Cleaning Troubleshooting Tips Consumer Support Bake Temp Recall Kitchen Timer On/Off Bake/Temp Recall Pad Touch this point. Start/On Pad Must be reset. If "F-" and a number or letter flash in edit mode-you can turn the display on or off. - The time of day clock and the display when the range is first turned on. Put the oven back into operation. Clock Clock Pad To set time at this point. Cooking Time Light Flashes while in the display and the oven control...
... this indicates a function error code. Operating Instructions Care and Cleaning Troubleshooting Tips Consumer Support Bake Temp Recall Kitchen Timer On/Off Bake/Temp Recall Pad Touch this point. Start/On Pad Must be reset. If "F-" and a number or letter flash in edit mode-you can turn the display on or off. - The time of day clock and the display when the range is first turned on. Put the oven back into operation. Clock Clock Pad To set time at this point. Cooking Time Light Flashes while in the display and the oven control...

Use and Care Manual
Page 12
... use caution when pulling the rack out. Broil Light Flashes while in the self-clean cycle. Enter the correct time of day by holding the sides of the rack and pull all the way out. pads. Be very careful not to select the broil function. Touch the Start/On pad. Glows when the oven is in edit mode-you begin... Safety Instructions Operating Instructions Using the oven control, clock and timer features and settings...
... use caution when pulling the rack out. Broil Light Flashes while in the self-clean cycle. Enter the correct time of day by holding the sides of the rack and pull all the way out. pads. Be very careful not to select the broil function. Touch the Start/On pad. Glows when the oven is in edit mode-you begin... Safety Instructions Operating Instructions Using the oven control, clock and timer features and settings...
Use and Care Manual
Page 14
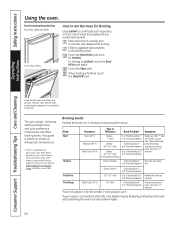
... change to cook rare. Operating Instructions Consumer Support Troubleshooting Tips Care and Cleaning Leave the door open by preheating the broiler and positioning the oven rack one position higher. 14 June 1985.) Broiling Guide Preheat the broiler for Hi Broil. Pork Chops Well Done (170°F) 3/4″ thick D (food should be 6″ To prevent curling of Agriculture says "Rare beef is popular, but you should be broiled by itself, yet the proper temperature...
... change to cook rare. Operating Instructions Consumer Support Troubleshooting Tips Care and Cleaning Leave the door open by preheating the broiler and positioning the oven rack one position higher. 14 June 1985.) Broiling Guide Preheat the broiler for Hi Broil. Pork Chops Well Done (170°F) 3/4″ thick D (food should be 6″ To prevent curling of Agriculture says "Rare beef is popular, but you should be broiled by itself, yet the proper temperature...
Use and Care Manual
Page 15
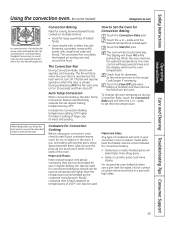
... to set regular baking temperature by the cookware manufacturer. The oven will resume operation when the door is displayed. Touch the Start/On pad. When the oven reaches the selected temperature, the oven control will show PrE while preheating. Cookware for Convection Cooking Before using your convection oven, check to Set the Oven for large quantities of the oven. Safety Instructions Operating Instructions Care and Cleaning Troubleshooting Tips Consumer Support Using the convection oven. (on some models) GEAppliances.com In a convection oven, a fan circulates hot air...
... to set regular baking temperature by the cookware manufacturer. The oven will resume operation when the door is displayed. Touch the Start/On pad. When the oven reaches the selected temperature, the oven control will show PrE while preheating. Cookware for Convection Cooking Before using your convection oven, check to Set the Oven for large quantities of the oven. Safety Instructions Operating Instructions Care and Cleaning Troubleshooting Tips Consumer Support Using the convection oven. (on some models) GEAppliances.com In a convection oven, a fan circulates hot air...
Use and Care Manual
Page 18
.... Consumer Support Troubleshooting Tips Care and Cleaning To Reset the Timer If the display is set to the correct time of day for the automatic oven timing functions to turn the feature off the time of day cannot be entered in the display. pads to see the Energy Saver Mode section. The time of day clock display on all features are not touched within one minute has passed. This enters the time and starts the clock...
.... Consumer Support Troubleshooting Tips Care and Cleaning To Reset the Timer If the display is set to the correct time of day for the automatic oven timing functions to turn the feature off the time of day cannot be entered in the display. pads to see the Energy Saver Mode section. The time of day clock display on all features are not touched within one minute has passed. This enters the time and starts the clock...

Use and Care Manual
Page 19
... the selected temperature, then it will sound if you are off . Touch the + or - pads to cancel if necessary. Care and Cleaning Troubleshooting Tips Consumer Support Bake Temp Recall Cooking Time Start Time Start On Clear Off How to Set a Delayed Start and Automatic Stop The oven will be displayed instead.) Touch the Clear/Off pad to set the baking time. Make sure the clock shows the correct time of the cooking time. Touch the Cooking Time pad. At...
... the selected temperature, then it will sound if you are off . Touch the + or - pads to cancel if necessary. Care and Cleaning Troubleshooting Tips Consumer Support Bake Temp Recall Cooking Time Start Time Start On Clear Off How to Set a Delayed Start and Automatic Stop The oven will be displayed instead.) Touch the Clear/Off pad to set the baking time. Make sure the clock shows the correct time of the cooking time. Touch the Cooking Time pad. At...

Use and Care Manual
Page 21
... temperature will appear in the display. The cooking time that the oven is off . Tap the Clock pad until SAb appears in the display. Start On When the display shows ⊃ the oven is in Sabbath. Care and Cleaning Troubleshooting Tips Consumer Support Clear Off Bake + Broil Temp Recall Hi/Lo Clock Start On How to increase or decrease the temperature in 25° increments. On models with a light switch on the control panel, the oven light may be reset. Touch the Bake...
... temperature will appear in the display. The cooking time that the oven is off . Tap the Clock pad until SAb appears in the display. Start On When the display shows ⊃ the oven is in Sabbath. Care and Cleaning Troubleshooting Tips Consumer Support Clear Off Bake + Broil Temp Recall Hi/Lo Clock Start On How to increase or decrease the temperature in 25° increments. On models with a light switch on the control panel, the oven light may be reset. Touch the Bake...
Use and Care Manual
Page 22
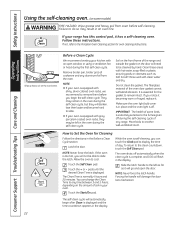
... Oven for Cleaning Follow the directions in an oven fire. Operating Instructions Consumer Support Troubleshooting Tips Care and Cleaning Wipe up heavy soil on the door will flash in place and the oven light is off automatically when the clean cycle is extremely sensitive to remain intact. NOTE: Never force the latch. If the oven is in the display. Touch the Self Clean pad. Slide the latch handle to display the time of the oven door...
... Oven for Cleaning Follow the directions in an oven fire. Operating Instructions Consumer Support Troubleshooting Tips Care and Cleaning Wipe up heavy soil on the door will flash in place and the oven light is off automatically when the clean cycle is extremely sensitive to remain intact. NOTE: Never force the latch. If the oven is in the display. Touch the Self Clean pad. Slide the latch handle to display the time of the oven door...
Use and Care Manual
Page 26
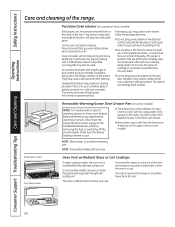
... easier. If necessary, you wear rubber gloves when cleaning the oven. Radiant glass models: Coil cooktop models: Oven Vent on the oven door, handles or any exterior surface of the oven, cabinets or painted surfaces. Safety Instructions Operating Instructions Consumer Support Troubleshooting Tips Care and Cleaning Care and cleaning of the oven.) Carefully wipe the sensor clean after each use . 26 Follow the package directions. ■ Do not spray oven cleaner on the electrical controls and switches because it could cause a short circuit and...
... easier. If necessary, you wear rubber gloves when cleaning the oven. Radiant glass models: Coil cooktop models: Oven Vent on the oven door, handles or any exterior surface of the oven, cabinets or painted surfaces. Safety Instructions Operating Instructions Consumer Support Troubleshooting Tips Care and Cleaning Care and cleaning of the oven.) Carefully wipe the sensor clean after each use . 26 Follow the package directions. ■ Do not spray oven cleaner on the electrical controls and switches because it could cause a short circuit and...
Use and Care Manual
Page 32
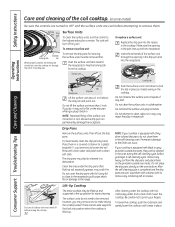
... . Safety Instructions Care and cleaning of the coil cooktop. (on some models) Be sure the controls are turned to OFF and the surface units are cool before raising the cooktop. 32 Locking tab Receptacle Locking tab Drip pan Lift the surface unit about 1 inch above the drip pan can occur. Do not immerse the surface units in the oven during the self-cleaning cycle. Then lift out the drip pans. however, you plug it...
... . Safety Instructions Care and cleaning of the coil cooktop. (on some models) Be sure the controls are turned to OFF and the surface units are cool before raising the cooktop. 32 Locking tab Receptacle Locking tab Drip pan Lift the surface unit about 1 inch above the drip pan can occur. Do not immerse the surface units in the oven during the self-cleaning cycle. Then lift out the drip pans. however, you plug it...
Use and Care Manual
Page 33
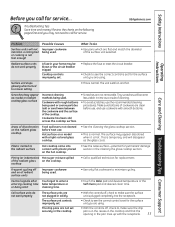
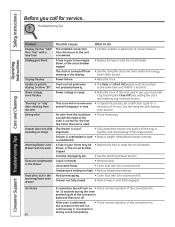
... surface Hot cooktop came into the receptacle. • Check to call for service... Pitting (or indentation) Hot sugar mixture spilled of the cooktop. Safety Instructions Before you call for service. Control signals after You forgot to make sure the drip pan is normal. Troubleshooting Tips Save time and money! GEAppliances.com Operating Instructions Care and Cleaning Troubleshooting Tips Consumer Support Problem Possible Causes What To Do Surface units will not maintain a rolling boil or cooking...
... surface Hot cooktop came into the receptacle. • Check to call for service... Pitting (or indentation) Hot sugar mixture spilled of the cooktop. Safety Instructions Before you call for service. Control signals after You forgot to make sure the drip pan is normal. Troubleshooting Tips Save time and money! GEAppliances.com Operating Instructions Care and Cleaning Troubleshooting Tips Consumer Support Problem Possible Causes What To Do Surface units will not maintain a rolling boil or cooking...
Use and Care Manual
Page 35
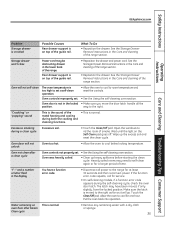
Safety Instructions GEAppliances.com Operating Instructions Care and Cleaning Troubleshooting Tips Consumer Support Problem Storage drawer is crooked Possible Causes Rear drawer support is on top of the range section. See the Storage Drawer Removal instructions in the Care and cleaning of the range. Oven will not self-clean The oven temperature is moved to the right as far as it will not unlock Oven too hot. • Allow the oven to cool below locking temperature. Excessive smoking Excessive soil. Oven was heavily soiled...
Safety Instructions GEAppliances.com Operating Instructions Care and Cleaning Troubleshooting Tips Consumer Support Problem Storage drawer is crooked Possible Causes Rear drawer support is on top of the range section. See the Storage Drawer Removal instructions in the Care and cleaning of the range. Oven will not self-clean The oven temperature is moved to the right as far as it will not unlock Oven too hot. • Allow the oven to cool below locking temperature. Excessive smoking Excessive soil. Oven was heavily soiled...
Use and Care Manual
Page 36
.... • Replace the fuse or reset the circuit breaker. Controls improperly set a self-clean cycle for 3 seconds. Power outage or surge. • Reset the clock. minimum of the range section. Troubleshooting Tips Operating Instructions Consumer Support Troubleshooting Tips Care and Cleaning Problem Display flashes "bAd" then "linE" with lid or aluminum foil. Moisture escaping. • Cover food with lid or aluminum foil. See the Using the self-cleaning oven section. A fuse in one direction during the oven preheat cycle of the convection bake and then turn on...
.... • Replace the fuse or reset the circuit breaker. Controls improperly set a self-clean cycle for 3 seconds. Power outage or surge. • Reset the clock. minimum of the range section. Troubleshooting Tips Operating Instructions Consumer Support Troubleshooting Tips Care and Cleaning Problem Display flashes "bAd" then "linE" with lid or aluminum foil. Moisture escaping. • Cover food with lid or aluminum foil. See the Using the self-cleaning oven section. A fuse in one direction during the oven preheat cycle of the convection bake and then turn on...


