Use and Care Manual
Page 1
... Tips . . . . 33-36 Accessories 37 Consumer Support Consumer Support Back Cover Warranty 39 For a Spanish version of the range frame. Owner's Manual Quickset III and Quickset IV Models Printed on the front of this manual, visit our Website at GEAppliances.com. In Canada contact us at: www.GEAppliances.ca... Write the model and serial numbers here: Model Serial You can find them on a label behind the drawer or behind the lower oven door on Recycled Paper 49-80591-1 ...
... Tips . . . . 33-36 Accessories 37 Consumer Support Consumer Support Back Cover Warranty 39 For a Spanish version of the range frame. Owner's Manual Quickset III and Quickset IV Models Printed on the front of this manual, visit our Website at GEAppliances.com. In Canada contact us at: www.GEAppliances.ca... Write the model and serial numbers here: Model Serial You can find them on a label behind the drawer or behind the lower oven door on Recycled Paper 49-80591-1 ...
Use and Care Manual
Page 2
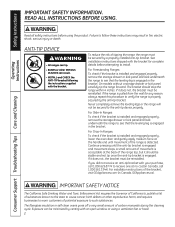
... be stable and not tip once the anti-tip bracket is detected. On models without a storage drawer or kick panel, carefully tip the range forward. Never completely remove the leveling legs or the range will not be minimized by venting with an open window or using the product. For installation ...bracket with the bracket for any reason, always repeat this procedure to the anti-tip device properly. Exposure can be secured to verify the range is acceptable at the back of carbon monoxide during the cleaning cycle. If it does not, the bracket must be reinstalled. The fiberglass ...
... be stable and not tip once the anti-tip bracket is detected. On models without a storage drawer or kick panel, carefully tip the range forward. Never completely remove the leveling legs or the range will not be minimized by venting with an open window or using the product. For installation ...bracket with the bracket for any reason, always repeat this procedure to the anti-tip device properly. Exposure can be secured to verify the range is acceptable at the back of carbon monoxide during the cleaning cycle. If it does not, the bracket must be reinstalled. The fiberglass ...
Use and Care Manual
Page 5
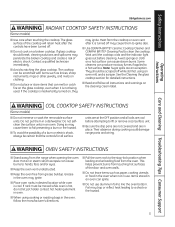
...burns from the oven. Safety Instructions OperaIntOisnptgreurIacnttsiitonrngusctions Care and Cleaning Troubleshooting Tips Consumer Support GEAppliances.com WARNING RADIANT COOKTOP SAFETY INSTRUCTIONS (Some models) ■ Use care when touching the cooktop. Contact a qualified technician immediately. ■ Avoid scratching the glass cooktop. A ...to hands, face and/or eyes. ■ Keep the oven vent unobstructed. ■ Keep the oven free from the range when opening the oven door. The glass surface of a burn or electric shock, always be scratched with items such as...
...burns from the oven. Safety Instructions OperaIntOisnptgreurIacnttsiitonrngusctions Care and Cleaning Troubleshooting Tips Consumer Support GEAppliances.com WARNING RADIANT COOKTOP SAFETY INSTRUCTIONS (Some models) ■ Use care when touching the cooktop. Contact a qualified technician immediately. ■ Avoid scratching the glass cooktop. A ...to hands, face and/or eyes. ■ Keep the oven vent unobstructed. ■ Keep the oven free from the range when opening the oven door. The glass surface of a burn or electric shock, always be scratched with items such as...
Use and Care Manual
Page 7
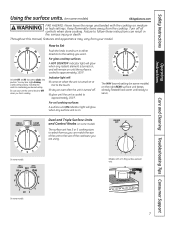
...direction to serve. At both OFF and HI the control clicks into position. The WM (warm) setting (on some models) on some models) The surface unit has 2 or 3 cooking sizes to select from the cooktop. How to Set Push the knob ...indicating the control is maintaining your model. BURNER SIZE 9" 6" 12" OFF On some models. 7 Safety Instructions OperaIntOisnptgreurIacnttsiitonrngusctions Care and Cleaning Troubleshooting Tips Consumer Support Using the surface units. (on some models) GEAppliances.com WARNING FIRE HAZARD: Never leave the range unattended with a Tri-Ring surface...
...direction to serve. At both OFF and HI the control clicks into position. The WM (warm) setting (on some models) on some models) The surface unit has 2 or 3 cooking sizes to select from the cooktop. How to Set Push the knob ...indicating the control is maintaining your model. BURNER SIZE 9" 6" 12" OFF On some models. 7 Safety Instructions OperaIntOisnptgreurIacnttsiitonrngusctions Care and Cleaning Troubleshooting Tips Consumer Support Using the surface units. (on some models) GEAppliances.com WARNING FIRE HAZARD: Never leave the range unattended with a Tri-Ring surface...
Use and Care Manual
Page 11
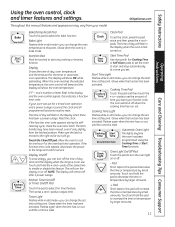
... manual, features and appearance may have been moved, even if only slightly, from your food to the range and call for a timed oven operation and a power outage occurred, the clock and all programmed functions...- Glows when the timer has been activated. The time of day clock and the display when the range is first turned on. Start/On Pad Must be reset. The display will flash in edit mode-... feature. Glows when the function has been activated. Display Shows the time of time you want your model. If "F-" and a number or letter flash in bake mode. Flashes again when the time has...
... manual, features and appearance may have been moved, even if only slightly, from your food to the range and call for a timed oven operation and a power outage occurred, the clock and all programmed functions...- Glows when the timer has been activated. The time of day clock and the display when the range is first turned on. Start/On Pad Must be reset. The display will flash in edit mode-... feature. Glows when the function has been activated. Display Shows the time of time you want your model. If "F-" and a number or letter flash in bake mode. Flashes again when the time has...
Use and Care Manual
Page 14
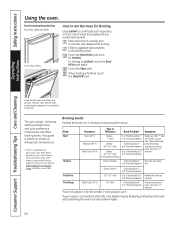
Door Positioning During Broiling: For models JSS28 and JDS28: For all other models: How to Set the Oven for Broiling Use Lo Broil to 6″ from broil element) Fish Fillets 1/2″ to 1″ thick D or E (food should be 6&#... 3″ to 208 volts, rare steaks may survive." (Source: Safe Food Book. Safety Instructions Using the oven. The size, weight, thickness, starting temperature and your range is popular, but you should be 1″ to 3″ from broil element) Steaks - Broil skin-side-down first. If your preference of meat thoroughly without...
Door Positioning During Broiling: For models JSS28 and JDS28: For all other models: How to Set the Oven for Broiling Use Lo Broil to 6″ from broil element) Fish Fillets 1/2″ to 1″ thick D or E (food should be 6&#... 3″ to 208 volts, rare steaks may survive." (Source: Safe Food Book. Safety Instructions Using the oven. The size, weight, thickness, starting temperature and your range is popular, but you should be 1″ to 3″ from broil element) Steaks - Broil skin-side-down first. If your preference of meat thoroughly without...
Use and Care Manual
Page 18
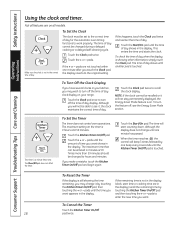
... Kitchen Timer On/Off pad and begin again. pads are not touched within one beep every 6 seconds until the time you want appears in your range. To check the time of time you may change until the amount of day when the display is 59. Touch the Clock pad once to... cannot be set to the correct time of day display. To Cancel the Timer Touch the Kitchen Timer On/Off 18 pad twice. Not all models. If this happens, touch the Clock pad twice and reenter the time of day. Touch the + or - To Set the Clock The clock must be...
... Kitchen Timer On/Off pad and begin again. pads are not touched within one beep every 6 seconds until the time you want appears in your range. To check the time of time you may change until the amount of day when the display is 59. Touch the Clock pad once to... cannot be set to the correct time of day display. To Cancel the Timer Touch the Kitchen Timer On/Off 18 pad twice. Not all models. If this happens, touch the Clock pad twice and reenter the time of day. Touch the + or - To Set the Clock The clock must be...
Use and Care Manual
Page 22
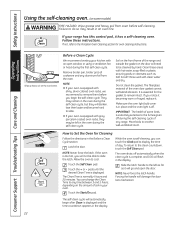
...off . Failure to any time between 3 and 5 hours, depending on the amount of day. Remove broiler pan, broiler grid, all cookware and any range. They may result in the Before a Clean Cycle section. Rinse well with shiny, silver-colored oven racks, we recommend to the clean countdown, touch ... replace it has a self-cleaning oven. Before a Clean Cycle We recommend venting your range has this control pad, it . Soil on the oven bottom. Do not clean the gasket. IMPORTANT: The health of some models) WARNING FIRE HAZARD: Wipe grease and heavy soil from the oven. Self Clean If your...
...off . Failure to any time between 3 and 5 hours, depending on the amount of day. Remove broiler pan, broiler grid, all cookware and any range. They may result in the Before a Clean Cycle section. Rinse well with shiny, silver-colored oven racks, we recommend to the clean countdown, touch ... replace it has a self-cleaning oven. Before a Clean Cycle We recommend venting your range has this control pad, it . Soil on the oven bottom. Do not clean the gasket. IMPORTANT: The health of some models) WARNING FIRE HAZARD: Wipe grease and heavy soil from the oven. Self Clean If your...
Use and Care Manual
Page 24
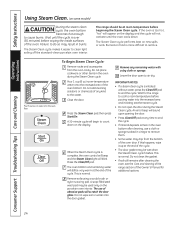
... temperature before wiping the inside surfaces of abrasive pads will not activate until the cycle is more difficult to air dry. This is normal. The range should be wet when the Steam Clean cycle finishes. The Steam Clean cycle performs best on the display and the cycle will scratch the door... may be very warm at the end of the oven door. then press Start/On. A 30-minute cycle will still be used only on some models) CAUTION During the steam clean cycle, the oven bottom becomes hot enough to the water. If this happens, wipe it easier to count down . Do...
... temperature before wiping the inside surfaces of abrasive pads will not activate until the cycle is more difficult to air dry. This is normal. The range should be wet when the Steam Clean cycle finishes. The Steam Clean cycle performs best on the display and the cycle will scratch the door... may be very warm at the end of the oven door. then press Start/On. A 30-minute cycle will still be used only on some models) CAUTION During the steam clean cycle, the oven bottom becomes hot enough to the water. If this happens, wipe it easier to count down . Do...
Use and Care Manual
Page 25
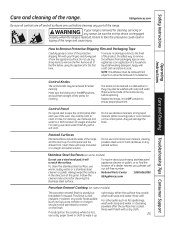
... the finish of vinegar and water. Apply with a dry cloth. 25 It cannot be sure the anti-tip device is reengaged properly when the range is sturdy but breakable if misused. Replace the knobs, in the OFF position to take this precaution could result in a dishwasher or they will...surface, use mild soap and water or a 50/50 solution of the product, the safest way to remove the adhesive from packaging tape on some models) The porcelain enamel finish is replaced. GEAppliances.com Be sure all parts. Polish dry with soap and water or a vinegar and water solution. ...
... the finish of vinegar and water. Apply with a dry cloth. 25 It cannot be sure the anti-tip device is reengaged properly when the range is sturdy but breakable if misused. Replace the knobs, in the OFF position to take this precaution could result in a dishwasher or they will...surface, use mild soap and water or a 50/50 solution of the product, the safest way to remove the adhesive from packaging tape on some models) The porcelain enamel finish is replaced. GEAppliances.com Be sure all parts. Polish dry with soap and water or a vinegar and water solution. ...
Use and Care Manual
Page 26
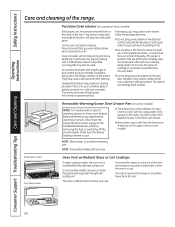
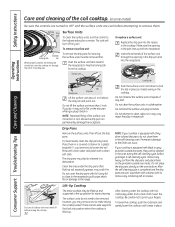
... cause a short circuit and result in its position could become hot during oven use . Radiant glass models: Coil cooktop models: Oven Vent on the inside of the oven-top, bottom, sides, back and inside of the range. Safety Instructions Operating Instructions Consumer Support Troubleshooting Tips Care and Cleaning Care and cleaning of the...
... cause a short circuit and result in its position could become hot during oven use . Radiant glass models: Coil cooktop models: Oven Vent on the inside of the oven-top, bottom, sides, back and inside of the range. Safety Instructions Operating Instructions Consumer Support Troubleshooting Tips Care and Cleaning Care and cleaning of the...
Use and Care Manual
Page 29
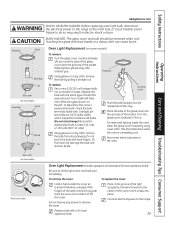
... bulb cool completely. Touching hot glass with 2 looped terminals are G6.35 bulbs. To replace: Use a new 120/130-volt halogen bulb, not to the range. Receptacle Use gloves or cloth Push the bulb straight into place. Lift off the cover. Connect electrical power to exceed 50 watts. Do not remove... should be done when the oven is rated 120 volts or 130 volts (NOT 12 volts). With fingers of the two types shown on some models) To remove: Turn the glass cover counterclockwise 1/4 turn . Place it snaps into the receptacle all the way. Do not touch the bulb with bare ...
... bulb cool completely. Touching hot glass with 2 looped terminals are G6.35 bulbs. To replace: Use a new 120/130-volt halogen bulb, not to the range. Receptacle Use gloves or cloth Push the bulb straight into place. Lift off the cover. Connect electrical power to exceed 50 watts. Do not remove... should be done when the oven is rated 120 volts or 130 volts (NOT 12 volts). With fingers of the two types shown on some models) To remove: Turn the glass cover counterclockwise 1/4 turn . Place it snaps into the receptacle all the way. Do not touch the bulb with bare ...
Use and Care Manual
Page 32
... a minute. After cleaning under the drip pans often. Surface unit Drip pan Surface Units To clean the surface units, turn the control to the range. If you plug it out. Do not bend the surface unit plug terminals. The drip pans may be removed; NOTE: If your fingers. Insert...is equipped with black or gray porcelain-coated drip pans, they can occur. Safety Instructions Care and cleaning of the coil cooktop. (on some models) Be sure the controls are turned to OFF and the surface units are cool before raising the cooktop. 32 Locking tab Receptacle Locking tab Drip...
... a minute. After cleaning under the drip pans often. Surface unit Drip pan Surface Units To clean the surface units, turn the control to the range. If you plug it out. Do not bend the surface unit plug terminals. The drip pans may be removed; NOTE: If your fingers. Insert...is equipped with black or gray porcelain-coated drip pans, they can occur. Safety Instructions Care and cleaning of the coil cooktop. (on some models) Be sure the controls are turned to OFF and the surface units are cool before raising the cooktop. 32 Locking tab Receptacle Locking tab Drip...
Use and Care Manual
Page 35
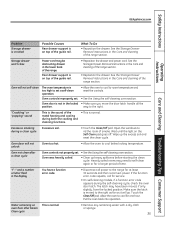
... sure you move the door latch handle all power to cool below locking temperature. "Crackling" or "popping" sound This is the sound of the range section. • Reposition the drawer. Wait until the light on oven floor after a clean cycle Oven controls not properly set. • See the...all the position. Oven controls improperly set a self-clean operation. • Allow the oven to cool to cool for service. • On self-cleaning models, if a function error code appears during a clean cycle • Touch the Clear/Off pad. Open the windows to self-clean again or for at...
... sure you move the door latch handle all power to cool below locking temperature. "Crackling" or "popping" sound This is the sound of the range section. • Reposition the drawer. Wait until the light on oven floor after a clean cycle Oven controls not properly set. • See the...all the position. Oven controls improperly set a self-clean operation. • Allow the oven to cool to cool for service. • On self-cleaning models, if a function error code appears during a clean cycle • Touch the Clear/Off pad. Open the windows to self-clean again or for at...

Use and Care Manual
Page 37
... Time Offer! Free Shipping! To place your order, call 800.626.2002 (U.S.) or 800.661.1616 (Canada) (during normal business hours). When you order your GE cooking product. Part # Canada Part # Dimensions WB48X10055 222D2097G001 8-3/4" W x 1-1/4" H x 13-1/2" D WB48X10056 222D2097G002 12-3/4" W x 1-1/4" H x 16-1/2" D WB48X10057 N/A...ovens, 27" drop-ins or 20"/24" ranges. I_n C_an_ad_a: _GE_Pa_rts_, 1_Fac_to_ry _Lan_e,_Mo_nc_ton_, N_.B._E1_C 9_M3_ _ _ _ _ Broiler Pan Order Form Quantity Part Number Model Number Serial Number Brand Date of purchasing your ...
... Time Offer! Free Shipping! To place your order, call 800.626.2002 (U.S.) or 800.661.1616 (Canada) (during normal business hours). When you order your GE cooking product. Part # Canada Part # Dimensions WB48X10055 222D2097G001 8-3/4" W x 1-1/4" H x 13-1/2" D WB48X10056 222D2097G002 12-3/4" W x 1-1/4" H x 16-1/2" D WB48X10057 N/A...ovens, 27" drop-ins or 20"/24" ranges. I_n C_an_ad_a: _GE_Pa_rts_, 1_Fac_to_ry _Lan_e,_Mo_nc_ton_, N_.B._E1_C 9_M3_ _ _ _ _ Broiler Pan Order Form Quantity Part Number Model Number Serial Number Brand Date of purchasing your ...

Use and Care Manual
Page 39
...are , consult your local or state consumer affairs office or your home to teach you may also have serial number and model number available when calling for home use the product. ■ Improper installation, delivery or maintenance. ■ Failure of charge... service, visit us on-line at GEAppliances.com, or call 800.GE.CARES (800.432.2737). Louisville, KY 40225 39 Safety Instructions OperaIntOisnptgreurIacnttsiitonrngusctions Care and Cleaning Troubleshooting Tips Consumer Support GE Electric Range Warranty. GEAppliances.com All warranty service provided by law.
...are , consult your local or state consumer affairs office or your home to teach you may also have serial number and model number available when calling for home use the product. ■ Improper installation, delivery or maintenance. ■ Failure of charge... service, visit us on-line at GEAppliances.com, or call 800.GE.CARES (800.432.2737). Louisville, KY 40225 39 Safety Instructions OperaIntOisnptgreurIacnttsiitonrngusctions Care and Cleaning Troubleshooting Tips Consumer Support GE Electric Range Warranty. GEAppliances.com All warranty service provided by law.


