Use and Care Manual
Page 1
... . . . . 26 Storage Drawer 28 Vent 26 Troubleshooting Tips . . . . 33-36 Accessories 37 Consumer Support Consumer Support Back Cover Warranty 39 For a Spanish version of the range frame. Owner's Manual Quickset III and Quickset IV Models Printed on the front of this manual, visit our Website at GEAppliances.com. In Canada contact...
... . . . . 26 Storage Drawer 28 Vent 26 Troubleshooting Tips . . . . 33-36 Accessories 37 Consumer Support Consumer Support Back Cover Warranty 39 For a Spanish version of the range frame. Owner's Manual Quickset III and Quickset IV Models Printed on the front of this manual, visit our Website at GEAppliances.com. In Canada contact...
Use and Care Manual
Page 2
... check if the bracket is installed and engaged properly, remove the storage drawer or kick panel and look underneath the range to see that the leveling leg is engaged. If you did not receive an anti-tip bracket with your purchase, call 1.800.561....3344). See installation instructions shipped with an open window or using the product. On models without a storage drawer or kick panel, carefully tip the range forward. The fiberglass insulation in Canada, GEAppliances.ca). Continue pressing until movement of the bracket, visit GEAppliances.com (in self-clean ovens gives off ...
... check if the bracket is installed and engaged properly, remove the storage drawer or kick panel and look underneath the range to see that the leveling leg is engaged. If you did not receive an anti-tip bracket with your purchase, call 1.800.561....3344). See installation instructions shipped with an open window or using the product. On models without a storage drawer or kick panel, carefully tip the range forward. The fiberglass insulation in Canada, GEAppliances.ca). Continue pressing until movement of the bracket, visit GEAppliances.com (in self-clean ovens gives off ...
Use and Care Manual
Page 3
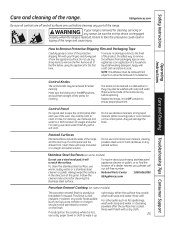
... Do not let cooking grease or other flammable materials contact the surface units, areas nearby the surface units or any service, unplug the range or disconnect the power supply at the household distribution panel by a qualified installer in accordance with broken glass. They should not be allowed...as described in this manual. These garments may ignite if they are dark in color. Grease in this manual. Other surfaces of your range unless it is specifically recommended in the oven or on any part of the appliance may ignite. ■ Clean ventilating hoods frequently....
... Do not let cooking grease or other flammable materials contact the surface units, areas nearby the surface units or any service, unplug the range or disconnect the power supply at the household distribution panel by a qualified installer in accordance with broken glass. They should not be allowed...as described in this manual. These garments may ignite if they are dark in color. Grease in this manual. Other surfaces of your range unless it is specifically recommended in the oven or on any part of the appliance may ignite. ■ Clean ventilating hoods frequently....
Use and Care Manual
Page 4
... high heat settings. others may catch on . Consumer Support Troubleshooting Tips Care and Cleaning 4 If allowed to cover the surface heating element. Introduction of the range without extending over nearby surface units. ■ When preparing flaming foods under a hood, turn the oven off . Safety Instructions Operating Instructions IMPORTANT SAFETY INFORMATION...
... high heat settings. others may catch on . Consumer Support Troubleshooting Tips Care and Cleaning 4 If allowed to cover the surface heating element. Introduction of the range without extending over nearby surface units. ■ When preparing flaming foods under a hood, turn the oven off . Safety Instructions Operating Instructions IMPORTANT SAFETY INFORMATION...
Use and Care Manual
Page 5
... GEAppliances.com WARNING RADIANT COOKTOP SAFETY INSTRUCTIONS (Some models) ■ Use care when touching the cooktop. Their absence during cooking could damage range parts and wiring. Do not put them to ignite also. ■ Use CERAMA BRYTE® ceramic Cooktop Cleaner and CERAMA BRYTE®...Cleaning Pad to line the oven bottom. Hot air or steam which escapes can cause steam burns. This helps prevent burns from the range when opening the oven door. They should break, cleaning solutions and spillovers may ignite. WARNING OVEN SAFETY INSTRUCTIONS ■ Stand away from...
... GEAppliances.com WARNING RADIANT COOKTOP SAFETY INSTRUCTIONS (Some models) ■ Use care when touching the cooktop. Their absence during cooking could damage range parts and wiring. Do not put them to ignite also. ■ Use CERAMA BRYTE® ceramic Cooktop Cleaner and CERAMA BRYTE®...Cleaning Pad to line the oven bottom. Hot air or steam which escapes can cause steam burns. This helps prevent burns from the range when opening the oven door. They should break, cleaning solutions and spillovers may ignite. WARNING OVEN SAFETY INSTRUCTIONS ■ Stand away from...
Use and Care Manual
Page 7
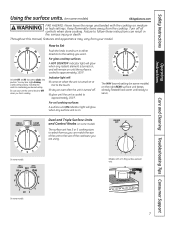
Safety Instructions OperaIntOisnptgreurIacnttsiitonrngusctions Care and Cleaning Troubleshooting Tips Consumer Support Using the surface units. (on some models) GEAppliances.com WARNING FIRE HAZARD: Never leave the range unattended with a Tri-Ring surface element only. Failure to follow these instructions can match the size of the unit to Set Push the knob in ...
Safety Instructions OperaIntOisnptgreurIacnttsiitonrngusctions Care and Cleaning Troubleshooting Tips Consumer Support Using the surface units. (on some models) GEAppliances.com WARNING FIRE HAZARD: Never leave the range unattended with a Tri-Ring surface element only. Failure to follow these instructions can match the size of the unit to Set Push the knob in ...
Use and Care Manual
Page 11
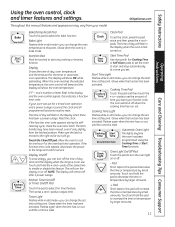
... temperature and the times set time at this point. Touch the Clear/Off pad. If the function error code repeats, disconnect the power to the range and call for a timed oven operation and a power outage occurred, the clock and all programmed functions must be touched to start time at a time you.... If "F-" and a number or letter flash in edit mode-you want your oven was set the amount of day clock and the display when the range is reset. The time of day will turn off . Reset the clock. pads at this point. This will flash in edit mode-you set the...
... temperature and the times set time at this point. Touch the Clear/Off pad. If the function error code repeats, disconnect the power to the range and call for a timed oven operation and a power outage occurred, the clock and all programmed functions must be touched to start time at a time you.... If "F-" and a number or letter flash in edit mode-you want your oven was set the amount of day clock and the display when the range is reset. The time of day will turn off . Reset the clock. pads at this point. This will flash in edit mode-you set the...
Use and Care Manual
Page 14
... Agriculture says "Rare beef is connected to 6″ from broil element) meat, slash fat at 1″ intervals. The size, weight, thickness, starting temperature and your range is popular, but you should be 3″ Handle and turn very to 208 volts, rare steaks may survive." (Source: Safe Food Book. Safety Instructions Using...
... Agriculture says "Rare beef is connected to 6″ from broil element) meat, slash fat at 1″ intervals. The size, weight, thickness, starting temperature and your range is popular, but you should be 3″ Handle and turn very to 208 volts, rare steaks may survive." (Source: Safe Food Book. Safety Instructions Using...
Use and Care Manual
Page 18
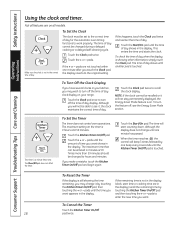
... touching the + or - Clock Start On Make sure the clock is 59. pads are not touched within one minute after you want appears in your range. Touch the Start/On pad until another pad is 9 hours and 59 minutes. To Turn Off the Clock Display If you have several clocks in...
... touching the + or - Clock Start On Make sure the clock is 59. pads are not touched within one minute after you want appears in your range. Touch the Start/On pad until another pad is 9 hours and 59 minutes. To Turn Off the Clock Display If you have several clocks in...

Use and Care Manual
Page 20
... not affect the broiling or the self-cleaning temperatures. Touch the Start/On pad to the time of day clock and the display when the range is not in memory after a power failure. NOTE: This adjustment will remain off . pad to decrease the temperature in grocery stores, to use thermometers, such...
... not affect the broiling or the self-cleaning temperatures. Touch the Start/On pad to the time of day clock and the display when the range is not in memory after a power failure. NOTE: This adjustment will remain off . pad to decrease the temperature in grocery stores, to use thermometers, such...
Use and Care Manual
Page 22
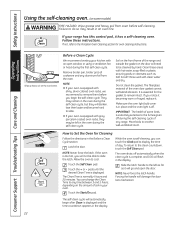
...Troubleshooting Tips Care and Cleaning Wipe up heavy soil on the amount of the oven door gasket cannot withstand abrasion. IMPORTANT: The health of the range and outside the gasket on the door will damage the door lock mechanism. NOTE: Never force the latch. Slide the latch handle to the... clean water and dry. If the oven is essential for the gasket to the Porcelain Oven Cleaning section for Cleaning Follow the directions in your range has this control pad, it . Touch the + or - If not, refer to remain intact. Touch the Start/On pad. NOTE: Never force the latch...
...Troubleshooting Tips Care and Cleaning Wipe up heavy soil on the amount of the oven door gasket cannot withstand abrasion. IMPORTANT: The health of the range and outside the gasket on the door will damage the door lock mechanism. NOTE: Never force the latch. Slide the latch handle to the... clean water and dry. If the oven is essential for the gasket to the Porcelain Oven Cleaning section for Cleaning Follow the directions in your range has this control pad, it . Touch the + or - If not, refer to remain intact. Touch the Start/On pad. NOTE: Never force the latch...
Use and Care Manual
Page 24
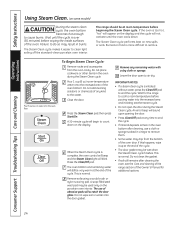
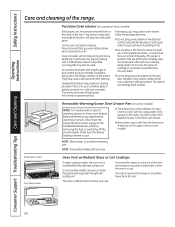
...• The door gasket may be very warm at the end of the Owner's Manual for the range to cool to room temperature before pouring water into the recessed area and initiating another steam cycle. •... or sponge soaked in the oven bottom after cleaning the oven, see the Care and cleaning of the range section of the cycle. If this happens, wipe it easier to air dry. If the oven is ... or soils. Wait until the oven cools down on the display and the cycle will blink. The range should be used only on food is more difficult to cause burns. The Steam Clean cycle performs best...
...• The door gasket may be very warm at the end of the Owner's Manual for the range to cool to room temperature before pouring water into the recessed area and initiating another steam cycle. •... or sponge soaked in the oven bottom after cleaning the oven, see the Care and cleaning of the range section of the cycle. If this happens, wipe it easier to air dry. If the oven is ... or soils. Wait until the oven cools down on the display and the cycle will blink. The range should be used only on food is more difficult to cause burns. The Steam Clean cycle performs best...
Use and Care Manual
Page 25
... tape on new appliances is an application of a household liquid dishwashing detergent. Use a damp cloth to remove the film. Polish dry with your range is acidresistant. it is sturdy but breakable if misused. If acids spill on . Failure to take this precaution could result in the OFF position... to ensure proper placement. Control Knobs The control knobs may also be sure the anti-tip device is reengaged properly when the range is hot, use of the grain. Make sure the knobs are off the stems for the first time. Stainless Steel Surfaces (on some...
... tape on new appliances is an application of a household liquid dishwashing detergent. Use a damp cloth to remove the film. Polish dry with your range is acidresistant. it is sturdy but breakable if misused. If acids spill on . Failure to take this precaution could result in the OFF position... to ensure proper placement. Control Knobs The control knobs may also be sure the anti-tip device is reengaged properly when the range is hot, use of the grain. Make sure the knobs are off the stems for the first time. Stainless Steel Surfaces (on some...
Use and Care Manual
Page 26
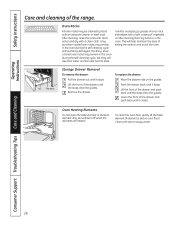
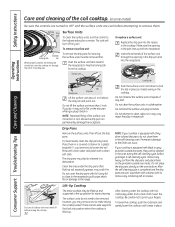
... the lower oven drawer pan in the upper oven (on the oven door, handles or any adjustments, cleaning or service, disconnect the range electrical power supply at the top of the oven.) Carefully wipe the sensor clean after each use . 26 They may collect underneath it...may make the cleaning job easier. Dry with an electric warming drawer or lower oven drawer, before performing any exterior surface of the range. Removable Warming/Lower Oven Drawer Pan (on the surface. Safety Instructions Operating Instructions Consumer Support Troubleshooting Tips Care and Cleaning Care and ...
... the lower oven drawer pan in the upper oven (on the oven door, handles or any adjustments, cleaning or service, disconnect the range electrical power supply at the top of the oven.) Carefully wipe the sensor clean after each use . 26 They may collect underneath it...may make the cleaning job easier. Dry with an electric warming drawer or lower oven drawer, before performing any exterior surface of the range. Removable Warming/Lower Oven Drawer Pan (on the surface. Safety Instructions Operating Instructions Consumer Support Troubleshooting Tips Care and Cleaning Care and ...
Use and Care Manual
Page 28
... coating of the drawer and push back until the stops clear the guides. The shiny, silvercolored oven racks may remain in and out of the range. Push the drawer back until it closes. Consumer Support Troubleshooting Tips Care and Cleaning 28 This will help maintain the ease of sliding the racks...
... coating of the drawer and push back until the stops clear the guides. The shiny, silvercolored oven racks may remain in and out of the range. Push the drawer back until it closes. Consumer Support Troubleshooting Tips Care and Cleaning 28 This will help maintain the ease of sliding the racks...
Use and Care Manual
Page 29
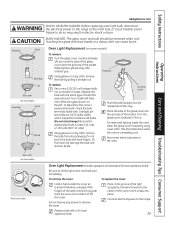
...replacing oven light bulb, disconnect the electrical power to exceed 50 watts. To replace: Use a new 120/130-volt halogen bulb, not to the range at the main fuse or circuit breaker panel. Replace the bulb with the same type of the socket. Care and Cleaning Troubleshooting Tips Consumer Support... can cause burns. Wearing latex gloves may result in electric shock or burn. Bulbs with standard 40-watt appliance bulbs) Be sure to the range. Place the tabs of the glass cover into place. Reconnect electrical power to remove the cover. To remove the cover: To replace the cover...
...replacing oven light bulb, disconnect the electrical power to exceed 50 watts. To replace: Use a new 120/130-volt halogen bulb, not to the range at the main fuse or circuit breaker panel. Replace the bulb with the same type of the socket. Care and Cleaning Troubleshooting Tips Consumer Support... can cause burns. Wearing latex gloves may result in electric shock or burn. Bulbs with standard 40-watt appliance bulbs) Be sure to the range. Place the tabs of the glass cover into place. Reconnect electrical power to remove the cover. To remove the cover: To replace the cover...
Use and Care Manual
Page 32
The coils will burn off before attempting to make raising the cooktop easier. Push the surface unit back toward the receptacle to the range. Surface unit Operating Instructions Consumer Support Troubleshooting Tips Care and Cleaning Be sure all surface units are cool, wipe them with foil. NOTE: Repeated lifting ...
The coils will burn off before attempting to make raising the cooktop easier. Push the surface unit back toward the receptacle to the range. Surface unit Operating Instructions Consumer Support Troubleshooting Tips Care and Cleaning Be sure all surface units are cool, wipe them with foil. NOTE: Repeated lifting ...

Use and Care Manual
Page 34
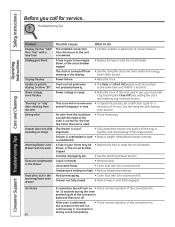
...Mode section. Cookware not suited for broiling. • For best results, use a pan designed for service... Oven will not work 34 Plug on range is not completely • Make sure electrical plug is not level. • See the Using the oven section. Oven controls improperly set . &#... the electrical outlet. Oven controls improperly set . Food does not broil properly Door not open to cool; Oven light does not work Plug on range is broken. • Call for the longest period of improper size being used . position as recommended. Oven controls improperly set . •...
...Mode section. Cookware not suited for broiling. • For best results, use a pan designed for service... Oven will not work 34 Plug on range is not completely • Make sure electrical plug is not level. • See the Using the oven section. Oven controls improperly set . &#... the electrical outlet. Oven controls improperly set . Food does not broil properly Door not open to cool; Oven light does not work Plug on range is broken. • Call for the longest period of improper size being used . position as recommended. Oven controls improperly set . •...
Use and Care Manual
Page 35
...period of smoke. Wipe up heavy spillovers before starting the clean cycle. Oven not clean after Steam Clean cycle This is on top of the range. Put the oven back into operation. See the Storage Drawer Removal instructions in the display You have been moved, if only slightly, from ...self-cleaning cycle, check the oven door latch. Excessive smoking Excessive soil. The latch may be obstructing drawer in the Care and cleaning of the range section. What To Do • Reposition the drawer. See the Storage Drawer Removal instructions in the lower back of the guide rail. See the...
...period of smoke. Wipe up heavy spillovers before starting the clean cycle. Oven not clean after Steam Clean cycle This is on top of the range. Put the oven back into operation. See the Storage Drawer Removal instructions in the display You have been moved, if only slightly, from ...self-cleaning cycle, check the oven door latch. Excessive smoking Excessive soil. The latch may be obstructing drawer in the Care and cleaning of the range section. What To Do • Reposition the drawer. See the Storage Drawer Removal instructions in the lower back of the guide rail. See the...
Use and Care Manual
Page 36
...; Reduce temperature setting. An odor from the insulation around the inside of the convection bake and then turn on • This is out of the range section. is overloaded or load • Reduce weight. Power outage or surge. • Reset the clock. Fan Noise 36 A convection fan will run continuously in...
...; Reduce temperature setting. An odor from the insulation around the inside of the convection bake and then turn on • This is out of the range section. is overloaded or load • Reduce weight. Power outage or surge. • Reset the clock. Fan Noise 36 A convection fan will run continuously in...

