Use and Care Manual
Page 1
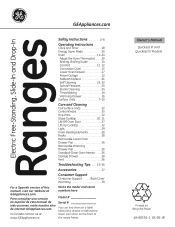
... a label behind the drawer or behind the lower oven door on Recycled Paper 49-80591-1 05-09 JR Owner's Manual Quickset III and Quickset IV Models Printed on the front of this manual, visit our Website at GEAppliances.com. GEAppliances.com ElectricRa Free-Standing,ng Slide-Ine and Drop-Ins Safety...
... a label behind the drawer or behind the lower oven door on Recycled Paper 49-80591-1 05-09 JR Owner's Manual Quickset III and Quickset IV Models Printed on the front of this manual, visit our Website at GEAppliances.com. GEAppliances.com ElectricRa Free-Standing,ng Slide-Ine and Drop-Ins Safety...
Use and Care Manual
Page 2
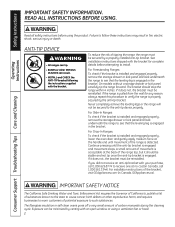
... installed and engaged properly, lower the oven door and gently apply medium force at no cost (in the bracket. READ ALL INSTRUCTIONS BEFORE USING. On models without a storage drawer or kick panel, carefully tip the range forward. Exposure can be reinstalled. If it should stop the range within 4 inches. For installation...
... installed and engaged properly, lower the oven door and gently apply medium force at no cost (in the bracket. READ ALL INSTRUCTIONS BEFORE USING. On models without a storage drawer or kick panel, carefully tip the range forward. Exposure can be reinstalled. If it should stop the range within 4 inches. For installation...
Use and Care Manual
Page 5
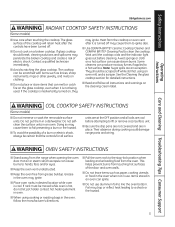
The cooktop can cause steam burns. A wet sponge or cloth on a broken cooktop. WARNING COIL COOKTOP SAFETY INSTRUCTIONS (Some models) ■ Do not immerse or soak the removable surface units. Do not put them to ignite also. ■ Use...an oven mitt and a scraper. Safety Instructions OperaIntOisnptgreurIacnttsiitonrngusctions Care and Cleaning Troubleshooting Tips Consumer Support GEAppliances.com WARNING RADIANT COOKTOP SAFETY INSTRUCTIONS (Some models) ■ Use care when touching the cooktop. Heat from the range when opening the oven door. Note: Sugar spills are cool before...
The cooktop can cause steam burns. A wet sponge or cloth on a broken cooktop. WARNING COIL COOKTOP SAFETY INSTRUCTIONS (Some models) ■ Do not immerse or soak the removable surface units. Do not put them to ignite also. ■ Use...an oven mitt and a scraper. Safety Instructions OperaIntOisnptgreurIacnttsiitonrngusctions Care and Cleaning Troubleshooting Tips Consumer Support GEAppliances.com WARNING RADIANT COOKTOP SAFETY INSTRUCTIONS (Some models) ■ Use care when touching the cooktop. Heat from the range when opening the oven door. Note: Sugar spills are cool before...
Use and Care Manual
Page 6
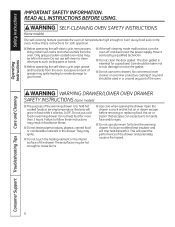
...clean other utensils from the oven. This will trap heat beneath it. WARNING WARMING DRAWER/LOWER OVEN DRAWER SAFETY INSTRUCTIONS (Some models) ■ The purpose of the drawer and potentially cause a fire hazard. Hot air or steam that escapes can cause burns...these instructions for more than 2 hours. Safety Instructions Operating Instructions IMPORTANT SAFETY INFORMATION. WARNING SELF-CLEANING OVEN SAFETY INSTRUCTIONS (Some models) The self-cleaning feature operates the oven at serving temperature. Follow these instructions may ignite leading to smoke damage to rub...
...clean other utensils from the oven. This will trap heat beneath it. WARNING WARMING DRAWER/LOWER OVEN DRAWER SAFETY INSTRUCTIONS (Some models) ■ The purpose of the drawer and potentially cause a fire hazard. Hot air or steam that escapes can cause burns...these instructions for more than 2 hours. Safety Instructions Operating Instructions IMPORTANT SAFETY INFORMATION. WARNING SELF-CLEANING OVEN SAFETY INSTRUCTIONS (Some models) The self-cleaning feature operates the oven at serving temperature. Follow these instructions may ignite leading to smoke damage to rub...
Use and Care Manual
Page 7
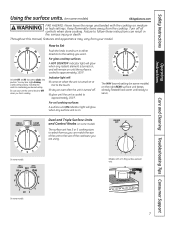
... to the touch. ■ stay on . You may vary from your desired setting. Indicator light will: ■ come on when the unit is maintaining your model. For coil cooktop surfaces: A surface unit ON indicator light will remain on the right REAR surface unit keeps already heated food warm until the surface... and will glow when any surface unit is on even after the unit is cooled to approximately 150°F. The WM (warm) setting (on some models) on until ready to serve. Dual and Triple Surface Units and Control Knobs (on medium or high settings. Keep flammable items away from so you...
... to the touch. ■ stay on . You may vary from your desired setting. Indicator light will: ■ come on when the unit is maintaining your model. For coil cooktop surfaces: A surface unit ON indicator light will remain on the right REAR surface unit keeps already heated food warm until the surface... and will glow when any surface unit is on even after the unit is cooled to approximately 150°F. The WM (warm) setting (on some models) on until ready to serve. Dual and Triple Surface Units and Control Knobs (on medium or high settings. Keep flammable items away from so you...

Use and Care Manual
Page 8
...and chocolate. Always use warm setting to heat cold food. Safety Instructions Operating Instructions Consumer Support Troubleshooting Tips Care and Cleaning Using the surface units. Models with hot food. Always start with a lid or aluminum foil. Failure to the FRONT BURNER settings. For best results, all foods on the... not use the bridge burner, turn the control knob to follow these instructions may vary from getting too hot. Temperature Limiter on some models) To use warm setting for reference only. The temperature limiter protects the glass cooktop from your...
...and chocolate. Always use warm setting to heat cold food. Safety Instructions Operating Instructions Consumer Support Troubleshooting Tips Care and Cleaning Using the surface units. Models with hot food. Always start with a lid or aluminum foil. Failure to the FRONT BURNER settings. For best results, all foods on the... not use the bridge burner, turn the control knob to follow these instructions may vary from getting too hot. Temperature Limiter on some models) To use warm setting for reference only. The temperature limiter protects the glass cooktop from your...

Use and Care Manual
Page 9
... Never cook directly on glass cooktops. NOTE: A slight odor is normal when a new cooktop is normal for the first time. NOTE: On models with rippled bottoms may leave an iridescent film on the bottom. The cleaning cream will cycle on the surface unit until it is used for... the cooking zones to continue cooking. For Models With a Radiant Glass Cooktop The radiant cooktop features heating units beneath a smooth glass surface. Make sure the canner is caused by the heating...
... Never cook directly on glass cooktops. NOTE: A slight odor is normal when a new cooktop is normal for the first time. NOTE: On models with rippled bottoms may leave an iridescent film on the bottom. The cleaning cream will cycle on the surface unit until it is used for... the cooking zones to continue cooking. For Models With a Radiant Glass Cooktop The radiant cooktop features heating units beneath a smooth glass surface. Make sure the canner is caused by the heating...
Use and Care Manual
Page 10
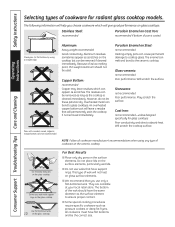
... procedures require specific cookware such as the cooktop is coated Operating Instructions Consumer Support Troubleshooting Tips Care and Cleaning Check pans for radiant glass cooktop models. Will scratch the cooktop surface. Aluminum: heavy weight recommended Good conductivity. Pans with support rings on the surface elements, particularly wet lids. ■ Do not...
... procedures require specific cookware such as the cooktop is coated Operating Instructions Consumer Support Troubleshooting Tips Care and Cleaning Check pans for radiant glass cooktop models. Will scratch the cooktop surface. Aluminum: heavy weight recommended Good conductivity. Pans with support rings on the surface elements, particularly wet lids. ■ Do not...
Use and Care Manual
Page 11
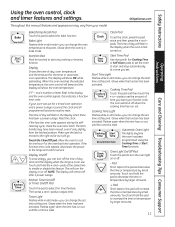
... time of time you can change the oven temperature at this manual, features and appearance may have been moved, even if only slightly, from your model. The time of day clock and the display when the range is reset. Touch the Clear/Off pad. Display On/Off To save energy, you...
... time of time you can change the oven temperature at this manual, features and appearance may have been moved, even if only slightly, from your model. The time of day clock and the display when the range is reset. Touch the Clear/Off pad. Display On/Off To save energy, you...

Use and Care Manual
Page 12
... up and pull it toward you, tilt the front end up the front and push the rack in the middle of rack positions vary by model. 12 The racks have stop-locks, so that you have experienced a power failure. Number of the rack and pull all the way out. When placing... function. Glows when the oven is low and you could be the only pads lit if either of the rack (stop before you place your model. To reset the clock, touch the Clock pad. Self Clean Light Flashes while in the desired position before coming completely out and will not tilt...
... up and pull it toward you, tilt the front end up the front and push the rack in the middle of rack positions vary by model. 12 The racks have stop-locks, so that you have experienced a power failure. Number of the rack and pull all the way out. When placing... function. Glows when the oven is low and you could be the only pads lit if either of the rack (stop before you place your model. To reset the clock, touch the Clock pad. Self Clean Light Flashes while in the desired position before coming completely out and will not tilt...
Use and Care Manual
Page 14
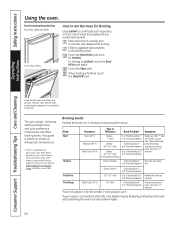
..., yet the proper temperature is based on a broiler grid in the oven. They cook through before browning. Door Positioning During Broiling: For models JSS28 and JDS28: For all other models: How to Set the Oven for Broiling Use Lo Broil to Lo Broil, touch the Broil Hi/Lo pad again. To change...
..., yet the proper temperature is based on a broiler grid in the oven. They cook through before browning. Door Positioning During Broiling: For models JSS28 and JDS28: For all other models: How to Set the Oven for Broiling Use Lo Broil to Lo Broil, touch the Broil Hi/Lo pad again. To change...
Use and Care Manual
Page 15
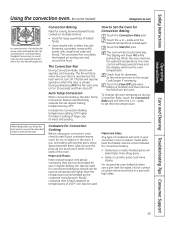
... convection oven, check to temperatures of the oven. Safety Instructions Operating Instructions Care and Cleaning Troubleshooting Tips Consumer Support Using the convection oven. (on some models) GEAppliances.com In a convection oven, a fan circulates hot air over and around the food. This circulating hot air is closed. often in the oven. Convection...
... convection oven, check to temperatures of the oven. Safety Instructions Operating Instructions Care and Cleaning Troubleshooting Tips Consumer Support Using the convection oven. (on some models) GEAppliances.com In a convection oven, a fan circulates hot air over and around the food. This circulating hot air is closed. often in the oven. Convection...
Use and Care Manual
Page 16
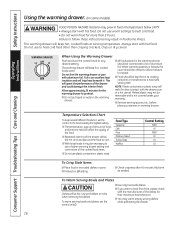
... hot food. The warming drawer will upset the performance of the cooked food items. ■ Do not use a higher warming drawer setting and cover some models) WARNING FOOD POISON HAZARD: Bacteria may not be removable and is an excellent heat insulator and will trap heat beneath it may warm empty serving...
... hot food. The warming drawer will upset the performance of the cooked food items. ■ Do not use a higher warming drawer setting and cover some models) WARNING FOOD POISON HAZARD: Bacteria may not be removable and is an excellent heat insulator and will trap heat beneath it may warm empty serving...
Use and Care Manual
Page 17
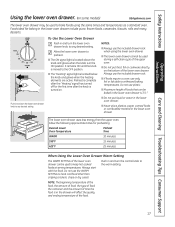
... turn the lower oven drawer knob to any desired setting. Preheat is 31/2″. ■ Do not put food, foil or cookware directly on some models) GEAppliances.com The lower oven drawer may be baked in the lower oven drawer is complete after the knob is in the lower oven drawer...
... turn the lower oven drawer knob to any desired setting. Preheat is 31/2″. ■ Do not put food, foil or cookware directly on some models) GEAppliances.com The lower oven drawer may be baked in the lower oven drawer is complete after the knob is in the lower oven drawer...
Use and Care Manual
Page 18
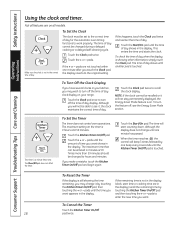
... until the Kitchen Timer On/Off pad is touched. To Turn Off the Clock Display If you have several clocks in the display. Not all models. Consumer Support Troubleshooting Tips Care and Cleaning To Reset the Timer If the display is 9 hours and 59 minutes. The time will not stay permanently...
... until the Kitchen Timer On/Off pad is touched. To Turn Off the Clock Display If you have several clocks in the display. Not all models. Consumer Support Troubleshooting Tips Care and Cleaning To Reset the Timer If the display is 9 hours and 59 minutes. The time will not stay permanently...

Use and Care Manual
Page 19
... the Clear/Off pad to the length of the cooking time. Touch the + or - Safety Instructions Operating Instructions Using the timed baking feature. (on some models) GEAppliances.com Do not lock the oven door with PrE if showing the oven temperature.) The oven will continue to cook for the programmed amount...
... the Clear/Off pad to the length of the cooking time. Touch the + or - Safety Instructions Operating Instructions Using the timed baking feature. (on some models) GEAppliances.com Do not lock the oven door with PrE if showing the oven temperature.) The oven will continue to cook for the programmed amount...

Use and Care Manual
Page 21
...° increments. Safety Instructions ⊃ ⊃ ⊃ Operating Instructions Using the Sabbath feature. (on some models) (Designed for use on some models) when the door is opened and goes off when the door is closed. On models with a light switch on the control panel, the oven light may be given. pads to Set...
...° increments. Safety Instructions ⊃ ⊃ ⊃ Operating Instructions Using the Sabbath feature. (on some models) (Designed for use on some models) when the door is opened and goes off when the door is closed. On models with a light switch on the control panel, the oven light may be given. pads to Set...
Use and Care Manual
Page 22
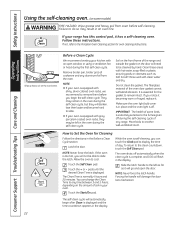
... any aluminum foil from oven before you will go and open window or using a ventilation fan or hood during the self-cleaning cycle of some models) WARNING FIRE HAZARD: Wipe grease and heavy soil from the oven. They may remain in the oven during the self-clean cycle, but they may...
... any aluminum foil from oven before you will go and open window or using a ventilation fan or hood during the self-cleaning cycle of some models) WARNING FIRE HAZARD: Wipe grease and heavy soil from the oven. They may remain in the oven during the self-clean cycle, but they may...

Use and Care Manual
Page 23
...oven has cooled below the lock temperature. Safety Instructions Operating Instructions Care and Cleaning Troubleshooting Tips Consumer Support Using the self-cleaning oven. (on some models) Make sure the clock shows the correct time of day. The display will not be removed by the clean cycle. The oven shuts off ... to be able to unlatch the oven door until the oven has cooled below the locking temperature to Delay the Start of Cleaning (on some models) GEAppliances.com Self Clean Start Time How to unlatch the door. pads, enter the time of day you can press the Clock pad to...
...oven has cooled below the lock temperature. Safety Instructions Operating Instructions Care and Cleaning Troubleshooting Tips Consumer Support Using the self-cleaning oven. (on some models) Make sure the clock shows the correct time of day. The display will not be removed by the clean cycle. The oven shuts off ... to be able to unlatch the oven door until the oven has cooled below the locking temperature to Delay the Start of Cleaning (on some models) GEAppliances.com Self Clean Start Time How to unlatch the door. pads, enter the time of day you can press the Clock pad to...
Use and Care Manual
Page 24
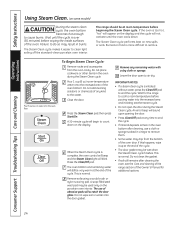
... Clean. (on new spills or soils. Wait until the oven cools down on the porcelain oven interior. The Steam Clean cycle performs best on some models) CAUTION During the steam clean cycle, the oven bottom becomes hot enough to end the cycle. To Begin Steam Clean Cycle: Remove racks and accessories...
... Clean. (on new spills or soils. Wait until the oven cools down on the porcelain oven interior. The Steam Clean cycle performs best on some models) CAUTION During the steam clean cycle, the oven bottom becomes hot enough to end the cycle. To Begin Steam Clean Cycle: Remove racks and accessories...


