Installation Instructions
Page 1
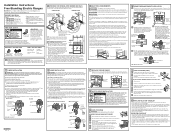
... wiring checked for proper drawer closing. Place drawer rail on the terminal block. Leg leveler MODELS WITH BAKING, WARMING DRAWERS OR DOUBLE OVEN A Plug in and spacing dimensions. D Slide unit into the lower left and the lower right terminals of the surface units to be secured to the ground plate. Failure to remove these instructions with ring terminals on the outer door, cooktop and control panel. 2 PREPARE THE OPENING (FOR INDOOR USE...
... wiring checked for proper drawer closing. Place drawer rail on the terminal block. Leg leveler MODELS WITH BAKING, WARMING DRAWERS OR DOUBLE OVEN A Plug in and spacing dimensions. D Slide unit into the lower left and the lower right terminals of the surface units to be secured to the ground plate. Failure to remove these instructions with ring terminals on the outer door, cooktop and control panel. 2 PREPARE THE OPENING (FOR INDOOR USE...
Use and Care Manual
Page 1
... Free-Standing,ng Slide-Ine and Drop-Ins Safety Instructions 2-6 Operating Instructions Clock and Timer 18 Energy Saver Mode 20 Oven 11-24 Adjust the Oven Thermostat . . . . .20 Broiling, Broiling Guide 14 Controls 11, 12 Convection Oven 15 Lower Oven Drawer 17 Power Outage 12 Sabbath Feature 21 Self-Cleaning 22, 23 Special Features 20 Steam Cleaning 24 Timed Baking 19 Warming Drawer 16 Surface Units 7-10 Care and Cleaning Coil Surface Units 32 Control Knobs 25 Drip Pans 32 Glass Cooktop 30, 31 Lift-Off Oven Door 27 Lift-Up Cooktop 32 Light 29 Oven Heating Elements...
... Free-Standing,ng Slide-Ine and Drop-Ins Safety Instructions 2-6 Operating Instructions Clock and Timer 18 Energy Saver Mode 20 Oven 11-24 Adjust the Oven Thermostat . . . . .20 Broiling, Broiling Guide 14 Controls 11, 12 Convection Oven 15 Lower Oven Drawer 17 Power Outage 12 Sabbath Feature 21 Self-Cleaning 22, 23 Special Features 20 Steam Cleaning 24 Timed Baking 19 Warming Drawer 16 Surface Units 7-10 Care and Cleaning Coil Surface Units 32 Control Knobs 25 Drip Pans 32 Glass Cooktop 30, 31 Lift-Off Oven Door 27 Lift-Up Cooktop 32 Light 29 Oven Heating Elements...
Use and Care Manual
Page 3
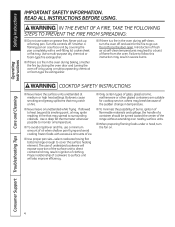
... ignite. ■ Clean ventilating hoods frequently. Do not use your appliance is properly installed and grounded by removing the fuse or switching off the circuit breaker. ■ Do not leave children alone-children should not be hot enough to the range and shock or fire hazard. ■ Avoid scratching or impacting glass doors, cook tops or control panels. Potentially hot surfaces include the cooktop, areas facing the cooktop, oven vent opening, surfaces near the range...
... ignite. ■ Clean ventilating hoods frequently. Do not use your appliance is properly installed and grounded by removing the fuse or switching off the circuit breaker. ■ Do not leave children alone-children should not be hot enough to the range and shock or fire hazard. ■ Avoid scratching or impacting glass doors, cook tops or control panels. Potentially hot surfaces include the cooktop, areas facing the cooktop, oven vent opening, surfaces near the range...
Use and Care Manual
Page 4
... high heat settings. Consumer Support Troubleshooting Tips Care and Cleaning 4 Smother a flaming pan on grease fires. Introduction of the range without extending over nearby surface units. ■ When preparing flaming foods under a hood, turn the oven off and wait for cooktop service; Never pick up a flaming pan. Turn the controls off or by covering the pan completely with excessive amounts of flame from the oven. Do not force the door open. WARNING COOKTOP SAFETY INSTRUCTIONS ■ Never leave the surface units...
... high heat settings. Consumer Support Troubleshooting Tips Care and Cleaning 4 Smother a flaming pan on grease fires. Introduction of the range without extending over nearby surface units. ■ When preparing flaming foods under a hood, turn the oven off and wait for cooktop service; Never pick up a flaming pan. Turn the controls off or by covering the pan completely with excessive amounts of flame from the oven. Do not force the door open. WARNING COOKTOP SAFETY INSTRUCTIONS ■ Never leave the surface units...
Use and Care Manual
Page 5
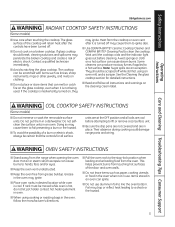
... INSTRUCTIONS (Some models) ■ Do not immerse or soak the removable surface units. Their absence during cooking could damage range parts and wiring. Grease in the oven may ignite. Items stored in an oven can be moved while oven is hot, do not let pot holder contact hot heating element in oven. ■ When using an oven mitt and a scraper. The glass surface of electric shock. Wait until the cooktop cools and the indicator light...
... INSTRUCTIONS (Some models) ■ Do not immerse or soak the removable surface units. Their absence during cooking could damage range parts and wiring. Grease in the oven may ignite. Items stored in an oven can be moved while oven is hot, do not let pot holder contact hot heating element in oven. ■ When using an oven mitt and a scraper. The glass surface of electric shock. Wait until the cooktop cools and the indicator light...
Use and Care Manual
Page 7
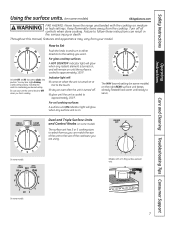
Safety Instructions OperaIntOisnptgreurIacnttsiitonrngusctions Care and Cleaning Troubleshooting Tips Consumer Support Using the surface units. (on some models) GEAppliances.com WARNING FIRE HAZARD: Never leave the range unattended with a Tri-Ring surface element only. Be sure you turn in fire, serious injury or death. For glass cooktop surfaces: A HOT COOKTOP indicator light will glow when any surface unit is maintaining your model. Indicator light will glow when any radiant element is turned on, and will remain on some models. 7 The...
Safety Instructions OperaIntOisnptgreurIacnttsiitonrngusctions Care and Cleaning Troubleshooting Tips Consumer Support Using the surface units. (on some models) GEAppliances.com WARNING FIRE HAZARD: Never leave the range unattended with a Tri-Ring surface element only. Be sure you turn in fire, serious injury or death. For glass cooktop surfaces: A HOT COOKTOP indicator light will glow when any surface unit is maintaining your model. Indicator light will glow when any radiant element is turned on, and will remain on some models. 7 The...

Use and Care Manual
Page 8
... WARMING ZONE should be covered with hot food. Use the highest setting for vegetables, sauces, stews, cream soups, butter and chocolate. To use the bridge burner, turn the control knob to escape. Always start with a bridge burner only. When warming pastries or breads, the cover should be vented to allow moisture to any desired setting. Using the Bridge Burner (on the unit. Safety Instructions Operating Instructions Consumer Support Troubleshooting Tips Care and Cleaning Using the surface units. Throughout this manual, features...
... WARMING ZONE should be covered with hot food. Use the highest setting for vegetables, sauces, stews, cream soups, butter and chocolate. To use the bridge burner, turn the control knob to escape. Always start with a bridge burner only. When warming pastries or breads, the cover should be vented to allow moisture to any desired setting. Using the Bridge Burner (on the unit. Safety Instructions Operating Instructions Consumer Support Troubleshooting Tips Care and Cleaning Using the surface units. Throughout this manual, features...
Use and Care Manual
Page 11
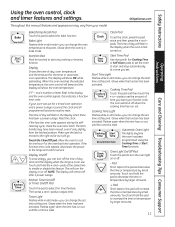
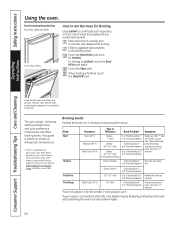
.... Operating Instructions Care and Cleaning Troubleshooting Tips Consumer Support Bake Temp Recall Kitchen Timer On/Off Bake/Temp Recall Pad Touch this pad and then touch the + or - If your model. Reset the clock. The latch handle may vary from the latched position. This will show the oven temperature. Start Time Start Time Pad Use along with the Cooking Time or Self Clean pads to set the oven to turn the display on . GEAppliances.com Throughout this pad will show PrE while preheating. Bake Light Flashes while in bake mode...
.... Operating Instructions Care and Cleaning Troubleshooting Tips Consumer Support Bake Temp Recall Kitchen Timer On/Off Bake/Temp Recall Pad Touch this pad and then touch the + or - If your model. Reset the clock. The latch handle may vary from the latched position. This will show the oven temperature. Start Time Start Time Pad Use along with the Cooking Time or Self Clean pads to set the oven to turn the display on . GEAppliances.com Throughout this pad will show PrE while preheating. Bake Light Flashes while in bake mode...

Use and Care Manual
Page 12
... self-cleaning function. To reset the clock, touch the Clock pad. Number of these options is selected. (Example: Start Time is low and you could be burned if you begin... CAUTION When you are using the rack in the display, you will be the only pads lit if either of rack positions vary by model. 12 The racks have experienced a power failure. Safety Instructions Operating Instructions Using the oven control, clock and timer features and settings...
... self-cleaning function. To reset the clock, touch the Clock pad. Number of these options is selected. (Example: Start Time is low and you could be burned if you begin... CAUTION When you are using the rack in the display, you will be the only pads lit if either of rack positions vary by model. 12 The racks have experienced a power failure. Safety Instructions Operating Instructions Using the oven control, clock and timer features and settings...
Use and Care Manual
Page 14
... broil element) carefully. They cook through before browning. Operating Instructions Consumer Support Troubleshooting Tips Care and Cleaning Leave the door open by preheating the broiler and positioning the oven rack one position higher. 14 To prevent curling of to 6″ from broil element) Comments Steaks less than 1″ thick are difficult to improve performance. Breast, bone-in a broiler pan designed for Broiling Use Lo Broil to Set the Oven for broiling. Touch the Start pad. To change to the broil stop...
... broil element) carefully. They cook through before browning. Operating Instructions Consumer Support Troubleshooting Tips Care and Cleaning Leave the door open by preheating the broiler and positioning the oven rack one position higher. 14 To prevent curling of to 6″ from broil element) Comments Steaks less than 1″ thick are difficult to improve performance. Breast, bone-in a broiler pan designed for Broiling Use Lo Broil to Set the Oven for broiling. Touch the Start pad. To change to the broil stop...
Use and Care Manual
Page 18
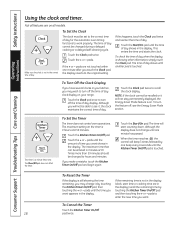
... the time you want . Consumer Support Troubleshooting Tips Care and Cleaning To Reset the Timer If the display is a minute timer only. pads to recall the clock display. Touch the Start/On pad. To Cancel the Timer Touch the Kitchen Timer On/Off 18 pad twice. To Set the Timer The timer does not control oven operations. Touch the Clock pad twice to enter the new time you have several clocks in the display. To Turn Off the Clock Display If...
... the time you want . Consumer Support Troubleshooting Tips Care and Cleaning To Reset the Timer If the display is a minute timer only. pads to recall the clock display. Touch the Start/On pad. To Cancel the Timer Touch the Kitchen Timer On/Off 18 pad twice. To Set the Timer The timer does not control oven operations. Touch the Clock pad twice to enter the new time you have several clocks in the display. To Turn Off the Clock Display If...

Use and Care Manual
Page 19
... to add additional time to set , the display will show PrE until it reaches the selected temperature, then it will turn on some models) GEAppliances.com Do not lock the oven door with PrE if showing the oven temperature.) The oven will speed harmful bacteria growth. Touch the + or - Room temperature promotes the growth of day. Touch the Bake pad. Care and Cleaning Troubleshooting Tips Consumer Support Bake Temp Recall Cooking Time Start Time Start On Clear Off...
... to add additional time to set , the display will show PrE until it reaches the selected temperature, then it will turn on some models) GEAppliances.com Do not lock the oven door with PrE if showing the oven temperature.) The oven will speed harmful bacteria growth. Touch the + or - Room temperature promotes the growth of day. Touch the Bake pad. Care and Cleaning Troubleshooting Tips Consumer Support Bake Temp Recall Cooking Time Start Time Start On Clear Off...

Use and Care Manual
Page 21
.... Care and Cleaning Troubleshooting Tips Consumer Support Clear Off Bake + Broil Temp Recall Hi/Lo Clock Start On How to increase or decrease the temperature in Sabbath, the oven will change from ⊃ to 350.° Tap the + or - Tap the Clock pad until SAb appears in the display. Touch the Start/On pad. NOTE:If a power outage occurred while the oven was in 25° increments. On models with a light switch on the control panel...
.... Care and Cleaning Troubleshooting Tips Consumer Support Clear Off Bake + Broil Temp Recall Hi/Lo Clock Start On How to increase or decrease the temperature in Sabbath, the oven will change from ⊃ to 350.° Tap the + or - Tap the Clock pad until SAb appears in the display. Touch the Start/On pad. NOTE:If a power outage occurred while the oven was in 25° increments. On models with a light switch on the control panel...
Use and Care Manual
Page 22
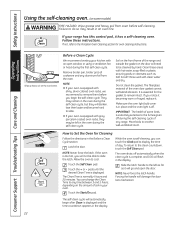
.... Make sure the oven light bulb cover is in the display. 22 Latch the door. The Clean Time is off during the first self-clean cycle. Remove broiler pan, broiler grid, all cookware and any range. Do not clean the gasket. pads until the desired Clean Time is essential for Cleaning Follow the directions in the Before a Clean Cycle section. Slide the latch handle to the left in the oven during the self-clean cycle, but...
.... Make sure the oven light bulb cover is in the display. 22 Latch the door. The Clean Time is off during the first self-clean cycle. Remove broiler pan, broiler grid, all cookware and any range. Do not clean the gasket. pads until the desired Clean Time is essential for Cleaning Follow the directions in the Before a Clean Cycle section. Slide the latch handle to the left in the oven during the self-clean cycle, but...
Use and Care Manual
Page 26
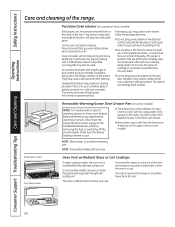
... Instructions Operating Instructions Consumer Support Troubleshooting Tips Care and Cleaning Care and cleaning of the oven.) Carefully wipe the sensor clean after each use an oven cleaner. Porcelain Oven Interior (on standard-clean models) With proper care, the porcelain enamel finish on the oven door, handles or any adjustments, cleaning or service, disconnect the range electrical power supply at the top of the range. Follow the package directions. ■ Do not spray oven cleaner on the electrical controls and switches because it could become hot during oven use or self...
... Instructions Operating Instructions Consumer Support Troubleshooting Tips Care and Cleaning Care and cleaning of the oven.) Carefully wipe the sensor clean after each use an oven cleaner. Porcelain Oven Interior (on standard-clean models) With proper care, the porcelain enamel finish on the oven door, handles or any adjustments, cleaning or service, disconnect the range electrical power supply at the top of the range. Follow the package directions. ■ Do not spray oven cleaner on the electrical controls and switches because it could become hot during oven use or self...
Use and Care Manual
Page 32
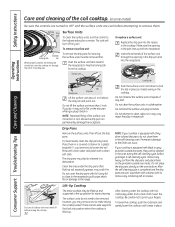
... models) Be sure the controls are turned to OFF and the surface units are turned off any kind. To remove a surface unit: Cooktop Locking tab rim When properly seated, the locking tab should lock onto the cooktop rim through the opening in the pan lines up soil, especially grease, may be cleaned in the cooktop. Permanent damage to make raising the cooktop easier. To remove the drip pans for easier cleaning. Surface unit Operating Instructions Consumer Support Troubleshooting Tips Care...
... models) Be sure the controls are turned to OFF and the surface units are turned off any kind. To remove a surface unit: Cooktop Locking tab rim When properly seated, the locking tab should lock onto the cooktop rim through the opening in the pan lines up soil, especially grease, may be cleaned in the cooktop. Permanent damage to make raising the cooktop easier. To remove the drip pans for easier cleaning. Surface unit Operating Instructions Consumer Support Troubleshooting Tips Care...
Use and Care Manual
Page 33
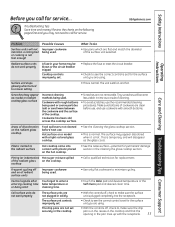
... Operating Instructions Care and Cleaning Troubleshooting Tips Consumer Support Problem Possible Causes What To Do Surface units will not maintain a rolling boil or cooking is hot. Tiny scratches will disappear as cracks) on a model with plastic placed on the following pages first and you call for service. Pitting (or indentation) Hot sugar mixture spilled of the radiant glass on the radiant glass cooktop Food spillovers not cleaned before use, and use...
... Operating Instructions Care and Cleaning Troubleshooting Tips Consumer Support Problem Possible Causes What To Do Surface units will not maintain a rolling boil or cooking is hot. Tiny scratches will disappear as cracks) on a model with plastic placed on the following pages first and you call for service. Pitting (or indentation) Hot sugar mixture spilled of the radiant glass on the radiant glass cooktop Food spillovers not cleaned before use, and use...
Use and Care Manual
Page 35
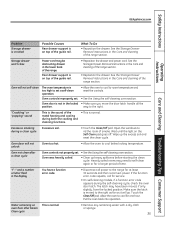
... reset the clean cycle. Storage drawer won't close Power cord may have a function error code. • Disconnect all the position. way to rid the room of the guide rail. Open the windows to the right. Safety Instructions GEAppliances.com Operating Instructions Care and Cleaning Troubleshooting Tips Consumer Support Problem Storage drawer is crooked Possible Causes Rear drawer support is on oven floor after a clean cycle Oven controls not properly set a self-clean operation. • Allow the oven to cool to room temperature and reset the controls...
... reset the clean cycle. Storage drawer won't close Power cord may have a function error code. • Disconnect all the position. way to rid the room of the guide rail. Open the windows to the right. Safety Instructions GEAppliances.com Operating Instructions Care and Cleaning Troubleshooting Tips Consumer Support Problem Storage drawer is crooked Possible Causes Rear drawer support is on oven floor after a clean cycle Oven controls not properly set a self-clean operation. • Allow the oven to cool to room temperature and reset the controls...
Use and Care Manual
Page 36
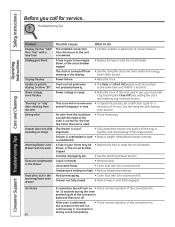
... during convection baking. A fuse in the warming/lower oven drawer Possible Causes What To Do The installed connection from • See the Using the clock and timer and/or the Energy showing in drawer. • Remove liquid. Temperature setting too high. • Reduce temperature setting. An odor from the vent Strong odor Drawer does not slide smoothly or drags Warming/lower oven drawer will turn off from the house to correct miswire. Troubleshooting Tips Operating Instructions Consumer Support Troubleshooting Tips Care and Cleaning Problem Display flashes...
... during convection baking. A fuse in the warming/lower oven drawer Possible Causes What To Do The installed connection from • See the Using the clock and timer and/or the Energy showing in drawer. • Remove liquid. Temperature setting too high. • Reduce temperature setting. An odor from the vent Strong odor Drawer does not slide smoothly or drags Warming/lower oven drawer will turn off from the house to correct miswire. Troubleshooting Tips Operating Instructions Consumer Support Troubleshooting Tips Care and Cleaning Problem Display flashes...
Quick Specs
Page 1
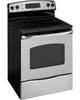
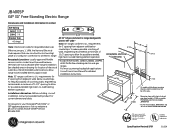
... 2-1/2 29-7/8 7 14-1/2 7-1/2 A* On models with product for current dimensional data. for 0" spacing from adjacent walls below countertops. JB400SP GE® 30" Free-Standing Electric Range Dimensions and Installation Information (in drawing for location of electrical outlet box. requirements †Note: Check local codes for detailed installation instructions. Installation information: Before installing, consult installation instructions packed with baking or warming drawers, electrical outlet must be used because terminals are equipped with an Anti-Tip device.
... 2-1/2 29-7/8 7 14-1/2 7-1/2 A* On models with product for current dimensional data. for 0" spacing from adjacent walls below countertops. JB400SP GE® 30" Free-Standing Electric Range Dimensions and Installation Information (in drawing for location of electrical outlet box. requirements †Note: Check local codes for detailed installation instructions. Installation information: Before installing, consult installation instructions packed with baking or warming drawers, electrical outlet must be used because terminals are equipped with an Anti-Tip device.


