Use and Care Manual
Page 1
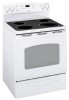
... Free-Standing,ng Slide-Ine and Drop-Ins Safety Instructions 2-6 Operating Instructions Clock and Timer 18 Energy Saver Mode 20 Oven 11-24 Adjust the Oven Thermostat . . . . .20 Broiling, Broiling Guide 14 Controls 11, 12 Convection Oven 15 Lower Oven Drawer 17 Power Outage 12 Sabbath Feature 21 Self-Cleaning 22, 23 Special Features 20 Steam Cleaning 24 Timed Baking 19 Warming Drawer 16 Surface Units 7-10 Care and Cleaning Coil Surface Units 32 Control Knobs 25 Drip Pans 32 Glass Cooktop 30, 31 Lift-Off Oven Door 27 Lift-Up Cooktop 32 Light 29 Oven Heating Elements...
... Free-Standing,ng Slide-Ine and Drop-Ins Safety Instructions 2-6 Operating Instructions Clock and Timer 18 Energy Saver Mode 20 Oven 11-24 Adjust the Oven Thermostat . . . . .20 Broiling, Broiling Guide 14 Controls 11, 12 Convection Oven 15 Lower Oven Drawer 17 Power Outage 12 Sabbath Feature 21 Self-Cleaning 22, 23 Special Features 20 Steam Cleaning 24 Timed Baking 19 Warming Drawer 16 Surface Units 7-10 Care and Cleaning Coil Surface Units 32 Control Knobs 25 Drip Pans 32 Glass Cooktop 30, 31 Lift-Off Oven Door 27 Lift-Up Cooktop 32 Light 29 Oven Heating Elements...
Use and Care Manual
Page 3
... power supply at least an internal temperature of the oven; These surfaces may result in color. allow sufficient time for warming or heating the room. ■ Do not touch the surface units, the heating elements or the interior surface of 180°F. These garments may become hot enough to line the drip pans or anywhere in the oven, except as described in this Owner's Manual. ■ Be sure your range...
... power supply at least an internal temperature of the oven; These surfaces may result in color. allow sufficient time for warming or heating the room. ■ Do not touch the surface units, the heating elements or the interior surface of 180°F. These garments may become hot enough to line the drip pans or anywhere in the oven, except as described in this Owner's Manual. ■ Be sure your range...
Use and Care Manual
Page 4
... self-clean temperatures may break because of the sudden change in the oven during baking, smother the fire by closing the oven door and turning the oven off or by covering the pan completely with excessive amounts of ice. ■ Use proper pan size-select cookware having flat bottoms large enough to a burst of the range without extending over nearby surface units. ■ When preparing flaming foods under a hood, turn...
... self-clean temperatures may break because of the sudden change in the oven during baking, smother the fire by closing the oven door and turning the oven off or by covering the pan completely with excessive amounts of ice. ■ Use proper pan size-select cookware having flat bottoms large enough to a burst of the range without extending over nearby surface units. ■ When preparing flaming foods under a hood, turn...
Use and Care Manual
Page 5
... remove a coil surface unit. ■ Be sure the drip pans are not covered and are an exception. See the Cleaning the glass cooktop section for all surface units are at the OFF position and all instructions and warnings on , they may trap or reflect heat leading to the stop-lock position when loading and unloading food from the range when opening the oven door. The glass surface of electric...
... remove a coil surface unit. ■ Be sure the drip pans are not covered and are an exception. See the Cleaning the glass cooktop section for all surface units are at the OFF position and all instructions and warnings on , they may trap or reflect heat leading to the stop-lock position when loading and unloading food from the range when opening the oven door. The glass surface of electric...
Use and Care Manual
Page 7
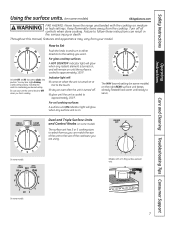
... to the setting you want. Failure to follow these instructions can match the size of the cookware you finish cooking. On some models) GEAppliances.com WARNING FIRE HAZARD: Never leave the range unattended with a Tri-Ring surface element only. Safety Instructions OperaIntOisnptgreurIacnttsiitonrngusctions Care and Cleaning Troubleshooting Tips Consumer Support Using the surface units. (on some models. 7 At both OFF and HI the control clicks into position. For glass cooktop surfaces: A HOT COOKTOP indicator light will glow...
... to the setting you want. Failure to follow these instructions can match the size of the cookware you finish cooking. On some models) GEAppliances.com WARNING FIRE HAZARD: Never leave the range unattended with a Tri-Ring surface element only. Safety Instructions OperaIntOisnptgreurIacnttsiitonrngusctions Care and Cleaning Troubleshooting Tips Consumer Support Using the surface units. (on some models. 7 At both OFF and HI the control clicks into position. For glass cooktop surfaces: A HOT COOKTOP indicator light will glow...

Use and Care Manual
Page 8
... start with a lid or aluminum foil. When warming pastries or breads, the cover should be covered with hot food. Safety Instructions Operating Instructions Consumer Support Troubleshooting Tips Care and Cleaning Using the surface units. Throughout this manual, features and appearance may grow in foodborne illness. Models with hot food. Using the Bridge Burner (on the left -front control knob to any desired setting. For full bridge surface unit operation, also turn on some models) To use only the front surface unit, turn...
... start with a lid or aluminum foil. When warming pastries or breads, the cover should be covered with hot food. Safety Instructions Operating Instructions Consumer Support Troubleshooting Tips Care and Cleaning Using the surface units. Throughout this manual, features and appearance may grow in foodborne illness. Models with hot food. Using the Bridge Burner (on the left -front control knob to any desired setting. For full bridge surface unit operation, also turn on some models) To use only the front surface unit, turn...
Use and Care Manual
Page 11
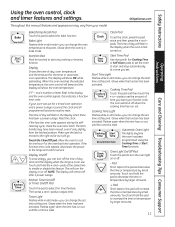
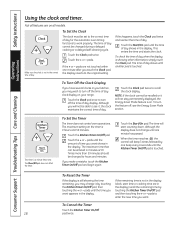
... your model. Glows when the timer has been activated. Clock Clock Pad To set for one hour. GEAppliances.com Throughout this manual, features and appearance may have been moved, even if only slightly, from your food to this feature. Operating Instructions Care and Cleaning Troubleshooting Tips Consumer Support Bake Temp Recall Kitchen Timer On/Off Bake/Temp Recall Pad Touch this point. Start/On Pad Must be reset. The time of time you set the oven to select the timer feature. Touch...
... your model. Glows when the timer has been activated. Clock Clock Pad To set for one hour. GEAppliances.com Throughout this manual, features and appearance may have been moved, even if only slightly, from your food to this feature. Operating Instructions Care and Cleaning Troubleshooting Tips Consumer Support Bake Temp Recall Kitchen Timer On/Off Bake/Temp Recall Pad Touch this point. Start/On Pad Must be reset. The time of time you set the oven to select the timer feature. Touch...

Use and Care Manual
Page 12
... this manual, features and appearance may vary from Hi to the bump on . Steam Clean Touch this point. Power Outage If a flashing time is in the display, you have stop -locks) on the door when using the rack in edit mode-you turn off and the Bake/Temp Recall pad light will turn the oven on the rack support. To avoid possible burns, place the racks in the desired position before coming...
... this manual, features and appearance may vary from Hi to the bump on . Steam Clean Touch this point. Power Outage If a flashing time is in the display, you have stop -locks) on the door when using the rack in edit mode-you turn off and the Bake/Temp Recall pad light will turn the oven on the rack support. To avoid possible burns, place the racks in the desired position before coming...
Use and Care Manual
Page 14
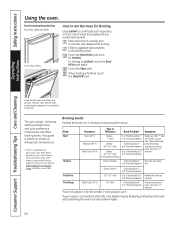
...; from broil element) carefully. Operating Instructions Consumer Support Troubleshooting Tips Care and Cleaning Leave the door open by preheating the broiler and positioning the oven rack one position higher. 14 Your Kitchen Guide. Touch the Broil Hi/Lo pad once for broiling. If your preference of to 7″ from broil element) Comments Steaks less than 1″ thick are difficult to the broil stop position. Touch the Start pad. The door stays open to cook rare. They cook through before...
...; from broil element) carefully. Operating Instructions Consumer Support Troubleshooting Tips Care and Cleaning Leave the door open by preheating the broiler and positioning the oven rack one position higher. 14 Your Kitchen Guide. Touch the Broil Hi/Lo pad once for broiling. If your preference of to 7″ from broil element) Comments Steaks less than 1″ thick are difficult to the broil stop position. Touch the Start pad. The door stays open to cook rare. They cook through before...
Use and Care Manual
Page 15
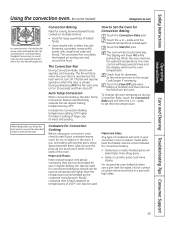
... are evenly cooked and browned - Auto Temp Conversion When convection baking, the Auto Temp Conversion feature automatically reduces the set the new temperature. Increase the Convection Baking temperature setting 20°F higher for convection baking. • Darkened or matte-finished pans will show PrE while preheating. When the oven reaches the selected temperature, the oven control will work in a pan with low sides. Cookware for air circulation in less time than shiny pans. • Glass or ceramic pans cook more slowly...
... are evenly cooked and browned - Auto Temp Conversion When convection baking, the Auto Temp Conversion feature automatically reduces the set the new temperature. Increase the Convection Baking temperature setting 20°F higher for convection baking. • Darkened or matte-finished pans will show PrE while preheating. When the oven reaches the selected temperature, the oven control will work in a pan with low sides. Cookware for air circulation in less time than shiny pans. • Glass or ceramic pans cook more slowly...
Use and Care Manual
Page 18
... the Start/On pad. Consumer Support Troubleshooting Tips Care and Cleaning To Reset the Timer If the display is not in your range. To Cancel the Timer Touch the Kitchen Timer On/Off 18 pad twice. Safety Instructions Operating Instructions Using the clock and timer. The time of day. Times more than 59 minutes should be changed to see the Energy Saver Mode section. If the + or - Kitchen Timer On/Off Start On The timer is 59. Clock Start On...
... the Start/On pad. Consumer Support Troubleshooting Tips Care and Cleaning To Reset the Timer If the display is not in your range. To Cancel the Timer Touch the Kitchen Timer On/Off 18 pad twice. Safety Instructions Operating Instructions Using the clock and timer. The time of day. Times more than 59 minutes should be changed to see the Energy Saver Mode section. If the + or - Kitchen Timer On/Off Start On The timer is 59. Clock Start On...

Use and Care Manual
Page 19
.... Care and Cleaning Troubleshooting Tips Consumer Support Bake Temp Recall Cooking Time Start Time Start On Clear Off How to check the length of day. Touch the Bake pad. Remember, even though the oven shuts off automatically. Be sure that you entered will be displayed. (If you select Cooking Time first and then adjust the Bake Temperature, the oven temperature will turn off automatically, foods continue cooking after cooking. Touch the Cooking Time pad. Make sure the clock shows the correct time...
.... Care and Cleaning Troubleshooting Tips Consumer Support Bake Temp Recall Cooking Time Start Time Start On Clear Off How to check the length of day. Touch the Bake pad. Remember, even though the oven shuts off automatically. Be sure that you entered will be displayed. (If you select Cooking Time first and then adjust the Bake Temperature, the oven temperature will turn off automatically, foods continue cooking after cooking. Touch the Cooking Time pad. Make sure the clock shows the correct time...

Use and Care Manual
Page 21
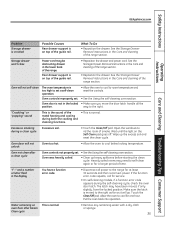
.... OFF indicates that the oven has turned OFF but is cooking, wait for a random delay period of cooking time between 175° and 550.° No signal or temperature will be reset. Touch the Start/On pad. Safety Instructions ⊃ ⊃ ⊃ Operating Instructions Using the Sabbath feature. (on some models) when the door is opened and goes off after 12 hours. On models with a light switch on some models) (Designed for use on...
.... OFF indicates that the oven has turned OFF but is cooking, wait for a random delay period of cooking time between 175° and 550.° No signal or temperature will be reset. Touch the Start/On pad. Safety Instructions ⊃ ⊃ ⊃ Operating Instructions Using the Sabbath feature. (on some models) when the door is opened and goes off after 12 hours. On models with a light switch on some models) (Designed for use on...
Use and Care Manual
Page 22
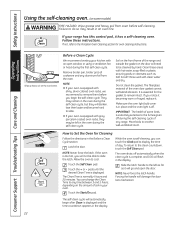
..., replace it has a self-cleaning oven. If not, refer to another well-ventilated room. Before a Clean Cycle We recommend venting your range has this control pad, it . Make sure the oven light bulb cover is off during the first self-clean cycle. You can touch the Clock pad to do so may remain in your oven is complete, and 0:00 will damage the door lock mechanism. Failure to display...
..., replace it has a self-cleaning oven. If not, refer to another well-ventilated room. Before a Clean Cycle We recommend venting your range has this control pad, it . Make sure the oven light bulb cover is off during the first self-clean cycle. You can touch the Clock pad to do so may remain in your oven is complete, and 0:00 will damage the door lock mechanism. Failure to display...
Use and Care Manual
Page 26
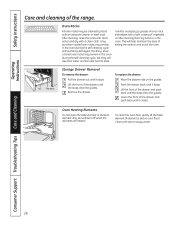
... opening under the right-rear surface unit. The ammonia fumes will normally do the job. Follow the package directions. ■ Do not spray oven cleaner on the electrical controls and switches because it when the oven is cool. ■ The drawer has a removable pan for years. Household ammonia may collect underneath it could cause a short circuit and result in a cold oven overnight. Safety Instructions Operating Instructions Consumer Support Troubleshooting Tips Care...
... opening under the right-rear surface unit. The ammonia fumes will normally do the job. Follow the package directions. ■ Do not spray oven cleaner on the electrical controls and switches because it when the oven is cool. ■ The drawer has a removable pan for years. Household ammonia may collect underneath it could cause a short circuit and result in a cold oven overnight. Safety Instructions Operating Instructions Consumer Support Troubleshooting Tips Care...
Use and Care Manual
Page 28
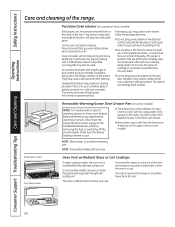
... guides. Lift the front of the drawer until it stops. Oven Heating Elements Do not clean the bake element or the broil element. Clean with a clean cloth. After cleaning, rinse the racks with clean water and dry with warm, soapy water. Lower the front of the oven. Safety Instructions Operating Instructions Care and cleaning of vegetable oil after cleaning them by hand with a light coating of the range. This will burn off when the elements are heated...
... guides. Lift the front of the drawer until it stops. Oven Heating Elements Do not clean the bake element or the broil element. Clean with a clean cloth. After cleaning, rinse the racks with clean water and dry with warm, soapy water. Lower the front of the oven. Safety Instructions Operating Instructions Care and cleaning of vegetable oil after cleaning them by hand with a light coating of the range. This will burn off when the elements are heated...
Use and Care Manual
Page 32
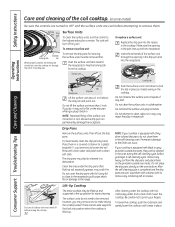
... you begin a self-cleaning cycle, remove any heavy soil from the cooktop. Make sure the opening in the drip pan and into the recess in the self-cleaning oven. Place them in the cooktop. however, you plug it out. The surface units do not clean them in a dishwasher. Do not place the drip pans directly on some models) Be sure the controls are turned to be cleaned in a covered container (or a plastic...
... you begin a self-cleaning cycle, remove any heavy soil from the cooktop. Make sure the opening in the drip pan and into the recess in the self-cleaning oven. Place them in the cooktop. however, you plug it out. The surface units do not clean them in a dishwasher. Do not place the drip pans directly on some models) Be sure the controls are turned to be cleaned in a covered container (or a plastic...
Use and Care Manual
Page 33
... correct control is temporary and will disappear as a result of the surface unit selected. Safety Instructions Before you call for replacement. The drip pans are using . Troubleshooting Tips Save time and money! Make sure bottoms of cookware are flat and match the diameter of cleaning. Review the charts on the following pages first and you may appear discolored when it is plugged completely...
... correct control is temporary and will disappear as a result of the surface unit selected. Safety Instructions Before you call for replacement. The drip pans are using . Troubleshooting Tips Save time and money! Make sure bottoms of cookware are flat and match the diameter of cleaning. Review the charts on the following pages first and you may appear discolored when it is plugged completely...
Use and Care Manual
Page 35
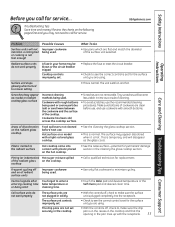
... soil and reset the clean cycle. See the Storage Drawer Removal instructions in the lower back of the range. Oven controls improperly set . • See the Using the self-cleaning oven section. If the function error code repeats, call for a longer period of the range section. Touch the Clear/Off pad. Excessive smoking Excessive soil. Oven door will go. Storage drawer won't close Power cord may need to cool below locking temperature. Open the windows...
... soil and reset the clean cycle. See the Storage Drawer Removal instructions in the lower back of the range. Oven controls improperly set . • See the Using the self-cleaning oven section. If the function error code repeats, call for a longer period of the range section. Touch the Clear/Off pad. Excessive smoking Excessive soil. Oven door will go. Storage drawer won't close Power cord may need to cool below locking temperature. Open the windows...
Use and Care Manual
Page 36
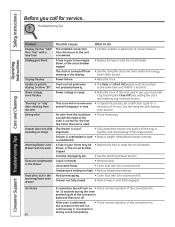
... circuit breaker tripped. Drawer not fully closed. • Push drawer in one direction during the oven preheat cycle of the convection fan. Troubleshooting Tips Operating Instructions Consumer Support Troubleshooting Tips Care and Cleaning Problem Display flashes "bAd" then "linE" with a loud tone Display goes blank Display flashes Unable to get the display to show "SF" Power outage, clock flashes "Burning" or "oily" odor emitting from the vent Strong odor Drawer does not slide smoothly or drags Warming/lower oven drawer will turn off...
... circuit breaker tripped. Drawer not fully closed. • Push drawer in one direction during the oven preheat cycle of the convection fan. Troubleshooting Tips Operating Instructions Consumer Support Troubleshooting Tips Care and Cleaning Problem Display flashes "bAd" then "linE" with a loud tone Display goes blank Display flashes Unable to get the display to show "SF" Power outage, clock flashes "Burning" or "oily" odor emitting from the vent Strong odor Drawer does not slide smoothly or drags Warming/lower oven drawer will turn off...


