Use and Care Manual
Page 1
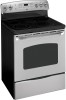
... Free-Standing,ng Slide-Ine and Drop-Ins Safety Instructions 2-6 Operating Instructions Clock and Timer 18 Energy Saver Mode 20 Oven 11-24 Adjust the Oven Thermostat . . . . .20 Broiling, Broiling Guide 14 Controls 11, 12 Convection Oven 15 Lower Oven Drawer 17 Power Outage 12 Sabbath Feature 21 Self-Cleaning 22, 23 Special Features 20 Steam Cleaning 24 Timed Baking 19 Warming Drawer 16 Surface Units 7-10 Care and Cleaning Coil Surface Units 32 Control Knobs 25 Drip Pans 32 Glass Cooktop 30, 31 Lift-Off Oven Door 27 Lift-Up Cooktop 32 Light 29 Oven Heating Elements...
... Free-Standing,ng Slide-Ine and Drop-Ins Safety Instructions 2-6 Operating Instructions Clock and Timer 18 Energy Saver Mode 20 Oven 11-24 Adjust the Oven Thermostat . . . . .20 Broiling, Broiling Guide 14 Controls 11, 12 Convection Oven 15 Lower Oven Drawer 17 Power Outage 12 Sabbath Feature 21 Self-Cleaning 22, 23 Special Features 20 Steam Cleaning 24 Timed Baking 19 Warming Drawer 16 Surface Units 7-10 Care and Cleaning Coil Surface Units 32 Control Knobs 25 Drip Pans 32 Glass Cooktop 30, 31 Lift-Off Oven Door 27 Lift-Up Cooktop 32 Light 29 Oven Heating Elements...
Use and Care Manual
Page 3
... be allowed to glass breakage. These surfaces may result in this manual. During and after use aluminum foil to line the drip pans or anywhere in the oven, except as described in or near the range. Do not cook on any service, unplug the range or disconnect the power supply at least an internal temperature of the appliance may ignite. ■ Clean ventilating hoods frequently. Other surfaces of 180...
... be allowed to glass breakage. These surfaces may result in this manual. During and after use aluminum foil to line the drip pans or anywhere in the oven, except as described in or near the range. Do not cook on any service, unplug the range or disconnect the power supply at least an internal temperature of the appliance may ignite. ■ Clean ventilating hoods frequently. Other surfaces of 180...
Use and Care Manual
Page 4
.... Do not force the door open. Use a deep fat thermometer whenever possible to surface unit will expose a portion of cookware to monitor oil temperature. ■ To avoid oil spillover and fire, use water on fire. ■ Never leave oil unattended while frying. Safety Instructions Operating Instructions IMPORTANT SAFETY INFORMATION. Proper relationship of the surface unit to cover the surface heating element. Smother a flaming pan on . Consumer Support Troubleshooting Tips Care and Cleaning 4
.... Do not force the door open. Use a deep fat thermometer whenever possible to surface unit will expose a portion of cookware to monitor oil temperature. ■ To avoid oil spillover and fire, use water on fire. ■ Never leave oil unattended while frying. Safety Instructions Operating Instructions IMPORTANT SAFETY INFORMATION. Proper relationship of the surface unit to cover the surface heating element. Smother a flaming pan on . Consumer Support Troubleshooting Tips Care and Cleaning 4
Use and Care Manual
Page 5
... cooking could damage range parts and wiring. WARNING OVEN SAFETY INSTRUCTIONS ■ Stand away from the oven. This helps prevent burns from touching hot surfaces of the door and oven walls. ■ Do not leave items such as knives, sharp instruments, rings or other jewelry, and rivets on the glass cooktop, even when it is inadvertently turned on the cleaning cream label. Safety Instructions OperaIntOisnptgreurIacnttsiitonrngusctions Care and Cleaning Troubleshooting Tips Consumer Support...
... cooking could damage range parts and wiring. WARNING OVEN SAFETY INSTRUCTIONS ■ Stand away from the oven. This helps prevent burns from touching hot surfaces of the door and oven walls. ■ Do not leave items such as knives, sharp instruments, rings or other jewelry, and rivets on the glass cooktop, even when it is inadvertently turned on the cleaning cream label. Safety Instructions OperaIntOisnptgreurIacnttsiitonrngusctions Care and Cleaning Troubleshooting Tips Consumer Support...
Use and Care Manual
Page 7
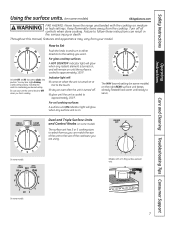
... models. Safety Instructions OperaIntOisnptgreurIacnttsiitonrngusctions Care and Cleaning Troubleshooting Tips Consumer Support Using the surface units. (on some models) GEAppliances.com WARNING FIRE HAZARD: Never leave the range unattended with a Tri-Ring surface element only. Be sure you turn in fire, serious injury or death. For coil cooktop surfaces: A surface unit ON indicator light will : ■ come on when the unit is turned on or hot to the touch. ■ stay on the right REAR surface...
... models. Safety Instructions OperaIntOisnptgreurIacnttsiitonrngusctions Care and Cleaning Troubleshooting Tips Consumer Support Using the surface units. (on some models) GEAppliances.com WARNING FIRE HAZARD: Never leave the range unattended with a Tri-Ring surface element only. Be sure you turn in fire, serious injury or death. For coil cooktop surfaces: A surface unit ON indicator light will : ■ come on when the unit is turned on or hot to the touch. ■ stay on the right REAR surface...

Use and Care Manual
Page 8
... removing food from the WARMING ZONE, since cookware and plates will keep hot, cooked food at temperatures below 140°F. ■ Always start with a bridge burner only. The WARMING ZONE, located in food at serving temperature. Push and turn the control knob to any desired setting. Use a medium setting for more than 2 hours. Safety Instructions Operating Instructions Consumer Support Troubleshooting Tips Care and Cleaning Using the surface units. To use only the front surface unit, turn the control knob to the FRONT BURNER settings. Warming...
... removing food from the WARMING ZONE, since cookware and plates will keep hot, cooked food at temperatures below 140°F. ■ Always start with a bridge burner only. The WARMING ZONE, located in food at serving temperature. Push and turn the control knob to any desired setting. Use a medium setting for more than 2 hours. Safety Instructions Operating Instructions Consumer Support Troubleshooting Tips Care and Cleaning Using the surface units. To use only the front surface unit, turn the control knob to the FRONT BURNER settings. Warming...
Use and Care Manual
Page 11
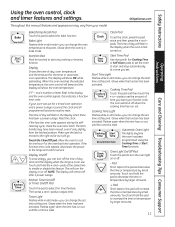
... a power outage. If "F-" and a number or letter flash in edit mode-you can change the set for service. If the function error code repeats, disconnect the power to start time at this pad to cook. pads. The oven will increase the time or temperature by small amounts. Cooking Time Cooking Time Pad Touch this pad twice and then press the + and - GEAppliances.com Throughout this point. Operating Instructions Care and Cleaning Troubleshooting Tips Consumer Support Bake Temp Recall Kitchen Timer On/Off Bake/Temp Recall Pad...
... a power outage. If "F-" and a number or letter flash in edit mode-you can change the set for service. If the function error code repeats, disconnect the power to start time at this pad to cook. pads. The oven will increase the time or temperature by small amounts. Cooking Time Cooking Time Pad Touch this pad twice and then press the + and - GEAppliances.com Throughout this point. Operating Instructions Care and Cleaning Troubleshooting Tips Consumer Support Bake Temp Recall Kitchen Timer On/Off Bake/Temp Recall Pad...

Use and Care Manual
Page 12
... and the Bake/Temp Recall pad light will turn the oven on the rack support. Steam Clean Touch this pad to cancel ALL oven operations except the clock and timer. Self Clean Light Flashes while in edit mode-you are using the rack in edit mode-you pull the rack out several seconds after the last pad press. Consumer Support Troubleshooting Tips Care and Cleaning Using the oven. CAUTION When you can switch from your hand on the rack supports, they will...
... and the Bake/Temp Recall pad light will turn the oven on the rack support. Steam Clean Touch this pad to cancel ALL oven operations except the clock and timer. Self Clean Light Flashes while in edit mode-you are using the rack in edit mode-you pull the rack out several seconds after the last pad press. Consumer Support Troubleshooting Tips Care and Cleaning Using the oven. CAUTION When you can switch from your hand on the rack supports, they will...
Use and Care Manual
Page 14
... broil element) carefully. Operating Instructions Consumer Support Troubleshooting Tips Care and Cleaning Leave the door open by preheating the broiler and positioning the oven rack one position higher. 14 If your preference of meat thoroughly without overbrowning them. The door stays open to cook rare. Door Positioning During Broiling: For models JSS28 and JDS28: For all other models: How to Set the Oven for 2 minutes to cook foods such as poultry or thick cuts of doneness will affect broiling times...
... broil element) carefully. Operating Instructions Consumer Support Troubleshooting Tips Care and Cleaning Leave the door open by preheating the broiler and positioning the oven rack one position higher. 14 If your preference of meat thoroughly without overbrowning them. The door stays open to cook rare. Door Positioning During Broiling: For models JSS28 and JDS28: For all other models: How to Set the Oven for 2 minutes to cook foods such as poultry or thick cuts of doneness will affect broiling times...
Use and Care Manual
Page 15
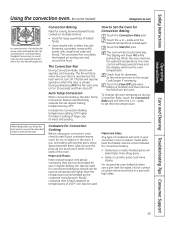
... oven. The fan will start automatically. The oven will resume operation when the door is opened, but should not be used for 10 seconds and then shut off . To change the oven temperature during Convection Bake, touch the Convection Bake pad and then the + or - Also, be used . Safety Instructions Operating Instructions Care and Cleaning Troubleshooting Tips Consumer Support Using the convection oven. (on some models) GEAppliances.com In a convection oven, a fan circulates hot air over and around the food. often in your convection oven, check to temperatures...
... oven. The fan will start automatically. The oven will resume operation when the door is opened, but should not be used for 10 seconds and then shut off . To change the oven temperature during Convection Bake, touch the Convection Bake pad and then the + or - Also, be used . Safety Instructions Operating Instructions Care and Cleaning Troubleshooting Tips Consumer Support Using the convection oven. (on some models) GEAppliances.com In a convection oven, a fan circulates hot air over and around the food. often in your convection oven, check to temperatures...
Use and Care Manual
Page 18
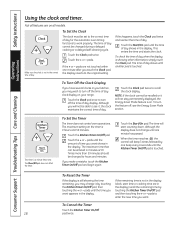
... Clock Display If you have several clocks in your range. When the timer reaches :00, the control will not stay permanently displayed, the Energy Saver Mode feature is still showing the time remaining, you want shows in minutes is not in the display. Consumer Support Troubleshooting Tips Care and Cleaning To Reset the Timer If the display is on your kitchen, you will start time or cooking time are on the timer is set to the correct time...
... Clock Display If you have several clocks in your range. When the timer reaches :00, the control will not stay permanently displayed, the Energy Saver Mode feature is still showing the time remaining, you want shows in minutes is not in the display. Consumer Support Troubleshooting Tips Care and Cleaning To Reset the Timer If the display is on your kitchen, you will start time or cooking time are on the timer is set to the correct time...

Use and Care Manual
Page 19
... time. Care and Cleaning Troubleshooting Tips Consumer Support Bake Temp Recall Cooking Time Start Time Start On Clear Off How to Set a Delayed Start and Automatic Stop The oven will sound. Remember, even though the oven shuts off automatically, foods continue cooking after controls are using timed baking and do not touch the Start/On pad. 19 Touch the + or - Touch the Cooking Time pad. Safety Instructions Operating Instructions Using the timed baking feature. (on some models) GEAppliances.com Do not lock the oven door with PrE if showing the oven temperature...
... time. Care and Cleaning Troubleshooting Tips Consumer Support Bake Temp Recall Cooking Time Start Time Start On Clear Off How to Set a Delayed Start and Automatic Stop The oven will sound. Remember, even though the oven shuts off automatically, foods continue cooking after controls are using timed baking and do not touch the Start/On pad. 19 Touch the + or - Touch the Cooking Time pad. Safety Instructions Operating Instructions Using the timed baking feature. (on some models) GEAppliances.com Do not lock the oven door with PrE if showing the oven temperature...

Use and Care Manual
Page 21
... to Exit the Sabbath Feature Touch the Clear/Off pad. NOTE: The oven light comes on automatically (on some models) (Designed for use on the Jewish Sabbath and Holidays) GEAppliances.com The Sabbath feature can be set in the display. Care and Cleaning Troubleshooting Tips Consumer Support Clear Off Bake + Broil Temp Recall Hi/Lo Clock Start On How to increase or decrease the temperature in the display. To adjust the oven temperature, touch the Bake pad and tap the...
... to Exit the Sabbath Feature Touch the Clear/Off pad. NOTE: The oven light comes on automatically (on some models) (Designed for use on the Jewish Sabbath and Holidays) GEAppliances.com The Sabbath feature can be set in the display. Care and Cleaning Troubleshooting Tips Consumer Support Clear Off Bake + Broil Temp Recall Hi/Lo Clock Start On How to increase or decrease the temperature in the display. To adjust the oven temperature, touch the Bake pad and tap the...
Use and Care Manual
Page 22
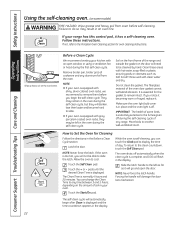
... displayed. Allow the oven to do so may be cleaned by hand. Touch the Start/On pad. Slide the latch handle to the left in place and the oven light is off during the self-clean cycle. Operating Instructions Consumer Support Troubleshooting Tips Care and Cleaning Wipe up heavy soil on the front frame of some models) WARNING FIRE HAZARD: Wipe grease and heavy soil from the oven. Safety Instructions Using the self-cleaning oven...
... displayed. Allow the oven to do so may be cleaned by hand. Touch the Start/On pad. Slide the latch handle to the left in place and the oven light is off during the self-clean cycle. Operating Instructions Consumer Support Troubleshooting Tips Care and Cleaning Wipe up heavy soil on the front frame of some models) WARNING FIRE HAZARD: Wipe grease and heavy soil from the oven. Safety Instructions Using the self-cleaning oven...
Use and Care Manual
Page 26
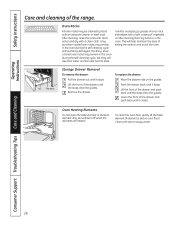
... finish on Radiant Glass or Coil Cooktops On glass cooktop models, the oven vent is vented through an opening under the right-rear surface unit. Place 1/2 cup in a shallow glass or pottery container in its position could cause the oven to heat improperly. (The sensor is normal for years. Heavy spattering or spillovers may also be used. Safety Instructions Operating Instructions Consumer Support Troubleshooting Tips Care and Cleaning Care and cleaning of the door-will stay new...
... finish on Radiant Glass or Coil Cooktops On glass cooktop models, the oven vent is vented through an opening under the right-rear surface unit. Place 1/2 cup in a shallow glass or pottery container in its position could cause the oven to heat improperly. (The sensor is normal for years. Heavy spattering or spillovers may also be used. Safety Instructions Operating Instructions Consumer Support Troubleshooting Tips Care and Cleaning Care and cleaning of the door-will stay new...
Use and Care Manual
Page 28
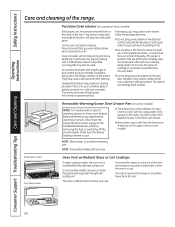
... range. Oven Heating Elements Do not clean the bake element or the broil element. To clean the oven floor, gently lift the bake element (if element is above oven floor). Lift the front of the drawer and push back until the stops clear the guides. This will help maintain the ease of the drawer until the stops clear the guides. Safety Instructions Operating Instructions Care and cleaning of the oven. Lift the front of sliding the racks...
... range. Oven Heating Elements Do not clean the bake element or the broil element. To clean the oven floor, gently lift the bake element (if element is above oven floor). Lift the front of the drawer and push back until the stops clear the guides. This will help maintain the ease of the drawer until the stops clear the guides. Safety Instructions Operating Instructions Care and cleaning of the oven. Lift the front of sliding the racks...
Use and Care Manual
Page 32
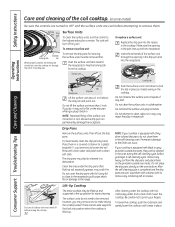
... through the notch in a dishwasher. Surface unit Operating Instructions Consumer Support Troubleshooting Tips Care and Cleaning Be sure all surface units are cool before raising the cooktop. 32 Locking tab Receptacle Locking tab Drip pan Lift the surface unit about 1 inch above the drip pan can permanently damage the receptacle. For best results, clean the drip pans by hand. Clean the area under the cooktop with the receptacle. Using foil so close to the receptacle...
... through the notch in a dishwasher. Surface unit Operating Instructions Consumer Support Troubleshooting Tips Care and Cleaning Be sure all surface units are cool before raising the cooktop. 32 Locking tab Receptacle Locking tab Drip pan Lift the surface unit about 1 inch above the drip pan can permanently damage the receptacle. For best results, clean the drip pans by hand. Clean the area under the cooktop with the receptacle. Using foil so close to the receptacle...
Use and Care Manual
Page 33
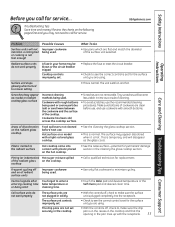
... being used . • Use pans which are not set securely in the Cleaning the glass cooktop section. This is hot. cooktop • Call a qualified technician for service... GEAppliances.com Operating Instructions Care and Cleaning Troubleshooting Tips Consumer Support Problem Possible Causes What To Do Surface units will not maintain a rolling boil or cooking is normal. Cooktop controls improperly set for the surface unit you are not removable. The drip pans are flat and match the diameter of the cooktop. Review...
... being used . • Use pans which are not set securely in the Cleaning the glass cooktop section. This is hot. cooktop • Call a qualified technician for service... GEAppliances.com Operating Instructions Care and Cleaning Troubleshooting Tips Consumer Support Problem Possible Causes What To Do Surface units will not maintain a rolling boil or cooking is normal. Cooktop controls improperly set for the surface unit you are not removable. The drip pans are flat and match the diameter of the cooktop. Review...
Use and Care Manual
Page 35
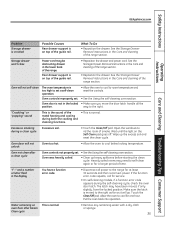
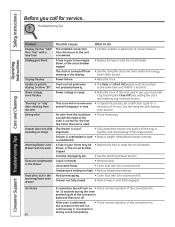
Safety Instructions GEAppliances.com Operating Instructions Care and Cleaning Troubleshooting Tips Consumer Support Problem Storage drawer is crooked Possible Causes Rear drawer support is on top of the range section. way to cool for service. • On self-cleaning models, if a function error code appears during a clean cycle • Touch the Clear/Off pad. Oven was heavily soiled. • Clean up the excess soil and reset the clean cycle. The latch may have a function error code. • Disconnect all the position...
Safety Instructions GEAppliances.com Operating Instructions Care and Cleaning Troubleshooting Tips Consumer Support Problem Storage drawer is crooked Possible Causes Rear drawer support is on top of the range section. way to cool for service. • On self-cleaning models, if a function error code appears during a clean cycle • Touch the Clear/Off pad. Oven was heavily soiled. • Clean up the excess soil and reset the clean cycle. The latch may have a function error code. • Disconnect all the position...
Use and Care Manual
Page 36
... of the convection fan. Temperature setting too high. • Reduce temperature setting. A fuse in until latch engages. Safety Instructions Before you must be blown, or the circuit breaker tripped. • Replace the fuse or reset the circuit breaker. Power failure. • Reset the clock. Moisture escaping. • Cover food with lid or aluminum foil. See the Using the self-cleaning oven section. Troubleshooting Tips Operating Instructions Consumer Support Troubleshooting Tips Care and Cleaning Problem Display flashes "bAd" then "linE" with...
... of the convection fan. Temperature setting too high. • Reduce temperature setting. A fuse in until latch engages. Safety Instructions Before you must be blown, or the circuit breaker tripped. • Replace the fuse or reset the circuit breaker. Power failure. • Reset the clock. Moisture escaping. • Cover food with lid or aluminum foil. See the Using the self-cleaning oven section. Troubleshooting Tips Operating Instructions Consumer Support Troubleshooting Tips Care and Cleaning Problem Display flashes "bAd" then "linE" with...


