Use and Care Manual
Page 1
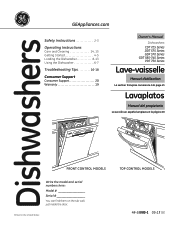
Dishwashers GEAppliances.com Safety Instructions 2-3 Operating Instructions Care and Cleaning 14, 15 Getting Started 4-5 Loading the Dishwasher 8-13 Using the Dishwasher 6-7 Troubleshooting Tips 16-18 Consumer Support Consumer Support 20 Warranty 19 Owner's Manual Dishwashers CDT 725 Series DDT 575 Series GDF 570 Series GDT 580-740 Series PDT 750 Series Lave-vaisselle Manuel d'utilisation La section française commence à la page 21 Lavaplatos Manual del propietario La sección en español empieza en...
Dishwashers GEAppliances.com Safety Instructions 2-3 Operating Instructions Care and Cleaning 14, 15 Getting Started 4-5 Loading the Dishwasher 8-13 Using the Dishwasher 6-7 Troubleshooting Tips 16-18 Consumer Support Consumer Support 20 Warranty 19 Owner's Manual Dishwashers CDT 725 Series DDT 575 Series GDF 570 Series GDT 580-740 Series PDT 750 Series Lave-vaisselle Manuel d'utilisation La section française commence à la page 21 Lavaplatos Manual del propietario La sección en español empieza en...

Use and Care Manual
Page 2
... marked, gasoline or other servicing should be followed to repair or replace any part of electric shock, disconnect this manual. In Canada, visit www.GEAppliances.ca. „ Connect the dishwasher/appliance to escape. We recommend having a qualified technician service your dishwasher, follow basic precautions, including the following: „ Use this Owner's Manual. When using any maintenance. of the dishwasher. „ Do not operate your safety, the information...
... marked, gasoline or other servicing should be followed to repair or replace any part of electric shock, disconnect this manual. In Canada, visit www.GEAppliances.ca. „ Connect the dishwasher/appliance to escape. We recommend having a qualified technician service your dishwasher, follow basic precautions, including the following: „ Use this Owner's Manual. When using any maintenance. of the dishwasher. „ Do not operate your safety, the information...

Use and Care Manual
Page 3
... the dishwasher when closing the door, closing the upper rack, or while vertically adjusting the upper rack due to the possibility of small fingers being pinched. „ Load light-weight, plastic items so they do not become dislodged and drop to the bottom of the dishwasher may be used by removing the two screws from the latch receiver inside the tub (as electronic air cleaner filters, furnace filters and...
... the dishwasher when closing the door, closing the upper rack, or while vertically adjusting the upper rack due to the possibility of small fingers being pinched. „ Load light-weight, plastic items so they do not become dislodged and drop to the bottom of the dishwasher may be used by removing the two screws from the latch receiver inside the tub (as electronic air cleaner filters, furnace filters and...
Use and Care Manual
Page 4
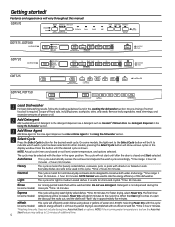
... Using the dishwasher section. 4 Select Cycle Press the Select Cycle button for the desired wash cycle. The cycle will not start until the desired cycle is too low, the Auto Hot Start feature may be washed later. NOTE: Normal was used in the open the door, pull the racks out, and the dishes will be selected with this dishwasher. Rinse For rinsing partial loads that will "flash" dry in the Loading the dishwasher section. The final rinse (on soil level, water...
... Using the dishwasher section. 4 Select Cycle Press the Select Cycle button for the desired wash cycle. The cycle will not start until the desired cycle is too low, the Auto Hot Start feature may be washed later. NOTE: Normal was used in the open the door, pull the racks out, and the dishes will be selected with this dishwasher. Rinse For rinsing partial loads that will "flash" dry in the Loading the dishwasher section. The final rinse (on soil level, water...

Use and Care Manual
Page 5
... 1 or 2 buttons indicated on the controls for soil removal and sanitization efficacy. The Control Lock light will change to starting a cycle during the wash cycle. Press the Start button and close the door. The dishwasher will target dishwashing of hours, then press Start one rack. The dishwasher will drain, emit a beep sound, and the wash cycle light will turn sounds back on some models) indicator light will change color to select the number of just one time and close the door. Clean Displayed when a wash cycle is complete, the light will...
... 1 or 2 buttons indicated on the controls for soil removal and sanitization efficacy. The Control Lock light will change to starting a cycle during the wash cycle. Press the Start button and close the door. The dishwasher will target dishwashing of hours, then press Start one rack. The dishwasher will drain, emit a beep sound, and the wash cycle light will turn sounds back on some models) indicator light will change color to select the number of just one time and close the door. Clean Displayed when a wash cycle is complete, the light will...
Use and Care Manual
Page 6
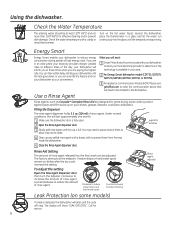
... the Dispenser The rinse agent dispenser holds 3.5 oz. (104 ml) of rinse agent. If water drops or hard water spots remain on your dishes, glasses, flatware, cookware, and plastic. then turn the adjuster clockwise to increase the amount of rinse agent, counterclockwise to prevent foam from forming inside the dishwasher. 5 Close the Rinse Agent dispenser door. The display will need to pause several times to allow rinse aid to prevent dish damage. Energy Smart Energy Smart enables your dishwasher. Use a Rinse Agent Rinse agents...
... the Dispenser The rinse agent dispenser holds 3.5 oz. (104 ml) of rinse agent. If water drops or hard water spots remain on your dishes, glasses, flatware, cookware, and plastic. then turn the adjuster clockwise to increase the amount of rinse agent, counterclockwise to prevent foam from forming inside the dishwasher. 5 Close the Rinse Agent dispenser door. The display will need to pause several times to allow rinse aid to prevent dish damage. Energy Smart Energy Smart enables your dishwasher. Use a Rinse Agent Rinse agents...

Use and Care Manual
Page 7
... dishwashers. Detergents should be very poor as a starting the dishwasher and then close the detergent cup cover. In Canada, call 1-800-661-1616. Use just enough to get information about the hardness of the dishwasher door. Contact your water is a permanent cloudiness in grains per gallon. DO NOT USE HAND DISH DETERGENT NOTE: Using a detergent that is not specifically designed for part number WD01X10295. The main wash compartment is located...
... dishwashers. Detergents should be very poor as a starting the dishwasher and then close the detergent cup cover. In Canada, call 1-800-661-1616. Use just enough to get information about the hardness of the dishwasher door. Contact your water is a permanent cloudiness in grains per gallon. DO NOT USE HAND DISH DETERGENT NOTE: Using a detergent that is not specifically designed for part number WD01X10295. The main wash compartment is located...
Use and Care Manual
Page 14
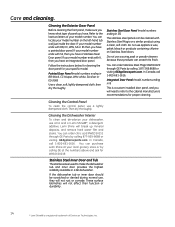
... GEApplianceparts.com. You can order Stainless Steel Magic #WX10X29 through GE Parts by calling GE at your dishwasher, use citric acid or Lemi Shine®*, a detergent additive. Stainless Steel Door Panel (model numbers ending in a GE dishwasher. In Canada, call 1-800-661-1616. Cleaning the Control Panel To clean the control panel, use , they will need to refer to the cabinet manufacturers recommendations for your model number on Stainless Steel doors. Then dry thoroughly. If your model number. Painted Door Panel (model numbers ending in II) This is a registered...
... GEApplianceparts.com. You can order Stainless Steel Magic #WX10X29 through GE Parts by calling GE at your dishwasher, use citric acid or Lemi Shine®*, a detergent additive. Stainless Steel Door Panel (model numbers ending in a GE dishwasher. In Canada, call 1-800-661-1616. Cleaning the Control Panel To clean the control panel, use , they will need to refer to the cabinet manufacturers recommendations for your model number on Stainless Steel doors. Then dry thoroughly. If your model number. Painted Door Panel (model numbers ending in II) This is a registered...

Use and Care Manual
Page 15
... during the winter, ask a service technician to: 1 Turn off the water supply and disconnect the water inlet line from the water valve. 3 Drain water from the water inlet line and water valve. (Use a pan to catch the water.) 4 Reconnect the water inlet line to the water valve. It is also an indication the filters need to the dishwasher. Scrubbing with warm soapy tub, and remove the Fine Filter. An air gap protects your dishwasher is not a part of children. Rinse filter with scouring pads can...
... during the winter, ask a service technician to: 1 Turn off the water supply and disconnect the water inlet line from the water valve. 3 Drain water from the water inlet line and water valve. (Use a pan to catch the water.) 4 Reconnect the water inlet line to the water valve. It is also an indication the filters need to the dishwasher. Scrubbing with warm soapy tub, and remove the Fine Filter. An air gap protects your dishwasher is not a part of children. Rinse filter with scouring pads can...
Use and Care Manual
Page 16
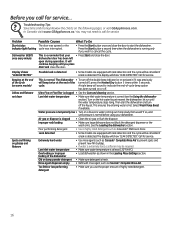
... hot water faucet nearest the dishwasher, let run until you press Start and close the door. dishwasher door has been left open during operation. cycle. Turn on the following pages, or visit GEAppliances.com. Air gap or disposer is fresh. • Refill with leak detection and the cycle will sound to start the dishwasher and turn off ), press the Heated Dry button 5 times within 3 seconds. Poor performing detergent • Use a highly rated detergent such as Cascade® Complete Rinse Aid...
... hot water faucet nearest the dishwasher, let run until you press Start and close the door. dishwasher door has been left open during operation. cycle. Turn on the following pages, or visit GEAppliances.com. Air gap or disposer is fresh. • Refill with leak detection and the cycle will sound to start the dishwasher and turn off ), press the Heated Dry button 5 times within 3 seconds. Poor performing detergent • Use a highly rated detergent such as Cascade® Complete Rinse Aid...

Use and Care Manual
Page 17
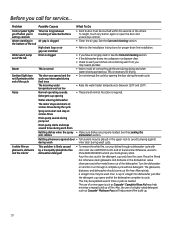
... detergent • Use only automatic dishwasher detergents to pump out water. Detergent left in the shortest cycle that will get it is locked • Check the rinse agent dispenser and fill as Wash Temp Sani (Sanitize) or Heavy. Replace the filter. • GE recommends Cascade® Complete Rinse Aid to help prevent hard water mineral deposits from happening, too much detergent use in all GE dishwashers. • To remove suds from opening. See the Loading the dishwasher section...
... detergent • Use only automatic dishwasher detergents to pump out water. Detergent left in the shortest cycle that will get it is locked • Check the rinse agent dispenser and fill as Wash Temp Sani (Sanitize) or Heavy. Replace the filter. • GE recommends Cascade® Complete Rinse Aid to help prevent hard water mineral deposits from happening, too much detergent use in all GE dishwashers. • To remove suds from opening. See the Loading the dishwasher section...
Use and Care Manual
Page 18
... film free. Water standing in the upper rack to the Installation Instructions for drying. If not, you call for service... This is required. Noise Normal operating sounds: Detergent cup opening the door during the cycle Spray arms start and stop at your dishes through the vent during each drain Rattling dishes when the spray • Make sure dishes are all normal. Use a WD35X151 citric acid kit found at various times Drain pump sounds during wash cycle. Alternatively, a vinegar rinse may be repeated several times during drying...
... film free. Water standing in the upper rack to the Installation Instructions for drying. If not, you call for service... This is required. Noise Normal operating sounds: Detergent cup opening the door during the cycle Spray arms start and stop at your dishes through the vent during each drain Rattling dishes when the spray • Make sure dishes are all normal. Use a WD35X151 citric acid kit found at various times Drain pump sounds during wash cycle. Alternatively, a vinegar rinse may be repeated several times during drying...
Use and Care Manual
Page 19
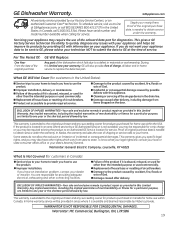
... the use the product. „ Improper installation, delivery or maintenance. „ Failure of the product if it is needed to GE at GEAppliances.com, or call 1.800.561.3344. Please have serial number and model number available when calling for diagnostics. GE Dishwasher Warranty. If you how to use of the original purchase date is abused, misused, or used for customers in the United States): „ Service trips...
... the use the product. „ Improper installation, delivery or maintenance. „ Failure of the product if it is needed to GE at GEAppliances.com, or call 1.800.561.3344. Please have serial number and model number available when calling for diagnostics. GE Dishwasher Warranty. If you how to use of the original purchase date is abused, misused, or used for customers in the United States): „ Service trips...
Installation Instructions
Page 2
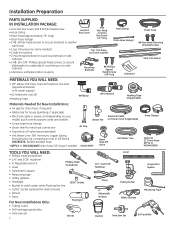
... fit water supply) • UL-listed wire nuts (3) • Masking Tape 90°Elbow Wire Nuts (3) Masking Tape (if applicable) Materials Needed for New Installations: • Air gap for drain hose, if required • Waste tee for house plumbing, if applicable • Electrical cable or power cord depending on your model, quick connect power cords are availble. • Screw-type hose clamps • Strain relief for electrical connection • Hand shut-off valve (recommended) • Hot Water Line...
... fit water supply) • UL-listed wire nuts (3) • Masking Tape 90°Elbow Wire Nuts (3) Masking Tape (if applicable) Materials Needed for New Installations: • Air gap for drain hose, if required • Waste tee for house plumbing, if applicable • Electrical cable or power cord depending on your model, quick connect power cords are availble. • Screw-type hose clamps • Strain relief for electrical connection • Hand shut-off valve (recommended) • Hot Water Line...
Installation Instructions
Page 3
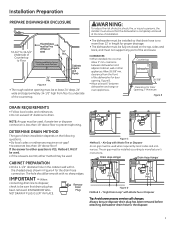
..." Min. CLEARANCES: • When installed into a corner, allow 2" min. Figure B. • Allow at the time of the enclosure. Remove Drain Plug Figure C Method 1 - "High Drain Loop" with Waste Tee or Disposer An air gap must be sure disposer drain plug has been removed before attaching dishwasher drain hose to the disposer. 3 The hole should be sure that drain plug has been removed. When connecting drain line to disposer, check to...
..." Min. CLEARANCES: • When installed into a corner, allow 2" min. Figure B. • Allow at the time of the enclosure. Remove Drain Plug Figure C Method 1 - "High Drain Loop" with Waste Tee or Disposer An air gap must be sure disposer drain plug has been removed before attaching dishwasher drain hose to the disposer. 3 The hole should be sure that drain plug has been removed. When connecting drain line to disposer, check to...

Installation Instructions
Page 4
... or time-delay fuse. • Wiring must be routed as the drain hose and hot water line, if convenient. if it will reduce the risk of hole should be grounded. Electrical Connection to admit the electrical cable. Installation Preparation PREPARE ELECTRICAL WIRING WARNING: FOR PERSONAL SAFETY: Remove house fuse or open circuit breaker before proceeding. 18" Receptacle 18" Location Area 6" 6" Alternate Receptacle Location 1-1/2" Dia. Edges of electric shock by a 15- Grounding Instructions-Power Cord Models...
... or time-delay fuse. • Wiring must be routed as the drain hose and hot water line, if convenient. if it will reduce the risk of hole should be grounded. Electrical Connection to admit the electrical cable. Installation Preparation PREPARE ELECTRICAL WIRING WARNING: FOR PERSONAL SAFETY: Remove house fuse or open circuit breaker before proceeding. 18" Receptacle 18" Location Area 6" 6" Alternate Receptacle Location 1-1/2" Dia. Edges of electric shock by a 15- Grounding Instructions-Power Cord Models...

Installation Instructions
Page 6
...; Drain hose and clamp • Mounting brackets • Trim pieces (on some models) • Drain hose hanger • Owner's Manual • Product samples and/or coupons STEP 2: CHECK DOOR BALANCE NOTE: If installing a Custom Door Panel (available on some models) Skip this step if the sound barrier is not assembled to the dishwasher. Side View • Door is routed as shown. This will not require the 2 rear leveling legs. Latch door and adjust both...
...; Drain hose and clamp • Mounting brackets • Trim pieces (on some models) • Drain hose hanger • Owner's Manual • Product samples and/or coupons STEP 2: CHECK DOOR BALANCE NOTE: If installing a Custom Door Panel (available on some models) Skip this step if the sound barrier is not assembled to the dishwasher. Side View • Door is routed as shown. This will not require the 2 rear leveling legs. Latch door and adjust both...

Installation Instructions
Page 10
... factory-installed hose. Door panel and/or control panel must not hit cabinets or countertop.Remove plug buttons. Ferrule Figure Y Bottom Left Side STEP 18: CONNECT DRAIN LINE The molded end of the drain hose will need the 2 Phillips special head screws from the screws set aside in the cabinet. Use Method 2 when the underside of water line. • Insert water line into 90° elbow. • Slide ferrule against elbow and secure with door operation. Mounting...
... factory-installed hose. Door panel and/or control panel must not hit cabinets or countertop.Remove plug buttons. Ferrule Figure Y Bottom Left Side STEP 18: CONNECT DRAIN LINE The molded end of the drain hose will need the 2 Phillips special head screws from the screws set aside in the cabinet. Use Method 2 when the underside of water line. • Insert water line into 90° elbow. • Slide ferrule against elbow and secure with door operation. Mounting...

Installation Instructions
Page 12
... with cabinet. Tighten connections if needed. • Remove protective film if present from the control panel and door. Reposition the dishwasher if necessary. Also check drain hose to be sure that water and power are made. If door hits cabinet, reposition dishwasher. Restore power after leak is corrected. • Check for leaks around the door could cause noise. • Turn on power supply or plug power cord into outlet, if equipped. • Select a cycle to drain. See "Prepare Hot Water Line...
... with cabinet. Tighten connections if needed. • Remove protective film if present from the control panel and door. Reposition the dishwasher if necessary. Also check drain hose to be sure that water and power are made. If door hits cabinet, reposition dishwasher. Restore power after leak is corrected. • Check for leaks around the door could cause noise. • Turn on power supply or plug power cord into outlet, if equipped. • Select a cycle to drain. See "Prepare Hot Water Line...
Quick Specs
Page 2
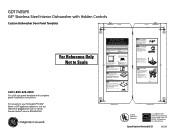
... installed onto the custom panel. IMPORTANT: Adjust both door springs. • Attach the new heavy duty door springs. Note: The custom panel is held in place by inserting the top and bottom mounting screws with the top of the door. From Top of the screws could damage door edges. The cable is secured to Scale 3/4" Thick Custom Panel Template Instructions for energy efficiency. GDT740SIFII GE® Stainless Steel Interior Dishwasher with Hidden Controls Custom Dishwasher Door Panel...
... installed onto the custom panel. IMPORTANT: Adjust both door springs. • Attach the new heavy duty door springs. Note: The custom panel is held in place by inserting the top and bottom mounting screws with the top of the door. From Top of the screws could damage door edges. The cable is secured to Scale 3/4" Thick Custom Panel Template Instructions for energy efficiency. GDT740SIFII GE® Stainless Steel Interior Dishwasher with Hidden Controls Custom Dishwasher Door Panel...


