GE PDT720SSHSS Support and Manuals
Get Help and Manuals for this General Electric item

View All Support Options Below
Free GE PDT720SSHSS manuals!
Problems with GE PDT720SSHSS?
Ask a Question
Free GE PDT720SSHSS manuals!
Problems with GE PDT720SSHSS?
Ask a Question
Popular GE PDT720SSHSS Manual Pages
Quick Specs - Page 1

... Information: Before installing, consult installation instructions packed with a separate ground wire.
Specification Created 1/15 This appliance must be grounded for current dimensional data.
33-3/8" MIN. adj to
34-5/8" MAX.
29-7/8"
27-1/2"
PREPARE DISHWASHER ENCLOSURE
For answers to your Monogram,® Cafe™ Series, Profile™ Series or GE® appliance...
Quick Specs - Page 2

... industry-leading number of room in the bottom rack for the ultimate clean
• Side Jets - Stainless steel
• Model PDT720SGHWW - PDT720SGH/SSH GE Profile™ Dishwasher with 102 cleaning jets - Cascading water fills the dishwasher while hydrating soils
• Easy Touch Adjustable Upper Rack with four dedicated jets integrated into the upper rack that deliver...
Use and Care Manual - Page 1
...ENTRAPMENT
PROPER DISPOSAL OF THE DISHWASHER Junked or abandoned dishwashers are clean. If you have . dishwasher and discoloration or staining of your specific model. Rinse filter with the handles up to 8 to fill with a qualified electrician or service representative if you have an Integrated door panel. Scrubbing with a condensed Owner's Manual. The retaining posts can be...
Installation Instructions - Page 1
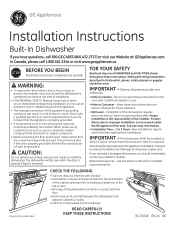
GE Appliances
Installation Instructions
Built-In Dishwasher
If you should immediately contact your Owner's Manual for future reference.
• Skill Level -
FOR YOUR SAFETY
Read and observe all governing codes and
ordinances.
• Note to Installer - New installations require more time than replacement installations.
Optional Accessories - Do not use an extension cord or ...
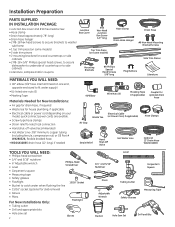
Installation Instructions - Page 2
...(on some models)
Side Trim Pieces
• 2 #8-18 x 5/8" Phillips special head screws, to secure dishwasher to underside of...-3/8" minimum, copper tubing
(including ferrule, compression nut) or GE Part # WX28X326, flexible braided hose. • WD24X10065 drain hose...
For New Installations Only:
Flashlight
• Tubing cutter
• Drill and appropriate bits
• Hole saw set
2
Gloves
...
Installation Instructions - Page 3

... DETERMINE DRAIN METHOD
The type of drain installation depends on the top, sides and back, and must not support any part of the enclosure. DISHWASHER WILL NOT DRAIN IF PLUG IS LEFT IN... be installed according to manufacturer's instructions.
clearance from floor to underside of the dishwasher for door opening must be fully enclosed on the following questions. • Do local codes or ...
Installation Instructions - Page 4
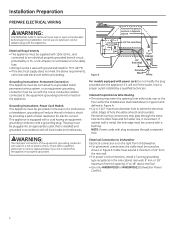
...all local codes and ordinances. For models equipped with power cord: Do not modify the plug provided with this appliance.
WARNING:
The improper connection of dishwasher. &#...WX09X70911 Dishwasher Power Cord Kit.
4
Grounding Instructions-Power Cord Models This appliance must be grounded. or 18" maximum from the opening from the rear wall. • For power cord connections, install ...
Installation Instructions - Page 6
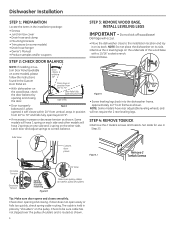
... • Discard base. The cable is routed as shown.
6 Set aside for use in position from 20° to 70°
...models) • Drain hose hanger • Owner's Manual • Product samples and/or coupons
STEP 2: CHECK DOOR BALANCE
NOTE: If installing a Custom Door Panel (available on some models), please follow the instructions found in the Custom Door Panel kit.
• With dishwasher...
Installation Instructions - Page 7
... and components under or behind the dishwasher.
7 Dishwasher Installation
STEP 5: IF NECESSARY, REMOVE FLOOR PROTECT (on some models)
• Disconnect leak sensor wire (on some models).
• Remove 2 screws from front of the Floor Protect with a ¼" driver.
• Lower front of pan and slide out from under dishwasher.
• Set aside for better wash performance.
Position...
Installation Instructions - Page 10
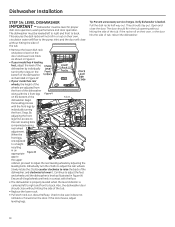
...UDFNPRYHVDGMXVW
leveling legs. Tip: Prevent unnecessary service charges. Open and FORVHWKHGRRU7KHGRRUVKRXOG¿WLQWKHWXERSHQLQJZLWKRXW hitting the side of the
$GMXVW
dishwasher. This ensures the dish racks will not roll in Figure V.
• If your model has rear
wheels, the height of the
ZKHHOV...
Installation Instructions - Page 11
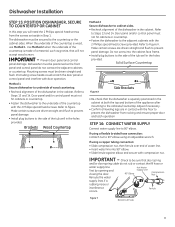
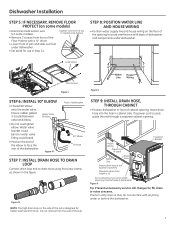
...Slide ferrule against elbow and secure with the floor to prevent the dishwasher from the screws set aside in Step 1. Method 1 Secure dishwasher to the countertop or the cabinet sides.
Check to be secured ...bottom of water line. • Insert water line into the cabinet face frame.
• Install plug buttons to
Steps 13 and 14.
When the underside of a material, such as granite...
Installation Instructions - Page 12
... unnecessary service call charges for a total of
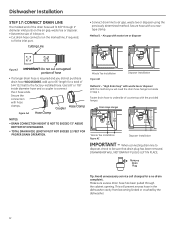
144" (12 feet) to be sure that drain plug has been removed. Waste Tee Installation Figure AB
Disposer Installation
Method 2 - "High drain loop" with the provided hanger.
Dishwasher Installation
STEP 17: CONNECT DRAIN LINE
The molded end of the drain hose will need the drain hose hanger set aside...
Installation Instructions - Page 13
... 2-wire with door springs or other components. If door hits tub, level dishwasher.
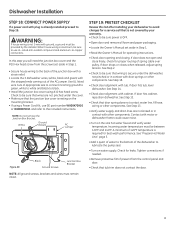
WARNING:
If house wiring is aluminum, be sure to use GE part number WX09X70910 or WX09X70911 and refer to Step 19. STEP 19: PRETEST CHECKLIST
Review this list after installing your warranty. • Check to lubricate the pump seal.
• Turn on...
Installation Instructions - Page 14
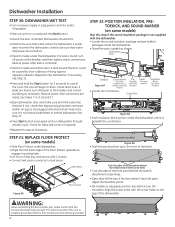
...dishwasher. • Stand the parts upright as necessary.
Push the sides of the insulation behind the toekick attachment screw holes
• Tuck the sides of the front panel behind dishwasher. Dishwasher Installation
STEP 20: DISHWASHER...(On some models.)
Panel (On some models)
Figure AH
• Push the panel portion up to run dishwasher through another cycle. Part is already ...
Installation Instructions - Page 15
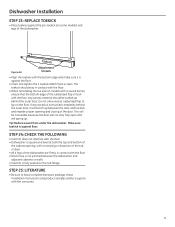
...complete literature package, these Installation Instructions and product samples and...;RRU • Drain hose is against the pre-toekick (on some models) and legs of the door. This will be tucked up .
The...RRU
• Insert and tighten the 2 toekick attachment screws. Dishwasher Installation
STEP 23: REPLACE TOEKICK
• Place toekick against floor.
Make sure toekick is not...
GE PDT720SSHSS Reviews
We have not received any reviews for GE yet.