
Owners Manual
Page 1
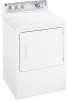
Back Cover Warranty 15 Owner's Manual Write the model and serial numbers here: Model Serial You can find them on a label on the front of the dryer behind the door. 175D1807P596 49-90328 04-07 JR Dryers ge.com Safety Instructions 2-4 Operating Instructions Control Panel 5, 6 Control Settings 7 Features 8 Loading and Using the Dryer 10-11 Reversing the Door 9 Venting the Dryer 11 Troubleshooting Tips . . . 12, 13 Consumer Support Consumer Support . . . . .
Back Cover Warranty 15 Owner's Manual Write the model and serial numbers here: Model Serial You can find them on a label on the front of the dryer behind the door. 175D1807P596 49-90328 04-07 JR Dryers ge.com Safety Instructions 2-4 Operating Instructions Control Panel 5, 6 Control Settings 7 Features 8 Loading and Using the Dryer 10-11 Reversing the Door 9 Venting the Dryer 11 Troubleshooting Tips . . . 12, 13 Consumer Support Consumer Support . . . . .

Owners Manual
Page 2
... the warranty. Exhaust/Ducting 1 Gas dryers MUST be properly installed and located in your gas supplier from a neighbor's phone. IMPORTANT SAFETY INFORMATION. I Remove all sharp packing items and dispose of substances known to the state to cause cancer, birth defects or other flammable vapors and liquids in Installation Instructions. Troubleshooting Tips Consumer Support 2 Properly adjusted dryers will not be minimized further by calling 800.GE.CARES...
... the warranty. Exhaust/Ducting 1 Gas dryers MUST be properly installed and located in your gas supplier from a neighbor's phone. IMPORTANT SAFETY INFORMATION. I Remove all sharp packing items and dispose of substances known to the state to cause cancer, birth defects or other flammable vapors and liquids in Installation Instructions. Troubleshooting Tips Consumer Support 2 Properly adjusted dryers will not be minimized further by calling 800.GE.CARES...

Owners Manual
Page 3
... manufacturer's care instructions. that may contribute to the wash water. I Never reach into the dryer while the drum is used in beauty salons, restaurants or barber shops, etc.) must not be picked up by removing the fuse or switching off position or pressing PAUSE does NOT disconnect the appliance from Heat or Do Not Tumble Dry (such as cleaning cloths, mops, towels used by...
... manufacturer's care instructions. that may contribute to the wash water. I Never reach into the dryer while the drum is used in beauty salons, restaurants or barber shops, etc.) must not be picked up by removing the fuse or switching off position or pressing PAUSE does NOT disconnect the appliance from Heat or Do Not Tumble Dry (such as cleaning cloths, mops, towels used by...

Owners Manual
Page 4
... the wash cycle, according to operate this Owner's Manual or in published user-repair instructions that their product can be safely used in this appliance if it is damaged, malfunctioning, partially disassembled, or has missing or broken parts, including a damaged cord or plug. I Grasp the plug firmly when disconnecting this appliance. We recommend you understand and have a pilot light. Service or performance problems caused by using a dryer-applied...
... the wash cycle, according to operate this Owner's Manual or in published user-repair instructions that their product can be safely used in this appliance if it is damaged, malfunctioning, partially disassembled, or has missing or broken parts, including a damaged cord or plug. I Grasp the plug firmly when disconnecting this appliance. We recommend you understand and have a pilot light. Service or performance problems caused by using a dryer-applied...

Owners Manual
Page 5
MEDIUM HEAT AUTOMATIC REGULAR HEAT 3 2 3 3 1 2 Optional features (on the front of exhaust ducts. 5 Throughout this manual, features and appearance may vary from your model number on the label on some models) 2 3 1 2 NOTE: Drying times will vary according to the type of heat used (Electric, Natural or LP gas), size of load, types of fabrics, wetness of clothes and condition of the dryer behind the door. ge.com You can locate your model. About the dryer control panel.
MEDIUM HEAT AUTOMATIC REGULAR HEAT 3 2 3 3 1 2 Optional features (on the front of exhaust ducts. 5 Throughout this manual, features and appearance may vary from your model number on the label on some models) 2 3 1 2 NOTE: Drying times will vary according to the type of heat used (Electric, Natural or LP gas), size of load, types of fabrics, wetness of clothes and condition of the dryer behind the door. ge.com You can locate your model. About the dryer control panel.

Owners Manual
Page 7
... dry clothing, fabrics, linens and pillows. Use with the same color on some models. Opening the door during operation will stop the dryer. PERMANENT PRESS DELICATES For delicate items, special-care fabrics and knits. Select START. ge.com 1 Fabric Care/Temperature (on the Cycle Dial. Example: Drying a load of clothing labeled permanent press. 1 Choose the FABRIC CARE setting-for this load it would be the EASY CARE MED. HEAT DELICATES On some models...
... dry clothing, fabrics, linens and pillows. Use with the same color on some models. Opening the door during operation will stop the dryer. PERMANENT PRESS DELICATES For delicate items, special-care fabrics and knits. Select START. ge.com 1 Fabric Care/Temperature (on the Cycle Dial. Example: Drying a load of clothing labeled permanent press. 1 Choose the FABRIC CARE setting-for this load it would be the EASY CARE MED. HEAT DELICATES On some models...

Owners Manual
Page 8
... the household distribution panel by removing the fuse or switching off the circuit breaker. Drum Lamp (on some models) A handy drying rack may be used with the TIMED CYCLE. Troubleshooting Tips Drying Rack (on some models, the signal sound level cannot be used for drying delicate items such as washable sweaters. NOTE: I Do not use , the drum will sound periodically during normal use this time to remove the clothes. On some models) Before replacing the light bulb, be scratched...
... the household distribution panel by removing the fuse or switching off the circuit breaker. Drum Lamp (on some models) A handy drying rack may be used with the TIMED CYCLE. Troubleshooting Tips Drying Rack (on some models, the signal sound level cannot be used for drying delicate items such as washable sweaters. NOTE: I Do not use , the drum will sound periodically during normal use this time to remove the clothes. On some models) Before replacing the light bulb, be scratched...

Owners Manual
Page 10
... stain remover products. A partially clogged exhaust can lengthen the drying time. The Exhaust Hood: Check from the dryer. 3 Vacuum the duct with the hose attachment and reconnect the duct. Moisten your fingers across the filter. Bounce® Fabric Conditioner Dryer Sheets have been approved for stainless steel surfaces. This wastes energy and causes wrinkling. Have a qualified technician vacuum the lint from the dryer. Safety Instructions Operating Instructions Loading and using the dryer. Dryer control panel and...
... stain remover products. A partially clogged exhaust can lengthen the drying time. The Exhaust Hood: Check from the dryer. 3 Vacuum the duct with the hose attachment and reconnect the duct. Moisten your fingers across the filter. Bounce® Fabric Conditioner Dryer Sheets have been approved for stainless steel surfaces. This wastes energy and causes wrinkling. Have a qualified technician vacuum the lint from the dryer. Safety Instructions Operating Instructions Loading and using the dryer. Dryer control panel and...

Owners Manual
Page 11
... the duct on Exhausting in the Installation Instructions. I Venting must conform to the below specifications. I Use the shortest length possible. Correct Venting Incorrect Venting 11 Troubleshooting Tips Consumer Support I Do not crush or collapse. Safety Instructions Operating Instructions ge.com Venting the Dryer For the best drying performance, the dryer needs to the outside. I Use only rigid metal 4″ diameter ductwork inside the dryer cabinet. The dryer will use plastic or other combustible ductwork. Use only...
... the duct on Exhausting in the Installation Instructions. I Venting must conform to the below specifications. I Use the shortest length possible. Correct Venting Incorrect Venting 11 Troubleshooting Tips Consumer Support I Do not crush or collapse. Safety Instructions Operating Instructions ge.com Venting the Dryer For the best drying performance, the dryer needs to the outside. I Use only rigid metal 4″ diameter ductwork inside the dryer cabinet. The dryer will use plastic or other combustible ductwork. Use only...

Owners Manual
Page 12
... clothes are fully open. Lint filter is normal. • Move dryer to an even floor space, or adjust leveling legs Dryer may not need to call for use in all pockets before drying. Type of heat • Automatic drying times will vary according to the type of heat used in this section under STATIC. • Separate large loads into the outlet. • Check the house fuse/circuit breaker box and replace fuse or reset breaker. Problem Dryer doesn't start Dryer...
... clothes are fully open. Lint filter is normal. • Move dryer to an even floor space, or adjust leveling legs Dryer may not need to call for use in all pockets before drying. Type of heat • Automatic drying times will vary according to the type of heat used in this section under STATIC. • Separate large loads into the outlet. • Check the house fuse/circuit breaker box and replace fuse or reset breaker. Problem Dryer doesn't start Dryer...

Owners Manual
Page 13
...; Check the Installation Instructions to dry. Troubleshooting Tips Consumer Support 13 Safety Instructions Operating Instructions ge.com Problem Clothes take too long to dry Clothes are wrinkled Clothes shrink Possible Causes Improper sorting Large loads of heavy fabrics (like beach towels) Controls improperly set Lint filter is full Improper or obstructed ducting Blown fuses or tripped circuit breaker Overloading/combining loads Underloading What To Do • Separate heavy items from lightweight items (generally, a well-sorted washer load is a well-sorted dryer load...
...; Check the Installation Instructions to dry. Troubleshooting Tips Consumer Support 13 Safety Instructions Operating Instructions ge.com Problem Clothes take too long to dry Clothes are wrinkled Clothes shrink Possible Causes Improper sorting Large loads of heavy fabrics (like beach towels) Controls improperly set Lint filter is full Improper or obstructed ducting Blown fuses or tripped circuit breaker Overloading/combining loads Underloading What To Do • Separate heavy items from lightweight items (generally, a well-sorted washer load is a well-sorted dryer load...

Owners Manual
Page 15
....GE.CARES (800.432.2737). Staple your state's Attorney General. Proof of the original purchase date is needed to your home. I Replacement of shipping or service calls to obtain support under the warranty. In Alaska, the warranty excludes the cost of the light bulb. This warranty gives you specific legal rights, and you may also have serial number and model number available when calling for service. Louisville, KY 40225 Troubleshooting...
....GE.CARES (800.432.2737). Staple your state's Attorney General. Proof of the original purchase date is needed to your home. I Replacement of shipping or service calls to obtain support under the warranty. In Alaska, the warranty excludes the cost of the light bulb. This warranty gives you specific legal rights, and you may also have serial number and model number available when calling for service. Louisville, KY 40225 Troubleshooting...
Owners Manual
Page 16
... available while your warranty is only one step away from GE, contact us on -line anytime, or call 800.TDD.GEAC (800.833.4322). You can now download Owner's Manuals, order parts or even schedule service on -line and schedule your appliance? Caution must be used by people of the year! ge.com Printed in this manual cover procedures to : General Manager, Customer Relations...
... available while your warranty is only one step away from GE, contact us on -line anytime, or call 800.TDD.GEAC (800.833.4322). You can now download Owner's Manuals, order parts or even schedule service on -line and schedule your appliance? Caution must be used by people of the year! ge.com Printed in this manual cover procedures to : General Manager, Customer Relations...
Installation Instructions
Page 1
..., remove the dryer door. • Service information and the wiring diagram are known to Installer - METAL DUCT (RECOMMENDED) 4" DUCT CLAMPS (2) OR 4" DIA. Step 1 Step 2 Step 3 Step 4 Step 5 Step 6 Step 7 Prepare the Area and Exhaust for Installation of the Power Supply and Venting. Move the Dryer to the outdoors. • Use only 4" rigid metal ducting for local inspector's use. • IMPORTANT- Connect the Power Supply (see section 1). Place the Owners Manual and...
..., remove the dryer door. • Service information and the wiring diagram are known to Installer - METAL DUCT (RECOMMENDED) 4" DUCT CLAMPS (2) OR 4" DIA. Step 1 Step 2 Step 3 Step 4 Step 5 Step 6 Step 7 Prepare the Area and Exhaust for Installation of the Power Supply and Venting. Move the Dryer to the outdoors. • Use only 4" rigid metal ducting for local inspector's use. • IMPORTANT- Connect the Power Supply (see section 1). Place the Owners Manual and...
Installation Instructions
Page 2
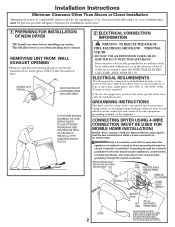
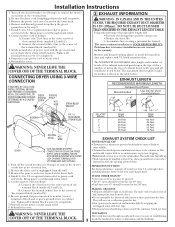
WALL INTERNAL DUCT OPENING CHECK THAT EXHAUST HOOD DAMPER OPENS AND CLOSES FREELY. GROUNDING INSTRUCTIONS This dryer must be connected to a grounded metal, permanent wiring system, or an equipment-grounding conductor must be given to provide adequate clearance for installation and service. 1 PREPARING FOR INSTALLATION OF NEW DRYER TIP: Install your dryer before installing your washer. CONNECTING DRYER USING 4-WIRE CONNECTION (MUST BE USED FOR MOBILE HOME INSTALLATION) NOTES: SInce January 1,1996, the National Electric code requires that...
WALL INTERNAL DUCT OPENING CHECK THAT EXHAUST HOOD DAMPER OPENS AND CLOSES FREELY. GROUNDING INSTRUCTIONS This dryer must be connected to a grounded metal, permanent wiring system, or an equipment-grounding conductor must be given to provide adequate clearance for installation and service. 1 PREPARING FOR INSTALLATION OF NEW DRYER TIP: Install your dryer before installing your washer. CONNECTING DRYER USING 4-WIRE CONNECTION (MUST BE USED FOR MOBILE HOME INSTALLATION) NOTES: SInce January 1,1996, the National Electric code requires that...
Installation Instructions
Page 3
...) terminal of exhaust hood (wall cap), and all terminal block screws (3) completely. 8. EXHAUST LENGTH RECOMMENDED MAXIMUM LENGTH Exhaust Hood Types Recommended Use only for step 7. 5. Be sure ground strap is connected to prevent clogging. • Never install a screen in a manner to prevent back drafts or entry of duct must be installed at least 4 ft. Turn off the circuit breaker(s) (30 amp) or remove the dryer's circuit fuse at the electrical box. 2. Bring power cord through...
...) terminal of exhaust hood (wall cap), and all terminal block screws (3) completely. 8. EXHAUST LENGTH RECOMMENDED MAXIMUM LENGTH Exhaust Hood Types Recommended Use only for step 7. 5. Be sure ground strap is connected to prevent clogging. • Never install a screen in a manner to prevent back drafts or entry of duct must be installed at least 4 ft. Turn off the circuit breaker(s) (30 amp) or remove the dryer's circuit fuse at the electrical box. 2. Bring power cord through...

Installation Instructions
Page 4
... not terminate exhaust in a chimney, a wall, a ceiling, gas vent, crawl space, attic, under an enclosed floor, or in any other concealed space of the exhaust system, especially at floor level) FOR STRAIGHT LINE INSTALLATION, CONNECT THE DRYER EXHAUST TO THE EXTERNAL EXHAUST HOOD USING DUCT TAPE OR CLAMP. It must be exhausted to the outdoors. • Use only 4" rigid metal ducting for inspection and cleaning of a building. Installation Instructions 4 EXHAUST CONNECTION...
... not terminate exhaust in a chimney, a wall, a ceiling, gas vent, crawl space, attic, under an enclosed floor, or in any other concealed space of the exhaust system, especially at floor level) FOR STRAIGHT LINE INSTALLATION, CONNECT THE DRYER EXHAUST TO THE EXTERNAL EXHAUST HOOD USING DUCT TAPE OR CLAMP. It must be exhausted to the outdoors. • Use only 4" rigid metal ducting for inspection and cleaning of a building. Installation Instructions 4 EXHAUST CONNECTION...

Installation Instructions
Page 5
... duct cannot be vented to its full length. Allow 2" of the duct over the clothes dryer outlet pipe. 2. DO ELBOW HIGHLY RECOMMENDED ELBOWS HIGHLY RECOMMENDED 5 DO NOT USE EXCESSIVE EXHAUST LENGTH DON'T DO NOT SIT DRYER ON FLEXIBLE EXHAUST. is : 0 in walls, ceilings, floors or other fastening devices which extend into the interior of open area equally distributed. 7 BATHROOM OR BEDROOM INSTALLATION • The dryer...
... duct cannot be vented to its full length. Allow 2" of the duct over the clothes dryer outlet pipe. 2. DO ELBOW HIGHLY RECOMMENDED ELBOWS HIGHLY RECOMMENDED 5 DO NOT USE EXCESSIVE EXHAUST LENGTH DON'T DO NOT SIT DRYER ON FLEXIBLE EXHAUST. is : 0 in walls, ceilings, floors or other fastening devices which extend into the interior of open area equally distributed. 7 BATHROOM OR BEDROOM INSTALLATION • The dryer...

Installation Instructions
Page 6
... LOCATION RIGHT OR LEFT SIDE EXHAUST Reconnect the cut portion (A) of the duct to pull or damage the electrical wires inside the dryer exhaust duct and save. PROTECT YOUR HANDS AND ARMS FROM SHARP EDGES WHEN WORKING INSIDE THE CABINET. Remove the screw inside the dryer when inserting the duct. Use the screw saved previously to secure the duct in place through the side opening , locate the...
... LOCATION RIGHT OR LEFT SIDE EXHAUST Reconnect the cut portion (A) of the duct to pull or damage the electrical wires inside the dryer exhaust duct and save. PROTECT YOUR HANDS AND ARMS FROM SHARP EDGES WHEN WORKING INSIDE THE CABINET. Remove the screw inside the dryer when inserting the duct. Use the screw saved previously to secure the duct in place through the side opening , locate the...

Installation Instructions
Page 7
.... TO REGISTER YOUR DRYER CALL TOLL-FREE 1-888-269-1192 Prompt registration confirms your right to Owner's Manual or visit our Web site. ADDING COVER PLATE TO REAR OF CABINET (SIDES AND BOTTOM EXHAUST) 10 CHANGING DIRECTION OF DOOR OPENING 1. Rotate the door 180º. Installation Instructions ADDING ELBOW FOR EXHAUST THROUGH BOTTOM OF CABINET • Insert the elbow through the rear opening and connect it UP and OUT...
.... TO REGISTER YOUR DRYER CALL TOLL-FREE 1-888-269-1192 Prompt registration confirms your right to Owner's Manual or visit our Web site. ADDING COVER PLATE TO REAR OF CABINET (SIDES AND BOTTOM EXHAUST) 10 CHANGING DIRECTION OF DOOR OPENING 1. Rotate the door 180º. Installation Instructions ADDING ELBOW FOR EXHAUST THROUGH BOTTOM OF CABINET • Insert the elbow through the rear opening and connect it UP and OUT...


