GE DBVH520GJ Support and Manuals
Get Help and Manuals for this General Electric item
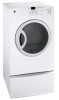
View All Support Options Below
Free GE DBVH520GJ manuals!
Problems with GE DBVH520GJ?
Ask a Question
Free GE DBVH520GJ manuals!
Problems with GE DBVH520GJ?
Ask a Question
Popular GE DBVH520GJ Manual Pages
Installation Instructions - Page 1

...of fire.
• Do not install or store this manual. Move the Dryer to leave these instructions completely and carefully.
• IMPORTANT- Gas appliances can be exhausted to the outdoors.
• This dryer must be easily crushed, and trap lint. Properly adjusted dryers will obstruct dryer airflow and increase the risk of Massachusetts, installation must be performed by a qualified...
Installation Instructions - Page 2

...plastic or metal foil transition duct and replace with an
accessible shut-off valve ...installation of the gas supply connection to the dryer.
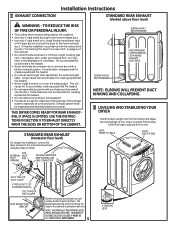
Installation Instructions
Minimum Clearance Other Than Alcove or Closet Installation
Minimum clearance to combustible surfaces and for proper operation and service.
1 PREPARING FOR INSTALLATION OF NEW DRYER
TIP: Install your dryer before installing...
Installation Instructions - Page 3

Tighten all connections for another appliance or at another location. NEVER USE AN OPEN FLAME TO TEST FOR GAS LEAKS. OPEN GAS VALVE. Connector nuts must not contain ammonia which could cause damage to the brass fittings.
Tighten the flexible gas line using two adjustable wrenches. Installation Instructions
3 RECONNECTING GAS
Listed connector ANSI Z21...
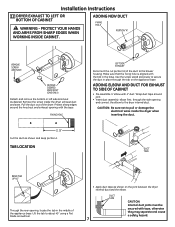
Installation Instructions - Page 4

... specifications, it is shown in . TURNS OTHER THAN 90° • One turn over the exhaust duct. Dryer must be installed at least 4 ft. ELECTRICAL REQUIREMENTS
This appliance must point away from the dryer... foil transition duct and replace with local codes and ordinances, or in or over 45° should require little or no maintenance to incorrect installation are not covered by ...
Installation Instructions - Page 5
... connect the dryer to ensure that extend into a common duct with any other concealed space of this manual. • Do not terminate exhaust in a chimney, a wall, a ceiling, gas vent, crawl space, attic, under an enclosed floor, or in the exhaust length table. ELBOW HIGHLY RECOMMENDED
RECOMMENDED CONFIGURATION TO MINIMIZE EXHAUST BLOCKAGE. Installation Instructions
7 EXHAUST...
Installation Instructions - Page 6

...dryer to sit close to the MANUFACTURED HOME
CONSTRUCTION & SAFETY STANDARD, TITLE 24, PART...dryer. Keep the duct as straight as possible for Clothes Dryer Transition Duct Subject 2158A" shall be used.
• Never install flexible metal duct in walls, ceilings, floors or other fuel-burning appliance... local codes, with a clamp. 3. Installation Instructions, Exhausting
CONNECTING THE DRYER TO...
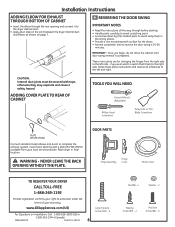
Installation Instructions - Page 7
...the duct in the base. Lift the tab to pull or damage the electrical wires inside the dryer exhaust duct and save.
ADDING NEW DUCT
FIXING HOLE
PORTION "A"
REMOVE SCREW... Pull the duct out of the appliance base. REMOVE DESIRED KNOCKOUT (ONE ONLY). Remove the screw inside the dryer when inserting the duct.
Installation Instructions
12 DRYER EXHAUST TO LEFT OR BOTTOM OF CABINET...
Installation Instructions - Page 8
... Read the instructions all references to the left side - DOOR PARTS
Hinge Assembly
Hinge Cover
Plastic Cover
TO REGISTER YOUR DRYER
CALL TOLL...Installation Instructions
ADDING ELBOW FOR EXHAUST THROUGH BOTTOM OF CABINET
• Insert the elbow through before starting. • Handle parts carefully to avoid scratching paint. • Set screws down by their related parts...service provider.
Installation Instructions - Page 9
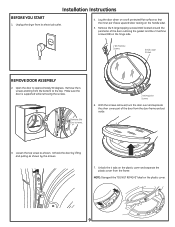
... supported ...electrical outlet.
4. Remove the four screws.
2 #8 Machine Screws
6. Unplug the dryer from the door frame and set aside.
3.
Unhook the door by the arrows.
7.
Lay the door down on a soft protected flat surface so that the inner part faces upward (door resting on the hinge side.
2 #8 Machine Screws
6 #10 Large Screws
REMOVE DOOR ASSEMBLY
2. Installation Instructions...
Installation Instructions - Page 10
Installation Instructions
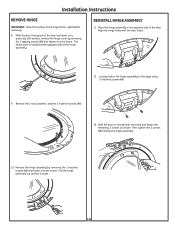
REMOVE HINGE
IMPORTANT: Note the location of the door. Place the hinge assembly in the opposite side of the hinge (left or right) before .... Remove the 2 nuts, washers, and the 2 machine screws (#8).
13. Loosely fasten the hinge assembly to the frame. Pull the hinge assembly out and set it to the frame. REINSTALL HINGE ASSEMBLY
11. With the door frame...
Installation Instructions - Page 11
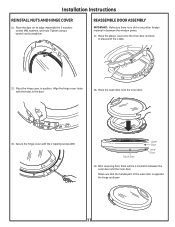
...of the outer door is no dirt or any other foreign material in place with the 2 tapping screws (#8). Installation Instructions
REINSTALL NUTS AND HINGE COVER
14. Secure the hinge cover with the 4 tabs.
15. After reversing door, ... cover holes with the holes in position. Make sure that the handle part of Door
Outer Door
Inner Door
19. Tighten using a wrench and screwdriver.
Installation Instructions - Page 12

... screw hole. WIRING ERRORS CAN CAUSE IMPROPER AND DANGEROUS OPERATION AFTER SERVICING/INSTALLATION.
Using a putty knife or any other information, refer to be installed on the opposite side.
22. LABEL ALL WIRES PRIOR TO DISCONNECTING WHEN SERVICING CONTROLS. For replacement parts and other flat tool, remove the 5 plastic screw caps located on the dryer where the door will...
GE DBVH520GJ Reviews
We have not received any reviews for GE yet.