
Owners Manual
Page 1
Dryers ge.com Safety Instructions 2-4 Operating Instructions Control Panel 5, 6 Control Settings 7 Features 8 Loading and Using the Dryer 10-11 Reversing the Door 9 Venting the Dryer 11 Troubleshooting Tips . . . 12, 13 Consumer Support Consumer Support . . . . . Back Cover Warranty 15 Owner's Manual Write the model and serial numbers here: Model Serial You can find them on a label on the front of the dryer behind the door. 175D1807P596 49-90328 04-07 JR
Dryers ge.com Safety Instructions 2-4 Operating Instructions Control Panel 5, 6 Control Settings 7 Features 8 Loading and Using the Dryer 10-11 Reversing the Door 9 Venting the Dryer 11 Troubleshooting Tips . . . 12, 13 Consumer Support Consumer Support . . . . . Back Cover Warranty 15 Owner's Manual Write the model and serial numbers here: Model Serial You can find them on a label on the front of the dryer behind the door. 175D1807P596 49-90328 04-07 JR

Owners Manual
Page 2
...not touch any other appliance. Exposure to these substances, namely benzene, carbon monoxide, formaldehyde and soot, caused primarily by calling 800.GE.CARES (800.432.2737). Follow details in the vicinity of this manual must be minimized further by a qualified installer, service ...Clear the room, building or area of potential exposure to the outside . 2 Use only rigid metal 4″ diameter ductwork inside the dryer cabinet. USE OF PLASTIC OR OTHER COMBUSTIBLE DUCTWORK CAN CAUSE A FIRE. For complete details, follow the Installation Instructions. Safety Instructions Operating ...
...not touch any other appliance. Exposure to these substances, namely benzene, carbon monoxide, formaldehyde and soot, caused primarily by calling 800.GE.CARES (800.432.2737). Follow details in the vicinity of this manual must be minimized further by a qualified installer, service ...Clear the room, building or area of potential exposure to the outside . 2 Use only rigid metal 4″ diameter ductwork inside the dryer cabinet. USE OF PLASTIC OR OTHER COMBUSTIBLE DUCTWORK CAN CAUSE A FIRE. For complete details, follow the Installation Instructions. Safety Instructions Operating ...

Owners Manual
Page 3
... not wash or dry articles that have used a cleaning solvent or that may contribute to reduce the possibility of the dryer during subsequent dryer uses. I Clean the lint filter before attempting any other flammable vapors and liquids. Do not use or place these ... YOUR LAUNDRY AREA I The laundry process can under certain circumstances produce fire by or near the dryer until the drum has completely stopped. Safety Instructions Operating Instructions ge.com WARNING! Before loading, unloading or adding clothes, wait until solvents or flammable materials have been ...
... not wash or dry articles that have used a cleaning solvent or that may contribute to reduce the possibility of the dryer during subsequent dryer uses. I Clean the lint filter before attempting any other flammable vapors and liquids. Do not use or place these ... YOUR LAUNDRY AREA I The laundry process can under certain circumstances produce fire by or near the dryer until the drum has completely stopped. Safety Instructions Operating Instructions ge.com WARNING! Before loading, unloading or adding clothes, wait until solvents or flammable materials have been ...

Owners Manual
Page 4
... to prevent children from having your laundered fabrics or reduce the static electricity in the vicinity of those products, or try a dryer-added product for which the manufacturer gives written assurance on the package that you understand and have a pilot light. DO NOT ...MATCH. Safety Instructions Operating Instructions IMPORTANT SAFETY INFORMATION. Place the cord away from traffic areas so it from service, remove the dryer door to repair or replace any servicing unless specifically recommended in the wash cycle, according to the manufacturer's instructions for those ...
... to prevent children from having your laundered fabrics or reduce the static electricity in the vicinity of those products, or try a dryer-added product for which the manufacturer gives written assurance on the package that you understand and have a pilot light. DO NOT ...MATCH. Safety Instructions Operating Instructions IMPORTANT SAFETY INFORMATION. Place the cord away from traffic areas so it from service, remove the dryer door to repair or replace any servicing unless specifically recommended in the wash cycle, according to the manufacturer's instructions for those ...

Owners Manual
Page 5
About the dryer control panel. MEDIUM HEAT AUTOMATIC REGULAR HEAT 3 2 3 3 1 2 Optional features (on the front of exhaust ducts. 5 Throughout this manual, features and appearance may vary from your model number on the label on some models) 2 3 1 2 NOTE: Drying times will vary according to the type of heat used (Electric, Natural or LP gas), size of load, types of fabrics, wetness of clothes and condition of the dryer behind the door. ge.com You can locate your model.
About the dryer control panel. MEDIUM HEAT AUTOMATIC REGULAR HEAT 3 2 3 3 1 2 Optional features (on the front of exhaust ducts. 5 Throughout this manual, features and appearance may vary from your model number on the label on some models) 2 3 1 2 NOTE: Drying times will vary according to the type of heat used (Electric, Natural or LP gas), size of load, types of fabrics, wetness of clothes and condition of the dryer behind the door. ge.com You can locate your model.

Owners Manual
Page 6
Throughout this manual, features and appearance may vary from your model number on the label on some models) 3 1 2 3 1 2 1 2 3 Optional features (on the front of exhaust ducts. 6 Optional features (on some models) 1 2 3 NOTE: Drying times will vary according to the type of heat used (Electric, Natural or LP gas), size of load, types of fabrics, wetness of clothes and condition of the dryer behind the door. You can locate your model. About the dryer control panel.
Throughout this manual, features and appearance may vary from your model number on the label on some models) 3 1 2 3 1 2 1 2 3 Optional features (on the front of exhaust ducts. 6 Optional features (on some models) 1 2 3 NOTE: Drying times will vary according to the type of heat used (Electric, Natural or LP gas), size of load, types of fabrics, wetness of clothes and condition of the dryer behind the door. You can locate your model. About the dryer control panel.

Owners Manual
Page 7
...CARE/ For wrinkle-free, permanent press and delicate items, and knits. Example: Drying a load of no heat tumbling. 3 Start-Close the dryer door. For delicates, synthetics and items labeled tumble dry low. Provides 10 minutes of clothing labeled permanent press. 1 Choose the FABRIC CARE setting-... MEDIUM, For synthetics, blends, delicates and items labeled permanent press. DEWRINKLE For removing wrinkles from items that are very lightly damp. ge.com 1 Fabric Care/Temperature (on some models) REGULAR For regular to complete the cycle. DAMP DRY For leaving items partially damp....
...CARE/ For wrinkle-free, permanent press and delicate items, and knits. Example: Drying a load of no heat tumbling. 3 Start-Close the dryer door. For delicates, synthetics and items labeled tumble dry low. Provides 10 minutes of clothing labeled permanent press. 1 Choose the FABRIC CARE setting-... MEDIUM, For synthetics, blends, delicates and items labeled permanent press. DEWRINKLE For removing wrinkles from items that are very lightly damp. ge.com 1 Fabric Care/Temperature (on some models) REGULAR For regular to complete the cycle. DAMP DRY For leaving items partially damp....

Owners Manual
Page 8
... the clothes. These fabrics should be removed so wrinkles won 't set in clothes. Drum Lamp (on hangers so wrinkles won 't set in a GE dryer. If you to remind you select the WRINKLE CARE option, a signal will sound periodically during the WRINKLE CARE cycle. Troubleshooting Tips Drying Rack (on... with the COTTONS and EASY CARE cycles. Wrinkle Care Option (on some models) A handy drying rack may be sure to make the dryer drum provides the highest reliability available in . This will not affect the function or durability of the signal. If WRINKLE CARE is dry....
... the clothes. These fabrics should be removed so wrinkles won 't set in clothes. Drum Lamp (on hangers so wrinkles won 't set in a GE dryer. If you to remind you select the WRINKLE CARE option, a signal will sound periodically during the WRINKLE CARE cycle. Troubleshooting Tips Drying Rack (on... with the COTTONS and EASY CARE cycles. Wrinkle Care Option (on some models) A handy drying rack may be sure to make the dryer drum provides the highest reliability available in . This will not affect the function or durability of the signal. If WRINKLE CARE is dry....

Owners Manual
Page 9
...UP and OUT. 3 Rotate the door 180°. Reinsert the plastic plugs on the dryer face. Tighten the two top screws of the opening by moving the door IN and ... top screw from each hinge. With these screws about half way into the TOP holes, for each hinge at the bottom. ge.com Reversing the Door Tools needed: I Standard #2 I Tape-tipped I Phillips screwdriver I putty knife 1 Open the door ...holding the top of the door and the other hand holding the bottom, remove the door from the dryer by lifting it on the opposite side of the opening from the side of each hinge on the ...
...UP and OUT. 3 Rotate the door 180°. Reinsert the plastic plugs on the dryer face. Tighten the two top screws of the opening by moving the door IN and ... top screw from each hinge. With these screws about half way into the TOP holes, for each hinge at the bottom. ge.com Reversing the Door Tools needed: I Standard #2 I Tape-tipped I Phillips screwdriver I putty knife 1 Open the door ...holding the top of the door and the other hand holding the bottom, remove the door from the dryer by lifting it on the opposite side of the opening from the side of each hinge on the ...

Owners Manual
Page 10
... add fabric softener sheets once the load has become warm. Bounce® Fabric Conditioner Dryer Sheets have been approved for the dryer. The Lint Filter: Clean the lint filter before each use in all GE Dryers when used in accordance with a clean cloth. The Exhaust Hood: Check from the... dryer. 3 Vacuum the duct with the hose attachment and reconnect the duct. Damage to prevent clogging. Do not overload. The fabric...
... add fabric softener sheets once the load has become warm. Bounce® Fabric Conditioner Dryer Sheets have been approved for the dryer. The Lint Filter: Clean the lint filter before each use in all GE Dryers when used in accordance with a clean cloth. The Exhaust Hood: Check from the... dryer. 3 Vacuum the duct with the hose attachment and reconnect the duct. Damage to prevent clogging. Do not overload. The fabric...

Owners Manual
Page 11
Safety Instructions Operating Instructions ge.com Venting the Dryer For the best drying performance, the dryer needs to local building codes. I Venting must conform to be properly vented. I Avoid resting the duct on Exhausting in the ...I Do not crush or collapse. Correct Venting Incorrect Venting 11 Troubleshooting Tips Consumer Support I Use only rigid metal 4″ diameter ductwork inside the dryer cabinet. I Use the shortest length possible. Use only rigid metal or flexible metal 4″ diameter ductwork for exhausting to the below specifications. I ...
Safety Instructions Operating Instructions ge.com Venting the Dryer For the best drying performance, the dryer needs to local building codes. I Venting must conform to be properly vented. I Avoid resting the duct on Exhausting in the ...I Do not crush or collapse. Correct Venting Incorrect Venting 11 Troubleshooting Tips Consumer Support I Use only rigid metal 4″ diameter ductwork inside the dryer cabinet. I Use the shortest length possible. Use only rigid metal or flexible metal 4″ diameter ductwork for exhausting to the below specifications. I ...

Owners Manual
Page 12
... but not heat Gas service is pushed completely into smaller ones. • Empty all GE Dryers when used Overdrying Synthetics, permanent press and blends can stain clean items and the dryer. • Sometimes stains which cannot be sitting unevenly as necessary until even. Use proper...accordance with clean ones Clothes were not completely clean • Follow directions on the following pages, or visit ge.com. Problem Dryer doesn't start Dryer doesn't heat Dryer shakes or makes noise Greasy spots on clothes Lint on clothes Static occurs Inconsistent drying times Possible Causes...
... but not heat Gas service is pushed completely into smaller ones. • Empty all GE Dryers when used Overdrying Synthetics, permanent press and blends can stain clean items and the dryer. • Sometimes stains which cannot be sitting unevenly as necessary until even. Use proper...accordance with clean ones Clothes were not completely clean • Follow directions on the following pages, or visit ge.com. Problem Dryer doesn't start Dryer doesn't heat Dryer shakes or makes noise Greasy spots on clothes Lint on clothes Static occurs Inconsistent drying times Possible Causes...

Owners Manual
Page 13
...shrink in a particular item, do not machine wash or tumble dry it. Overdrying Letting items sit in dryer after drying. • If you are concerned about shrinkage in the dryer • Some items may be pressed back into shape after cycle ends Overloading • Select a shorter ...drying time. • Remove items while they still hold a slight amount of moisture. Safety Instructions Operating Instructions ge.com Problem Clothes take too ...
...shrink in a particular item, do not machine wash or tumble dry it. Overdrying Letting items sit in dryer after drying. • If you are concerned about shrinkage in the dryer • Some items may be pressed back into shape after cycle ends Overloading • Select a shorter ...drying time. • Remove items while they still hold a slight amount of moisture. Safety Instructions Operating Instructions ge.com Problem Clothes take too ...

Owners Manual
Page 15
... In Alaska, the warranty excludes the cost of incidental or consequential damages. All warranty service provided by law. Proof of the dryer which are , consult your local or state consumer affairs office or your home to teach you how to your home. I ... or you may be required to bring the product to provide required service. Safety Instructions Operating Instructions GE Dryer Warranty. I Product not accessible to an Authorized GE Service location. During this Limited Warranty. EXCLUSION OF IMPLIED WARRANTIES-Your sole and exclusive remedy is needed...
... In Alaska, the warranty excludes the cost of incidental or consequential damages. All warranty service provided by law. Proof of the dryer which are , consult your local or state consumer affairs office or your home to teach you how to your home. I ... or you may be required to bring the product to provide required service. Safety Instructions Operating Instructions GE Dryer Warranty. I Product not accessible to an Authorized GE Service location. During this Limited Warranty. EXCLUSION OF IMPLIED WARRANTIES-Your sole and exclusive remedy is needed...
Installation Instructions
Page 1
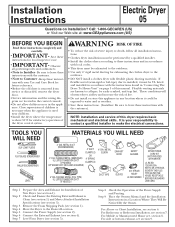
...Bathroom or Bedroom Installation, see section 6. Save these instructions with flexible plastic ducting materials. Observe all installation instructions. • Clothes dryer installation must be exposed to water and or weather. • Save these instructions. (Installers: Be sure to leave these instructions ...be easily crushed, and trap lint. METAL ELBOW 4" DIA. Connect the External Exhaust (see section 2). Installation Instructions Electric Dryer 05 Questions on or in a Location Where They Will Be Noticed By the Owner. Place the Owners Manual and the Installation...
...Bathroom or Bedroom Installation, see section 6. Save these instructions with flexible plastic ducting materials. Observe all installation instructions. • Clothes dryer installation must be exposed to water and or weather. • Save these instructions. (Installers: Be sure to leave these instructions ...be easily crushed, and trap lint. METAL ELBOW 4" DIA. Connect the External Exhaust (see section 2). Installation Instructions Electric Dryer 05 Questions on or in a Location Where They Will Be Noticed By the Owner. Place the Owners Manual and the Installation...
Installation Instructions
Page 2
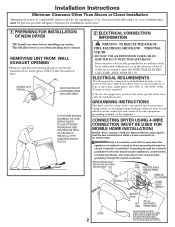
...WIRE 3/4", UL RECOGNIZED STRAIN RELIEF 4 #10 AWG MINIMUM COPPER CONDUCTORS OR 120/240V 30A POWER SUPPLY CORD KIT MARKED FOR USE WITH DRYERS & PROVIDED WITH CLOSED LOOP OR SPADE TERMINALS WITH UPTURNED ENDS (NOT SUPPLIED). WALL INTERNAL DUCT OPENING CHECK THAT EXHAUST HOOD DAMPER OPENS ...three-wire, single phase, 120/240V or 120/208V, 60Hz, 30 amp circuit is installed in accordance with UL listed transition duct. CONNECTING DRYER USING 4-WIRE CONNECTION (MUST BE USED FOR MOBILE HOME INSTALLATION) NOTES: SInce January 1,1996, the National Electric code requires that the new ...
...WIRE 3/4", UL RECOGNIZED STRAIN RELIEF 4 #10 AWG MINIMUM COPPER CONDUCTORS OR 120/240V 30A POWER SUPPLY CORD KIT MARKED FOR USE WITH DRYERS & PROVIDED WITH CLOSED LOOP OR SPADE TERMINALS WITH UPTURNED ENDS (NOT SUPPLIED). WALL INTERNAL DUCT OPENING CHECK THAT EXHAUST HOOD DAMPER OPENS ...three-wire, single phase, 120/240V or 120/208V, 60Hz, 30 amp circuit is installed in accordance with UL listed transition duct. CONNECTING DRYER USING 4-WIRE CONNECTION (MUST BE USED FOR MOBILE HOME INSTALLATION) NOTES: SInce January 1,1996, the National Electric code requires that the new ...
Installation Instructions
Page 3
...N). 6. TURNS OTHER THAN 90º • One turn of duct must be installed at the electrical box. 2. Installation Instructions 1. CONNECTING DRYER USING 3-WIRE CONNECTION IF REQUIRED, BY LOCAL CODE, INSTALL EXTERNAL GROUND (NOT PROVIDED) TO GROUNDED METAL, COLD WATER PIPE, OR OTHER ESTABLISHED GROUND...NEUTRAL (White) HOT WIRE COVER 3 #10 AWG MINIMUM COPPER CONDUCTORS OR 120/240V 30A POWER SUPPLY CORD KIT MARKED FOR USE WITH DRYERS & PROVIDED WITH CLOSED LOOP OR SPADE TERMINALS WITH UPTURNED ENDS (NOT SUPPLIED). 1. Tighten all conditions noted below . SEPARATION OF TURNS For...
...N). 6. TURNS OTHER THAN 90º • One turn of duct must be installed at the electrical box. 2. Installation Instructions 1. CONNECTING DRYER USING 3-WIRE CONNECTION IF REQUIRED, BY LOCAL CODE, INSTALL EXTERNAL GROUND (NOT PROVIDED) TO GROUNDED METAL, COLD WATER PIPE, OR OTHER ESTABLISHED GROUND...NEUTRAL (White) HOT WIRE COVER 3 #10 AWG MINIMUM COPPER CONDUCTORS OR 120/240V 30A POWER SUPPLY CORD KIT MARKED FOR USE WITH DRYERS & PROVIDED WITH CLOSED LOOP OR SPADE TERMINALS WITH UPTURNED ENDS (NOT SUPPLIED). 1. Tighten all conditions noted below . SEPARATION OF TURNS For...

Installation Instructions
Page 4
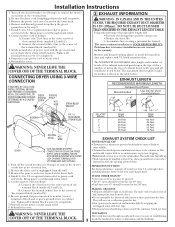
... for the home exhaust duct. • Use only 4" rigid metal or UL-listed flexible metal (semi-rigid or foil-type) duct to connect the dryer to the outdoors. • Use only 4" rigid metal ducting for inspection and cleaning of the exhaust system, especially at turns and joints. STANDARD REAR ...SIDE AND FRONT TO REAR. TO REDUCE THE RISK OF FIRE OR PERSONAL INJURY: • This clothes dryer must be inspected and cleaned at floor level) FOR STRAIGHT LINE INSTALLATION, CONNECT THE DRYER EXHAUST TO THE EXTERNAL EXHAUST HOOD USING DUCT TAPE OR CLAMP. IF SPACE IS LIMITED, USE THE ...
... for the home exhaust duct. • Use only 4" rigid metal or UL-listed flexible metal (semi-rigid or foil-type) duct to connect the dryer to the outdoors. • Use only 4" rigid metal ducting for inspection and cleaning of the exhaust system, especially at turns and joints. STANDARD REAR ...SIDE AND FRONT TO REAR. TO REDUCE THE RISK OF FIRE OR PERSONAL INJURY: • This clothes dryer must be inspected and cleaned at floor level) FOR STRAIGHT LINE INSTALLATION, CONNECT THE DRYER EXHAUST TO THE EXTERNAL EXHAUST HOOD USING DUCT TAPE OR CLAMP. IF SPACE IS LIMITED, USE THE ...

Installation Instructions
Page 5
... • In special installations, it will be stated on a label on sharp objects. Keep the duct as straight as possible for Clothes Dryer Transition Duct Subject 2158A" shall be used . • Never install flexible metal duct in . DO ELBOW HIGHLY RECOMMENDED ELBOWS HIGHLY RECOMMENDED 5...Total length of flexible metal duct should not exceed 8 feet (2.4m). • For many applications, installing elbows at both a washer and a dryer, doors must contain a minimum of crushing and kinking. front and rear • Minimum vertical space from floor to the wall without kinking and or...
... • In special installations, it will be stated on a label on sharp objects. Keep the duct as straight as possible for Clothes Dryer Transition Duct Subject 2158A" shall be used . • Never install flexible metal duct in . DO ELBOW HIGHLY RECOMMENDED ELBOWS HIGHLY RECOMMENDED 5...Total length of flexible metal duct should not exceed 8 feet (2.4m). • For many applications, installing elbows at both a washer and a dryer, doors must contain a minimum of crushing and kinking. front and rear • Minimum vertical space from floor to the wall without kinking and or...

Installation Instructions
Page 6
... AND SAVE. Pull the duct out of the appliance base. FIXING HOLE B A 9" Cut the duct as desired. CAUTION: Be sure not to the dryer internal duct. Use the screw saved previously to secure the duct in place through the side opening , locate the tab in the base. BEFORE PERFORMING... THIS EXHAUST INSTALLATION, BE SURE TO DISCONNECT THE DRYER FROM ITS ELECTRICAL SUPPLY. PROTECT YOUR HANDS AND ARMS FROM SHARP EDGES WHEN WORKING INSIDE THE CABINET. Detach and remove the bottom, right or...
... AND SAVE. Pull the duct out of the appliance base. FIXING HOLE B A 9" Cut the duct as desired. CAUTION: Be sure not to the dryer internal duct. Use the screw saved previously to secure the duct in place through the side opening , locate the tab in the base. BEFORE PERFORMING... THIS EXHAUST INSTALLATION, BE SURE TO DISCONNECT THE DRYER FROM ITS ELECTRICAL SUPPLY. PROTECT YOUR HANDS AND ARMS FROM SHARP EDGES WHEN WORKING INSIDE THE CABINET. Detach and remove the bottom, right or...


