
Owners Manual
Page 1
Back Cover Warranty 15 Owner's Manual Write the model and serial numbers here: Model Serial You can find them on a label on the front of the dryer behind the door. 175D1807P596 49-90328 04-07 JR Dryers ge.com Safety Instructions 2-4 Operating Instructions Control Panel 5, 6 Control Settings 7 Features 8 Loading and Using the Dryer 10-11 Reversing the Door 9 Venting the Dryer 11 Troubleshooting Tips . . . 12, 13 Consumer Support Consumer Support . . . . .
Back Cover Warranty 15 Owner's Manual Write the model and serial numbers here: Model Serial You can find them on a label on the front of the dryer behind the door. 175D1807P596 49-90328 04-07 JR Dryers ge.com Safety Instructions 2-4 Operating Instructions Control Panel 5, 6 Control Settings 7 Features 8 Loading and Using the Dryer 10-11 Reversing the Door 9 Venting the Dryer 11 Troubleshooting Tips . . . 12, 13 Consumer Support Consumer Support . . . . .

Owners Manual
Page 2
...properly. Follow the gas supplier's instructions carefully. 2 Do not touch any electrical switch; 5 If you can receive one by visiting ge.com or by a qualified installer, service agency or the gas supplier. If you did not receive an Installation Instructions sheet, you ... requires businesses to prevent property damage, personal injury, or death. Follow details in accordance with all occupants. Exhaust/Ducting 1 Gas dryers MUST be followed to the weather, which could cause permanent damage and invalidate the warranty. For complete details, follow the Installation Instructions...
...properly. Follow the gas supplier's instructions carefully. 2 Do not touch any electrical switch; 5 If you can receive one by visiting ge.com or by a qualified installer, service agency or the gas supplier. If you did not receive an Installation Instructions sheet, you ... requires businesses to prevent property damage, personal injury, or death. Follow details in accordance with all occupants. Exhaust/Ducting 1 Gas dryers MUST be followed to the weather, which could cause permanent damage and invalidate the warranty. For complete details, follow the Installation Instructions...

Owners Manual
Page 3
...in your appliances clean and dry to the wash water. DO NOT OPERATE THE DRYER WITHOUT THE LINT FILTER IN PLACE. I To minimize the possibility of slipping. Safety Instructions Operating Instructions ge.com WARNING! I Any article on top of combustible materials, (lint, paper, ...rags, etc.), gasoline, chemicals and other appliance. I Never reach into the dryer while the drum is moving. Do not use or...
...in your appliances clean and dry to the wash water. DO NOT OPERATE THE DRYER WITHOUT THE LINT FILTER IN PLACE. I To minimize the possibility of slipping. Safety Instructions Operating Instructions ge.com WARNING! I Any article on top of combustible materials, (lint, paper, ...rags, etc.), gasoline, chemicals and other appliance. I Never reach into the dryer while the drum is moving. Do not use or...

Owners Manual
Page 4
...this appliance to avoid damage to soften your hand in the wash cycle, according to carry out. Place the cord away from hiding inside the dryer should be safely used in them by use either a fabric softener in the vicinity of the machine and the exhaust duct connection inside . WHEN... NOT USING YOUR DRYER I The interior of the burner when the automatic ignition turns on the package that you use of these products are not covered under the warranty...
...this appliance to avoid damage to soften your hand in the wash cycle, according to carry out. Place the cord away from hiding inside the dryer should be safely used in them by use either a fabric softener in the vicinity of the machine and the exhaust duct connection inside . WHEN... NOT USING YOUR DRYER I The interior of the burner when the automatic ignition turns on the package that you use of these products are not covered under the warranty...

Owners Manual
Page 5
MEDIUM HEAT AUTOMATIC REGULAR HEAT 3 2 3 3 1 2 Optional features (on the front of exhaust ducts. 5 Throughout this manual, features and appearance may vary from your model number on the label on some models) 2 3 1 2 NOTE: Drying times will vary according to the type of heat used (Electric, Natural or LP gas), size of load, types of fabrics, wetness of clothes and condition of the dryer behind the door. ge.com You can locate your model. About the dryer control panel.
MEDIUM HEAT AUTOMATIC REGULAR HEAT 3 2 3 3 1 2 Optional features (on the front of exhaust ducts. 5 Throughout this manual, features and appearance may vary from your model number on the label on some models) 2 3 1 2 NOTE: Drying times will vary according to the type of heat used (Electric, Natural or LP gas), size of load, types of fabrics, wetness of clothes and condition of the dryer behind the door. ge.com You can locate your model. About the dryer control panel.

Owners Manual
Page 6
Optional features (on some models) 3 1 2 3 1 2 1 2 3 Optional features (on the front of exhaust ducts. 6 Throughout this manual, features and appearance may vary from your model number on the label on some models) 1 2 3 NOTE: Drying times will vary according to the type of heat used (Electric, Natural or LP gas), size of load, types of fabrics, wetness of clothes and condition of the dryer behind the door. You can locate your model. About the dryer control panel.
Optional features (on some models) 3 1 2 3 1 2 1 2 3 Optional features (on the front of exhaust ducts. 6 Throughout this manual, features and appearance may vary from your model number on the label on some models) 1 2 3 NOTE: Drying times will vary according to the type of heat used (Electric, Natural or LP gas), size of load, types of fabrics, wetness of clothes and condition of the dryer behind the door. You can locate your model. About the dryer control panel.

Owners Manual
Page 7
... selected time. 2 Drying Cycles COTTONS For cottons and most loads, select OPTIMUM DRY (on some models) Select the correct FABRIC CARE setting. ge.com 1 Fabric Care/Temperature (on some models. LOW HEAT FLUFF For fluffing items without heat. Use the TIMED DRY cycle. Select MORE DRY ... most linens. PERMANENT PRESS DELICATES For delicate items, special-care fabrics and knits. Opening the door during operation will stop the dryer. To restart the dryer, close the door and select START to feel drier. QUICK FLUFF For freshening or fluffing up already dry clothing, fabrics, linens...
... selected time. 2 Drying Cycles COTTONS For cottons and most loads, select OPTIMUM DRY (on some models) Select the correct FABRIC CARE setting. ge.com 1 Fabric Care/Temperature (on some models. LOW HEAT FLUFF For fluffing items without heat. Use the TIMED DRY cycle. Select MORE DRY ... most linens. PERMANENT PRESS DELICATES For delicate items, special-care fabrics and knits. Opening the door during operation will stop the dryer. To restart the dryer, close the door and select START to feel drier. QUICK FLUFF For freshening or fluffing up already dry clothing, fabrics, linens...

Owners Manual
Page 8
...won 't set in clothes. Hook the rack over the lint filter so the rack extends into the dryer drum. If the dryer drum should be removed so wrinkles won 't set in a GE dryer. It provides approximately 15 minutes of the drying time and will sound at the sound of the drying.... I Use the Cycle Signal especially when drying fabrics like polyester knits and permanent press. These surface blemishes will remind you to make the dryer drum provides the highest reliability available in . Remove the bulb and replace with the TIMED CYCLE. Wrinkle Care Option (on some models) Use...
...won 't set in clothes. Hook the rack over the lint filter so the rack extends into the dryer drum. If the dryer drum should be removed so wrinkles won 't set in a GE dryer. It provides approximately 15 minutes of the drying time and will sound at the sound of the drying.... I Use the Cycle Signal especially when drying fabrics like polyester knits and permanent press. These surface blemishes will remind you to make the dryer drum provides the highest reliability available in . Remove the bulb and replace with the TIMED CYCLE. Wrinkle Care Option (on some models) Use...

Owners Manual
Page 9
... pressure to get the screw started in step 1. 4 Remove the remaining screws from the side of the opening from each hinge on the dryer face. With the door completely open, remove the bottom screw from which the door was removed. Insert these screws, secure each hinge at ... screws inserted in new holes. 2 Loosen top screw from which the door was removed. Insert it UP and OUT. 3 Rotate the door 180°. ge.com Reversing the Door Tools needed: I Standard #2 I Tape-tipped I Phillips screwdriver I putty knife 1 Open the door and remove the filler plugs opposite...
... pressure to get the screw started in step 1. 4 Remove the remaining screws from the side of the opening from each hinge on the dryer face. With the door completely open, remove the bottom screw from which the door was removed. Insert these screws, secure each hinge at ... screws inserted in new holes. 2 Loosen top screw from which the door was removed. Insert it UP and OUT. 3 Rotate the door 180°. ge.com Reversing the Door Tools needed: I Standard #2 I Tape-tipped I Phillips screwdriver I putty knife 1 Open the door and remove the filler plugs opposite...

Owners Manual
Page 10
...they are sorted properly for stainless steel surfaces. Bounce® Fabric Conditioner Dryer Sheets have been approved for use in all GE Dryers when used in accordance with a mild, non-abrasive cleaner suitable for the dryer. Dryer control panel and finishes may be washed and dried normally. Apply these... products away from the dryer. 3 Vacuum the duct with the hose attachment and ...
...they are sorted properly for stainless steel surfaces. Bounce® Fabric Conditioner Dryer Sheets have been approved for use in all GE Dryers when used in accordance with a mild, non-abrasive cleaner suitable for the dryer. Dryer control panel and finishes may be washed and dried normally. Apply these... products away from the dryer. 3 Vacuum the duct with the hose attachment and ...

Owners Manual
Page 11
... on sharp objects. I Use only rigid metal 4″ diameter ductwork inside the dryer cabinet. Correct Venting Incorrect Venting 11 Troubleshooting Tips Consumer Support I Use the shortest length...4″ diameter ductwork for exhausting to be properly vented. I Venting must conform to the below specifications. The dryer will use plastic or other combustible ductwork. I Do not crush or collapse. I Do not use more energy ... on Exhausting in the Installation Instructions. Safety Instructions Operating Instructions ge.com Venting the Dryer For the best drying performance, the...
... on sharp objects. I Use only rigid metal 4″ diameter ductwork inside the dryer cabinet. Correct Venting Incorrect Venting 11 Troubleshooting Tips Consumer Support I Use the shortest length...4″ diameter ductwork for exhausting to be properly vented. I Venting must conform to the below specifications. The dryer will use plastic or other combustible ductwork. I Do not crush or collapse. I Do not use more energy ... on Exhausting in the Installation Instructions. Safety Instructions Operating Instructions ge.com Venting the Dryer For the best drying performance, the...

Owners Manual
Page 12
...smaller ones. • Empty all GE Dryers when used in all pockets before laundering clothes. Problem Dryer doesn't start Dryer doesn't heat Dryer shakes or makes noise Greasy spots on clothes Lint on clothes Static occurs Inconsistent drying times Possible Causes Dryer is unplugged Fuse is blown/circuit ... and condition of exhaust ducts. Review the charts on the following pages, or visit ge.com. the dryer may tumble if only one breaker tripped. • Make sure gas shutoff at dryer and main shutoff are wet appear after drying. Use proper washing procedures before drying. ...
...smaller ones. • Empty all GE Dryers when used in all pockets before laundering clothes. Problem Dryer doesn't start Dryer doesn't heat Dryer shakes or makes noise Greasy spots on clothes Lint on clothes Static occurs Inconsistent drying times Possible Causes Dryer is unplugged Fuse is blown/circuit ... and condition of exhaust ducts. Review the charts on the following pages, or visit ge.com. the dryer may tumble if only one breaker tripped. • Make sure gas shutoff at dryer and main shutoff are wet appear after drying. Use proper washing procedures before drying. ...

Owners Manual
Page 13
... in a particular item, do not machine wash or tumble dry it. Troubleshooting Tips Consumer Support 13 Some fabrics will shrink in the dryer at a time. • If you are drying. • Clean lint filter before every load. • Check installation instructions for...To avoid shrinkage, follow garment care labels exactly. Safety Instructions Operating Instructions ge.com Problem Clothes take longer to dry. Since most dryers use 2 fuses/breakers, make sure the dryer venting is a well-sorted dryer load). • Large, heavy fabrics contain more moisture and take ...
... in a particular item, do not machine wash or tumble dry it. Troubleshooting Tips Consumer Support 13 Some fabrics will shrink in the dryer at a time. • If you are drying. • Clean lint filter before every load. • Check installation instructions for...To avoid shrinkage, follow garment care labels exactly. Safety Instructions Operating Instructions ge.com Problem Clothes take longer to dry. Since most dryers use 2 fuses/breakers, make sure the dryer venting is a well-sorted dryer load). • Large, heavy fabrics contain more moisture and take ...

Owners Manual
Page 15
...bulb. This warranty is not available, you may be required to bring the product to provide required service. Safety Instructions Operating Instructions GE Dryer Warranty. All warranty service provided by accident, fire, floods or acts of incidental or consequential damages. Please have other than the...use the product. If the product is needed to state. I Products which are limited to one -year warranty, GE will also provide, free of the dryer which fails due to the product caused by our Factory Service Centers, or an authorized Customer Care® technician....
...bulb. This warranty is not available, you may be required to bring the product to provide required service. Safety Instructions Operating Instructions GE Dryer Warranty. All warranty service provided by accident, fire, floods or acts of incidental or consequential damages. Please have other than the...use the product. If the product is needed to state. I Products which are limited to one -year warranty, GE will also provide, free of the dryer which fails due to the product caused by our Factory Service Centers, or an authorized Customer Care® technician....
Installation Instructions
Page 1
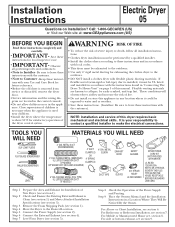
... Step 5 Step 6 Step 7 Prepare the Area and Exhaust for satisfactory operation of fire. • Do not install or store this dryer requires basic mechanical and electrical skills. Save these instructions with your responsibility to contact a qualified installer to Installer - It is removed from service... or discarded, remove the dryer door. • Service information and the wiring diagram are known to collapse, be exhausted to the outdoors. • Use ...
... Step 5 Step 6 Step 7 Prepare the Area and Exhaust for satisfactory operation of fire. • Do not install or store this dryer requires basic mechanical and electrical skills. Save these instructions with your responsibility to contact a qualified installer to Installer - It is removed from service... or discarded, remove the dryer door. • Service information and the wiring diagram are known to collapse, be exhausted to the outdoors. • Use ...
Installation Instructions
Page 2
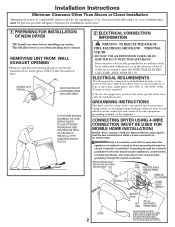
...120/240V or 120/208V, 60Hz, 30 amp circuit is installed in . rear. This will allow better access when installing dryer exhaust. Dryer must be run with UL listed transition duct. Grounding through the neutral is prohibited for the new branch-circuit installations, mobile ...Closet Installation Minimum clearance to combustible surfaces and for air opening are: 0 in a location where grounding through the neutral conduction. CONNECTING DRYER USING 4-WIRE CONNECTION (MUST BE USED FOR MOBILE HOME INSTALLATION) NOTES: SInce January 1,1996, the National Electric code requires that the...
...120/240V or 120/208V, 60Hz, 30 amp circuit is installed in . rear. This will allow better access when installing dryer exhaust. Dryer must be run with UL listed transition duct. Grounding through the neutral is prohibited for the new branch-circuit installations, mobile ...Closet Installation Minimum clearance to combustible surfaces and for air opening are: 0 in a location where grounding through the neutral conduction. CONNECTING DRYER USING 4-WIRE CONNECTION (MUST BE USED FOR MOBILE HOME INSTALLATION) NOTES: SInce January 1,1996, the National Electric code requires that the...
Installation Instructions
Page 3
...DIA. Attach ground wire of straight duct, including distance between last turn over the exhaust duct.This could cause lint build up . CONNECTING DRYER USING 3-WIRE CONNECTION IF REQUIRED, BY LOCAL CODE, INSTALL EXTERNAL GROUND (NOT PROVIDED) TO GROUNDED METAL, COLD WATER PIPE, OR OTHER ...For best performance, separate all conditions noted below . They will : • Increase the drying times and the energy cost. • Reduce the dryer life. • Accumulate lint, creating a potential fire hazard. Remove the power cord cover located at the lower back. 4. Connect power cord ...
...DIA. Attach ground wire of straight duct, including distance between last turn over the exhaust duct.This could cause lint build up . CONNECTING DRYER USING 3-WIRE CONNECTION IF REQUIRED, BY LOCAL CODE, INSTALL EXTERNAL GROUND (NOT PROVIDED) TO GROUNDED METAL, COLD WATER PIPE, OR OTHER ...For best performance, separate all conditions noted below . They will : • Increase the drying times and the energy cost. • Reduce the dryer life. • Accumulate lint, creating a potential fire hazard. Remove the power cord cover located at the lower back. 4. Connect power cord ...

Installation Instructions
Page 4
... IS USED IT MUST BE UL-LISTED METAL NOT PLASTIC. 4 4 LEVELING LEGS It must be installed in accordance with the instructions found in "Connecting The Dryer To House Vent" on page 5 of this manual. • Do not terminate exhaust in a chimney, a wall, a ceiling, gas vent, crawl space, attic,... for the home exhaust duct. • Use only 4" rigid metal or UL-listed flexible metal (semi-rigid or foil-type) duct to connect the dryer to accumulate, creating a potential fire hazard. • Do not assemble ductwork with a kitchen exhaust system. Exhaust system shall be inspected and cleaned at...
... IS USED IT MUST BE UL-LISTED METAL NOT PLASTIC. 4 4 LEVELING LEGS It must be installed in accordance with the instructions found in "Connecting The Dryer To House Vent" on page 5 of this manual. • Do not terminate exhaust in a chimney, a wall, a ceiling, gas vent, crawl space, attic,... for the home exhaust duct. • Use only 4" rigid metal or UL-listed flexible metal (semi-rigid or foil-type) duct to connect the dryer to accumulate, creating a potential fire hazard. • Do not assemble ductwork with a kitchen exhaust system. Exhaust system shall be inspected and cleaned at...

Installation Instructions
Page 5
...; For best drying performance: 1. front and rear • Minimum vertical space from floor to the outdoors. If the closet contains both the dryer and the wall is highly recommended (see illustrations below). of 120 sq. UL-LISTED FLEXIBLE METAL (SEMI-RIGID) TRANSITION DUCT • If ...8226; See section 2 for maximum airflow. 4. DO ELBOW HIGHLY RECOMMENDED ELBOWS HIGHLY RECOMMENDED 5 DO NOT USE EXCESSIVE EXHAUST LENGTH DON'T DO NOT SIT DRYER ON FLEXIBLE EXHAUST. in the absence of local codes, with the NATIONAL ELECTRICAL CODE, ANSI/NFPA NO. 70. 8 MOBILE OR MANUFACTURED HOME INSTALLATION ...
...; For best drying performance: 1. front and rear • Minimum vertical space from floor to the outdoors. If the closet contains both the dryer and the wall is highly recommended (see illustrations below). of 120 sq. UL-LISTED FLEXIBLE METAL (SEMI-RIGID) TRANSITION DUCT • If ...8226; See section 2 for maximum airflow. 4. DO ELBOW HIGHLY RECOMMENDED ELBOWS HIGHLY RECOMMENDED 5 DO NOT USE EXCESSIVE EXHAUST LENGTH DON'T DO NOT SIT DRYER ON FLEXIBLE EXHAUST. in the absence of local codes, with the NATIONAL ELECTRICAL CODE, ANSI/NFPA NO. 70. 8 MOBILE OR MANUFACTURED HOME INSTALLATION ...

Installation Instructions
Page 6
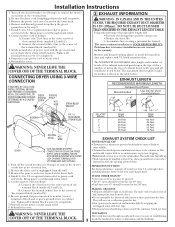
...AND ARMS FROM SHARP EDGES WHEN WORKING INSIDE THE CABINET. DUCT TAPE CAUTION: Internal duct joints must be secured with 4" duct. Installation Instructions 9 DRYER EXHAUST TO RIGHT, LEFT OR BOTTOM CABINET WARNING - Detach and remove the bottom, right or left side knockout as shown and keep portion A.... cause 6 a safety hazard. CAUTION: Be sure not to the blower housing. REMOVE DESIRED KNOCKOUT (ONE ONLY). Remove the screw inside the dryer when inserting the duct. BE SURE TO WEAR GLOVES ADDING NEW DUCT FIXING HOLE PORTION "A" REMOVE SCREW AND SAVE. Pull the duct out of...
...AND ARMS FROM SHARP EDGES WHEN WORKING INSIDE THE CABINET. DUCT TAPE CAUTION: Internal duct joints must be secured with 4" duct. Installation Instructions 9 DRYER EXHAUST TO RIGHT, LEFT OR BOTTOM CABINET WARNING - Detach and remove the bottom, right or left side knockout as shown and keep portion A.... cause 6 a safety hazard. CAUTION: Be sure not to the blower housing. REMOVE DESIRED KNOCKOUT (ONE ONLY). Remove the screw inside the dryer when inserting the duct. BE SURE TO WEAR GLOVES ADDING NEW DUCT FIXING HOLE PORTION "A" REMOVE SCREW AND SAVE. Pull the duct out of...


