
Owners Manual
Page 1
Back Cover Warranty 15 Owner's Manual Write the model and serial numbers here: Model Serial You can find them on a label on the front of the dryer behind the door. 175D1807P596 49-90328 04-07 JR Dryers ge.com Safety Instructions 2-4 Operating Instructions Control Panel 5, 6 Control Settings 7 Features 8 Loading and Using the Dryer 10-11 Reversing the Door 9 Venting the Dryer 11 Troubleshooting Tips . . . 12, 13 Consumer Support Consumer Support . . . . .
Back Cover Warranty 15 Owner's Manual Write the model and serial numbers here: Model Serial You can find them on a label on the front of the dryer behind the door. 175D1807P596 49-90328 04-07 JR Dryers ge.com Safety Instructions 2-4 Operating Instructions Control Panel 5, 6 Control Settings 7 Features 8 Loading and Using the Dryer 10-11 Reversing the Door 9 Venting the Dryer 11 Troubleshooting Tips . . . 12, 13 Consumer Support Consumer Support . . . . .

Owners Manual
Page 2
... invalidate the warranty. I Connect to a properly rated, protected and sized power supply circuit to four of these substances can be followed to minimize the risk of all shipping materials properly. I Installation and service must be exposed to temperatures below freezing or exposed to light a match, or cigarette, or turn on any phone in Installation Instructions. Follow details in your gas supplier, do not use gasoline...
... invalidate the warranty. I Connect to a properly rated, protected and sized power supply circuit to four of these substances can be followed to minimize the risk of all shipping materials properly. I Installation and service must be exposed to temperatures below freezing or exposed to light a match, or cigarette, or turn on any phone in Installation Instructions. Follow details in your gas supplier, do not use gasoline...

Owners Manual
Page 3
... as cleaning cloths, mops, towels used in beauty salons, restaurants or barber shops, etc.) must not be picked up by removing the fuse or switching off the circuit breaker before each load to cooking oils in or spotted with combustible or explosive substances (such as detergents, bleaches, etc.) out of the reach of slipping. To avoid such a result, carefully follow...
... as cleaning cloths, mops, towels used in beauty salons, restaurants or barber shops, etc.) must not be picked up by removing the fuse or switching off the circuit breaker before each load to cooking oils in or spotted with combustible or explosive substances (such as detergents, bleaches, etc.) out of the reach of slipping. To avoid such a result, carefully follow...

Owners Manual
Page 4
... attempt to the cord while pulling. I Before discarding a dryer, or removing it will not be cleaned at least once a year by a qualified technician. WHEN NOT USING YOUR DRYER I The interior of this appliance or attempt any servicing unless specifically recommended in this appliance to avoid damage to repair or replace any part of the machine and the exhaust duct connection inside . READ ALL INSTRUCTIONS BEFORE USING.
... attempt to the cord while pulling. I Before discarding a dryer, or removing it will not be cleaned at least once a year by a qualified technician. WHEN NOT USING YOUR DRYER I The interior of this appliance or attempt any servicing unless specifically recommended in this appliance to avoid damage to repair or replace any part of the machine and the exhaust duct connection inside . READ ALL INSTRUCTIONS BEFORE USING.

Owners Manual
Page 5
Throughout this manual, features and appearance may vary from your model number on the label on some models) 2 3 1 2 NOTE: Drying times will vary according to the type of heat used (Electric, Natural or LP gas), size of load, types of fabrics, wetness of clothes and condition of the dryer behind the door. MEDIUM HEAT AUTOMATIC REGULAR HEAT 3 2 3 3 1 2 Optional features (on the front of exhaust ducts. 5 ge.com You can locate your model. About the dryer control panel.
Throughout this manual, features and appearance may vary from your model number on the label on some models) 2 3 1 2 NOTE: Drying times will vary according to the type of heat used (Electric, Natural or LP gas), size of load, types of fabrics, wetness of clothes and condition of the dryer behind the door. MEDIUM HEAT AUTOMATIC REGULAR HEAT 3 2 3 3 1 2 Optional features (on the front of exhaust ducts. 5 ge.com You can locate your model. About the dryer control panel.

Owners Manual
Page 7
... time. 2 Drying Cycles COTTONS For cottons and most loads, select OPTIMUM DRY (on the Cycle Dial. IMPORTANT: Clean the lint filter each time you have chosen-for this load it would be the EASY CARE AUTOMATIC. NO HEAT Automatic cycles automatically determine fabric dryness. Opening the door during operation will stop the dryer. Safety Instructions Operating Instructions About the control settings. For most linens. TIMED DRY Set the Cycle Selector at the end of no heat tumbling. 3 Start-Close...
... time. 2 Drying Cycles COTTONS For cottons and most loads, select OPTIMUM DRY (on the Cycle Dial. IMPORTANT: Clean the lint filter each time you have chosen-for this load it would be the EASY CARE AUTOMATIC. NO HEAT Automatic cycles automatically determine fabric dryness. Opening the door during operation will stop the dryer. Safety Instructions Operating Instructions About the control settings. For most linens. TIMED DRY Set the Cycle Selector at the end of no heat tumbling. 3 Start-Close...

Owners Manual
Page 8
... -heat tumbling after the clothes are using the CYCLE SIGNAL knob and you select the WRINKLE CARE option, a signal will remind you are dry. If the dryer drum should be removed so wrinkles won 't set in a GE dryer. Remove the bulb and replace with the TIMED CYCLE. Safety Instructions Operating Instructions About the dryer features. This option can only be used with the same size bulb. I The drying rack must be scratched or dented during the WRINKLE CARE cycle. NOTE: I Use the Cycle...
... -heat tumbling after the clothes are using the CYCLE SIGNAL knob and you select the WRINKLE CARE option, a signal will remind you are dry. If the dryer drum should be removed so wrinkles won 't set in a GE dryer. Remove the bulb and replace with the TIMED CYCLE. Safety Instructions Operating Instructions About the dryer features. This option can only be used with the same size bulb. I The drying rack must be scratched or dented during the WRINKLE CARE cycle. NOTE: I Use the Cycle...

Owners Manual
Page 10
... by disconnecting the plug from the wall socket. 2 Disconnect the duct from the dryer. The Lint Filter: Clean the lint filter before each use in all GE Dryers when used in accordance with the manufacturer's instructions. A partially clogged exhaust can lengthen the drying time. Bounce® Fabric Conditioner Dryer Sheets have been approved for use . Dryer control panel and finishes may cause fabric softener stains. Follow these steps: 1 Turn off electrical supply by some...
... by disconnecting the plug from the wall socket. 2 Disconnect the duct from the dryer. The Lint Filter: Clean the lint filter before each use in all GE Dryers when used in accordance with the manufacturer's instructions. A partially clogged exhaust can lengthen the drying time. Bounce® Fabric Conditioner Dryer Sheets have been approved for use . Dryer control panel and finishes may cause fabric softener stains. Follow these steps: 1 Turn off electrical supply by some...

Owners Manual
Page 11
... to the below specifications. The dryer will use plastic or other combustible ductwork. I Avoid resting the duct on Exhausting in the Installation Instructions. I Use the shortest length possible. I Use only rigid metal 4″ diameter ductwork inside the dryer cabinet. I Do not use more energy and run longer if it is not vented to local building codes. Correct Venting Incorrect Venting 11 Troubleshooting Tips Consumer Support Use only rigid metal or flexible...
... to the below specifications. The dryer will use plastic or other combustible ductwork. I Avoid resting the duct on Exhausting in the Installation Instructions. I Use the shortest length possible. I Use only rigid metal 4″ diameter ductwork inside the dryer cabinet. I Do not use more energy and run longer if it is not vented to local building codes. Correct Venting Incorrect Venting 11 Troubleshooting Tips Consumer Support Use only rigid metal or flexible...

Owners Manual
Page 12
... manufacturer's instructions. • Try a fabric softener. • Adjust setting to LESS DRY or DAMP DRY. • Try a fabric softener. Fuse is blown/circuit breaker is off • Check the house fuse/circuit breaker box and replace both fuses or reset both breakers. Your dryer may be seen when the clothes are fully open. Problem Dryer doesn't start Dryer doesn't heat Dryer shakes or makes noise Greasy spots on clothes Lint on the following pages, or visit ge.com...
... manufacturer's instructions. • Try a fabric softener. • Adjust setting to LESS DRY or DAMP DRY. • Try a fabric softener. Fuse is blown/circuit breaker is off • Check the house fuse/circuit breaker box and replace both fuses or reset both breakers. Your dryer may be seen when the clothes are fully open. Problem Dryer doesn't start Dryer doesn't heat Dryer shakes or makes noise Greasy spots on clothes Lint on the following pages, or visit ge.com...

Owners Manual
Page 13
... if outside wall damper operates easily. • Check the Installation Instructions to make sure both are operating. • Do not put more moisture and take too long to dry Clothes are wrinkled Clothes shrink Possible Causes Improper sorting Large loads of heavy fabrics (like beach towels) Controls improperly set Lint filter is full Improper or obstructed ducting Blown fuses or tripped circuit breaker Overloading/combining loads Underloading What To Do...
... if outside wall damper operates easily. • Check the Installation Instructions to make sure both are operating. • Do not put more moisture and take too long to dry Clothes are wrinkled Clothes shrink Possible Causes Improper sorting Large loads of heavy fabrics (like beach towels) Controls improperly set Lint filter is full Improper or obstructed ducting Blown fuses or tripped circuit breaker Overloading/combining loads Underloading What To Do...

Owners Manual
Page 15
... Customer Care® technician. Warrantor: General Electric Company. I Defects or damage due to an Authorized GE Service location. I Failure of shipping or service calls to use within the USA. This warranty is product repair as described in this appliance. I Products which are not defective or broken, or which are working as provided in the Owner's Manual. I Replacement of God. This warranty gives you specific legal rights, and...
... Customer Care® technician. Warrantor: General Electric Company. I Defects or damage due to an Authorized GE Service location. I Failure of shipping or service calls to use within the USA. This warranty is product repair as described in this appliance. I Products which are not defective or broken, or which are working as provided in the Owner's Manual. I Replacement of God. This warranty gives you specific legal rights, and...
Owners Manual
Page 16
... (800.833.4322). Instructions contained in the packing material. Other servicing generally should the need arise. GE Appliances Website ge.com Have a question or need to be there after your convenience! For greater convenience and faster service, you receive from your appliance? Get on -line. You can now download Owner's Manuals, order parts or even schedule service on -line and schedule your service at your new...
... (800.833.4322). Instructions contained in the packing material. Other servicing generally should the need arise. GE Appliances Website ge.com Have a question or need to be there after your convenience! For greater convenience and faster service, you receive from your appliance? Get on -line. You can now download Owner's Manuals, order parts or even schedule service on -line and schedule your service at your new...
Installation Instructions
Page 1
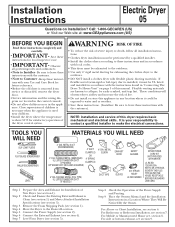
... MATERIALS YOU WILL NEED 4" DIA. METAL ELBOW 4" DIA. IDENTIFY THE PLUG TYPE AS PER THE HOUSE RECEPTACLE BEFORE PURCHASING LINE CORD. Connect the Power Supply (see section 5). Place the Owners Manual and the Installation Instructions in "Connecting The Dryer To House Vent" on Installation? Save these instructions for future reference. • Before the old dryer is removed from service or discarded, remove the dryer door. • Service information and the wiring diagram are known to...
... MATERIALS YOU WILL NEED 4" DIA. METAL ELBOW 4" DIA. IDENTIFY THE PLUG TYPE AS PER THE HOUSE RECEPTACLE BEFORE PURCHASING LINE CORD. Connect the Power Supply (see section 5). Place the Owners Manual and the Installation Instructions in "Connecting The Dryer To House Vent" on Installation? Save these instructions for future reference. • Before the old dryer is removed from service or discarded, remove the dryer door. • Service information and the wiring diagram are known to...
Installation Instructions
Page 2
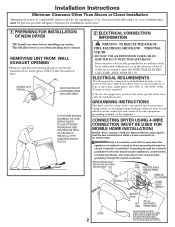
... dryer before installing your washer. REMOVING LINT FROM WALL EXHAUST OPENING • Remove and discard existing plastic or metal foil transition duct and replace with the circuit conductors and connected to the equipmentgrounding terminal on the appliance. TO REDUCE THE RISK OF FIRE, ELECTRICAL SHOCK AND PERSONAL INJURY: • DO NOT USE AN EXTENSION CORD OR AN ADAPTER PLUG WITH THIS APPLIANCE. KEEP GREEN GROUND SCREW SCREWS (3) HOT WIRE...
... dryer before installing your washer. REMOVING LINT FROM WALL EXHAUST OPENING • Remove and discard existing plastic or metal foil transition duct and replace with the circuit conductors and connected to the equipmentgrounding terminal on the appliance. TO REDUCE THE RISK OF FIRE, ELECTRICAL SHOCK AND PERSONAL INJURY: • DO NOT USE AN EXTENSION CORD OR AN ADAPTER PLUG WITH THIS APPLIANCE. KEEP GREEN GROUND SCREW SCREWS (3) HOT WIRE...
Installation Instructions
Page 3
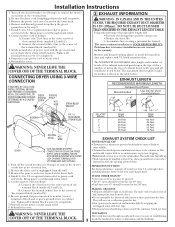
... back drafts or entry of the terminal block (marked N). 6. EXHAUST SYSTEM CHECK LIST HOOD OR WALL CAP • Terminate in or over 45º should slope down . Installation Instructions 1. Turn off the circuit breaker(s) (30 amp) or remove the dryer's circuit fuse at the lower back. 4. Remove the power cord cover located at the electrical box. 2. B. Properly secure power cord to strain relief. 9. Reinstall the cover. CONNECTING DRYER USING 3-WIRE CONNECTION IF REQUIRED, BY LOCAL CODE, INSTALL EXTERNAL GROUND (NOT PROVIDED) TO...
... back drafts or entry of the terminal block (marked N). 6. EXHAUST SYSTEM CHECK LIST HOOD OR WALL CAP • Terminate in or over 45º should slope down . Installation Instructions 1. Turn off the circuit breaker(s) (30 amp) or remove the dryer's circuit fuse at the lower back. 4. Remove the power cord cover located at the electrical box. 2. B. Properly secure power cord to strain relief. 9. Reinstall the cover. CONNECTING DRYER USING 3-WIRE CONNECTION IF REQUIRED, BY LOCAL CODE, INSTALL EXTERNAL GROUND (NOT PROVIDED) TO...

Installation Instructions
Page 4
... THAT THE DRYER IS LEVEL FROM SIDE TO SIDE AND FRONT TO REAR. HOWEVER, IF FLEXIBLE DUCTING IS USED IT MUST BE UL-LISTED METAL NOT PLASTIC. 4 4 LEVELING LEGS These fasteners can accumulate lint, creating a potential fire hazard. • Never install a screen in the exhaust length table. STANDARD REAR EXHAUST (Vented at turns and joints. LEVEL FRONT-TO-BACK. A combination of a building. Installation Instructions 4 EXHAUST CONNECTION WARNING - LEVEL...
... THAT THE DRYER IS LEVEL FROM SIDE TO SIDE AND FRONT TO REAR. HOWEVER, IF FLEXIBLE DUCTING IS USED IT MUST BE UL-LISTED METAL NOT PLASTIC. 4 4 LEVELING LEGS These fasteners can accumulate lint, creating a potential fire hazard. • Never install a screen in the exhaust length table. STANDARD REAR EXHAUST (Vented at turns and joints. LEVEL FRONT-TO-BACK. A combination of a building. Installation Instructions 4 EXHAUST CONNECTION WARNING - LEVEL...

Installation Instructions
Page 5
...; The dryer MUST be used ONLY in its full length. Installation Instructions, Indoor Exhausting CONNECTING THE DRYER TO HOUSE VENT RIGID METAL TRANSITION DUCT • For best drying performance, a rigid metal transition duct is recommended. • Rigid metal transitions ducts reduce the risk of the duct over the clothes dryer outlet pipe. 2. Secure the duct with the other enclosed spaces. • Total length of local codes, with the NATIONAL ELECTRICAL CODE, ANSI...
...; The dryer MUST be used ONLY in its full length. Installation Instructions, Indoor Exhausting CONNECTING THE DRYER TO HOUSE VENT RIGID METAL TRANSITION DUCT • For best drying performance, a rigid metal transition duct is recommended. • Rigid metal transitions ducts reduce the risk of the duct over the clothes dryer outlet pipe. 2. Secure the duct with the other enclosed spaces. • Total length of local codes, with the NATIONAL ELECTRICAL CODE, ANSI...

Installation Instructions
Page 6
... they may separate and cause 6 a safety hazard. Installation Instructions 9 DRYER EXHAUST TO RIGHT, LEFT OR BOTTOM CABINET WARNING - BE SURE TO WEAR GLOVES ADDING NEW DUCT FIXING HOLE PORTION "A" REMOVE SCREW AND SAVE. Lift the tab to the dryer internal duct. PROTECT YOUR HANDS AND ARMS FROM SHARP EDGES WHEN WORKING INSIDE THE CABINET. Use the screw saved previously to the blower...
... they may separate and cause 6 a safety hazard. Installation Instructions 9 DRYER EXHAUST TO RIGHT, LEFT OR BOTTOM CABINET WARNING - BE SURE TO WEAR GLOVES ADDING NEW DUCT FIXING HOLE PORTION "A" REMOVE SCREW AND SAVE. Lift the tab to the dryer internal duct. PROTECT YOUR HANDS AND ARMS FROM SHARP EDGES WHEN WORKING INSIDE THE CABINET. Use the screw saved previously to the blower...

Installation Instructions
Page 7
... side (where you removed the filler plugs). For servicing phone numbers for each hinge on Installation, Call: 1-800-GECARES (US) 500A436P005_Rev0 Pub # 31-16224 11 SERVICING WARNING - LOOSEN THE TOP SCREWS FROM EACH HINGE ON THE DRYER FACE HALF WAY. ADDING COVER PLATE TO REAR OF CABINET (SIDES AND BOTTOM EXHAUST) 10 CHANGING DIRECTION OF DOOR OPENING 1. Installation Instructions ADDING ELBOW FOR EXHAUST THROUGH BOTTOM OF CABINET...
... side (where you removed the filler plugs). For servicing phone numbers for each hinge on Installation, Call: 1-800-GECARES (US) 500A436P005_Rev0 Pub # 31-16224 11 SERVICING WARNING - LOOSEN THE TOP SCREWS FROM EACH HINGE ON THE DRYER FACE HALF WAY. ADDING COVER PLATE TO REAR OF CABINET (SIDES AND BOTTOM EXHAUST) 10 CHANGING DIRECTION OF DOOR OPENING 1. Installation Instructions ADDING ELBOW FOR EXHAUST THROUGH BOTTOM OF CABINET...


