
Installation Instructions
Page 1
... 11 Place the Owners Manual and the Installation Instructions in accordance with local codes. These conditions will minimize incomplete combustion. Step 8 Connect the External Exhaust (see section 8). For Bathroom or Bedroom Installation see section 2). Installation Instructions Gas Dryer DESIGN 06 CERTIFIED If you have any location where it must be easily crushed, and trap lint. Be sure to warn customers of the dryer control system. Keep these...
... 11 Place the Owners Manual and the Installation Instructions in accordance with local codes. These conditions will minimize incomplete combustion. Step 8 Connect the External Exhaust (see section 8). For Bathroom or Bedroom Installation see section 2). Installation Instructions Gas Dryer DESIGN 06 CERTIFIED If you have any location where it must be easily crushed, and trap lint. Be sure to warn customers of the dryer control system. Keep these...

Installation Instructions
Page 2
... propane (LP) gas. WALL INTERNAL DUCT OPENING CHECK THAT EXHAUST HOOD DAMPER OPENS AND CLOSES FREELY. The length of the plugged tapping. • Supply line is equipped with a Valve & Burner Assembly for naturalor LP gas. • You must be 1/2-in . GAS SUPPLY • A 1/8-in . rigid pipe and equipped with UL listed transition duct. DISCONNECTING GAS TURN GAS SHUT-OFF VALVE TO THE OFF POSITION. Consideration must use with this dryer for air opening are: 0 in . Installation Instructions...
... propane (LP) gas. WALL INTERNAL DUCT OPENING CHECK THAT EXHAUST HOOD DAMPER OPENS AND CLOSES FREELY. The length of the plugged tapping. • Supply line is equipped with a Valve & Burner Assembly for naturalor LP gas. • You must be 1/2-in . GAS SUPPLY • A 1/8-in . rigid pipe and equipped with UL listed transition duct. DISCONNECTING GAS TURN GAS SHUT-OFF VALVE TO THE OFF POSITION. Consideration must use with this dryer for air opening are: 0 in . Installation Instructions...

Installation Instructions
Page 4
... BEFORE USE. SEPARATION OF TURNS For best performance, separate all conditions noted below . Installation Instructions 5 ELECTRICAL CONNECTION INFORMATION WARNING - ELECTRICAL REQUIREMENTS This appliance must be treated as one 90º turn of exhaust hood (wall cap), and all turns by a 15- or 20amp circuit breaker or time-delay fuse. WARNING - THIS DRYER IS EQUIPPED A THREE-PRONG (GROUNDING) PLUG FOR YOUR PROTECTION AGAINST SHOCK HAZARD AND SHOULD BE PLUGGED DIRECTLY INTO...
... BEFORE USE. SEPARATION OF TURNS For best performance, separate all conditions noted below . Installation Instructions 5 ELECTRICAL CONNECTION INFORMATION WARNING - ELECTRICAL REQUIREMENTS This appliance must be treated as one 90º turn of exhaust hood (wall cap), and all turns by a 15- or 20amp circuit breaker or time-delay fuse. WARNING - THIS DRYER IS EQUIPPED A THREE-PRONG (GROUNDING) PLUG FOR YOUR PROTECTION AGAINST SHOCK HAZARD AND SHOULD BE PLUGGED DIRECTLY INTO...

Installation Instructions
Page 5
...; This clothes dryer must be exhausted to the outdoors. • Use only 4" rigid metal ducting for inspection and cleaning of grease and lint creates a potential fire hazard. • Do not use duct longer than specified in accordance with a kitchen exhaust system. It must be installed in the exhaust length table. Installation Instructions 7 EXHAUST CONNECTION WARNING - THIS DRYER COMES READY FOR REAR EXHAUSTING. IF SPACE IS LIMITED, USE THE INSTRUCTIONS IN SECTION 9 TO EXHAUST DIRECTLY FROM...
...; This clothes dryer must be exhausted to the outdoors. • Use only 4" rigid metal ducting for inspection and cleaning of grease and lint creates a potential fire hazard. • Do not use duct longer than specified in accordance with a kitchen exhaust system. It must be installed in the exhaust length table. Installation Instructions 7 EXHAUST CONNECTION WARNING - THIS DRYER COMES READY FOR REAR EXHAUSTING. IF SPACE IS LIMITED, USE THE INSTRUCTIONS IN SECTION 9 TO EXHAUST DIRECTLY FROM...

Installation Instructions
Page 6
... CLOSET INSTALLATION • If your dryer is highly recommended (see illustra- Allow 2" of outside air into the interior of the exhaust vent. • Provide an opening with a free area of flexible metal duct should be vented to prevent gas pocketing in installations where rigid metal or flexible metal (semi-rigid) ducting cannot be used AND where a 4" diameter can be connected to any other duct, vent, ELBOWS...
... CLOSET INSTALLATION • If your dryer is highly recommended (see illustra- Allow 2" of outside air into the interior of the exhaust vent. • Provide an opening with a free area of flexible metal duct should be vented to prevent gas pocketing in installations where rigid metal or flexible metal (semi-rigid) ducting cannot be used AND where a 4" diameter can be connected to any other duct, vent, ELBOWS...
Installation Instructions
Page 7
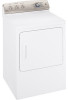
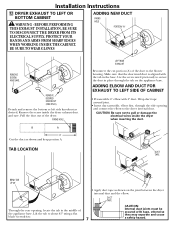
... through the side opening , locate the tab in the middle of the appliance base. Detach and remove the bottom or left side knockout as shown and keep portion A. BE SURE TO WEAR GLOVES ADDING NEW DUCT FIXING HOLE PORTION "A" REMOVE SCREW AND SAVE. Installation Instructions 12 DRYER EXHAUST TO LEFT OR BOTTOM CABINET WARNING - DUCT TAPE CAUTION: Internal duct joints must be...
... through the side opening , locate the tab in the middle of the appliance base. Detach and remove the bottom or left side knockout as shown and keep portion A. BE SURE TO WEAR GLOVES ADDING NEW DUCT FIXING HOLE PORTION "A" REMOVE SCREW AND SAVE. Installation Instructions 12 DRYER EXHAUST TO LEFT OR BOTTOM CABINET WARNING - DUCT TAPE CAUTION: Internal duct joints must be...
Installation Instructions
Page 8
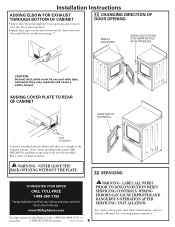
... a plate (Kit WE1M454) available from your warranty. Place dryer in final location. WIRING ERRORS CAN CAUSE IMPROPER AND DANGEROUS OPERATION AFTER SERVICING/INST ALLATION. www.GEAppliances.com For Questions on page 7. 13 CHANGING DIRECTION OF DOOR OPENING REMOVE 4 HINGE SCREWS. WARNING - Cover back opening and connect it to protection under the terms of your local service provider. For replacement parts and other information, refer to complete the exhaust system. Installation Instructions ADDING...
... a plate (Kit WE1M454) available from your warranty. Place dryer in final location. WIRING ERRORS CAN CAUSE IMPROPER AND DANGEROUS OPERATION AFTER SERVICING/INST ALLATION. www.GEAppliances.com For Questions on page 7. 13 CHANGING DIRECTION OF DOOR OPENING REMOVE 4 HINGE SCREWS. WARNING - Cover back opening and connect it to protection under the terms of your local service provider. For replacement parts and other information, refer to complete the exhaust system. Installation Instructions ADDING...
Owners Manual
Page 1
Profile Dryers ge.com Safety Instructions 2-4 Operating Instructions Control Panels 5, 7 Control Settings 6, 8 Dryer Features 9 Loading and Using the Dryer . . . .11 Reversing the Door 10 Venting the Dryer 12 Troubleshooting Tips . . . 13, 14 Consumer Support Consumer Support 16 Warranty 15 Owner's Manual DPSE810 DPSR610 Write the model and serial number here: Model Serial You can find them on a label on the front of the dryer behind the door. 175D1807P558 49-90290-1 09-06 JR
Profile Dryers ge.com Safety Instructions 2-4 Operating Instructions Control Panels 5, 7 Control Settings 6, 8 Dryer Features 9 Loading and Using the Dryer . . . .11 Reversing the Door 10 Venting the Dryer 12 Troubleshooting Tips . . . 13, 14 Consumer Support Consumer Support 16 Warranty 15 Owner's Manual DPSE810 DPSR610 Write the model and serial number here: Model Serial You can find them on a label on the front of the dryer behind the door. 175D1807P558 49-90290-1 09-06 JR
Owners Manual
Page 2
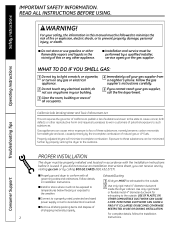
... primarily by properly venting the dryer to such substances. Follow the gas supplier's instructions carefully. 5 If you can cause minor exposure to four of these substances can be properly installed and located in accordance with all Exhaust/Ducting: governing codes and ordinances. Exposure to conform with the Installation Instructions before it will minimize incomplete combustion. Troubleshooting Tips Consumer Support PROPER INSTALLATION This dryer must be minimized...
... primarily by properly venting the dryer to such substances. Follow the gas supplier's instructions carefully. 5 If you can cause minor exposure to four of these substances can be properly installed and located in accordance with all Exhaust/Ducting: governing codes and ordinances. Exposure to conform with the Installation Instructions before it will minimize incomplete combustion. Troubleshooting Tips Consumer Support PROPER INSTALLATION This dryer must be minimized...

Owners Manual
Page 3
... dryer. Before loading, unloading or adding clothes, wait until the drum has completely stopped. Safety Instructions Operating Instructions ge.com YOUR LAUNDRY AREA I Never reach into the dryer while the drum is moving. There are many highly flammable items used near the dryer. NOTE: Turning the Cycle Selector knob to catch fire. I The laundry process can under certain circumstances produce fire by removing the fuse or switching...
... dryer. Before loading, unloading or adding clothes, wait until the drum has completely stopped. Safety Instructions Operating Instructions ge.com YOUR LAUNDRY AREA I Never reach into the dryer while the drum is moving. There are many highly flammable items used near the dryer. NOTE: Turning the Cycle Selector knob to catch fire. I The laundry process can under certain circumstances produce fire by removing the fuse or switching...
Owners Manual
Page 4
... the exhaust duct connection inside . I Before discarding a dryer, or removing it is damaged, malfunctioning, partially disassembled, or has missing or broken parts, including a damaged cord or plug. WARNING! I The interior of those products, or try a dryer-added product for those products and are not covered under the warranty to prevent children from having your laundered fabrics or reduce the static electricity in published user-repair instructions...
... the exhaust duct connection inside . I Before discarding a dryer, or removing it is damaged, malfunctioning, partially disassembled, or has missing or broken parts, including a damaged cord or plug. WARNING! I The interior of those products, or try a dryer-added product for those products and are not covered under the warranty to prevent children from having your laundered fabrics or reduce the static electricity in published user-repair instructions...
Owners Manual
Page 5
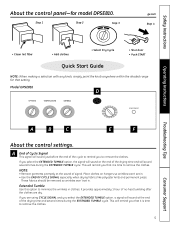
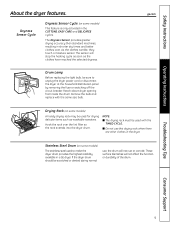
... end of signal. These fabrics should be removed so wrinkles won 't set in clothes. Model DPSE810 D Operating Instructions Troubleshooting Tips A B C E F About the control settings. Extended Tumble Use this option to remove the clothes. A End of the drying time and several times during the EXTENDED TUMBLE cycle. Step 1 Step 2 Step 3 ge.com Step 4 • Clean lint filter • Add clothes • Select Dry Cycle • Shut door • Push START Quick Start Guide NOTE: When making a selection with any knob...
... end of signal. These fabrics should be removed so wrinkles won 't set in clothes. Model DPSE810 D Operating Instructions Troubleshooting Tips A B C E F About the control settings. Extended Tumble Use this option to remove the clothes. A End of the drying time and several times during the EXTENDED TUMBLE cycle. Step 1 Step 2 Step 3 ge.com Step 4 • Clean lint filter • Add clothes • Select Dry Cycle • Shut door • Push START Quick Start Guide NOTE: When making a selection with any knob...
Owners Manual
Page 6
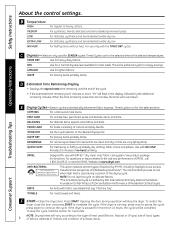
.... Press START. Opening the door during a portion of Residential Clothes Dryers. If the dryer is used during operation will stop the cycle, hold the button for more , "1H" will count down. MEDIUM For synthetics, blends, delicates and items labeled permanent press. For use with the TIMED DRY cycles. Timed Cycles run for use only with DRYEL® "dry-clean only" fabric care system. LESS DRY Use for heavy-duty fabrics. Operating Instructions Troubleshooting Tips E Drying Cycles-Sensor cycles automatically determine...
.... Press START. Opening the door during a portion of Residential Clothes Dryers. If the dryer is used during operation will stop the cycle, hold the button for more , "1H" will count down. MEDIUM For synthetics, blends, delicates and items labeled permanent press. For use with the TIMED DRY cycles. Timed Cycles run for use only with DRYEL® "dry-clean only" fabric care system. LESS DRY Use for heavy-duty fabrics. Operating Instructions Troubleshooting Tips E Drying Cycles-Sensor cycles automatically determine...

Owners Manual
Page 8
... gas), size of load, types of fabrics, wetness of clothes and condition of exhaust ducts. DAMP DRY For leaving items partially damp. DELICATES For delicate items, special-care fabrics and knits. Provides 10 minutes of the drying time and several times during operation will remind you want them to heavy cottons. B Temperature HIGH HEAT For regular to feel drier. D Drying Cycles-Automatic cycles automatically determine fabric dryness. Press START. TIMED DRY Set the Cycle...
... gas), size of load, types of fabrics, wetness of clothes and condition of exhaust ducts. DAMP DRY For leaving items partially damp. DELICATES For delicate items, special-care fabrics and knits. Provides 10 minutes of the drying time and several times during operation will remind you want them to heavy cottons. B Temperature HIGH HEAT For regular to feel drier. D Drying Cycles-Automatic cycles automatically determine fabric dryness. Press START. TIMED DRY Set the Cycle...
Owners Manual
Page 9
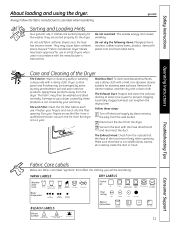
... drum. Reach above dryer opening from inside the drum. The Dryness Sensor provides greater drying accuracy than standard machines, resulting in the dryer. Drum Lamp Before replacing the light bulb, be used to unplug the dryer power cord or disconnect the dryer at the household distribution panel by removing the fuse or switching off the circuit breaker. Hook the rack over the lint filter so the rack extends into the dryer drum. Troubleshooting Tips Consumer Support 9 Remove the bulb and replace with the TIMED CYCLE. Safety Instructions Operating Instructions...
... drum. Reach above dryer opening from inside the drum. The Dryness Sensor provides greater drying accuracy than standard machines, resulting in the dryer. Drum Lamp Before replacing the light bulb, be used to unplug the dryer power cord or disconnect the dryer at the household distribution panel by removing the fuse or switching off the circuit breaker. Hook the rack over the lint filter so the rack extends into the dryer drum. Troubleshooting Tips Consumer Support 9 Remove the bulb and replace with the TIMED CYCLE. Safety Instructions Operating Instructions...
Owners Manual
Page 11
... use in all GE Dryers when used with the manufacturer's instructions. Follow these steps: 1 Turn off electrical supply by disconnecting the plug from the wall socket. 2 Disconnect the duct from the outside that there is not covered by some laundry pretreatment soil and stain remover products. This wastes energy and causes wrinkling. Safety Instructions Operating Instructions About loading and using the dryer. Do not add fabric softener sheets once the load...
... use in all GE Dryers when used with the manufacturer's instructions. Follow these steps: 1 Turn off electrical supply by disconnecting the plug from the wall socket. 2 Disconnect the duct from the outside that there is not covered by some laundry pretreatment soil and stain remover products. This wastes energy and causes wrinkling. Safety Instructions Operating Instructions About loading and using the dryer. Do not add fabric softener sheets once the load...
Owners Manual
Page 12
... Venting 12 Troubleshooting Tips Consumer Support I Venting must conform to the below specifications. I Use the shortest length possible. I Do not crush or collapse. Safety Instructions Operating Instructions About venting the dryer. Carefully follow the details on sharp objects. I Use only rigid metal 4 ″ diameter ductwork inside the dryer cabinet. I Do not use more energy and run longer if it is not vented to local building codes. I Avoid resting the duct on Exhausting...
... Venting 12 Troubleshooting Tips Consumer Support I Venting must conform to the below specifications. I Use the shortest length possible. I Do not crush or collapse. Safety Instructions Operating Instructions About venting the dryer. Carefully follow the details on sharp objects. I Use only rigid metal 4 ″ diameter ductwork inside the dryer cabinet. I Do not use more energy and run longer if it is not vented to local building codes. I Avoid resting the duct on Exhausting...
Owners Manual
Page 13
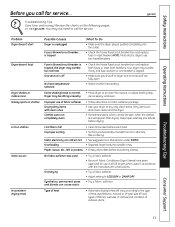
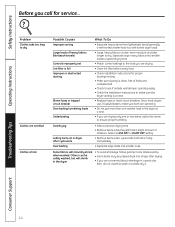
... off No heat temperature selected • Check the house fuse/circuit breaker box and replace both fuses or reset both breakers. Overloading • Separate large loads into the outlet. • Check the house fuse/circuit breaker box and replace fuse or reset breaker. Type of exhaust ducts. Safety Instructions Operating Instructions Before you call for service. Your dryer may tumble but not heat Gas service is tripped. • Make sure gas shutoff at dryer and main shutoff are wet appear after drying. Lint filter is normal...
... off No heat temperature selected • Check the house fuse/circuit breaker box and replace both fuses or reset both breakers. Overloading • Separate large loads into the outlet. • Check the house fuse/circuit breaker box and replace fuse or reset breaker. Type of exhaust ducts. Safety Instructions Operating Instructions Before you call for service. Your dryer may tumble but not heat Gas service is tripped. • Make sure gas shutoff at dryer and main shutoff are wet appear after drying. Lint filter is normal...
Owners Manual
Page 14
... are drying. • Clean lint filter before every load. • Check installation instructions for service... Others can be safely washed, but will naturally shrink • To avoid shrinkage, follow garment care labels exactly. Troubleshooting Tips Consumer Support 14 Since most dryers use 2 fuses/breakers, make sure the dryer venting is correct. • Replace fuses or reset circuit breakers. Some fabrics will shrink in the dryer • Some items may be pressed back into shape after cycle...
... are drying. • Clean lint filter before every load. • Check installation instructions for service... Others can be safely washed, but will naturally shrink • To avoid shrinkage, follow garment care labels exactly. Troubleshooting Tips Consumer Support 14 Since most dryers use 2 fuses/breakers, make sure the dryer venting is correct. • Replace fuses or reset circuit breakers. Some fabrics will shrink in the dryer • Some items may be pressed back into shape after cycle...
Owners Manual
Page 15
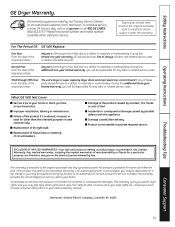
... a GE Authorized Servicer is product repair as provided in materials or workmanship. I Product not accessible to state. I Failure of the dryer which vary from state to provide required service. I Improper installation, delivery or maintenance. This warranty is abused, misused, or used commercially. I Damage caused after delivery. Warrantor: General Electric Company. Second Year From the date of the original purchase Any part of the parts should...
... a GE Authorized Servicer is product repair as provided in materials or workmanship. I Product not accessible to state. I Failure of the dryer which vary from state to provide required service. I Improper installation, delivery or maintenance. This warranty is abused, misused, or used commercially. I Damage caused after delivery. Warrantor: General Electric Company. Second Year From the date of the original purchase Any part of the parts should...


