
Owners Manual
Page 1
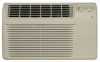
Air ConditionRoeorms ge.com Owner's Manual and Installation Instructions Safety Instructions 2, 3 Operating Instructions Controls-Control Knobs . . . . 8, 9 Controls-Touch Pads 4-6 Care and Cleaning Air Filter 11 Front Grille 10 Grille and Case 10 Outdoor Coils 10 Installation Instructions Before You Begin 12, 13 Installing a J-Model in an Existing Wall Case 14 Through-the-Wall Installation-Optional 15 Window Installation- Back Cover Warranty 23 *ENERGY STAR® labeled product Cool Only: AJCH 08, 10 AJCH 10, 12 AJCQ 06 AJCQ 08, 10, 12 AJCQ 10, 12 AJCS...
Air ConditionRoeorms ge.com Owner's Manual and Installation Instructions Safety Instructions 2, 3 Operating Instructions Controls-Control Knobs . . . . 8, 9 Controls-Touch Pads 4-6 Care and Cleaning Air Filter 11 Front Grille 10 Grille and Case 10 Outdoor Coils 10 Installation Instructions Before You Begin 12, 13 Installing a J-Model in an Existing Wall Case 14 Through-the-Wall Installation-Optional 15 Window Installation- Back Cover Warranty 23 *ENERGY STAR® labeled product Cool Only: AJCH 08, 10 AJCH 10, 12 AJCQ 06 AJCQ 08, 10, 12 AJCQ 10, 12 AJCS...
Owners Manual
Page 2
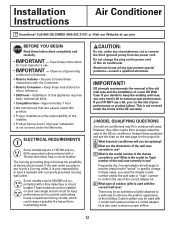
Consumer Support Troubleshooting Tips Installation Instructions Care and Cleaning Operating Instructions Safety Instructions IMPORTANT SAFETY INFORMATION. I Turn the mode control OFF and unplug your air conditioner before it replaced with the company handling disposal about what to minimize the risk of this or any circumstances, cut or remove the third (ground) prong from this manual must be plugged into its own individual electrical outlet which could cause a fire hazard...
Consumer Support Troubleshooting Tips Installation Instructions Care and Cleaning Operating Instructions Safety Instructions IMPORTANT SAFETY INFORMATION. I Turn the mode control OFF and unplug your air conditioner before it replaced with the company handling disposal about what to minimize the risk of this or any circumstances, cut or remove the third (ground) prong from this manual must be plugged into its own individual electrical outlet which could cause a fire hazard...
Owners Manual
Page 3
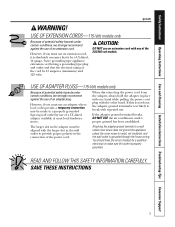
... wall outlet is absolutely necessary that it be a UL-listed, 14 gauge, 3-wire grounding type appliance extension cord having a grounding type plug and outlet and that the electrical rating of the 230/208 volt models. SAVE THESE INSTRUCTIONS 3 Safety Instructions Operating Instructions Care and Cleaning Installation Instructions Troubleshooting Tips Consumer Support ge.com WARNING! USE OF ADAPTER PLUGS-115-Volt models only Because of potential safety hazards under certain conditions, we strongly recommend against the use...
... wall outlet is absolutely necessary that it be a UL-listed, 14 gauge, 3-wire grounding type appliance extension cord having a grounding type plug and outlet and that the electrical rating of the 230/208 volt models. SAVE THESE INSTRUCTIONS 3 Safety Instructions Operating Instructions Care and Cleaning Installation Instructions Troubleshooting Tips Consumer Support ge.com WARNING! USE OF ADAPTER PLUGS-115-Volt models only Because of potential safety hazards under certain conditions, we strongly recommend against the use...
Owners Manual
Page 4
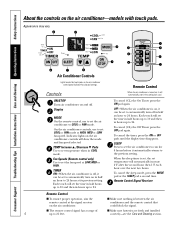
... Remote Control I To ensure proper operation, aim the remote control at HIGH, MED or LOW fan speed. Consumer Support Troubleshooting Tips Installation Instructions Care and Cleaning Operating Instructions Safety Instructions About the controls on the air conditioner control panel indicate the selected settings. Timer On Timer Off Sleep Cool Fan High Med Low On Air Conditioner Controls Lights beside the touch pads on the air conditioner-models with touch pads. correctly-see the Care and Cleaning section. Display MODE On the remote control, use to the previous setting...
... Remote Control I To ensure proper operation, aim the remote control at HIGH, MED or LOW fan speed. Consumer Support Troubleshooting Tips Installation Instructions Care and Cleaning Operating Instructions Safety Instructions About the controls on the air conditioner control panel indicate the selected settings. Timer On Timer Off Sleep Cool Fan High Med Low On Air Conditioner Controls Lights beside the touch pads on the air conditioner-models with touch pads. correctly-see the Care and Cleaning section. Display MODE On the remote control, use to the previous setting...

Owners Manual
Page 5
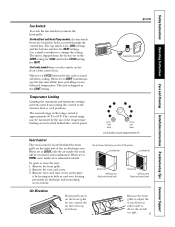
... the air conditioner is off and is lit for the desired fan speed. 2. When set temperature. Since fan only settings do not provide cooling, a temperature setting will be displayed. Remove the front grille. 2. Remove the vent card screw. 3. Locating hole Locating hole Screw hole OPEN position (Mesh end toward back) Screw hole CLOSE position (Mesh end toward front) Air Direction Horizontal louvers on the control box. Safety Instructions Operating Instructions Care and Cleaning Installation Instructions Troubleshooting Tips Consumer Support ge.com COOL MODE Remote Control...
... the air conditioner is off and is lit for the desired fan speed. 2. When set temperature. Since fan only settings do not provide cooling, a temperature setting will be displayed. Remove the front grille. 2. Remove the vent card screw. 3. Locating hole Locating hole Screw hole OPEN position (Mesh end toward back) Screw hole CLOSE position (Mesh end toward front) Air Direction Horizontal louvers on the control box. Safety Instructions Operating Instructions Care and Cleaning Installation Instructions Troubleshooting Tips Consumer Support ge.com COOL MODE Remote Control...
Owners Manual
Page 6
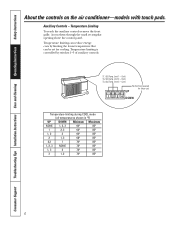
...; 2 1, 3 68° 85° 2,3 1 70° 85° 1, 2, 3 NONE 72° 85° 1, 3 2 74° 85° 3 1, 2 76° 85° 6 Cool) TL2 (C) (Temp. Consumer Support Troubleshooting Tips Installation Instructions Care and Cleaning Operating Instructions Safety Instructions About the controls on the air conditioner-models with touch pads. Access them through the small rectangular opening above the control panel. Cool) No function (reserved for cooling. TL1 (C) (Temp. Limit 1 - Limit 3 - Auxiliary...
...; 2 1, 3 68° 85° 2,3 1 70° 85° 1, 2, 3 NONE 72° 85° 1, 3 2 74° 85° 3 1, 2 76° 85° 6 Cool) TL2 (C) (Temp. Consumer Support Troubleshooting Tips Installation Instructions Care and Cleaning Operating Instructions Safety Instructions About the controls on the air conditioner-models with touch pads. Access them through the small rectangular opening above the control panel. Cool) No function (reserved for cooling. TL1 (C) (Temp. Limit 1 - Limit 3 - Auxiliary...
Owners Manual
Page 8
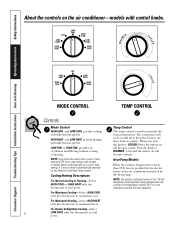
... temp control is automatically provided on the Heat/Cool and Heat Pump models. The compressor will cycle on and off to keep the room at mid point. Turn the knob to maintain the room temperature. Heat Pump Models When the outdoor temperature is lower than 25°F., heat is provided by the heat pump. Consumer Support Troubleshooting Tips Installation Instructions Care and Cleaning Operating Instructions Safety Instructions WARM About the controls on the air conditioner-models with different fan speeds. A 3-minute delay is used...
... temp control is automatically provided on the Heat/Cool and Heat Pump models. The compressor will cycle on and off to keep the room at mid point. Turn the knob to maintain the room temperature. Heat Pump Models When the outdoor temperature is lower than 25°F., heat is provided by the heat pump. Consumer Support Troubleshooting Tips Installation Instructions Care and Cleaning Operating Instructions Safety Instructions WARM About the controls on the air conditioner-models with different fan speeds. A 3-minute delay is used...
Owners Manual
Page 9
... when cooling. Limits heat temp Limits cool temp Each position equals approximately 3°F. When set at front. Remove vent card, turn it by the use of the air discharge area. The unit is located behind the control panel. Remove the front grille to adjust the vertical louvers side-to-side to 85°F. Safety Instructions Operating Instructions Care and Cleaning Installation Instructions Troubleshooting Tips Consumer Support Fan Switch To reach the fan switch(es) remove the front grille. On Heat/Cool and Heat Pump models, the fan switch...
... when cooling. Limits heat temp Limits cool temp Each position equals approximately 3°F. When set at front. Remove vent card, turn it by the use of the air discharge area. The unit is located behind the control panel. Remove the front grille to adjust the vertical louvers side-to-side to 85°F. Safety Instructions Operating Instructions Care and Cleaning Installation Instructions Troubleshooting Tips Consumer Support Fan Switch To reach the fan switch(es) remove the front grille. On Heat/Cool and Heat Pump models, the fan switch...
Owners Manual
Page 10
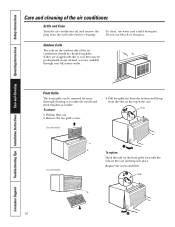
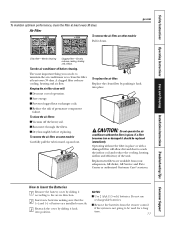
... some models To replace: Hook the tabs on the front grille even with dirt or soot they are clogged with the tabs on the outdoor side of the air conditioner. Grille Tab On some models 3. To remove: 1. Consumer Support Troubleshooting Tips Installation Instructions Care and Cleaning Operating Instructions Safety Instructions Care and cleaning of the air conditioner should be removed for more thorough cleaning or to make the model and serial numbers accessible. Do not use water...
... some models To replace: Hook the tabs on the front grille even with dirt or soot they are clogged with the tabs on the outdoor side of the air conditioner. Grille Tab On some models 3. To remove: 1. Consumer Support Troubleshooting Tips Installation Instructions Care and Cleaning Operating Instructions Safety Instructions Care and cleaning of the air conditioner should be removed for more thorough cleaning or to make the model and serial numbers accessible. Do not use water...
Owners Manual
Page 11
... filter reduces cooling, heating and air flow. I Save energy. I Reduce the risk of battery are available from the remote control if the system is to the arrow direction. 2 Insert new batteries making sure that the (+) and (-) of premature component failure. How to Insert the Batteries 1 Remove the battery cover by sliding it back into place. Safety Instructions Operating Instructions Care and Cleaning Installation Instructions Troubleshooting Tips Consumer Support To...
... filter reduces cooling, heating and air flow. I Save energy. I Reduce the risk of battery are available from the remote control if the system is to the arrow direction. 2 Insert new batteries making sure that the (+) and (-) of premature component failure. How to Insert the Batteries 1 Remove the battery cover by sliding it back into place. Safety Instructions Operating Instructions Care and Cleaning Installation Instructions Troubleshooting Tips Consumer Support To...
Owners Manual
Page 12
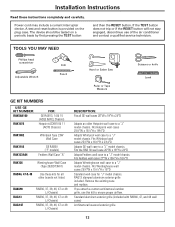
... type of outdoor grille is the model (or Type) number of the GE warranty. Save these instructions for the proper kit. Installation of poor performance or product failure. If you run the risk of this air conditioner. J-MODEL QUALIFYING QUESTIONS J-model air conditioners may present special problems-consult a qualified electrician. Aluminum house wiring may fit in use of the building. However, they often need the chassis model number and/or the wall case or "type" number to...
... type of outdoor grille is the model (or Type) number of the GE warranty. Save these instructions for the proper kit. Installation of poor performance or product failure. If you run the risk of this air conditioner. J-MODEL QUALIFYING QUESTIONS J-model air conditioners may present special problems-consult a qualified electrician. Aluminum house wiring may fit in use of the building. However, they often need the chassis model number and/or the wall case or "type" number to...
Owners Manual
Page 13
... or 48 (J-Chassis) DESCRIPTION: Fits all other brands not listed. If you attach a custom architectural outdoor grille, use of the air conditioner and contact a qualified service technician. Remove the existing case and replace. If the TEST button does not trip or if the RESET button will not stay engaged, discontinue use this kit to a "J" model chassis. RAG13 stamped aluminum exterior grille included. Power cord may include a current interrupter device.
... or 48 (J-Chassis) DESCRIPTION: Fits all other brands not listed. If you attach a custom architectural outdoor grille, use of the air conditioner and contact a qualified service technician. Remove the existing case and replace. If the TEST button does not trip or if the RESET button will not stay engaged, discontinue use this kit to a "J" model chassis. RAG13 stamped aluminum exterior grille included. Power cord may include a current interrupter device.
Owners Manual
Page 14
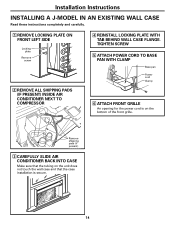
... Power cord Clamp 6 ATTACH FRONT GRILLE An opening for the power cord is secure. 14 Remove shipping pads (if present) 3 CAREFULLY SLIDE AIR CONDITIONER BACK INTO CASE Make sure that the tubing on the unit does not touch the wall case and that the case installation is on the bottom of the front grille. Installation Instructions INSTALLING A J-MODEL IN AN EXISTING WALL CASE Read these instructions completely and carefully. 1 REMOVE...
... Power cord Clamp 6 ATTACH FRONT GRILLE An opening for the power cord is secure. 14 Remove shipping pads (if present) 3 CAREFULLY SLIDE AIR CONDITIONER BACK INTO CASE Make sure that the tubing on the unit does not touch the wall case and that the case installation is on the bottom of the front grille. Installation Instructions INSTALLING A J-MODEL IN AN EXISTING WALL CASE Read these instructions completely and carefully. 1 REMOVE...
Owners Manual
Page 15
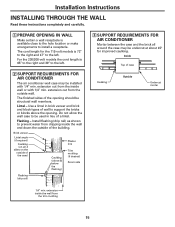
...; min. Use a lintel in lieu of a lintel. Inside Top of wall to install a receptacle. Installation Instructions INSTALLING THROUGH THE WALL Read these instructions completely and carefully. 1 PREPARE OPENING IN WALL Make certain a wall receptacle is available close to the hole location or make arrangements to support the bricks or blocks above & below the flashing) Plaster line Trim molding (if desired) Room side Flashing (drip rail) 3 SUPPORT REQUIREMENTS FOR AIR CONDITIONER Mortar...
...; min. Use a lintel in lieu of a lintel. Inside Top of wall to install a receptacle. Installation Instructions INSTALLING THROUGH THE WALL Read these instructions completely and carefully. 1 PREPARE OPENING IN WALL Make certain a wall receptacle is available close to the hole location or make arrangements to support the bricks or blocks above & below the flashing) Plaster line Trim molding (if desired) Room side Flashing (drip rail) 3 SUPPORT REQUIREMENTS FOR AIR CONDITIONER Mortar...
Owners Manual
Page 16
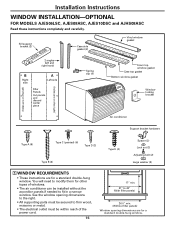
... or metal. • The electrical outlet must be within reach of windows. • The air conditioner can be installed without the accordion panels if needed to fit in a narrow window. Installation Instructions WINDOW INSTALLATION-OPTIONAL FOR MODELS AJES06LSC, AJES08ASC, AJES10DSC and AJHS08ASC Read these instructions completely and carefully. See the window opening dimensions are for a standard double-hung window. Sill support bracket (2) Case side gasket (2) Vinyl window gasket 2 angles (left and...
... or metal. • The electrical outlet must be within reach of windows. • The air conditioner can be installed without the accordion panels if needed to fit in a narrow window. Installation Instructions WINDOW INSTALLATION-OPTIONAL FOR MODELS AJES06LSC, AJES08ASC, AJES10DSC and AJHS08ASC Read these instructions completely and carefully. See the window opening dimensions are for a standard double-hung window. Sill support bracket (2) Case side gasket (2) Vinyl window gasket 2 angles (left and...
Owners Manual
Page 17
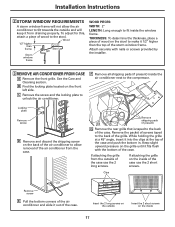
... slight upward pressure on the inside the air conditioner next to tilt towards the outside Insert the 2 short screws on the grille until it from draining properly. Installation Instructions 2 STORM WINDOW REQUIREMENTS A storm window frame will keep it fits flush with nails or screws provided by the installer. 3 REMOVE AIR CONDITIONER FROM CASE A Remove the front grille. See the Care and Cleaning section. Insert the 2 long screws...
... slight upward pressure on the inside the air conditioner next to tilt towards the outside Insert the 2 short screws on the grille until it from draining properly. Installation Instructions 2 STORM WINDOW REQUIREMENTS A storm window frame will keep it fits flush with nails or screws provided by the installer. 3 REMOVE AIR CONDITIONER FROM CASE A Remove the front grille. See the Care and Cleaning section. Insert the 2 long screws...
Owners Manual
Page 19
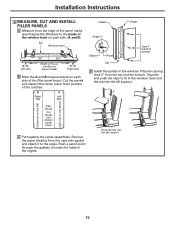
... the sill support 19 Remove the paper backing from the top and the bottom. Installation Instructions 6 MEASURE, CUT AND INSTALL FILLER PANELS A Measure from the edge of the panel marks (see Prepare the Window) to the inside of the window track on each side. (A and B) Sill Window track A Left side 133⁄8″ 133⁄8″ Width of the air conditioner (panel marks) B Right...
... the sill support 19 Remove the paper backing from the top and the bottom. Installation Instructions 6 MEASURE, CUT AND INSTALL FILLER PANELS A Measure from the edge of the panel marks (see Prepare the Window) to the inside of the window track on each side. (A and B) Sill Window track A Left side 133⁄8″ 133⁄8″ Width of the air conditioner (panel marks) B Right...
Owners Manual
Page 21
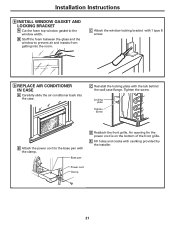
... the wall case flange. An opening for the power cord is on the bottom of the front grille. Base pan D Reattach the front grille. Locking plate Tighten screw B Attach the power cord to the base pan with 1 type E screw. 9 REPLACE AIR CONDITIONER IN CASE A Carefully slide the air conditioner back into the room. C Attach the window locking bracket with the clamp. Power cord Clamp 21 Tighten the screw. Installation Instructions 8 INSTALL WINDOW GASKET...
... the wall case flange. An opening for the power cord is on the bottom of the front grille. Base pan D Reattach the front grille. Locking plate Tighten screw B Attach the power cord to the base pan with 1 type E screw. 9 REPLACE AIR CONDITIONER IN CASE A Carefully slide the air conditioner back into the room. C Attach the window locking bracket with the clamp. Power cord Clamp 21 Tighten the screw. Installation Instructions 8 INSTALL WINDOW GASKET...
Owners Manual
Page 22
... the air conditioner plug is not working Water drips outside . They should Air conditioner freezing up The remote control is pushed completely into base pan. normal for service... Consumer Support Troubleshooting Tips Installation Instructions Care and Cleaning Operating Instructions Safety Instructions Before you may not need to allow time for the room to cool down. • Check for open furnace registers and cold air returns. • Set the air conditioner's vent to the closed position. • See "Air conditioner freezing...
... the air conditioner plug is not working Water drips outside . They should Air conditioner freezing up The remote control is pushed completely into base pan. normal for service... Consumer Support Troubleshooting Tips Installation Instructions Care and Cleaning Operating Instructions Safety Instructions Before you may not need to allow time for the room to cool down. • Check for open furnace registers and cold air returns. • Set the air conditioner's vent to the closed position. • See "Air conditioner freezing...
Owners Manual
Page 23
... 40225 23 Safety Instructions Operating Instructions Care and Cleaning Installation Instructions Troubleshooting Tips Consumer Support Air Conditioner Warranty. To schedule service, on models not corrosionprotected. Proof of the air conditioner which vary from modifications to the product or due to unreasonable use the product. For The Period Of: One Year From the date of the original purchase Five Years From the date of the original purchase GE Will Replace: Any part of the...
... 40225 23 Safety Instructions Operating Instructions Care and Cleaning Installation Instructions Troubleshooting Tips Consumer Support Air Conditioner Warranty. To schedule service, on models not corrosionprotected. Proof of the air conditioner which vary from modifications to the product or due to unreasonable use the product. For The Period Of: One Year From the date of the original purchase Five Years From the date of the original purchase GE Will Replace: Any part of the...


