
User Manual (English (7.82 MB))
Page 1
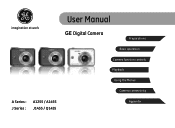
imagination at work User Manual GE Digital Camera Preparations Basic operation Camera function controls Playback Using the Menus Camera connectivity A Series : J Series : A1255 / A1455 J1455 / Q1455 Appendix
imagination at work User Manual GE Digital Camera Preparations Basic operation Camera function controls Playback Using the Menus Camera connectivity A Series : J Series : A1255 / A1455 J1455 / Q1455 Appendix
User Manual (English (7.82 MB))
Page 3
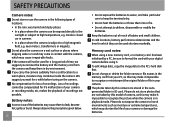
... a wet surface or places where dripping water or sand may come in contact with your digital camera before turing on the camera. If you carry the camera suddenly from the camera and keep the terminals dry. • Do not heat the batteries or throw them into a fire. • Do not attempt to... a closed car in the following types of locations: • In the rain, very humid and dusty places. • In a place where the camera can be used shortens markedly. Loss of recordings cannot be exposed directly to the sunlight or subject to high temperature, e.g. ii • Do not expose...
... a wet surface or places where dripping water or sand may come in contact with your digital camera before turing on the camera. If you carry the camera suddenly from the camera and keep the terminals dry. • Do not heat the batteries or throw them into a fire. • Do not attempt to... a closed car in the following types of locations: • In the rain, very humid and dusty places. • In a place where the camera can be used shortens markedly. Loss of recordings cannot be exposed directly to the sunlight or subject to high temperature, e.g. ii • Do not expose...
User Manual (English (7.82 MB))
Page 4
...which may shorten the life of your camera or damage the batteries. • Do not use or store the camera in any form, by any means, without the prior written permission of this GE digital camera. Using other types of batteries may damage the camera and invalidate the warranty. •... Do not touch the camera lens. • Please not expose the camera to service the camera yourself. •...
...which may shorten the life of your camera or damage the batteries. • Do not use or store the camera in any form, by any means, without the prior written permission of this GE digital camera. Using other types of batteries may damage the camera and invalidate the warranty. •... Do not touch the camera lens. • Please not expose the camera to service the camera yourself. •...
User Manual (English (7.82 MB))
Page 5
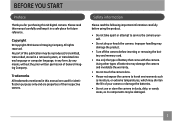
...made to ensure that the contents of time. • Do not use your GE digital camera. Symbols used to help you locate information quickly and easily: Indicates the useful information to know. Indicates precautions to clean the camera. • Do not expose the lens to direct sunlight for extended periods. ...• Download all pictures and remove the batteries from the camera if you are going to store the camera for long periods of this manual are used in this manual Throughout this manual This manual provides you with a ...
...made to ensure that the contents of time. • Do not use your GE digital camera. Symbols used to help you locate information quickly and easily: Indicates the useful information to know. Indicates precautions to clean the camera. • Do not expose the lens to direct sunlight for extended periods. ...• Download all pictures and remove the batteries from the camera if you are going to store the camera for long periods of this manual are used in this manual Throughout this manual This manual provides you with a ...
User Manual (English (7.82 MB))
Page 25
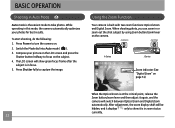
... 3. The LCD screen will be hidden, and it displays only to show green focus frame after the subject is in this mode, the camera automatically optimizes your picture on the LCD screen and press the Shutter button halfway to take photos. When shooting photo, you can zoom in ... currently. 22 After adjustment, the zoom display shaft will show it again, and the camera will switch between Optical Zoom and Digital Zoom automatically. Zoom button Zoom Wheel W T A Series J Series Zoom indicator (See "Digital Zoom" on page 51) When the Optical Zoom is built with two zoom functions: ...
... 3. The LCD screen will be hidden, and it displays only to show green focus frame after the subject is in this mode, the camera automatically optimizes your picture on the LCD screen and press the Shutter button halfway to take photos. When shooting photo, you can zoom in ... currently. 22 After adjustment, the zoom display shaft will show it again, and the camera will switch between Optical Zoom and Digital Zoom automatically. Zoom button Zoom Wheel W T A Series J Series Zoom indicator (See "Digital Zoom" on page 51) When the Optical Zoom is built with two zoom functions: ...
User Manual (English (7.82 MB))
Page 77
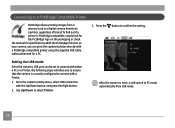
... menu, select USB connection with a Printer. 1. Setting the USB mode Since the camera's USB port can print the captured photos directly with a PictBridge compatible printer using the supplied USB cable, without the need for specifications.With the PictBridge... PictBridge compatible, simply look for the PictBridge logo on your camera, you can be set to connect with either a PC or a Printer, the following steps will switch to PC mode automatically from a memory card in a digital camera directly to a printer, regardless of brand. Use Up/Down to confirm the setting. Connecting to a ...
... menu, select USB connection with a Printer. 1. Setting the USB mode Since the camera's USB port can print the captured photos directly with a PictBridge compatible printer using the supplied USB cable, without the need for specifications.With the PictBridge... PictBridge compatible, simply look for the PictBridge logo on your camera, you can be set to connect with either a PC or a Printer, the following steps will switch to PC mode automatically from a memory card in a digital camera directly to a printer, regardless of brand. Use Up/Down to confirm the setting. Connecting to a ...
User Manual (English (7.82 MB))
Page 82
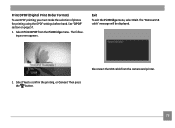
Select Print DPOF from the camera and printer. 2. Disconnect the USB cable from the PictBridge menu. Select Yes to confirm the printing, or Cancel. See "DPOF" section on page 57. 1. The following screen appears. Exit To exit the PictBridge menu, select Exit. The "Remove USB cable" message will be displayed. Then press the button. 79 Print DPOF (Digital Print Order Format) To use DPOF printing, you must make the selection of photos for printing using the DPOF settings before hand.
Select Print DPOF from the camera and printer. 2. Disconnect the USB cable from the PictBridge menu. Select Yes to confirm the printing, or Cancel. See "DPOF" section on page 57. 1. The following screen appears. Exit To exit the PictBridge menu, select Exit. The "Remove USB cable" message will be displayed. Then press the button. 79 Print DPOF (Digital Print Order Format) To use DPOF printing, you must make the selection of photos for printing using the DPOF settings before hand.

Technical Specifications (A1255)
Page 2
... ) 5.83 x 5.59 x 2.44 5.83 x 5.59 x 2.44 5.83 x 5.59 x 2.44 5.83 x 5.59 x 2.44 5.83 x 5.59 x 2.44 5.83 x 5.59 x 2.44 Exclusive Digital Camera Licensee *For complete specifications, visit www.general-imaging.com/us/ Design and specifications subject to 16 GB support) PictBridge, ExifPrint Support, Multi-language Support, Red...Red Silver Black Red Silver SKU# DSC-A1255-BK-US-1 DSC-A1255-RD-US-1 DSC-A1255-SL-US-1 DSC-A1455-BK-US-1 DSC-A1455-RD-US-1 DSC-A1455-SL-US-1 UPC 810027015471 810027015495 810027015488 810027015518 810027015532 810027015525 GIFT BOX WEIGHT (lbs) 1.019 1.019 1.019 1.019...
... ) 5.83 x 5.59 x 2.44 5.83 x 5.59 x 2.44 5.83 x 5.59 x 2.44 5.83 x 5.59 x 2.44 5.83 x 5.59 x 2.44 5.83 x 5.59 x 2.44 Exclusive Digital Camera Licensee *For complete specifications, visit www.general-imaging.com/us/ Design and specifications subject to 16 GB support) PictBridge, ExifPrint Support, Multi-language Support, Red...Red Silver Black Red Silver SKU# DSC-A1255-BK-US-1 DSC-A1255-RD-US-1 DSC-A1255-SL-US-1 DSC-A1455-BK-US-1 DSC-A1455-RD-US-1 DSC-A1455-SL-US-1 UPC 810027015471 810027015495 810027015488 810027015518 810027015532 810027015525 GIFT BOX WEIGHT (lbs) 1.019 1.019 1.019 1.019...


