User Guide
Page 2
... to a compatible modular jack that temporary discontinuance of service may harm the telephone network, the telephone company shall, where practicable, notify you are subject to state tariffs, and therefore, you may connect to your telephone number is called. A compliant telephone cord and modular plug is provided with parts 15 and 68, FCC Rules and Regulations and the Technical Requirements for Telephone Terminal Equipment...
... to a compatible modular jack that temporary discontinuance of service may harm the telephone network, the telephone company shall, where practicable, notify you are subject to state tariffs, and therefore, you may connect to your telephone number is called. A compliant telephone cord and modular plug is provided with parts 15 and 68, FCC Rules and Regulations and the Technical Requirements for Telephone Terminal Equipment...
User Guide
Page 3
... Radio/TV Interference Problems." This equipment generates, uses, and can be ensured when using this product. Hearing Aid Compatibility This telephone system meets FCC standards for additional suggestions. Interference Information This equipment has been tested and found to comply with the instructions, may not be determined by turning the equipment off and on, the user is "receiving" the...
... Radio/TV Interference Problems." This equipment generates, uses, and can be ensured when using this product. Hearing Aid Compatibility This telephone system meets FCC standards for additional suggestions. Interference Information This equipment has been tested and found to comply with the instructions, may not be determined by turning the equipment off and on, the user is "receiving" the...
User Guide
Page 4
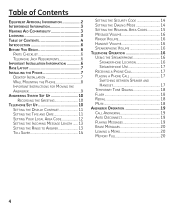
... Display Contrast 11 Setting the Time and Date 11 Setting Your Local Area Code 12 Setting the Incoming Message Length....... 13 Setting the Rings to Answer 13 Toll Saver 14 Setting the Security Code 14 Setting the Dialing Mode 14 Setting the Regional Area Codes 15 Message Volume 16 Ringer Volume 16 Handset Volume 16 Speakerphone Volume 16 Telephone Operation 16 Using the Speakerphone 16 Speakerphone Location 16 Speakerphone Use 17 Receiving a Phone Call 17 Placing a Phone Call 17 Switching between Speaker and Handset 17 Temporary Tone Dialing 18 Flash 18 Redial 18 Mute...
... Display Contrast 11 Setting the Time and Date 11 Setting Your Local Area Code 12 Setting the Incoming Message Length....... 13 Setting the Rings to Answer 13 Toll Saver 14 Setting the Security Code 14 Setting the Dialing Mode 14 Setting the Regional Area Codes 15 Message Volume 16 Ringer Volume 16 Handset Volume 16 Speakerphone Volume 16 Telephone Operation 16 Using the Speakerphone 16 Speakerphone Location 16 Speakerphone Use 17 Receiving a Phone Call 17 Placing a Phone Call 17 Switching between Speaker and Handset 17 Temporary Tone Dialing 18 Flash 18 Redial 18 Mute...
User Guide
Page 5
...REFER SERVICING TO QUALIFIED SERVICE PERSONNEL. Remote Access 21 Remote Access Commands 21 Caller ID Features 22 Summary Screen 22 Caller ID with Call Waiting 22 Receiving and Storing Calls 23 Reviewing Call Records 23 Erasing Caller ID Info 23 Dialing Back 24 Memory 25 Storing a Number in Memory 25 Storing Caller ID Records 26 Inserting a Pause in the Dialing Sequence 26 Changing a Stored Number 26 Dialing a Stored Number 26 Dialing a Quick Dial Number 27 Reviewing Stored Numbers 27 Chain Dialing from Memory 28 Message Indicators 28 Troubleshooting Guide 29 General Product...
...REFER SERVICING TO QUALIFIED SERVICE PERSONNEL. Remote Access 21 Remote Access Commands 21 Caller ID Features 22 Summary Screen 22 Caller ID with Call Waiting 22 Receiving and Storing Calls 23 Reviewing Call Records 23 Erasing Caller ID Info 23 Dialing Back 24 Memory 25 Storing a Number in Memory 25 Storing Caller ID Records 26 Inserting a Pause in the Dialing Sequence 26 Changing a Stored Number 26 Dialing a Stored Number 26 Dialing a Quick Dial Number 27 Reviewing Stored Numbers 27 Chain Dialing from Memory 28 Message Indicators 28 Troubleshooting Guide 29 General Product...
User Guide
Page 7
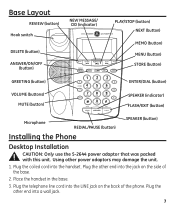
.... Plug the telephone line cord into the jack on the back of the base. 2. Plug the other end into the handset. Place the handset in the base. 3. Base Layout REVIEW (button) Hook switch NEW MESSAGE/ CID (indicator) DELETE (button) ANSWER/ON/OFF (button) PLAY/STOP (button) NEXT (button) MEMO (button) MENU (button) STORE (button) GREETING (button) ENTER/DIAL (button) VOLUME (buttons) MUTE (button) SPEAKER (indicator) FLASH/EXIT (button) Microphone REDIAL/PAUSE (button) Installing the Phone SPEAKER (button) Desktop Installation CAUTION: Only use the 5-2644 power adaptor that was...
.... Plug the telephone line cord into the jack on the back of the base. 2. Plug the other end into the handset. Place the handset in the base. 3. Base Layout REVIEW (button) Hook switch NEW MESSAGE/ CID (indicator) DELETE (button) ANSWER/ON/OFF (button) PLAY/STOP (button) NEXT (button) MEMO (button) MENU (button) STORE (button) GREETING (button) ENTER/DIAL (button) VOLUME (buttons) MUTE (button) SPEAKER (indicator) FLASH/EXIT (button) Microphone REDIAL/PAUSE (button) Installing the Phone SPEAKER (button) Desktop Installation CAUTION: Only use the 5-2644 power adaptor that was...
User Guide
Page 10
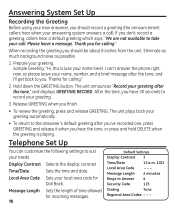
... for incoming messages. 10 Default Settings Display Contrast 3 Time/Date 12 a.m. 1/01 Local Area Code - - - Display Contrast Selects the display contrast. Local Area Code Sets your local area code for calling." 2. Answering System Set Up Recording the Greeting Before using your new answerer, you should be about 6 inches from the unit. Prepare your answering system answers a call . Message Length 2 minutes Rings to suit your name, number, and a brief message after the tone, and I can customize the following settings to Answer 4 Security Code 123 Dialing Tone...
... for incoming messages. 10 Default Settings Display Contrast 3 Time/Date 12 a.m. 1/01 Local Area Code - - - Display Contrast Selects the display contrast. Local Area Code Sets your local area code for calling." 2. Answering System Set Up Recording the Greeting Before using your new answerer, you should be about 6 inches from the unit. Prepare your answering system answers a call . Message Length 2 minutes Rings to suit your name, number, and a brief message after the tone, and I can customize the following settings to Answer 4 Security Code 123 Dialing Tone...
User Guide
Page 11
... phone, you to the Caller ID display feature from your telephone company, the telephone company sends the time and date with the Caller ID information. If you have subscribed to adjust the display contrast for tone or pulse dialing. Rings to the next setting, press MENU. Use NEXT or REVIEW to set the hour. 3. Hour 1. Use NEXT or REVIEW to select the desired setting or press the keypad number for remote access to the previous Setup menu...
... phone, you to the Caller ID display feature from your telephone company, the telephone company sends the time and date with the Caller ID information. If you have subscribed to adjust the display contrast for tone or pulse dialing. Rings to the next setting, press MENU. Use NEXT or REVIEW to set the hour. 3. Hour 1. Use NEXT or REVIEW to select the desired setting or press the keypad number for remote access to the previous Setup menu...
User Guide
Page 14
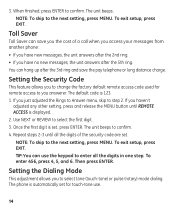
.... The default code is automatically set for remote access to select the first digit. 3. To exit setup, press EXIT. The phone is 123. 1. If you just adjusted the Rings to Answer menu, skip to the next setting, press MENU. Use NEXT or REVIEW to you to change the factory default remote access code used for touch-tone use the keypad to enter all the digits of a call when you access your messages from another phone: • If you have no new messages...
.... The default code is automatically set for remote access to select the first digit. 3. To exit setup, press EXIT. The phone is 123. 1. If you just adjusted the Rings to Answer menu, skip to the next setting, press MENU. Use NEXT or REVIEW to you to change the factory default remote access code used for touch-tone use the keypad to enter all the digits of a call when you access your messages from another phone: • If you have no new messages...
User Guide
Page 15
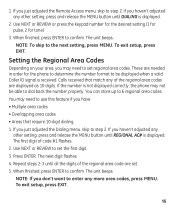
... you just adjusted the Remote Access menu, skip to dial back the number properly. If you have: • Multiple area codes • Overlapping area codes • Areas that match any more area codes, press MENU. The first digit of the regional area code are needed in order for tone). 3. Repeat steps 2-3 until DIALING is not displayed correctly, the phone may not be displayed when a valid Caller ID signal is...
... you just adjusted the Remote Access menu, skip to dial back the number properly. If you have: • Multiple area codes • Overlapping area codes • Areas that match any more area codes, press MENU. The first digit of the regional area code are needed in order for tone). 3. Repeat steps 2-3 until DIALING is not displayed correctly, the phone may not be displayed when a valid Caller ID signal is...
User Guide
Page 16
... affected by vibration. • Recessed areas such as in use. The phone gives a sample ring when adjusting. NOTE: You can use the keypad to enter all the digits in one step. Ringer Volume Use the VOLUME ^ pt and v buttons to adjust the volume when playing back messages and while reviewing or changing the setting. Telephone Operation Using the Speakerphone Speakerphone Location For best speakerphone performance, avoid the following: • Areas with high background...
... affected by vibration. • Recessed areas such as in use. The phone gives a sample ring when adjusting. NOTE: You can use the keypad to enter all the digits in one step. Ringer Volume Use the VOLUME ^ pt and v buttons to adjust the volume when playing back messages and while reviewing or changing the setting. Telephone Operation Using the Speakerphone Speakerphone Location For best speakerphone performance, avoid the following: • Areas with high background...
User Guide
Page 18
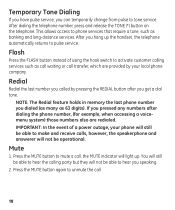
... using the hook switch to mute a call transfer, which are provided by pressing the REDIAL button after dialing the phone number, (for example, when accessing a voicemenu system) those numbers also are redialed. After dialing the telephone number, press and release the TONE (*) button on the telephone. Press the MUTE button to activate customer calling services such as call waiting or call , the MUTE indicator will not be operational. Flash Press the FLASH button instead of a power outage, your local phone company. NOTE: The Redial feature holds in memory...
... using the hook switch to mute a call transfer, which are provided by pressing the REDIAL button after dialing the phone number, (for example, when accessing a voicemenu system) those numbers also are redialed. After dialing the telephone number, press and release the TONE (*) button on the telephone. Press the MUTE button to activate customer calling services such as call waiting or call , the MUTE indicator will not be operational. Flash Press the FLASH button instead of a power outage, your local phone company. NOTE: The Redial feature holds in memory...

User Guide
Page 19
... button. Answerer Operation Call Answering When a call comes in the order received. This is received, that tells the unit to the incoming message (Call screening). • Pick up the phone during the greeting play, wait about two seconds after picking up and the machine keeps playing the greeting. If there are no messages, the unit announces, "You have no new messages, the old messages are no messages." If Caller ID name and number...
... button. Answerer Operation Call Answering When a call comes in the order received. This is received, that tells the unit to the incoming message (Call screening). • Pick up the phone during the greeting play, wait about two seconds after picking up and the machine keeps playing the greeting. If there are no messages, the unit announces, "You have no new messages, the old messages are no messages." If Caller ID name and number...
User Guide
Page 21
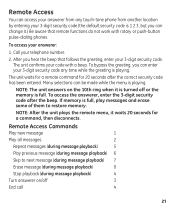
... previous message (during message playback) 6 Skip to restore memory. To bypass the greeting, you can enter your 3-digit security code any touch-tone phone from any time while the greeting is playing. To access the answerer, enter the 3-digit security code after the correct security code has been entered. To access your telephone number. 2. NOTE: After the unit plays the remote menu, it is turned off 3 End call 4 21 The unit waits for a remote...
... previous message (during message playback) 6 Skip to restore memory. To bypass the greeting, you can enter your 3-digit security code any touch-tone phone from any time while the greeting is playing. To access the answerer, enter the 3-digit security code after the correct security code has been entered. To access your telephone number. 2. NOTE: After the unit plays the remote menu, it is turned off 3 End call 4 21 The unit waits for a remote...

User Guide
Page 22
... Service. Message date-time stamp Message number MSG 12:15 PM 8/24 NEW CALL 1 1‐317‐555‐1234 JOHN SMITH Call ID phone number (if any) Call ID name (if any button is pressed. Only the handset that is displayed until any ) Caller ID with Call Waiting Provided you subscribe to put the current call on the line. This unit receives and displays CID information transmitted by your phone company; or the name, phone number...
... Service. Message date-time stamp Message number MSG 12:15 PM 8/24 NEW CALL 1 1‐317‐555‐1234 JOHN SMITH Call ID phone number (if any) Call ID name (if any button is pressed. Only the handset that is displayed until any ) Caller ID with Call Waiting Provided you subscribe to put the current call on the line. This unit receives and displays CID information transmitted by your phone company; or the name, phone number...
User Guide
Page 24
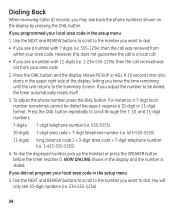
... When reviewing Caller ID records, you adjust the number to be dialed because it requires a 10-digit or 11-digit format. To adjust the phone number, press the DIAL button. Press the DIAL button repeatedly to the Summary Screen. To dial the displayed number, pick up the handset or press the SPEAKER button before the timer reaches 0. Press the DIAL button and the display shows PICKUP or ADJ. For instance, a 7-digit local number sometimes cannot be dialed, the timer automatically resets...
... When reviewing Caller ID records, you adjust the number to be dialed because it requires a 10-digit or 11-digit format. To adjust the phone number, press the DIAL button. Press the DIAL button repeatedly to the Summary Screen. To dial the displayed number, pick up the handset or press the SPEAKER button before the timer reaches 0. Press the DIAL button and the display shows PICKUP or ADJ. For instance, a 7-digit local number sometimes cannot be dialed, the timer automatically resets...
User Guide
Page 29
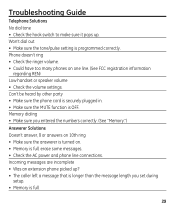
...; Was an extension phone picked up . Troubleshooting Guide Telephone Solutions No dial tone • Check the hook switch to make sure it pops up ? • The caller left a message that is longer than the message length you entered the numbers correctly. (See "Memory.") Answerer Solutions Doesn't answer, ß or answers on 10th ring • Make sure the answerer is turned on one line. (See FCC registration information regarding REN) Low handset or speaker volume • Check the volume settings.
...; Was an extension phone picked up . Troubleshooting Guide Telephone Solutions No dial tone • Check the hook switch to make sure it pops up ? • The caller left a message that is longer than the message length you entered the numbers correctly. (See "Memory.") Answerer Solutions Doesn't answer, ß or answers on 10th ring • Make sure the answerer is turned on one line. (See FCC registration information regarding REN) Low handset or speaker volume • Check the volume settings.
User Guide
Page 30
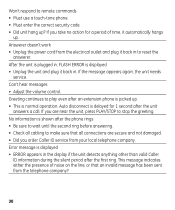
... operation. Can't hear messages • Adjust the volume control. Auto disconnect is picked up ? No information is shown after an extension phone is delayed for a period of noise on the line, or that all cabling to reset the answerer. If you take no action for 1 second after the first ring. Error message is displayed • Unplug the unit and plug it back in to make...
... operation. Can't hear messages • Adjust the volume control. Auto disconnect is picked up ? No information is shown after an extension phone is delayed for a period of noise on the line, or that all cabling to reset the answerer. If you take no action for 1 second after the first ring. Error message is displayed • Unplug the unit and plug it back in to make...
User Guide
Page 32
...Products which were originally provided with a new or, at our option, a refurbished unit. Also print your warranty does not cover: • Customer instruction. (Your User's Guide provides information regarding operating instructions and user controls. Thomson Inc. What your name and address and a description of ...8226; Products purchased or serviced outside the USA. • Acts of nature, such as but not limited to you get service: • Properly pack your dealer.) • Installation and setup service adjustments. • Batteries. • Damage from date of sale or receipted ...
...Products which were originally provided with a new or, at our option, a refurbished unit. Also print your warranty does not cover: • Customer instruction. (Your User's Guide provides information regarding operating instructions and user controls. Thomson Inc. What your name and address and a description of ...8226; Products purchased or serviced outside the USA. • Acts of nature, such as but not limited to you get service: • Properly pack your dealer.) • Installation and setup service adjustments. • Batteries. • Damage from date of sale or receipted ...
User Guide
Page 34
Index A Answerer Operation 19 Answerer Solutions 29 Answering System Set Up 10 Auto Disconnect 19 B Base Layout 7 Before You Begin 6 C Call Answering 19 Caller ID Features 22 Caller ID with Call Waiting 22 Chain Dialing from Memory 28 Changing a Stored Number 26 D Desktop Installation 7 Dialing a Quick Dial Number 27 Dialing a Stored Number 26 Dialing Back 24 E Equipment Approval Information 2 Erase Messages 20 Erasing Caller ID Info 23 F Flash 18 G General Product Care 31 H Handset Volume 16 Hearing Aid Compatibility 3 I Important Installation Information 6 Inserting a Pause in the Dialing ...
Index A Answerer Operation 19 Answerer Solutions 29 Answering System Set Up 10 Auto Disconnect 19 B Base Layout 7 Before You Begin 6 C Call Answering 19 Caller ID Features 22 Caller ID with Call Waiting 22 Chain Dialing from Memory 28 Changing a Stored Number 26 D Desktop Installation 7 Dialing a Quick Dial Number 27 Dialing a Stored Number 26 Dialing Back 24 E Equipment Approval Information 2 Erase Messages 20 Erasing Caller ID Info 23 F Flash 18 G General Product Care 31 H Handset Volume 16 Hearing Aid Compatibility 3 I Important Installation Information 6 Inserting a Pause in the Dialing ...
User Guide
Page 35
... a Phone Call 17 Redial 18 Remote Access 21 Remote Access Commands 21 Reviewing Call Records 23 Reviewing Stored Numbers 27 Ringer Volume 16 S Service 31 Setting the Dialing Mode 14 Setting the Display Contrast 11 Setting the Incoming Message Length 13 Setting the Regional Area Codes 15 Setting the Rings to Answer 13 Setting the Security Code 14 Setting the Time and Date 11 Setting Your Local Area Code 12 Index Speakerphone Volume 16 Storing a Number in Memory 25 Storing Caller ID Records 26 Summary Screen 22 Switching between Speaker and Handset 17 T Table of Contents 4 Telephone Jack...
... a Phone Call 17 Redial 18 Remote Access 21 Remote Access Commands 21 Reviewing Call Records 23 Reviewing Stored Numbers 27 Ringer Volume 16 S Service 31 Setting the Dialing Mode 14 Setting the Display Contrast 11 Setting the Incoming Message Length 13 Setting the Regional Area Codes 15 Setting the Rings to Answer 13 Setting the Security Code 14 Setting the Time and Date 11 Setting Your Local Area Code 12 Index Speakerphone Volume 16 Storing a Number in Memory 25 Storing Caller ID Records 26 Summary Screen 22 Switching between Speaker and Handset 17 T Table of Contents 4 Telephone Jack...


