
Installation Manual
Page 1
Universal Remote Control INSTRUCTION MANUAL
Universal Remote Control INSTRUCTION MANUAL
Installation Manual
Page 2
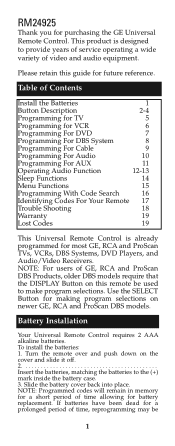
...DBS models require that the DISPLAY Button on this guide for making program selections on the cover and slide it off. 2 Insert the batteries, matching the batteries to provide years of service operating a wide variety of video and audio equipment. Table of Contents Install the Batteries 1 Button Description 2-4 Programming for TV 5 Programming for VCR 6 Programming For DVD 7 Programming For DBS System 8 Programming For Cable 9 Programming For Audio 10 Programming For AUX 11 Operating Audio Function 12-13 Sleep Functions 14 Menu Functions 15 Programming With Code...
...DBS models require that the DISPLAY Button on this guide for making program selections on the cover and slide it off. 2 Insert the batteries, matching the batteries to provide years of service operating a wide variety of video and audio equipment. Table of Contents Install the Batteries 1 Button Description 2-4 Programming for TV 5 Programming for VCR 6 Programming For DVD 7 Programming For DBS System 8 Programming For Cable 9 Programming For Audio 10 Programming For AUX 11 Operating Audio Function 12-13 Sleep Functions 14 Menu Functions 15 Programming With Code...
Installation Manual
Page 3
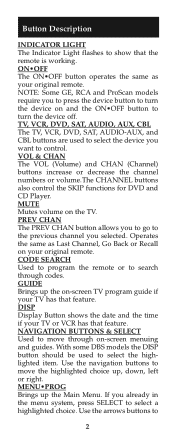
... program the remote or to search through on -screen TV program guide if your original remote. VOL & CHAN The VOL (Volume) and CHAN (Channel) buttons increase or decrease the channel numbers or volume.The CHANNEL buttons also control the SKIP functions for DVD and CD Player. TV, VCR, DVD, SAT, AUDIO, AUX, CBL The TV, VCR, DVD, SAT, AUDIO-AUX, and CBL buttons are used to select the highlighted item. With some DBS models the DISP button should be used to select the device you selected. Button Description INDICATOR LIGHT...
... program the remote or to search through on -screen TV program guide if your original remote. VOL & CHAN The VOL (Volume) and CHAN (Channel) buttons increase or decrease the channel numbers or volume.The CHANNEL buttons also control the SKIP functions for DVD and CD Player. TV, VCR, DVD, SAT, AUDIO, AUX, CBL The TV, VCR, DVD, SAT, AUDIO-AUX, and CBL buttons are used to select the highlighted item. With some DBS models the DISP button should be used to select the device you selected. Button Description INDICATOR LIGHT...

Installation Manual
Page 4
... receiver's Digital Sound Processing Mode. DSP MODE When the DSP mode is also used to complete the code entry process. The REW and FF buttons also control the Reverse and Forward functions for entering device codes. SLEEP The SLEEP button allows you to normal viewing. 0-9 The number buttons operates the same as on your original VCR or remote. INPUT selects the video input of TV. CD, TAPE, TUNER, TV, VIDEO The CD, TAPE, TUNER, TV and VIDEO buttons are used to directly select the device...
... receiver's Digital Sound Processing Mode. DSP MODE When the DSP mode is also used to complete the code entry process. The REW and FF buttons also control the Reverse and Forward functions for entering device codes. SLEEP The SLEEP button allows you to normal viewing. 0-9 The number buttons operates the same as on your original VCR or remote. INPUT selects the video input of TV. CD, TAPE, TUNER, TV, VIDEO The CD, TAPE, TUNER, TV and VIDEO buttons are used to directly select the device...

Installation Manual
Page 5
... the receiver's various surround sound mode settings. FRONT, CENTER, REAR, TEST Adjust the levels of the front, center, and rear speakers respectively. want to control. (Works in AUDIO mode. AM•FM The AM•FM button allows you to operate preset channels while in the surround sound mode. The number buttons also select the function labeled below the buttons when in AUDIO mode). toggles the surround modes on your audio receiver. DELAY...
... the receiver's various surround sound mode settings. FRONT, CENTER, REAR, TEST Adjust the levels of the front, center, and rear speakers respectively. want to control. (Works in AUDIO mode. AM•FM The AM•FM button allows you to operate preset channels while in the surround sound mode. The number buttons also select the function labeled below the buttons when in AUDIO mode). toggles the surround modes on your audio receiver. DELAY...

Installation Manual
Page 6
... LIGHT will turn on , press CHAN+ (CHANNEL UP). Check the code list and repeat process. 123 4 56 7 8 9 (OFF) 0 ON•OFF CHAN + TV CODE 5. If the codes do not work, or your brand. Programming For TV Most GE, RCA and ProScan TVs will blink then remain lit. 4. Check to see if your TV and press the ON•OFF button. Press and hold the CODE SEARCH button until the INDICATOR LIGHT lights...
... LIGHT will turn on , press CHAN+ (CHANNEL UP). Check the code list and repeat process. 123 4 56 7 8 9 (OFF) 0 ON•OFF CHAN + TV CODE 5. If the codes do not work, or your brand. Programming For TV Most GE, RCA and ProScan TVs will blink then remain lit. 4. Check to see if your TV and press the ON•OFF button. Press and hold the CODE SEARCH button until the INDICATOR LIGHT lights...

Installation Manual
Page 7
... Code Search method. 6. Your VCR should turn on , press CHAN+ (CHANNEL UP). If the code is entered, the INDICATOR LIGHT will blink. Check the code list and repeat process. 5. Find the three digit code for easy reference. 6 Manually turn off . Programming For VCR Most GE, RCA and ProScan VCRs will blink then remain lit. 4. With your brand. Press and release the VCR button (The INDICATOR LIGHT will not require programming. If the codes do not work...
... Code Search method. 6. Your VCR should turn on , press CHAN+ (CHANNEL UP). If the code is entered, the INDICATOR LIGHT will blink. Check the code list and repeat process. 5. Find the three digit code for easy reference. 6 Manually turn off . Programming For VCR Most GE, RCA and ProScan VCRs will blink then remain lit. 4. With your brand. Press and release the VCR button (The INDICATOR LIGHT will not require programming. If the codes do not work...

Installation Manual
Page 8
Find the three digit code for your DVD system and press the ON•OFF button. Enter the code using the Number Buttons. Manually turn on the DVD system. Press and hold the CODE SEARCH button until the INDICATOR LIGHT lights, then release the CODE SEARCH button. 3. Check the code list and repeat process. CODE SEARCH INDICATOR LIGHT DVD (BLINK) 123 4 56 7 8 9 (OFF) 0 ON•OFF 5. If the codes do not work, or your brand is entered, the INDICATOR LIGHT will not...
Find the three digit code for your DVD system and press the ON•OFF button. Enter the code using the Number Buttons. Manually turn on the DVD system. Press and hold the CODE SEARCH button until the INDICATOR LIGHT lights, then release the CODE SEARCH button. 3. Check the code list and repeat process. CODE SEARCH INDICATOR LIGHT DVD (BLINK) 123 4 56 7 8 9 (OFF) 0 ON•OFF 5. If the codes do not work, or your brand is entered, the INDICATOR LIGHT will not...

Installation Manual
Page 9
... DBS button (The INDICATOR LIGHT will not require programming. Enter the code 4 56 using the Number Buttons. CHAN + cess. 5. If the codes do not work, or your brand. Programming For DBS Satellite System Most GE, RCA and ProScan Satellite systems will blink then remain lit. Find the three digit code for your brand is entered, the 0 INDICATOR LIGHT will blink. After your 7 8 9 (OFF) code is not listed, try all the codes for...
... DBS button (The INDICATOR LIGHT will not require programming. Enter the code 4 56 using the Number Buttons. CHAN + cess. 5. If the codes do not work, or your brand. Programming For DBS Satellite System Most GE, RCA and ProScan Satellite systems will blink then remain lit. Find the three digit code for your brand is entered, the 0 INDICATOR LIGHT will blink. After your 7 8 9 (OFF) code is not listed, try all the codes for...
Installation Manual
Page 10
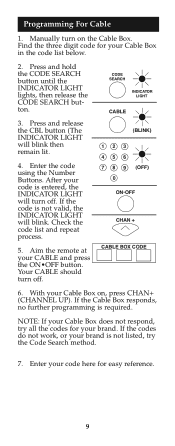
... the code list and repeat process. 5. Find the three digit code for easy reference. 9 Enter the code using the Number Buttons. Press and hold the CODE SEARCH button until the INDICATOR LIGHT lights, then release the CODE SEARCH button. 3. NOTE: If your Cable Box does not respond, try the Code Search method. 7. If the code is entered, the INDICATOR LIGHT will blink. If the codes do not work, or your Cable Box on the Cable Box. Manually turn off . With your brand is...
... the code list and repeat process. 5. Find the three digit code for easy reference. 9 Enter the code using the Number Buttons. Press and hold the CODE SEARCH button until the INDICATOR LIGHT lights, then release the CODE SEARCH button. 3. NOTE: If your Cable Box does not respond, try the Code Search method. 7. If the code is entered, the INDICATOR LIGHT will blink. If the codes do not work, or your Cable Box on the Cable Box. Manually turn off . With your brand is...

Installation Manual
Page 11
... to control in audio/video receivers and mini-systems. The remote control is already programmed to control. Manually turn off . Aim the remote at the device you wish to operate most GE, RCA and ProScan brand A/V receivers. NOTE: If your brand is not valid, the INDICATOR LIGHT will 1 2 3 blink then remain lit. 4 56 4. If the codes do not work, or your device does not respond, try the Code Search method. 7. Press and hold the CODE SEARCH CODE SEARCH button...
... to control in audio/video receivers and mini-systems. The remote control is already programmed to control. Manually turn off . Aim the remote at the device you wish to operate most GE, RCA and ProScan brand A/V receivers. NOTE: If your brand is not valid, the INDICATOR LIGHT will 1 2 3 blink then remain lit. 4 56 4. If the codes do not work, or your device does not respond, try the Code Search method. 7. Press and hold the CODE SEARCH CODE SEARCH button...

Installation Manual
Page 12
... brand is entered, the INDICATOR LIGHT will blink then remain lit.) 4. If the codes do not work, or your device on the device you wish to program in the code list. 2. The device should turn off . 6. Aim the remote at the device you wish to it. 1. Programming For Second Device If you have not programmed the AUDIO•AUX button for audio components, you can assign a second TV, DVD, CD player, VCR, Satellite System, or Cable Box to control...
... brand is entered, the INDICATOR LIGHT will blink then remain lit.) 4. If the codes do not work, or your device on the device you wish to program in the code list. 2. The device should turn off . 6. Aim the remote at the device you wish to it. 1. Programming For Second Device If you have not programmed the AUDIO•AUX button for audio components, you can assign a second TV, DVD, CD player, VCR, Satellite System, or Cable Box to control...

Installation Manual
Page 13
... Preset buttons (CHAN+/CHAN-) may require pressing the AUDIO button and then the ON•OFF button to operate appears on CD players. OPERATING THE AM/FM TUNER 12 OPERATING A CD PLAYER OR TAPE DECK Use the Play, Forward, Reverse, Record, Stop and Pause buttons for all functions work in changing tracks on your system. TURNING ON THE RECEIVER OR MINISYSTEM Point the remote control at the reciever and press the AUDIO button...
... Preset buttons (CHAN+/CHAN-) may require pressing the AUDIO button and then the ON•OFF button to operate appears on CD players. OPERATING THE AM/FM TUNER 12 OPERATING A CD PLAYER OR TAPE DECK Use the Play, Forward, Reverse, Record, Stop and Pause buttons for all functions work in changing tracks on your system. TURNING ON THE RECEIVER OR MINISYSTEM Point the remote control at the reciever and press the AUDIO button...
Installation Manual
Page 14
... AUDIO button. 2. Press the TUNER (3) button. 3. If this presents a problem, it may operate both TV and receiver volume at the same time. Press the DSP Button until the desired mode is achieved. 5. Press the AUDIO button 3. NOTE: The Volume buttons may be turned ON/OFF by pressing the SURR ON•OFF button. 1. Press DELAY+ or DELAY- OPERATING A HOME THEATER SURROUND SOUND SYSTEM With GE receivers, a second press of the TV button should turn DSP (Digital Sound...
... AUDIO button. 2. Press the TUNER (3) button. 3. If this presents a problem, it may operate both TV and receiver volume at the same time. Press the DSP Button until the desired mode is achieved. 5. Press the AUDIO button 3. NOTE: The Volume buttons may be turned ON/OFF by pressing the SURR ON•OFF button. 1. Press DELAY+ or DELAY- OPERATING A HOME THEATER SURROUND SOUND SYSTEM With GE receivers, a second press of the TV button should turn DSP (Digital Sound...
Installation Manual
Page 15
... Release the SLEEP button. 2. INDICATOR LIGHT will stay lit. To Turn Off SLEEP Timer: 1. Enter time in minutes using the numerical keypad. Leave remote aimed at television. Sleep Function The Sleep Function will turn off your TV automatically after the user programs the time interval from one (1) to zero by either of the following: Press and hold the SLEEP button. Press and hold SLEEP button until INDICATOR LIGHT blinks or press ON•OFF button, turning TV off...
... Release the SLEEP button. 2. INDICATOR LIGHT will stay lit. To Turn Off SLEEP Timer: 1. Enter time in minutes using the numerical keypad. Leave remote aimed at television. Sleep Function The Sleep Function will turn off your TV automatically after the user programs the time interval from one (1) to zero by either of the following: Press and hold the SLEEP button. Press and hold SLEEP button until INDICATOR LIGHT blinks or press ON•OFF button, turning TV off...

Installation Manual
Page 16
... the remote. EXITING THE MENU MODE To exit the Menu Mode and clear the screen, push the device button you to the highlighted menu items. Not all functions in Menu Mode, these buttons will function as follows: Navigation LEFT/RIGHT buttons will operate as cursor up or down. Push the device button on the remote for the desired menu screen. 2. The MENU button invokes TV, and SAT modes. Navigation UP/ DOWN buttons will operate as setting color, channels, timer, etc. Entering the Menu Mode: 1.
... the remote. EXITING THE MENU MODE To exit the Menu Mode and clear the screen, push the device button you to the highlighted menu items. Not all functions in Menu Mode, these buttons will function as follows: Navigation LEFT/RIGHT buttons will operate as cursor up or down. Push the device button on the remote for the desired menu screen. 2. The MENU button invokes TV, and SAT modes. Navigation UP/ DOWN buttons will operate as setting color, channels, timer, etc. Entering the Menu Mode: 1.
Installation Manual
Page 17
.... Manually turn off . 5. The INDICATOR LIGHT will turn on the device you are programming. Press and release the device button for your brand, or if your brand is not listed, try searching your code by the device button. 4. Press and hold the CODE SEARCH until your device turns off . 16 Press and release ON•OFF until the INDICATOR LIGHT lights, then release CODE SEARCH. 3. Programming With Code Search If your TV, VCR, DBS Satellite System, Cable Box or Audio System...
.... Manually turn off . 5. The INDICATOR LIGHT will turn on the device you are programming. Press and release the device button for your brand, or if your brand is not listed, try searching your code by the device button. 4. Press and hold the CODE SEARCH until your device turns off . 16 Press and release ON•OFF until the INDICATOR LIGHT lights, then release CODE SEARCH. 3. Programming With Code Search If your TV, VCR, DBS Satellite System, Cable Box or Audio System...

Installation Manual
Page 18
... Codes From Your Universal Remote If you need to blink is set-up, use this procedure. 1. The INDICATOR LIGHT will turn off. 4. Press and release CODE SEARCH. The number which causes the INDICATOR LIGHT to find the three-digit code for the code you have retrieved all three 17 Press and hold CODE SEARCH until you are retrieving. Press and release the device button for your TV, VCR, DBS System, Cable Box or Audio...
... Codes From Your Universal Remote If you need to blink is set-up, use this procedure. 1. The INDICATOR LIGHT will turn off. 4. Press and release CODE SEARCH. The number which causes the INDICATOR LIGHT to find the three-digit code for the code you have retrieved all three 17 Press and hold CODE SEARCH until you are retrieving. Press and release the device button for your TV, VCR, DBS System, Cable Box or Audio...

Installation Manual
Page 19
A) Make sure you have new batteries and you must press the REC button twice. B) Check that batteries are properly installed. A) Try all the codes listed for your brand. devices. Trouble Shooting PROBLEM SOLUTION A) Replace the batter- mands properly ibility Problems programming a TV/VCR Combo Unit Try the VCR code for your device. Some combo units, however, may require both a TV and VCR code for full compat- key. code for full operation. As a safety feature on your remote, you are aiming your...
A) Make sure you have new batteries and you must press the REC button twice. B) Check that batteries are properly installed. A) Try all the codes listed for your brand. devices. Trouble Shooting PROBLEM SOLUTION A) Replace the batter- mands properly ibility Problems programming a TV/VCR Combo Unit Try the VCR code for your device. Some combo units, however, may require both a TV and VCR code for full compat- key. code for full operation. As a safety feature on your remote, you are aiming your...

Installation Manual
Page 20
...unit should you lose your codes or programming instructions, you . Apply the ...CODES? This warranty gives you specific rights, and you programmed. Check the Code list and reprogram the Remote 90 Day Limited Warranty Jasco Products Company warrants this product to be used with dated proof of this remote is limited to the repair or replacement...free from manufacturing defects for each device you may also have other warranties express or implied. Trouble Shooting Invalid Code for future reference. No response after pressing a key SOLUTION Try using the DISPLAY button...
...unit should you lose your codes or programming instructions, you . Apply the ...CODES? This warranty gives you specific rights, and you programmed. Check the Code list and reprogram the Remote 90 Day Limited Warranty Jasco Products Company warrants this product to be used with dated proof of this remote is limited to the repair or replacement...free from manufacturing defects for each device you may also have other warranties express or implied. Trouble Shooting Invalid Code for future reference. No response after pressing a key SOLUTION Try using the DISPLAY button...


