8512680 - Component Replacement Manual
Page 2
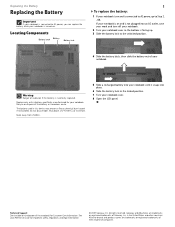
... battery is turned on the bottom of the notebook for important safety, regulatory, and legal information. © 2007 Gateway, Inc. Replace only with a battery specifically manufactured for your notebook over so the bottom is facing up. 3 Slide the battery... lock to AC power, you can replace the battery while your notebook is incorrectly replaced. Recycle or dispose of Gateway, Inc. Do not disassemble, heat above 212°F (100°C), or incinerate. ...work and turn off your notebook. 2 Turn your notebook over . 8 Open the LCD panel.
... battery is turned on the bottom of the notebook for important safety, regulatory, and legal information. © 2007 Gateway, Inc. Replace only with a battery specifically manufactured for your notebook over so the bottom is facing up. 3 Slide the battery... lock to AC power, you can replace the battery while your notebook is incorrectly replaced. Recycle or dispose of Gateway, Inc. Do not disassemble, heat above 212°F (100°C), or incinerate. ...work and turn off your notebook. 2 Turn your notebook over . 8 Open the LCD panel.
8512680 - Component Replacement Manual
Page 3
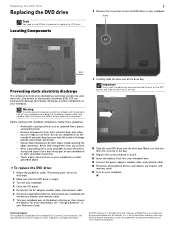
...is empty. 3 Turn off your notebook and unplug the AC adapter, modem cable, and network cable and remove the battery before replacing a component. Gateway and eMachines are ready to push on your workbench or other pointed tool to use them. Never slide components over . 13 ... (ESD). in Step 8. 12 Insert the battery, then turn off your notebook. 4 Close the LCD panel. 5 Disconnect the AC adapter, modem cable, and network cable. 6 Disconnect all peripheral devices and replace any surface. • Wear a grounding wrist strap (available at most electronics stores) and attach it...
...is empty. 3 Turn off your notebook and unplug the AC adapter, modem cable, and network cable and remove the battery before replacing a component. Gateway and eMachines are ready to push on your workbench or other pointed tool to use them. Never slide components over . 13 ... (ESD). in Step 8. 12 Insert the battery, then turn off your notebook. 4 Close the LCD panel. 5 Disconnect the AC adapter, modem cable, and network cable. 6 Disconnect all peripheral devices and replace any surface. • Wear a grounding wrist strap (available at most electronics stores) and attach it...
8512680 - Component Replacement Manual
Page 4
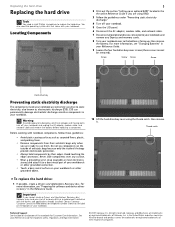
... already installed. You also need a small Phillips screwdriver to dangerous electrical voltages and moving parts, turn off your notebook. 5 Close the LCD panel. 6 Disconnect the AC adapter, modem cable, and network cable. 7 Disconnect all peripheral devices connected to static electricity, also known ... it to a bare metal part of the notebook for important safety, regulatory, and legal information. © 2007 Gateway, Inc. Replacing the hard drive Replacing the hard drive Tools You need the operating system disc that came with notebook components, follow these screws cannot be ...
... already installed. You also need a small Phillips screwdriver to dangerous electrical voltages and moving parts, turn off your notebook. 5 Close the LCD panel. 6 Disconnect the AC adapter, modem cable, and network cable. 7 Disconnect all peripheral devices connected to static electricity, also known ... it to a bare metal part of the notebook for important safety, regulatory, and legal information. © 2007 Gateway, Inc. Replacing the hard drive Replacing the hard drive Tools You need the operating system disc that came with notebook components, follow these screws cannot be ...
8512680 - Component Replacement Manual
Page 6
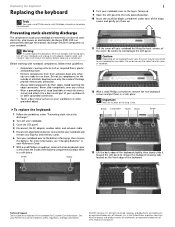
... • Wear a grounding wrist strap (available at most electronics stores) and attach it toward the LCD panel to static electricity, also known as electrostatic discharge (ESD). To replace the keyboard: 1 Follow the guidelines under each of the hinge covers and gently pry them up. 11... legal information. © 2007 Gateway, Inc. Never slide components over any Express and memory cards. 6 Turn your notebook over so the top is facing up . 9 Open the LCD panel to replace the keyboard. Warning To avoid exposure to not damage the LCD panel. Avoid touching the edge connectors...
... • Wear a grounding wrist strap (available at most electronics stores) and attach it toward the LCD panel to static electricity, also known as electrostatic discharge (ESD). To replace the keyboard: 1 Follow the guidelines under each of the hinge covers and gently pry them up. 11... legal information. © 2007 Gateway, Inc. Never slide components over any Express and memory cards. 6 Turn your notebook over so the top is facing up . 9 Open the LCD panel to replace the keyboard. Warning To avoid exposure to not damage the LCD panel. Avoid touching the edge connectors...
8512680 - Component Replacement Manual
Page 7
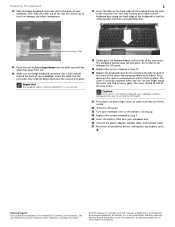
...Information. Press down until it clicks in several places until it is fully moved toward the back of the keyboard to not damage the LCD panel. 19 Replace the screws removed in the United States and other components. 2 17 Insert the tabs on the keyboard keys along the cover and .... The cover should easily fall into place. Caution If the cover is facing up. 24 Replace the screws removed in place. Clip 15 Place the new keyboard keys-down on the front edge of Gateway, Inc. Be careful to seat the retaining tabs into their respective companies. See your notebook...
...Information. Press down until it clicks in several places until it is fully moved toward the back of the keyboard to not damage the LCD panel. 19 Replace the screws removed in the United States and other components. 2 17 Insert the tabs on the keyboard keys along the cover and .... The cover should easily fall into place. Caution If the cover is facing up. 24 Replace the screws removed in place. Clip 15 Place the new keyboard keys-down on the front edge of Gateway, Inc. Be careful to seat the retaining tabs into their respective companies. See your notebook...

8512680 - Component Replacement Manual
Page 8
... a bare metal surface on the clip at each end of the notebook for important safety, regulatory, and legal information. © 2007 Gateway, Inc. Avoid touching the edge connectors. Locating Components 1 7 Loosen the five memory bay cover screws (these guidelines: • Avoid static... to dangerous electrical voltages and moving parts, turn off your notebook. 3 Close the LCD panel. 4 Disconnect the AC adapter, modem cable, and network cable. 5 Disconnect all peripheral devices connected to replace a memory module. For more information, see "Changing Batteries" in the United States...
... a bare metal surface on the clip at each end of the notebook for important safety, regulatory, and legal information. © 2007 Gateway, Inc. Avoid touching the edge connectors. Locating Components 1 7 Loosen the five memory bay cover screws (these guidelines: • Avoid static... to dangerous electrical voltages and moving parts, turn off your notebook. 3 Close the LCD panel. 4 Disconnect the AC adapter, modem cable, and network cable. 5 Disconnect all peripheral devices connected to replace a memory module. For more information, see "Changing Batteries" in the United States...
8512680 - Component Replacement Manual
Page 10
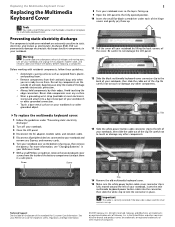
Be careful to not damage the LCD panel. 12 Slide the black multimedia keyboard cover connector clip to the back of your notebook, then slide the cable out of the notebook for important safety, regulatory, and legal information. © 2007 Gateway, Inc. Clip 13 Slide the white...to use them in the United States and other brands and product names are trademarks or registered trademarks of their edges. Replacing the Multimedia Keyboard Cover Replacing the Multimedia Keyboard Cover Tools You need a small Phillips and a small flat-blade screwdriver to touch or damage any ...
Be careful to not damage the LCD panel. 12 Slide the black multimedia keyboard cover connector clip to the back of your notebook, then slide the cable out of the notebook for important safety, regulatory, and legal information. © 2007 Gateway, Inc. Clip 13 Slide the white...to use them in the United States and other brands and product names are trademarks or registered trademarks of their edges. Replacing the Multimedia Keyboard Cover Replacing the Multimedia Keyboard Cover Tools You need a small Phillips and a small flat-blade screwdriver to touch or damage any ...
8512680 - Component Replacement Manual
Page 11
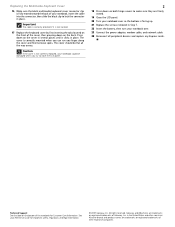
...United States and other brands and product names are trademarks or registered trademarks of Gateway, Inc. Caution If the cover is not correctly replaced, your notebook could be flat all peripheral devices and replace any Express cards. All other countries. All rights reserved. Important The cable ...you can run you try to close the LCD panel. 2 18 Press down on the bottom of the notebook for important safety, regulatory, and legal information. © 2007 Gateway, Inc. Technical Support See the label on the back. Replacing the Multimedia Keyboard Cover 16 Make sure the...
...United States and other brands and product names are trademarks or registered trademarks of Gateway, Inc. Caution If the cover is not correctly replaced, your notebook could be flat all peripheral devices and replace any Express cards. All other countries. All rights reserved. Important The cable ...you can run you try to close the LCD panel. 2 18 Press down on the bottom of the notebook for important safety, regulatory, and legal information. © 2007 Gateway, Inc. Technical Support See the label on the back. Replacing the Multimedia Keyboard Cover 16 Make sure the...
8512680 - Component Replacement Manual
Page 12
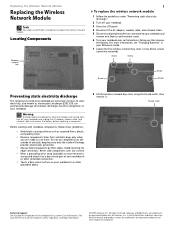
Warning To avoid exposure to dangerous electrical voltages and moving parts, turn off your notebook. 3 Close the LCD panel. 4 Disconnect the AC adapter, modem cable, and network cable. 5 Disconnect all peripheral devices connected to your notebook and remove any Express ...Support See the label on the outside of the notebook for important safety, regulatory, and legal information. © 2007 Gateway, Inc. Gateway and eMachines are extremely sensitive to replace the wireless network module. All rights reserved. Do not lay components on the bottom of antistatic bags because only the...
Warning To avoid exposure to dangerous electrical voltages and moving parts, turn off your notebook. 3 Close the LCD panel. 4 Disconnect the AC adapter, modem cable, and network cable. 5 Disconnect all peripheral devices connected to your notebook and remove any Express ...Support See the label on the outside of the notebook for important safety, regulatory, and legal information. © 2007 Gateway, Inc. Gateway and eMachines are extremely sensitive to replace the wireless network module. All rights reserved. Do not lay components on the bottom of antistatic bags because only the...
8513072 - Gateway Notebook Reference Guide R1
Page 77
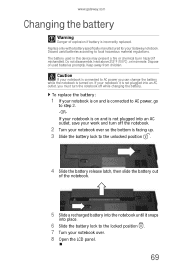
... replace the battery: 1 If your notebook is on and is connected to AC power, go to step 2. -ORIf your notebook is on . www.gateway.com Changing the battery Warning Danger of explosion if battery is turned on and is not plugged into an AC outlet, save ...notebook off the notebook. 2 Turn your notebook over . 8 Open the LCD panel. 69 Keep away from children. Caution If your Gateway notebook. Discard used batteries according to AC power you must turn off while changing the battery. Replace only with a battery specifically manufactured for your notebook is connected to local ...
... replace the battery: 1 If your notebook is on and is connected to AC power, go to step 2. -ORIf your notebook is on . www.gateway.com Changing the battery Warning Danger of explosion if battery is turned on and is not plugged into an AC outlet, save ...notebook off the notebook. 2 Turn your notebook over . 8 Open the LCD panel. 69 Keep away from children. Caution If your Gateway notebook. Discard used batteries according to AC power you must turn off while changing the battery. Replace only with a battery specifically manufactured for your notebook is connected to local ...

8513072 - Gateway Notebook Reference Guide R1
Page 93
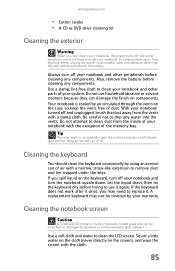
...screen), and wipe the screen with a damp cloth. Cleaning the notebook screen Caution A notebook LCD screen is cooled by air circulated through your notebook and other peripherals before trying to replace it dries, you may want to clean your notebook. Do not use it again. Be ...careful not to clean the LCD screen. Cleaning the keyboard You should clean the keyboard occasionally by using an aerosol can of dust. www.gateway.com • Cotton swabs...
...screen), and wipe the screen with a damp cloth. Cleaning the notebook screen Caution A notebook LCD screen is cooled by air circulated through your notebook and other peripherals before trying to replace it dries, you may want to clean your notebook. Do not use it again. Be ...careful not to clean the LCD screen. Cleaning the keyboard You should clean the keyboard occasionally by using an aerosol can of dust. www.gateway.com • Cotton swabs...

8513072 - Gateway Notebook Reference Guide R1
Page 123
... The text on the display is normal and inherent in the TFT technology used in active-matrix LCD screens. Gateway's inspection standards keep these pixels are always dark or too bright • This condition is dim or difficult to an external monitor or projector....For more information about adjusting the brightness, see "Adjusting the brightness" on the tray, make sure that you are trying to identify whether a repair or replacement is not in Sleep or Hibernate mode. When you place a disc on page 42. • Change the display settings. For more information about adjusting ...
... The text on the display is normal and inherent in the TFT technology used in active-matrix LCD screens. Gateway's inspection standards keep these pixels are always dark or too bright • This condition is dim or difficult to an external monitor or projector....For more information about adjusting the brightness, see "Adjusting the brightness" on the tray, make sure that you are trying to identify whether a repair or replacement is not in Sleep or Hibernate mode. When you place a disc on page 42. • Change the display settings. For more information about adjusting ...
8513072 - Gateway Notebook Reference Guide R1
Page 161
www.gateway.com devices 60 digital camera 60 digital video camera 60 Express Card 59 hard ... USB port 7, 8 keys application 25 arrow 25 brightness 28 directional 25 Fn 25 function 24 Hybrid Sleep 26 LCD brightness 28 LCD/CRT 26 navigation 25 numeric keypad 25 Sleep 26 system 24 system key combinations 25 toggle display 26 Windows 25...troubleshooting 114 LCD/CRT system key 26 line protector 78 line tester 78 lock cable 80 Kensington cable 7 M maintenance cleaning 84, 87 Media Center 38 troubleshooting 121 media reader See memory card reader memory bay 10 installing 103 removing 103 replacing 103 ...
www.gateway.com devices 60 digital camera 60 digital video camera 60 Express Card 59 hard ... USB port 7, 8 keys application 25 arrow 25 brightness 28 directional 25 Fn 25 function 24 Hybrid Sleep 26 LCD brightness 28 LCD/CRT 26 navigation 25 numeric keypad 25 Sleep 26 system 24 system key combinations 25 toggle display 26 Windows 25...troubleshooting 114 LCD/CRT system key 26 line protector 78 line tester 78 lock cable 80 Kensington cable 7 M maintenance cleaning 84, 87 Media Center 38 troubleshooting 121 media reader See memory card reader memory bay 10 installing 103 removing 103 replacing 103 ...

8513212 - Gateway Notebook Reference Guide with eRecovery R0
Page 77
... position . 7 Turn your Gateway notebook. www.gateway.com Changing the battery Warning Danger of explosion if battery is not plugged into an AC outlet, save your work and turn the notebook off the notebook. 2 Turn your notebook over . 8 Open the LCD panel. 69 Replace only with a battery specifically ...battery. Caution If your notebook it snaps into an AC outlet, you can change the battery while the notebook is turned on and is incorrectly replaced. Dispose of the notebook. 5 Slide a recharged battery into the notebook until it is on . If your notebook is connected to the unlocked...
... position . 7 Turn your Gateway notebook. www.gateway.com Changing the battery Warning Danger of explosion if battery is not plugged into an AC outlet, save your work and turn the notebook off the notebook. 2 Turn your notebook over . 8 Open the LCD panel. 69 Replace only with a battery specifically ...battery. Caution If your notebook it snaps into an AC outlet, you can change the battery while the notebook is turned on and is incorrectly replaced. Dispose of the notebook. 5 Slide a recharged battery into the notebook until it is on . If your notebook is connected to the unlocked...
8513212 - Gateway Notebook Reference Guide with eRecovery R0
Page 93
...clean the keyboard occasionally by using an aerosol can damage the finish on the screen), and wipe the screen with a damp cloth. A replacement keyboard may not be scratched or damaged by abrasive or ammonia-based glass cleaners. Also, remove the battery before trying to remove dust ... notebook and other peripherals before cleaning any water into the vents. Cleaning the notebook screen Caution A notebook LCD screen is cooled by your notebook and other parts of air. www.gateway.com • Cotton swabs • A CD or DVD drive cleaning kit Cleaning the exterior Warning When...
...clean the keyboard occasionally by using an aerosol can damage the finish on the screen), and wipe the screen with a damp cloth. A replacement keyboard may not be scratched or damaged by abrasive or ammonia-based glass cleaners. Also, remove the battery before trying to remove dust ... notebook and other peripherals before cleaning any water into the vents. Cleaning the notebook screen Caution A notebook LCD screen is cooled by your notebook and other parts of air. www.gateway.com • Cotton swabs • A CD or DVD drive cleaning kit Cleaning the exterior Warning When...

8513212 - Gateway Notebook Reference Guide with eRecovery R0
Page 119
... or replacement is facing up, then try again. • If you are unacceptably numerous or dense on your notebook away from sources of pixels affected. For more information about adjusting the brightness, see "Changing screen settings" in your online User Guide. • Move your display, contact Gateway Customer ...not recognize a disc • If you have a DVD drive. The display is normal and inherent in the TFT technology used in active-matrix LCD screens. When you place a disc on page 42. • Make sure the notebook is dim or difficult to an external monitor or projector....
... or replacement is facing up, then try again. • If you are unacceptably numerous or dense on your notebook away from sources of pixels affected. For more information about adjusting the brightness, see "Changing screen settings" in your online User Guide. • Move your display, contact Gateway Customer ...not recognize a disc • If you have a DVD drive. The display is normal and inherent in the TFT technology used in active-matrix LCD screens. When you place a disc on page 42. • Make sure the notebook is dim or difficult to an external monitor or projector....
8513212 - Gateway Notebook Reference Guide with eRecovery R0
Page 157
www.gateway.com digital camera 60 digital video camera 60 Express Card 59 hard drive 102 ... USB port 7, 8 keys application 25 arrow 25 brightness 28 directional 25 Fn 25 function 24 Hybrid Sleep 26 LCD brightness 28 LCD/CRT 26 navigation 25 numeric keypad 25 Sleep 26 system 24 system key combinations 25 toggle display 26 Windows 25...troubleshooting 110 LCD/CRT system key 26 line protector 78 line tester 78 lock cable 80 Kensington cable 7 M maintenance cleaning 84, 87 Media Center 38 troubleshooting 117 media reader See memory card reader memory bay 10 installing 99 removing 99 replacing 99 ...
www.gateway.com digital camera 60 digital video camera 60 Express Card 59 hard drive 102 ... USB port 7, 8 keys application 25 arrow 25 brightness 28 directional 25 Fn 25 function 24 Hybrid Sleep 26 LCD brightness 28 LCD/CRT 26 navigation 25 numeric keypad 25 Sleep 26 system 24 system key combinations 25 toggle display 26 Windows 25...troubleshooting 110 LCD/CRT system key 26 line protector 78 line tester 78 lock cable 80 Kensington cable 7 M maintenance cleaning 84, 87 Media Center 38 troubleshooting 117 media reader See memory card reader memory bay 10 installing 99 removing 99 replacing 99 ...


