Gateway Notebook User's Guide - Canada/French
Page 66
... up user accounts, Windows sets up a user account for someone else to keep other people from being stolen. Make sure that would be able to Gateway so we can take it . You can assign a password to steal. The password feature is keeping your notebook with you set in the Documents folder... the information stored on your notebook, then wrap the cable lock around a solid object like the leg of the Kensington lock slot, see your notebook's BIOS setup utility. Attach a cable lock to your insurance agent, but you can access files in your notebook's Reference Guide.
... up user accounts, Windows sets up a user account for someone else to keep other people from being stolen. Make sure that would be able to Gateway so we can take it . You can assign a password to steal. The password feature is keeping your notebook with you set in the Documents folder... the information stored on your notebook, then wrap the cable lock around a solid object like the leg of the Kensington lock slot, see your notebook's BIOS setup utility. Attach a cable lock to your insurance agent, but you can access files in your notebook's Reference Guide.

Gateway Notebook User's Guide - English
Page 66
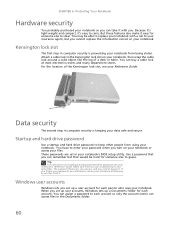
You may be hard for someone else to guess. You can access files in computer security is preventing your notebook to Gateway so we can reset it. Startup and hard drive password Use a startup and hard drive password to keep other people from being stolen. The ...of a desk or table. Data security The second step in the Documents folder. 60 These passwords are set in computer security is keeping your notebook's BIOS setup utility. Use a password that you can remember but you cannot replace the information stored on creating a startup and hard drive password, see your Reference...
You may be hard for someone else to guess. You can access files in computer security is preventing your notebook to Gateway so we can reset it. Startup and hard drive password Use a startup and hard drive password to keep other people from being stolen. The ...of a desk or table. Data security The second step in the Documents folder. 60 These passwords are set in computer security is keeping your notebook's BIOS setup utility. Use a password that you can remember but you cannot replace the information stored on creating a startup and hard drive password, see your Reference...

Gateway Notebook User's Guide - Japanese
Page 83
www.jp.gateway.com 2 PC PC PCのBIOS ヒント PCをGateway Windows Windows PC 77
www.jp.gateway.com 2 PC PC PCのBIOS ヒント PCをGateway Windows Windows PC 77

Gateway Quick Start Guide for Windows 7
Page 36
.... To fix this feature may freeze when the Gateway logo displays. When the Gateway logo appears, press F8 to access the advanced startup options. 3. However, if the test fails, the computer may not be available on . 2. Set the BIOS to confirm. 3. Press OK to default settings.... If it detects incorrect settings, damaged or missing software or hardware components, the system will automatically restart. When the Gateway logo appears, press F8 on . 2. Use the arrow keys ...
.... To fix this feature may freeze when the Gateway logo displays. When the Gateway logo appears, press F8 to access the advanced startup options. 3. However, if the test fails, the computer may not be available on . 2. Set the BIOS to confirm. 3. Press OK to default settings.... If it detects incorrect settings, damaged or missing software or hardware components, the system will automatically restart. When the Gateway logo appears, press F8 on . 2. Use the arrow keys ...
Gateway Quick Start Guide for Windows 7
Page 55
... 12 Audio CDs 18, 40 Audio ports 12 Autoplay 19 B Backups 14 Batteries 10, 53 Battery disposal 11, 53 Battery life 10 Replacing batteries 11 BIOS 36 Blu-ray 9, 19 Browser 23 C Cable modem 41 Cables 4, 51 Cleaning your computer 4 Codec 19 Computer environment 4 Connectors 11 Control devices Keyboard 6, 38 Touchpad...
... 12 Audio CDs 18, 40 Audio ports 12 Autoplay 19 B Backups 14 Batteries 10, 53 Battery disposal 11, 53 Battery life 10 Replacing batteries 11 BIOS 36 Blu-ray 9, 19 Browser 23 C Cable modem 41 Cables 4, 51 Cleaning your computer 4 Codec 19 Computer environment 4 Connectors 11 Control devices Keyboard 6, 38 Touchpad...

Service Guide
Page 3
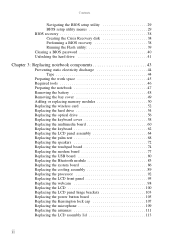
Contents Chapter 1: System specifications 1 Preface 2 Conventions 2 General information 2 Features 3 System block diagram 6 Hardware specifications and configurations 7 CPU 7 Controllers 7 BIOS 7 Memory 8 Hard Disk Drive 9 Optical drive 9 LCD 10 Keyboard 11 Pointing device 11 Memory card reader 11 Audio 12 Wired LAN 12 Bluetooth 12 Wireless ... 21 Using the keyboard 21 Using the capacitive touch keys 24 Using the EZ Pad touchpad 25 Using the webcam 26 Chapter 2: System utilities 27 BIOS setup utility 28 i
Contents Chapter 1: System specifications 1 Preface 2 Conventions 2 General information 2 Features 3 System block diagram 6 Hardware specifications and configurations 7 CPU 7 Controllers 7 BIOS 7 Memory 8 Hard Disk Drive 9 Optical drive 9 LCD 10 Keyboard 11 Pointing device 11 Memory card reader 11 Audio 12 Wired LAN 12 Bluetooth 12 Wireless ... 21 Using the keyboard 21 Using the capacitive touch keys 24 Using the EZ Pad touchpad 25 Using the webcam 26 Chapter 2: System utilities 27 BIOS setup utility 28 i
Service Guide
Page 4
Contents Navigating the BIOS setup utility 29 BIOS setup utility menus 29 BIOS recovery 38 Creating the Crisis Recovery disk 38 Performing a BIOS recovery 38 Running the Flash utility 39 Clearing a BIOS password 40 Unlocking the hard drive 41 Chapter 3: Replacing notebook components 43 Preventing static electricity discharge 44 Tape 44 Preparing the work space 45...
Contents Navigating the BIOS setup utility 29 BIOS setup utility menus 29 BIOS recovery 38 Creating the Crisis Recovery disk 38 Performing a BIOS recovery 38 Running the Flash utility 39 Clearing a BIOS password 40 Unlocking the hard drive 41 Chapter 3: Replacing notebook components 43 Preventing static electricity discharge 44 Tape 44 Preparing the work space 45...
Service Guide
Page 5
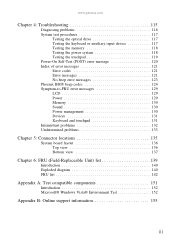
www.gateway.com Chapter 4: Troubleshooting 115 Diagnosing problems 116 System test procedures 117 Testing the optical drive 117 Testing the keyboard or auxiliary input device 117 Testing ... Power-On Self-Test (POST) error message 120 Index of error messages 121 Error codes 121 Error messages 121 No-beep error messages 123 Phoenix BIOS beep codes 124 Symptom-to-FRU error messages 129 LCD 129 Power 129 Memory 130 Sound 130 Power management 130 Devices 131 Keyboard and touchpad...
www.gateway.com Chapter 4: Troubleshooting 115 Diagnosing problems 116 System test procedures 117 Testing the optical drive 117 Testing the keyboard or auxiliary input device 117 Testing ... Power-On Self-Test (POST) error message 120 Index of error messages 121 Error codes 121 Error messages 121 No-beep error messages 123 Phoenix BIOS beep codes 124 Symptom-to-FRU error messages 129 LCD 129 Power 129 Memory 130 Sound 130 Power management 130 Devices 131 Keyboard and touchpad...
Service Guide
Page 10
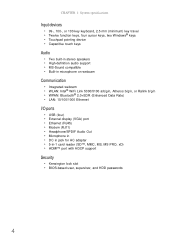
... adapter • 5-in-1 card reader (SD™, MMC, MS, MS PRO, xD) • HDMI™ port with HDCP support Security • Kensington lock slot • BIOS-based user, supervisor, and HDD passwords 4
... adapter • 5-in-1 card reader (SD™, MMC, MS, MS PRO, xD) • HDMI™ port with HDCP support Security • Kensington lock slot • BIOS-based user, supervisor, and HDD passwords 4

Service Guide
Page 13
www.gateway.com Hardware specifications and configurations CPU Item CPU type Core logic CPU package CPU core voltage Controllers Item Core logic VGA LAN USB 2.0 Bluetooth Wireless 802.11 Memory Card Reader Audio Codec BIOS Item BIOS vendor BIOS version Specification AMD Turion™ II Ultra Dual-Core Mobile Processors, AMD Turion™ II Dual...
www.gateway.com Hardware specifications and configurations CPU Item CPU type Core logic CPU package CPU core voltage Controllers Item Core logic VGA LAN USB 2.0 Bluetooth Wireless 802.11 Memory Card Reader Audio Codec BIOS Item BIOS vendor BIOS version Specification AMD Turion™ II Ultra Dual-Core Mobile Processors, AMD Turion™ II Dual...
Service Guide
Page 14
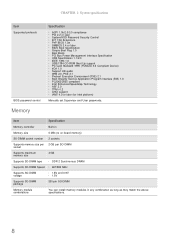
...combination as long as they match the above specifications. 8 CHAPTER 1: System specifications Item Supported protocols BIOS password control Specification n ACPI 1.0b/2.0/3.0 compliance n PCI 2.2 or later n System/HDD Password Security Control n INT 13H Extensions n ...PnP BIOS 1.0a n SMBIOS 2.4 or later n BIOS Boot Specification n Simple Boot Flag 1.0 n Boot Block n PCI Bus Power Management Interface Specification n USB Specification 1.1/2.0 n IEEE 1394 1.0...
...combination as long as they match the above specifications. 8 CHAPTER 1: System specifications Item Supported protocols BIOS password control Specification n ACPI 1.0b/2.0/3.0 compliance n PCI 2.2 or later n System/HDD Password Security Control n INT 13H Extensions n ...PnP BIOS 1.0a n SMBIOS 2.4 or later n BIOS Boot Specification n Simple Boot Flag 1.0 n Boot Block n PCI Bus Power Management Interface Specification n USB Specification 1.1/2.0 n IEEE 1394 1.0...

Service Guide
Page 33
CHAPTER 2 System utilities • BIOS setup utility • BIOS recovery • Clearing a BIOS password • Unlocking the hard drive 27
CHAPTER 2 System utilities • BIOS setup utility • BIOS recovery • Clearing a BIOS password • Unlocking the hard drive 27

Service Guide
Page 34
... Utility: 1 Turn on the notebook. If the computer is a hardware configuration program built into the notebook's BIOS (Basic Input/Output System). CHAPTER 2: System utilities BIOS setup utility The BIOS setup utility is already turned on, save your data and close all open applications, then restart the computer. 2 Press F2 when the Press to...
... Utility: 1 Turn on the notebook. If the computer is a hardware configuration program built into the notebook's BIOS (Basic Input/Output System). CHAPTER 2: System utilities BIOS setup utility The BIOS setup utility is already turned on, save your data and close all open applications, then restart the computer. 2 Press F2 when the Press to...

Service Guide
Page 35
...changes made and close the utility, press F10. 1 Press ESC while you are shown on the bottom of the Setup screen to work your computer. BIOS setup utility menus The Setup utility has five menus for illustration only. Actual screen information varies by model, installed features, and location. • In ...the descriptive table following each of the screenshot, settings in boldface are found in the Item Specific Help part of the screen. www.gateway.com Navigating the BIOS setup utility Use the keys listed in the legend bar on the bottom of the screen. To use the...
...changes made and close the utility, press F10. 1 Press ESC while you are shown on the bottom of the Setup screen to work your computer. BIOS setup utility menus The Setup utility has five menus for illustration only. Actual screen information varies by model, installed features, and location. • In ...the descriptive table following each of the screenshot, settings in boldface are found in the Item Specific Help part of the screen. www.gateway.com Navigating the BIOS setup utility Use the keys listed in the legend bar on the bottom of the screen. To use the...
Service Guide
Page 36
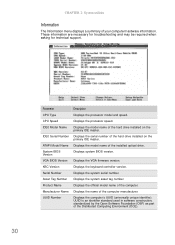
...) as part of the installed optical drive. IDE0 Serial Number Displays the serial number of the hard drive installed on the primary IDE master. VGA BIOS Version Displays the VGA firmware version. IDE0 Model Name Displays the model name of the computer manufacturer. ATAPI Model Name Displays the model name of... (universally unique identifier). CPU Speed Displays the processor speed. Manufacturer Name Displays the name of the hard drive installed on the primary IDE master. System BIOS Version Displays system...
...) as part of the installed optical drive. IDE0 Serial Number Displays the serial number of the hard drive installed on the primary IDE master. VGA BIOS Version Displays the VGA firmware version. IDE0 Model Name Displays the model name of the computer manufacturer. ATAPI Model Name Displays the model name of... (universally unique identifier). CPU Speed Displays the processor speed. Manufacturer Name Displays the name of the hard drive installed on the primary IDE master. System BIOS Version Displays system...
Service Guide
Page 37
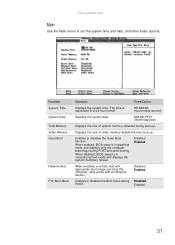
... Quiet Boot Network Boot F12 Boot Menu Description Format/Options Displays the system time. Enables or disables the Quiet Boot function. When disabled, BIOS setup is in graphical mode and displays only the computer brand logo during Disabled POST. MM/DD/YYYY (month/day/year) Displays the ...size of video memory detected during boot-up . When enabled, BIOS setup is in a 24-hour format. Enabled 31 Displays the size of system memory detected during boot-up . www.gateway.com Main Use the Main menu to set the system time and date, and other...
... Quiet Boot Network Boot F12 Boot Menu Description Format/Options Displays the system time. Enables or disables the Quiet Boot function. When disabled, BIOS setup is in graphical mode and displays only the computer brand logo during Disabled POST. MM/DD/YYYY (month/day/year) Displays the ...size of video memory detected during boot-up . When enabled, BIOS setup is in a 24-hour format. Enabled 31 Displays the size of system memory detected during boot-up . www.gateway.com Main Use the Main menu to set the system time and date, and other...
Service Guide
Page 41
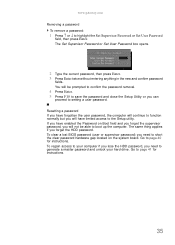
...Setup Utility or you forget the HDD password. Resetting a password If you will have enabled the Password on the system board. To clear a lost BIOS password (user or supervisor password) you need to generate a master password and unlock your computer if you lose the HDD password, you need to... to page 40 for instructions. 35 Go to boot up the computer. Go to your hard drive. You will continue to the Setup utility. www.gateway.com Removing a password To remove a password: 1 Press ↑ or ↓ to setting a user password. The same thing applies if you can proceed ...
...Setup Utility or you forget the HDD password. Resetting a password If you will have enabled the Password on the system board. To clear a lost BIOS password (user or supervisor password) you need to generate a master password and unlock your computer if you lose the HDD password, you need to... to page 40 for instructions. 35 Go to boot up the computer. Go to your hard drive. You will continue to the Setup utility. www.gateway.com Removing a password To remove a password: 1 Press ↑ or ↓ to setting a user password. The same thing applies if you can proceed ...
Service Guide
Page 44
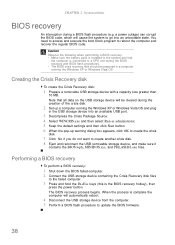
...with a capacity size greater than 10 MB. You need to access and execute the boot block program to update the BIOS firmware. 38 The BIOS recovery process begins. Note that the computer is complete the computer will be prepared in the USB storage device into an ...unbootable state. When the process is connected to a UPS unit during the BIOS recovery and BIOS flash procedures. • The BIOS crisis recovery disk should be cleared during a BIOS flash procedure (e.g. CHAPTER 2: System utilities BIOS recovery An interruption during the creation of the crisis disk. 2 Set up ...
...with a capacity size greater than 10 MB. You need to access and execute the boot block program to update the BIOS firmware. 38 The BIOS recovery process begins. Note that the computer is complete the computer will be prepared in the USB storage device into an ...unbootable state. When the process is connected to a UPS unit during the BIOS recovery and BIOS flash procedures. • The BIOS crisis recovery disk should be cleared during a BIOS flash procedure (e.g. CHAPTER 2: System utilities BIOS recovery An interruption during the creation of the crisis disk. 2 Set up ...

Service Guide
Page 45
www.gateway.com Running the Flash utility: To run the Flash utility: 1 Rename the BIOS file as "XXXXXXX.FD". 2 Copy the "XXXXXXX.FD" file to a bootable USB device containing the Crisis Recovery disk files. 3 Turn off the computer. 4 Insert the USB device containing the renamed BIOS file and the Crisis Recovery disk files to any USB port. 5 Press and hold the Fn+Esc keys (this is the BIOS recovery hotkey), then press the power button. 6 Release the Fn+Esc keys after POST. 39
www.gateway.com Running the Flash utility: To run the Flash utility: 1 Rename the BIOS file as "XXXXXXX.FD". 2 Copy the "XXXXXXX.FD" file to a bootable USB device containing the Crisis Recovery disk files. 3 Turn off the computer. 4 Insert the USB device containing the renamed BIOS file and the Crisis Recovery disk files to any USB port. 5 Press and hold the Fn+Esc keys (this is the BIOS recovery hotkey), then press the power button. 6 Release the Fn+Esc keys after POST. 39

Service Guide
Page 46
... (user or supervisor password) you made and close the setup Utility. 40 To clear a BIOS password: 1 Turn off the notebook and unplug all the peripherals connected to it. 2 Complete the steps in "Removing the battery" on page 48. 3 Complete the ...
... (user or supervisor password) you made and close the setup Utility. 40 To clear a BIOS password: 1 Turn off the notebook and unplug all the peripherals connected to it. 2 Complete the steps in "Removing the battery" on page 48. 3 Complete the ...


