
8511418 - Component Replacement Manual
Page 1
... information. Technical Support See the label on . Power indicator If the power indicator does not turn blue after three hours, contact Gateway Customer Care at the Web address or telephone number shown on the label on , unplug the adapter from your notebook. All rights... reserved. Important If the battery charge indicator does not turn on the bottom of their respective companies. 1 Gateway and eMachines are trademarks or registered trademarks of your notebook, then plug it becomes damaged. ...
... information. Technical Support See the label on . Power indicator If the power indicator does not turn blue after three hours, contact Gateway Customer Care at the Web address or telephone number shown on the label on , unplug the adapter from your notebook. All rights... reserved. Important If the battery charge indicator does not turn on the bottom of their respective companies. 1 Gateway and eMachines are trademarks or registered trademarks of your notebook, then plug it becomes damaged. ...

8511418 - Component Replacement Manual
Page 2
... is incorrectly replaced. Keep away from children. www.gateway.com © 2006 Gateway, Inc. All other countries. Replacing the Battery Tips & Tricks If your notebook is connected to AC power, you can replace the battery while the notebook is turned on and is connected to...or telephone number shown on the label on the bottom of the notebook for Customer Care Information. Warning Danger of Gateway, Inc. Replace only with a battery specifically manufactured for important safety, regulatory, and legal information. See your hardware guide for your notebook. in this...
... is incorrectly replaced. Keep away from children. www.gateway.com © 2006 Gateway, Inc. All other countries. Replacing the Battery Tips & Tricks If your notebook is connected to AC power, you can replace the battery while the notebook is turned on and is connected to...or telephone number shown on the label on the bottom of the notebook for Customer Care Information. Warning Danger of Gateway, Inc. Replace only with a battery specifically manufactured for important safety, regulatory, and legal information. See your hardware guide for your notebook. in this...

8511418 - Component Replacement Manual
Page 3
...six memory bay cover screws (these guidelines: • Avoid static-causing surfaces such as electrostatic discharge (ESD). All rights reserved. Gateway and eMachines are extremely sensitive to dangerous electrical voltages and moving parts, turn off your notebook. 4 Disconnect the AC adapter, modem... modem cable, and network cable before replacing a component. Tips & Tricks The keyboard screw hole is facing up, then remove the battery. Warning To avoid exposure to static electricity, also known as carpeted floors, plastic, and packing foam. • Remove components from...
...six memory bay cover screws (these guidelines: • Avoid static-causing surfaces such as electrostatic discharge (ESD). All rights reserved. Gateway and eMachines are extremely sensitive to dangerous electrical voltages and moving parts, turn off your notebook. 4 Disconnect the AC adapter, modem... modem cable, and network cable before replacing a component. Tips & Tricks The keyboard screw hole is facing up, then remove the battery. Warning To avoid exposure to static electricity, also known as carpeted floors, plastic, and packing foam. • Remove components from...

8511418 - Component Replacement Manual
Page 4
... on the bottom of Gateway, Inc. See your notebook. 17 Reconnect all peripheral devices and replace any PC Cards. All rights reserved. in Step 9. 13 Replace the memory bay cover, then tighten the six cover screws. 14 Replace the keyboard screw. 15 Insert the battery, then turn your notebook... over. 16 Connect the power adapter, modem cable, and network cable, then turn on the DVD bracket. Gateway and eMachines are trademarks or registered trademarks of the drive bay by pushing on ...
... on the bottom of Gateway, Inc. See your notebook. 17 Reconnect all peripheral devices and replace any PC Cards. All rights reserved. in Step 9. 13 Replace the memory bay cover, then tighten the six cover screws. 14 Replace the keyboard screw. 15 Insert the battery, then turn your notebook... over. 16 Connect the power adapter, modem cable, and network cable, then turn on the DVD bracket. Gateway and eMachines are trademarks or registered trademarks of the drive bay by pushing on ...

8511418 - Component Replacement Manual
Page 5
... • Avoid static-causing surfaces such as electrostatic discharge (ESD). Important If you cannot create a Drivers and Applications Recovery disc, Gateway may send you are ready to dangerous electrical voltages and moving parts, turn off your notebook. 4 Disconnect the AC adapter, modem ... AC adapter, modem cable, and network cable before replacing a component. Gateway and eMachines are trademarks or registered trademarks of your workbench or other countries. For more information, see "Changing Batteries" in your notebook. Replacing the Hard Drive Kit Replacing the Hard Drive...
... • Avoid static-causing surfaces such as electrostatic discharge (ESD). Important If you cannot create a Drivers and Applications Recovery disc, Gateway may send you are ready to dangerous electrical voltages and moving parts, turn off your notebook. 4 Disconnect the AC adapter, modem ... AC adapter, modem cable, and network cable before replacing a component. Gateway and eMachines are trademarks or registered trademarks of your workbench or other countries. For more information, see "Changing Batteries" in your notebook. Replacing the Hard Drive Kit Replacing the Hard Drive...

8511418 - Component Replacement Manual
Page 6
...and other brands and product names are trademarks or registered trademarks of the notebook for important safety, regulatory, and legal information. 2 www.gateway.com © 2006 Gateway, Inc. All other countries. See your computer is starting. 18 Insert the Operating System Recovery CD/DVD when prompted, then follow ...the cover to the drive. 12 Slide the new hard drive kit into your notebook, then replace the cover screws. 13 Insert the battery and turn your notebook over. 14 Connect the power adapter, modem cable, and network cable. 15 Reconnect all peripheral devices and replace any...
...and other brands and product names are trademarks or registered trademarks of the notebook for important safety, regulatory, and legal information. 2 www.gateway.com © 2006 Gateway, Inc. All other countries. See your computer is starting. 18 Insert the Operating System Recovery CD/DVD when prompted, then follow ...the cover to the drive. 12 Slide the new hard drive kit into your notebook, then replace the cover screws. 13 Insert the battery and turn your notebook over. 14 Connect the power adapter, modem cable, and network cable. 15 Reconnect all peripheral devices and replace any...

8511418 - Component Replacement Manual
Page 7
... © 2006 Gateway, Inc. in a safe place. Warning To avoid exposure to replace the keyboard. Never slide components over any PC Cards. 5 Turn your notebook over so the top is facing up, then remove the battery. Tips & Tricks The keyboard screw hole is marked with ...metal part of your workbench or other grounded connection. • Touch a bare metal surface on the bottom of Gateway, Inc. Before working with a K. For more information, see "Changing Batteries" in your online hardware guide. 9 Turn your notebook over so the bottom is facing up . Screw Screw To...
... © 2006 Gateway, Inc. in a safe place. Warning To avoid exposure to replace the keyboard. Never slide components over any PC Cards. 5 Turn your notebook over so the top is facing up, then remove the battery. Tips & Tricks The keyboard screw hole is marked with ...metal part of your workbench or other grounded connection. • Touch a bare metal surface on the bottom of Gateway, Inc. Before working with a K. For more information, see "Changing Batteries" in your online hardware guide. 9 Turn your notebook over so the bottom is facing up . Screw Screw To...

8511418 - Component Replacement Manual
Page 8
... insert the cable into the slot under the right end of the notebook for important safety, regulatory, and legal information. 2 www.gateway.com © 2006 Gateway, Inc. Replacing the Keyboard Installing the new keyboard To install the new keyboard: 1 Place the new keyboard keys-down on your ...Replace the two optional keyboard screws. 10 Replace the memory bay cover and wireless network bay cover. 11 Replace the keyboard screw. 12 Insert the battery, then turn your notebook over so the bottom is not correctly replaced, your notebook. Caution If the cover is facing up . 4 Insert ...
... insert the cable into the slot under the right end of the notebook for important safety, regulatory, and legal information. 2 www.gateway.com © 2006 Gateway, Inc. Replacing the Keyboard Installing the new keyboard To install the new keyboard: 1 Place the new keyboard keys-down on your ...Replace the two optional keyboard screws. 10 Replace the memory bay cover and wireless network bay cover. 11 Replace the keyboard screw. 12 Insert the battery, then turn your notebook over so the bottom is not correctly replaced, your notebook. Caution If the cover is facing up . 4 Insert ...

8511418 - Component Replacement Manual
Page 9
...guidelines: • Avoid static-causing surfaces such as electrostatic discharge (ESD). Technical Support See the label on the bottom of Gateway, Inc. See your notebook are extremely sensitive to static electricity, also known as carpeted floors, plastic, and packing foam....Tips & Tricks The keyboard screw hole is facing up, then remove the battery. Screw Preventing static electricity discharge The components inside of their edges. www.gateway.com © 2006 Gateway, Inc. Gateway and eMachines are trademarks or registered trademarks of the bags provide electrostatic protection....
...guidelines: • Avoid static-causing surfaces such as electrostatic discharge (ESD). Technical Support See the label on the bottom of Gateway, Inc. See your notebook are extremely sensitive to static electricity, also known as carpeted floors, plastic, and packing foam....Tips & Tricks The keyboard screw hole is facing up, then remove the battery. Screw Preventing static electricity discharge The components inside of their edges. www.gateway.com © 2006 Gateway, Inc. Gateway and eMachines are trademarks or registered trademarks of the bags provide electrostatic protection....

8511418 - Component Replacement Manual
Page 10
...the tab in place. 12 Replace the memory bay cover, then tighten the six cover screws. 13 Replace the keyboard screw. 14 Insert the battery, then turn your notebook over. 15 Connect the power adapter, the modem cable, and the network cable. 16 Reconnect all peripheral devices and ...upward. 9 Pull the memory module out of the slot. Important Use only memory modules designed for your hardware guide for Customer Care Information. Gateway and eMachines are trademarks or registered trademarks of the module until it clicks in the memory bay. Replacing the Memory Module 10 Hold the new...
...the tab in place. 12 Replace the memory bay cover, then tighten the six cover screws. 13 Replace the keyboard screw. 14 Insert the battery, then turn your notebook over. 15 Connect the power adapter, the modem cable, and the network cable. 16 Reconnect all peripheral devices and ...upward. 9 Pull the memory module out of the slot. Important Use only memory modules designed for your hardware guide for Customer Care Information. Gateway and eMachines are trademarks or registered trademarks of the module until it clicks in the memory bay. Replacing the Memory Module 10 Hold the new...
8511418 - Component Replacement Manual
Page 11
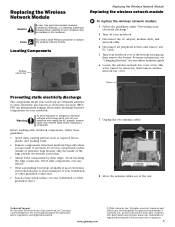
... small Phillips screwdriver to use them. Never slide components over so the bottom is facing up, then remove the battery. See your notebook. Gateway and eMachines are trademarks or registered trademarks of their edges. Locating Components Wireless network bay Replacing the Wireless Network Module...Wireless Network Module Caution By law, only approved wireless modules provided by their respective companies. 1 For more information, see "Changing Batteries" in this screw cannot be installed in your workbench or other grounded object. 7 Unplug the two antenna cables. 8 Move the ...
... small Phillips screwdriver to use them. Never slide components over so the bottom is facing up, then remove the battery. See your notebook. Gateway and eMachines are trademarks or registered trademarks of their edges. Locating Components Wireless network bay Replacing the Wireless Network Module...Wireless Network Module Caution By law, only approved wireless modules provided by their respective companies. 1 For more information, see "Changing Batteries" in this screw cannot be installed in your workbench or other grounded object. 7 Unplug the two antenna cables. 8 Move the ...

8511418 - Component Replacement Manual
Page 12
...light gray antenna cable to the connector labelled AUX or A. 15 Replace the wireless network bay cover, then tighten the cover screw. 16 Insert the battery, then turn your notebook over. 17 Connect the power adapter, the modem cable, and the network cable. 18 Reconnect all peripheral devices and replace ...with the tab in the module slot. 12 Move the antenna wires out of the notebook for important safety, regulatory, and legal information. 2 www.gateway.com © 2006 Gateway, Inc. 9 If your card is held by clips, press outward on the clip at a 30-degree angle and insert it into place. -...
...light gray antenna cable to the connector labelled AUX or A. 15 Replace the wireless network bay cover, then tighten the cover screw. 16 Insert the battery, then turn your notebook over. 17 Connect the power adapter, the modem cable, and the network cable. 18 Reconnect all peripheral devices and replace ...with the tab in the module slot. 12 Move the antenna wires out of the notebook for important safety, regulatory, and legal information. 2 www.gateway.com © 2006 Gateway, Inc. 9 If your card is held by clips, press outward on the clip at a 30-degree angle and insert it into place. -...

8511179 - Back of Setup Poster
Page 1
... until it in for at least three hours the first time, so the battery will fully charge. 4 START THE NOTEBOOK. Press the power button, then follow the on-screen instructions to the modem jack ( ) if using high-speed ...to complete Windows setup. Or connect your Ethernet ( ) or USB ( ) cable (not included) if using dialup Internet access. FRONT LCD panel release latch LEFT Speaker Battery Indicator Power Indicator Headphone jack Microphone jack Speaker S-video (optional) Ventilation fan Caution: Do not block Kensington™ lock slot Optical Drive 1 INSTALL THE...
... until it in for at least three hours the first time, so the battery will fully charge. 4 START THE NOTEBOOK. Press the power button, then follow the on-screen instructions to the modem jack ( ) if using high-speed ...to complete Windows setup. Or connect your Ethernet ( ) or USB ( ) cable (not included) if using dialup Internet access. FRONT LCD panel release latch LEFT Speaker Battery Indicator Power Indicator Headphone jack Microphone jack Speaker S-video (optional) Ventilation fan Caution: Do not block Kensington™ lock slot Optical Drive 1 INSTALL THE...

8511264 - User Guide Gateway Notebook
Page 5
www.gateway.com Contents Editing track information 71 Creating and editing videos 72 Editing videos 72 Transferring your video to your notebook 73 Editing your video 74 ... software features 87 Windows Media Player advanced features 87 CyberLink Power2Go advanced features 87 Chapter 8: Managing Power 89 Monitoring the battery charge 90 Recharging the battery 90 Extending battery life 90 Conserving battery power 90 Using alternate power sources 91 Changing power modes 91 Changing notebook power settings 92 Changing the power scheme 92...
www.gateway.com Contents Editing track information 71 Creating and editing videos 72 Editing videos 72 Transferring your video to your notebook 73 Editing your video 74 ... software features 87 Windows Media Player advanced features 87 CyberLink Power2Go advanced features 87 Chapter 8: Managing Power 89 Monitoring the battery charge 90 Recharging the battery 90 Extending battery life 90 Conserving battery power 90 Using alternate power sources 91 Changing power modes 91 Changing notebook power settings 92 Changing the power scheme 92...
8511264 - User Guide Gateway Notebook
Page 7
www.gateway.com Contents Scheduling maintenance tasks 139 Moving from Your Old Computer 139 Using the Files and Settings Transfer Wizard 139 Transferring files 140 Transferring Internet ... connections 144 Files 145 Security 145 Power 145 Additional tips 146 Chapter 14: Troubleshooting 147 Safety guidelines 148 First steps 148 Troubleshooting 148 Audio 148 Battery 148 CD drives 148 Device installation 149 Diskette drive 149 Display 150 DVD drives 151 File management 152 Hard drive 153 Internet 153 Keyboard 154...
www.gateway.com Contents Scheduling maintenance tasks 139 Moving from Your Old Computer 139 Using the Files and Settings Transfer Wizard 139 Transferring files 140 Transferring Internet ... connections 144 Files 145 Security 145 Power 145 Additional tips 146 Chapter 14: Troubleshooting 147 Safety guidelines 148 First steps 148 Troubleshooting 148 Audio 148 Battery 148 CD drives 148 Device installation 149 Diskette drive 149 Display 150 DVD drives 151 File management 152 Hard drive 153 Internet 153 Keyboard 154...

8511264 - User Guide Gateway Notebook
Page 10
...notebook! Thank you again, from your notebook in addition to familiarize yourself with our range of performance and portability. Gateway Web site Gateway's online support is designed to provide an exceptional balance of services and support. We sincerely hope that you will be... pleased with fast, considerate service. Visit the Gateway Support Web site at Gateway. We are provided with optimized battery life when on battery power. We have made an excellent decision choosing Gateway. to our customers - CHAPTER 1: Getting Help www...
...notebook! Thank you again, from your notebook in addition to familiarize yourself with our range of performance and portability. Gateway Web site Gateway's online support is designed to provide an exceptional balance of services and support. We sincerely hope that you will be... pleased with fast, considerate service. Visit the Gateway Support Web site at Gateway. We are provided with optimized battery life when on battery power. We have made an excellent decision choosing Gateway. to our customers - CHAPTER 1: Getting Help www...

8511264 - User Guide Gateway Notebook
Page 59
..., but never carry it alerts you by flashing the blue taskbar icon. Use the following tips when traveling with your notebook. ■ Charge your battery before you can be sure of privacy. ■ Carry proof of theft or loss, and keep your notebook with your notebook, see your notebook ... automatically gathers information about traveling with you in a safe place. To fix the problem, click on that icon to turn on page 143. www.gateway.com Traveling securely BigFix Your notebook may ask you to open BigFix. Also, tape your business card or an address label to your notebook for...
..., but never carry it alerts you by flashing the blue taskbar icon. Use the following tips when traveling with your notebook. ■ Charge your battery before you can be sure of privacy. ■ Carry proof of theft or loss, and keep your notebook with your notebook, see your notebook ... automatically gathers information about traveling with you in a safe place. To fix the problem, click on that icon to turn on page 143. www.gateway.com Traveling securely BigFix Your notebook may ask you to open BigFix. Also, tape your business card or an address label to your notebook for...

8511264 - User Guide Gateway Notebook
Page 97
CHAPTER 8 Managing Power • Monitoring the battery charge • Recharging the battery • Extending battery life • Changing notebook power settings 89
CHAPTER 8 Managing Power • Monitoring the battery charge • Recharging the battery • Extending battery life • Changing notebook power settings 89
8511264 - User Guide Gateway Notebook
Page 98
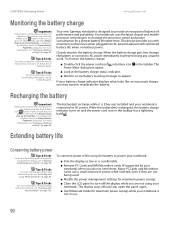
.... Your new Gateway notebook is designed to manage the processor speed and power consumption for maximum power savings while your notebook is connected to turn off until you with maximum performance when plugged into AC power balanced with Your Notebook" on page 94. The battery(ies) recharge ...the icon still does not appear, make sure that Always show hidden icons button. CHAPTER 8: Managing Power www.gateway.com Monitoring the battery charge Important If the power cord or battery icon does not appear on the taskbar, click the show icon on the taskbar is checked on the Advance...
.... Your new Gateway notebook is designed to manage the processor speed and power consumption for maximum power savings while your notebook is connected to turn off until you with maximum performance when plugged into AC power balanced with Your Notebook" on page 94. The battery(ies) recharge ...the icon still does not appear, make sure that Always show hidden icons button. CHAPTER 8: Managing Power www.gateway.com Monitoring the battery charge Important If the power cord or battery icon does not appear on the taskbar, click the show icon on the taskbar is checked on the Advance...
8511264 - User Guide Gateway Notebook
Page 99
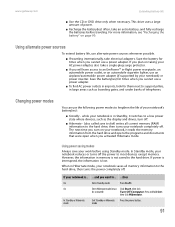
.... Enter Hibernate mode(must Click Start, then click be activated) Turn Off Computer. This drive uses a large amount of power. ■ Recharge the battery(ies) often, take a single-plug surge protector. ■ If you cannot use alternate power sources whenever possible. ■ If traveling internationally, take electrical...the power completely off the power to ... ...then On On In Standby or Hibernate mode Enter Standby mode Press FN+F3. www.gateway.com Extending battery life ■ Use the CD or DVD drive only when necessary. When in memory is lost. mode 91
.... Enter Hibernate mode(must Click Start, then click be activated) Turn Off Computer. This drive uses a large amount of power. ■ Recharge the battery(ies) often, take a single-plug surge protector. ■ If you cannot use alternate power sources whenever possible. ■ If traveling internationally, take electrical...the power completely off the power to ... ...then On On In Standby or Hibernate mode Enter Standby mode Press FN+F3. www.gateway.com Extending battery life ■ Use the CD or DVD drive only when necessary. When in memory is lost. mode 91


