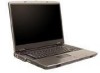

8511418 - Component Replacement Manual
Page 3
...bare metal part of the bags provide electrostatic protection. • Always hold components by their edges. www.gateway.com © 2006 Gateway, Inc. Replacing the DVD Drive Tools You need a small Phillips screwdriver to static electricity, also known as carpeted floors, plastic, and... legal information. Do not lay components on the bottom of Gateway, Inc. Replacing the DVD drive To replace the DVD drive: 1 Follow the guidelines under "Preventing static electricity discharge." 2 Make sure that the DVD drive is marked with notebook components, follow these screws cannot be removed...
...bare metal part of the bags provide electrostatic protection. • Always hold components by their edges. www.gateway.com © 2006 Gateway, Inc. Replacing the DVD Drive Tools You need a small Phillips screwdriver to static electricity, also known as carpeted floors, plastic, and... legal information. Do not lay components on the bottom of Gateway, Inc. Replacing the DVD drive To replace the DVD drive: 1 Follow the guidelines under "Preventing static electricity discharge." 2 Make sure that the DVD drive is marked with notebook components, follow these screws cannot be removed...

8511418 - Component Replacement Manual
Page 4
... drive fits securely in the bay. 12 Secure the DVD drive with the screw removed in the United States and other brands and product names are trademarks or registered trademarks of the notebook for important safety, regulatory, and legal information. 2 www.gateway.com © 2006 Gateway, Inc. DVD bracket Replacing the DVD Drive 11 Slide the new DVD drive into the drive...
... drive fits securely in the bay. 12 Secure the DVD drive with the screw removed in the United States and other brands and product names are trademarks or registered trademarks of the notebook for important safety, regulatory, and legal information. 2 www.gateway.com © 2006 Gateway, Inc. DVD bracket Replacing the DVD Drive 11 Slide the new DVD drive into the drive...

8511418 - Component Replacement Manual
Page 6
...Gateway with the operating system, applications, and drivers installed, you will see the Windows startup screen. -ORIf you see a blank screen, restart your notebook, then press F11 while your computer is starting. 18 Insert the Operating System Recovery CD/DVD when prompted, then follow the on-screen instructions. Replacing the Hard Drive...15 Reconnect all peripheral devices and replace any PC Cards. 16 Turn on your notebook. 17 If the hard drive was sent to the hard drive cover. All other countries. Technical Support See the label on the bottom of Gateway, Inc. All rights reserved....
...Gateway with the operating system, applications, and drivers installed, you will see the Windows startup screen. -ORIf you see a blank screen, restart your notebook, then press F11 while your computer is starting. 18 Insert the Operating System Recovery CD/DVD when prompted, then follow the on-screen instructions. Replacing the Hard Drive...15 Reconnect all peripheral devices and replace any PC Cards. 16 Turn on your notebook. 17 If the hard drive was sent to the hard drive cover. All other countries. Technical Support See the label on the bottom of Gateway, Inc. All rights reserved....
8511369 - Gateway Notebook Hardware Reference
Page 4
Contents www.gateway.com Chapter 3: Maintaining and Upgrading Your Notebook 31 Preventing static electricity discharge 32 Adding or replacing memory 32 Replacing the DVD drive 35 Replacing the hard drive kit 38 Replacing the keyboard 40 Removing the keyboard 40 Installing the keyboard 45 Appendix A: Safety, Regulatory, and Legal Information 47 Index 59 ii
Contents www.gateway.com Chapter 3: Maintaining and Upgrading Your Notebook 31 Preventing static electricity discharge 32 Adding or replacing memory 32 Replacing the DVD drive 35 Replacing the hard drive kit 38 Replacing the keyboard 40 Removing the keyboard 40 Installing the keyboard 45 Appendix A: Safety, Regulatory, and Legal Information 47 Index 59 ii
8511369 - Gateway Notebook Hardware Reference
Page 35
CHAPTER 3 Maintaining and Upgrading Your Notebook • Preventing static electricity discharge • Adding or replacing memory • Replacing the DVD drive • Replacing the hard drive kit • Replacing the keyboard 31
CHAPTER 3 Maintaining and Upgrading Your Notebook • Preventing static electricity discharge • Adding or replacing memory • Replacing the DVD drive • Replacing the hard drive kit • Replacing the keyboard 31
8511369 - Gateway Notebook Hardware Reference
Page 39
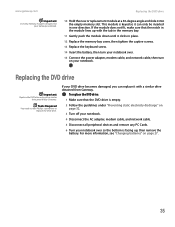
... all peripheral devices and remove any PC Cards. 6 Turn your notebook. Replacing the DVD drive Important Replace the DVD drive only with a similar drive obtained from Gateway. Tools Required You need a small Phillips screwdriver to replace the DVD drive. If the module does not fit, make sure that the DVD drive is empty. 2 Follow the guidelines under "Preventing static electricity discharge" on page...
... all peripheral devices and remove any PC Cards. 6 Turn your notebook. Replacing the DVD drive Important Replace the DVD drive only with a similar drive obtained from Gateway. Tools Required You need a small Phillips screwdriver to replace the DVD drive. If the module does not fit, make sure that the DVD drive is empty. 2 Follow the guidelines under "Preventing static electricity discharge" on page...
8511369 - Gateway Notebook Hardware Reference
Page 41
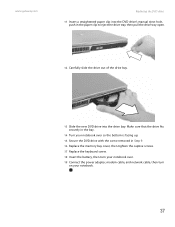
www.gateway.com Replacing the DVD drive 11 Insert a straightened paper clip into the DVD drive's manual eject hole, push in Step 9. 16 Replace the memory bay cover, then tighten the captive screws. 17 Replace the keyboard screw. 18 Insert the battery, then turn your notebook. 37 Make sure that the drive fits securely ... on your notebook over so the bottom is facing up. 15 Secure the DVD drive with the screw removed in the paper clip to eject the drive tray, then pull the drive tray open. 12 Carefully slide the drive out of the drive bay. 13 Slide the new DVD drive into the drive bay.
www.gateway.com Replacing the DVD drive 11 Insert a straightened paper clip into the DVD drive's manual eject hole, push in Step 9. 16 Replace the memory bay cover, then tighten the captive screws. 17 Replace the keyboard screw. 18 Insert the battery, then turn your notebook. 37 Make sure that the drive fits securely ... on your notebook over so the bottom is facing up. 15 Secure the DVD drive with the screw removed in the paper clip to eject the drive tray, then pull the drive tray open. 12 Carefully slide the drive out of the drive bay. 13 Slide the new DVD drive into the drive bay.
8511369 - Gateway Notebook Hardware Reference
Page 63
...25 removing PC Card 26 slots 25, 26 types of memory cards supported 25 carrying case 29 CD inserting 25 CD drive See DVD drive cellular phone memory cards 25 Certificate of Authenticity 3 clicking 22 closing unresponsive program 16 connecting AC adapter 12 dial-up ...drives DVD 24, 35 DVD/CD-RW 7, 24 DVD±RW 7, 24 hard drive 10, 38 identifying drive types 24 multi-format DVD±RW 7, 24 replacing hard drive 38 types 24 DSL modem 14 DVD drive 24 inserting 25 DVD drive identifying 24 installing 35 locating 7 replacing 35 using 24 DVD/CD-RW drive See DVD drive DVD±RW drive See DVD drive ...
...25 removing PC Card 26 slots 25, 26 types of memory cards supported 25 carrying case 29 CD inserting 25 CD drive See DVD drive cellular phone memory cards 25 Certificate of Authenticity 3 clicking 22 closing unresponsive program 16 connecting AC adapter 12 dial-up ...drives DVD 24, 35 DVD/CD-RW 7, 24 DVD±RW 7, 24 hard drive 10, 38 identifying drive types 24 multi-format DVD±RW 7, 24 replacing hard drive 38 types 24 DSL modem 14 DVD drive 24 inserting 25 DVD drive identifying 24 installing 35 locating 7 replacing 35 using 24 DVD/CD-RW drive See DVD drive DVD±RW drive See DVD drive ...

8511369 - Gateway Notebook Hardware Reference
Page 64
... 19 folders opening 22 function keys 18 G Gateway model number 2, 10 serial number 2, 3 Support 3 H hard drive bay 10 indicator 17 installing 38 replacing 38 headphone jack 6 hot-swapping 26 I i.Link port 8 IEEE 1394 port 8 indicators See status indicators inkjet printer 30 installing battery 27 DVD drive 35 hard drive 38 keyboard 40 memory 32 PC Card...
... 19 folders opening 22 function keys 18 G Gateway model number 2, 10 serial number 2, 3 Support 3 H hard drive bay 10 indicator 17 installing 38 replacing 38 headphone jack 6 hot-swapping 26 I i.Link port 8 IEEE 1394 port 8 indicators See status indicators inkjet printer 30 installing battery 27 DVD drive 35 hard drive 38 keyboard 40 memory 32 PC Card...
8511264 - User Guide Gateway Notebook
Page 156
...or mouse) does not work, make sure that you replace the cover, reinstall any maintenance tasks where you remove the memory bay or hard drive bay cover, make sure that all connections are damaged...click the arrow. Troubleshooting Audio Battery CD drives 148 Audio troubleshooting is covered under "Power" on page 164. CD drive troubleshooting is covered under "DVD drives" on page 151. If you have .... CHAPTER 14: Troubleshooting www.gateway.com Safety guidelines Warning Do not try these safety guidelines: ■ Never remove the memory bay or hard drive bay cover while your notebook is...
...or mouse) does not work, make sure that you replace the cover, reinstall any maintenance tasks where you remove the memory bay or hard drive bay cover, make sure that all connections are damaged...click the arrow. Troubleshooting Audio Battery CD drives 148 Audio troubleshooting is covered under "Power" on page 164. CD drive troubleshooting is covered under "DVD drives" on page 151. If you have .... CHAPTER 14: Troubleshooting www.gateway.com Safety guidelines Warning Do not try these safety guidelines: ■ Never remove the memory bay or hard drive bay cover while your notebook is...


