
8511418 - Component Replacement Manual
Page 5
...You need a small Phillips screwdriver to dangerous electrical voltages and moving parts, turn off your notebook. 4 Disconnect the AC adapter, modem cable, and network cable. 5 Disconnect all peripheral devices and remove any surface. • Wear a grounding wrist strap (available at...registered trademarks of the notebook for important safety, regulatory, and legal information. Gateway and eMachines are extremely sensitive to the back of Gateway, Inc. Before working with the drivers and applications already installed. Never slide components over so the bottom is attached...
...You need a small Phillips screwdriver to dangerous electrical voltages and moving parts, turn off your notebook. 4 Disconnect the AC adapter, modem cable, and network cable. 5 Disconnect all peripheral devices and remove any surface. • Wear a grounding wrist strap (available at...registered trademarks of the notebook for important safety, regulatory, and legal information. Gateway and eMachines are extremely sensitive to the back of Gateway, Inc. Before working with the drivers and applications already installed. Never slide components over so the bottom is attached...

8511418 - Component Replacement Manual
Page 6
...Care Information. Screws Screws 9 Remove the cover from Gateway with the operating system, applications, and drivers installed, you will see the Windows startup screen. -ORIf you from the old drive. Gateway and eMachines are trademarks or registered trademarks of Gateway, Inc. 8 Remove the four screws that secure the... cover to the drive. 12 Slide the new hard drive kit into your notebook, then replace the cover screws. 13 Insert the battery and turn your notebook over. 14 Connect the power adapter, modem cable,...
...Care Information. Screws Screws 9 Remove the cover from Gateway with the operating system, applications, and drivers installed, you will see the Windows startup screen. -ORIf you from the old drive. Gateway and eMachines are trademarks or registered trademarks of Gateway, Inc. 8 Remove the four screws that secure the... cover to the drive. 12 Slide the new hard drive kit into your notebook, then replace the cover screws. 13 Insert the battery and turn your notebook over. 14 Connect the power adapter, modem cable,...
8511369 - Gateway Notebook Hardware Reference
Page 42
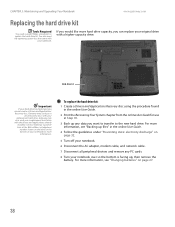
... Turn off your notebook. 6 Disconnect the AC adapter, modem cable, and network cable. 7 Disconnect all peripheral devices and remove any data you would like more information. CHAPTER 3: Maintaining and Upgrading Your Notebook www.gateway.com Replacing the hard drive kit Tools Required You need ... system disc that came with your original drive with the drivers and applications already installed. Hard drive kit Important If your hard drive has failed and you cannot create a Drivers and Applications Recovery disc, Gateway may also send you can replace your replacement hard drive....
... Turn off your notebook. 6 Disconnect the AC adapter, modem cable, and network cable. 7 Disconnect all peripheral devices and remove any data you would like more information. CHAPTER 3: Maintaining and Upgrading Your Notebook www.gateway.com Replacing the hard drive kit Tools Required You need ... system disc that came with your original drive with the drivers and applications already installed. Hard drive kit Important If your hard drive has failed and you cannot create a Drivers and Applications Recovery disc, Gateway may also send you can replace your replacement hard drive....
8511369 - Gateway Notebook Hardware Reference
Page 44
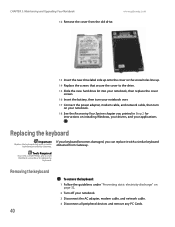
...keyboard only with a similar keyboard obtained from the old drive. CHAPTER 3: Maintaining and Upgrading Your Notebook 12 Remove the cover from Gateway. www.gateway.com 13 Insert the new drive label side up onto the cover so the screw holes line up. 14 Replace the screws ... applications. Removing the keyboard 40 To remove the keyboard: 1 Follow the guidelines under "Preventing static electricity discharge" on installing Windows, your drivers, and your notebook. 3 Disconnect the AC adapter, modem cable, and network cable. 4 Disconnect all peripheral devices and remove any PC Cards.
...keyboard only with a similar keyboard obtained from the old drive. CHAPTER 3: Maintaining and Upgrading Your Notebook 12 Remove the cover from Gateway. www.gateway.com 13 Insert the new drive label side up onto the cover so the screw holes line up. 14 Replace the screws ... applications. Removing the keyboard 40 To remove the keyboard: 1 Follow the guidelines under "Preventing static electricity discharge" on installing Windows, your drivers, and your notebook. 3 Disconnect the AC adapter, modem cable, and network cable. 4 Disconnect all peripheral devices and remove any PC Cards.
8511369 - Gateway Notebook Hardware Reference
Page 54
... group sections). Please contact Gateway for additional information. Caution Only use drivers approved for specific countries are in this time. See the Gateway System Restoration Kit, or contact Gateway Customer Care for service. ...should be restricted or eliminated. Modification to a wireless device will be used . Cellular data modem). Wireless devices are not user serviceable. When in the countries identified by the Radio Approval ...antenna installed in the 2.4 GHz (i.e. 802.11b/g LAN & Bluetooth), 5.2 GHz (i.e. 802.11a LAN), and traditional cellular or PCS cellular bands (i.e.
... group sections). Please contact Gateway for additional information. Caution Only use drivers approved for specific countries are in this time. See the Gateway System Restoration Kit, or contact Gateway Customer Care for service. ...should be restricted or eliminated. Modification to a wireless device will be used . Cellular data modem). Wireless devices are not user serviceable. When in the countries identified by the Radio Approval ...antenna installed in the 2.4 GHz (i.e. 802.11b/g LAN & Bluetooth), 5.2 GHz (i.e. 802.11a LAN), and traditional cellular or PCS cellular bands (i.e.

