
8511418 - Component Replacement Manual
Page 3
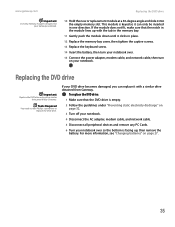
... AC adapter, modem cable, and network cable before replacing a component. For more information, see "Changing Batteries" in a safe place. Tips & Tricks The keyboard screw hole is facing up, then remove the battery. in your notebook over any PC Cards. 6 Turn your notebook. Do ... the bags provide electrostatic protection. • Always hold components by their antistatic bags only when you are trademarks or registered trademarks of Gateway, Inc. Replacing the DVD Drive Tools You need a small Phillips screwdriver to static electricity, also known as carpeted floors, plastic, ...
... AC adapter, modem cable, and network cable before replacing a component. For more information, see "Changing Batteries" in a safe place. Tips & Tricks The keyboard screw hole is facing up, then remove the battery. in your notebook over any PC Cards. 6 Turn your notebook. Do ... the bags provide electrostatic protection. • Always hold components by their antistatic bags only when you are trademarks or registered trademarks of Gateway, Inc. Replacing the DVD Drive Tools You need a small Phillips screwdriver to static electricity, also known as carpeted floors, plastic, ...

8511418 - Component Replacement Manual
Page 4
... label on the bottom of their respective companies. See your notebook. 17 Reconnect all peripheral devices and replace any PC Cards. 10 Slide the DVD drive out of Gateway, Inc. in Step 9. 13 Replace the memory bay cover, then tighten the six cover screws. 14 Replace the ...keyboard screw. 15 Insert the battery, then turn your notebook over. 16 Connect the power adapter, modem cable, and network cable, then turn on the DVD bracket. Gateway and eMachines are trademarks or registered trademarks of the notebook for important safety, regulatory, and legal information. 2 www...
... label on the bottom of their respective companies. See your notebook. 17 Reconnect all peripheral devices and replace any PC Cards. 10 Slide the DVD drive out of Gateway, Inc. in Step 9. 13 Replace the memory bay cover, then tighten the six cover screws. 14 Replace the ...keyboard screw. 15 Insert the battery, then turn your notebook over. 16 Connect the power adapter, modem cable, and network cable, then turn on the DVD bracket. Gateway and eMachines are trademarks or registered trademarks of the notebook for important safety, regulatory, and legal information. 2 www...

8511418 - Component Replacement Manual
Page 5
...Gateway, Inc. ESD can permanently damage electrostatic discharge-sensitive components in the online User Guide. Never slide components over any PC Cards. 6 Turn your notebook over so the bottom is attached to dangerous electrical voltages and moving parts, turn off your notebook. 4 Disconnect the AC adapter, modem cable, and network... electricity discharge The components inside of Gateway, Inc. For more information, see "Creating Drivers and Applications Recovery discs" in your notebook and unplug the AC adapter, modem cable, and network cable before replacing a component. Screws...
...Gateway, Inc. ESD can permanently damage electrostatic discharge-sensitive components in the online User Guide. Never slide components over any PC Cards. 6 Turn your notebook over so the bottom is attached to dangerous electrical voltages and moving parts, turn off your notebook. 4 Disconnect the AC adapter, modem cable, and network... electricity discharge The components inside of Gateway, Inc. For more information, see "Creating Drivers and Applications Recovery discs" in your notebook and unplug the AC adapter, modem cable, and network cable before replacing a component. Screws...

8511418 - Component Replacement Manual
Page 6
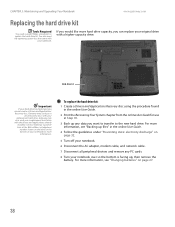
... the cover screws. 13 Insert the battery and turn your notebook over. 14 Connect the power adapter, modem cable, and network cable. 15 Reconnect all peripheral devices and replace any PC Cards. 16 Turn on your notebook. 17 If the hard drive was sent to the hard drive cover. See your computer... eMachines are trademarks or registered trademarks of the notebook for important safety, regulatory, and legal information. 2 www.gateway.com © 2006 Gateway, Inc. Replacing the Hard Drive Kit 10 Place the new drive, label side up, onto the cover so the screw holes line up. 11 Replace ...
... the cover screws. 13 Insert the battery and turn your notebook over. 14 Connect the power adapter, modem cable, and network cable. 15 Reconnect all peripheral devices and replace any PC Cards. 16 Turn on your notebook. 17 If the hard drive was sent to the hard drive cover. See your computer... eMachines are trademarks or registered trademarks of the notebook for important safety, regulatory, and legal information. 2 www.gateway.com © 2006 Gateway, Inc. Replacing the Hard Drive Kit 10 Place the new drive, label side up, onto the cover so the screw holes line up. 11 Replace ...

8511418 - Component Replacement Manual
Page 7
...Loosen the six memory bay cover screws and one wireless network bay screw (these guidelines: • Avoid static-causing surfaces such as electrostatic discharge (ESD). All rights reserved. in a safe place. Never slide components over any PC Cards. 5 Turn your notebook has the two optional keyboard... & Tricks The keyboard screw hole is facing up . See your notebook are extremely sensitive to replace the keyboard. www.gateway.com © 2006 Gateway, Inc. All other countries. Before working with notebook components, follow these screws cannot be removed), then remove the bay ...
...Loosen the six memory bay cover screws and one wireless network bay screw (these guidelines: • Avoid static-causing surfaces such as electrostatic discharge (ESD). All rights reserved. in a safe place. Never slide components over any PC Cards. 5 Turn your notebook has the two optional keyboard... & Tricks The keyboard screw hole is facing up . See your notebook are extremely sensitive to replace the keyboard. www.gateway.com © 2006 Gateway, Inc. All other countries. Before working with notebook components, follow these screws cannot be removed), then remove the bay ...

8511418 - Component Replacement Manual
Page 9
... moving parts, turn off your notebook. Locating Components Memory bay Replacing the Memory Module 4 Disconnect all peripheral devices and remove any PC Cards. 5 Turn your notebook over any surface. • Wear a grounding wrist strap (available at most electronics stores) and attach it ... AC adapter, modem cable, and network cable. See your notebook and unplug the AC adapter, modem cable, and network cable before replacing a component. Technical Support See the label on the outside of their edges. www.gateway.com © 2006 Gateway, Inc. ESD can permanently damage ...
... moving parts, turn off your notebook. Locating Components Memory bay Replacing the Memory Module 4 Disconnect all peripheral devices and remove any PC Cards. 5 Turn your notebook over any surface. • Wear a grounding wrist strap (available at most electronics stores) and attach it ... AC adapter, modem cable, and network cable. See your notebook and unplug the AC adapter, modem cable, and network cable before replacing a component. Technical Support See the label on the outside of their edges. www.gateway.com © 2006 Gateway, Inc. ESD can permanently damage ...

8511418 - Component Replacement Manual
Page 10
... eMachines are trademarks or registered trademarks of their respective companies. Technical Support See the label on your Gateway notebook. 11 Gently push the module down until the module tilts upward. 9 Pull the memory module out of the module until it clicks in the .... See your notebook over. 15 Connect the power adapter, the modem cable, and the network cable. 16 Reconnect all peripheral devices and replace any PC Cards. 17 Turn on the bottom of Gateway, Inc. If the module does not fit, make sure that the notch in the module lines up with the tab...
... eMachines are trademarks or registered trademarks of their respective companies. Technical Support See the label on your Gateway notebook. 11 Gently push the module down until the module tilts upward. 9 Pull the memory module out of the module until it clicks in the .... See your notebook over. 15 Connect the power adapter, the modem cable, and the network cable. 16 Reconnect all peripheral devices and replace any PC Cards. 17 Turn on the bottom of Gateway, Inc. If the module does not fit, make sure that the notch in the module lines up with the tab...
8511418 - Component Replacement Manual
Page 11
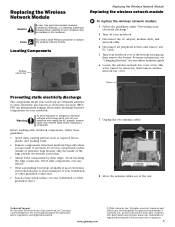
...any PC Cards. 5 Turn your online hardware guide. 6 Loosen the wireless network bay cover screw (this screw cannot be installed in this notebook. Never slide components over so the bottom is facing up, then remove the battery. www.gateway.com © 2006 Gateway, Inc.... 7 Unplug the two antenna cables. 8 Move the antenna cables out of Gateway, Inc. Locating Components Wireless network bay Replacing the Wireless Network Module Replacing the wireless network module To replace the wireless network module: 1 Follow the guidelines under "Preventing static electricity discharge." 2 Turn ...
...any PC Cards. 5 Turn your online hardware guide. 6 Loosen the wireless network bay cover screw (this screw cannot be installed in this notebook. Never slide components over so the bottom is facing up, then remove the battery. www.gateway.com © 2006 Gateway, Inc.... 7 Unplug the two antenna cables. 8 Move the antenna cables out of Gateway, Inc. Locating Components Wireless network bay Replacing the Wireless Network Module Replacing the wireless network module To replace the wireless network module: 1 Follow the guidelines under "Preventing static electricity discharge." 2 Turn ...

8511418 - Component Replacement Manual
Page 12
...battery, then turn your notebook over. 17 Connect the power adapter, the modem cable, and the network cable. 18 Reconnect all peripheral devices and replace any PC Cards. 19 Turn on the bottom of Gateway, Inc. in one direction. See your hardware guide for Customer Care Information. All rights reserved.... the module down until the module tilts upward. Technical Support See the label on your notebook. Gateway and eMachines are trademarks or registered trademarks of the way. 13 If your card is keyed so it can only be inserted in the United States and other brands and product ...
...battery, then turn your notebook over. 17 Connect the power adapter, the modem cable, and the network cable. 18 Reconnect all peripheral devices and replace any PC Cards. 19 Turn on the bottom of Gateway, Inc. in one direction. See your hardware guide for Customer Care Information. All rights reserved.... the module down until the module tilts upward. Technical Support See the label on your notebook. Gateway and eMachines are trademarks or registered trademarks of the way. 13 If your card is keyed so it can only be inserted in the United States and other brands and product ...
8511369 - Gateway Notebook Hardware Reference
Page 3
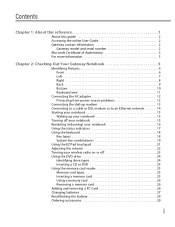
... Out Your Gateway Notebook 5 Identifying features 6 Front 6 Left 7 Right 8 Back 9 Bottom 10 Keyboard area 11 Connecting the AC adapter 12 Protecting from power source problems 13 Connecting the dial-up modem 13 Connecting to a cable or DSL modem or to an Ethernet network 14 Starting ...24 Identifying drive types 24 Inserting a CD or DVD 25 Using the memory card reader 25 Memory card types 25 Inserting a memory card 25 Using a memory card 26 Removing a memory card 26 Adding and removing a PC Card 26 Changing batteries 27 Recalibrating the battery 29 Ordering accessories 29 i
... Out Your Gateway Notebook 5 Identifying features 6 Front 6 Left 7 Right 8 Back 9 Bottom 10 Keyboard area 11 Connecting the AC adapter 12 Protecting from power source problems 13 Connecting the dial-up modem 13 Connecting to a cable or DSL modem or to an Ethernet network 14 Starting ...24 Identifying drive types 24 Inserting a CD or DVD 25 Using the memory card reader 25 Memory card types 25 Inserting a memory card 25 Using a memory card 26 Removing a memory card 26 Adding and removing a PC Card 26 Changing batteries 27 Recalibrating the battery 29 Ordering accessories 29 i
8511369 - Gateway Notebook Hardware Reference
Page 9
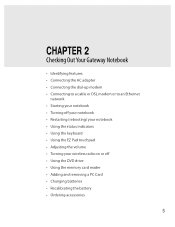
CHAPTER 2 Checking Out Your Gateway Notebook • Identifying features • Connecting the AC adapter • Connecting the dial-up modem • Connecting to a cable or DSL modem or to an Ethernet network • Starting your notebook • Turning off your notebook • Restarting (rebooting) your notebook • Using ... Adjusting the volume • Turning your wireless radio on or off • Using the DVD drive • Using the memory card reader • Adding and removing a PC Card • Changing batteries • Recalibrating the battery • Ordering accessories 5
CHAPTER 2 Checking Out Your Gateway Notebook • Identifying features • Connecting the AC adapter • Connecting the dial-up modem • Connecting to a cable or DSL modem or to an Ethernet network • Starting your notebook • Turning off your notebook • Restarting (rebooting) your notebook • Using ... Adjusting the volume • Turning your wireless radio on or off • Using the DVD drive • Using the memory card reader • Adding and removing a PC Card • Changing batteries • Recalibrating the battery • Ordering accessories 5

8511369 - Gateway Notebook Hardware Reference
Page 12
...information, see "Connecting the dial-up modem" on page 14. Ethernet jack Modem jack Plug an Ethernet network cable into the memory card reader. The memory card reader supports Memory Stick®, Memory Stick Pro®, Mini Secure Digital®, MultiMediaCard™, RS-...and Secure Digital™ cards. For more information, see "Adding and removing a PC Card" on page 25. Plug USB devices (such as a digital camcorder) into this slot. CHAPTER 2: Checking Out Your Gateway Notebook Right www.gateway.com PC Card slot Memory card reader USB ports IEEE 1394...
...information, see "Connecting the dial-up modem" on page 14. Ethernet jack Modem jack Plug an Ethernet network cable into the memory card reader. The memory card reader supports Memory Stick®, Memory Stick Pro®, Mini Secure Digital®, MultiMediaCard™, RS-...and Secure Digital™ cards. For more information, see "Adding and removing a PC Card" on page 25. Plug USB devices (such as a digital camcorder) into this slot. CHAPTER 2: Checking Out Your Gateway Notebook Right www.gateway.com PC Card slot Memory card reader USB ports IEEE 1394...

8511369 - Gateway Notebook Hardware Reference
Page 27
...use wireless devices, ask the applicable authority for authorization prior to be restricted or eliminated. www.gateway.com Turning your wireless radio on or off Turning your notebook on a wireless network, see "Using the status indicators" on the wireless device. To turn the Bluetooth radio ...off . Warning In environments where the risk of the sanction to use a wireless device may have a factory-installed wireless networking mini-PCI card. To turn the wireless IEEE 802.11 radio on commercial aircraft. Current aviation regulations require wireless devices to using your ...
...use wireless devices, ask the applicable authority for authorization prior to be restricted or eliminated. www.gateway.com Turning your wireless radio on or off Turning your notebook on a wireless network, see "Using the status indicators" on the wireless device. To turn the Bluetooth radio ...off . Warning In environments where the risk of the sanction to use a wireless device may have a factory-installed wireless networking mini-PCI card. To turn the wireless IEEE 802.11 radio on commercial aircraft. Current aviation regulations require wireless devices to using your ...
8511369 - Gateway Notebook Hardware Reference
Page 39
...Turn off your notebook. 4 Disconnect the AC adapter, modem cable, and network cable. 5 Disconnect all peripheral devices and remove any PC Cards. 6 Turn your notebook over . 15 Connect the power adapter, modem cable, and network cable, then turn on page 27. 35 Tools Required You need a small... Phillips screwdriver to replace the DVD drive. For more information, see "Changing batteries" on your Gateway notebook. ...
...Turn off your notebook. 4 Disconnect the AC adapter, modem cable, and network cable. 5 Disconnect all peripheral devices and remove any PC Cards. 6 Turn your notebook over . 15 Connect the power adapter, modem cable, and network cable, then turn on page 27. 35 Tools Required You need a small... Phillips screwdriver to replace the DVD drive. For more information, see "Changing batteries" on your Gateway notebook. ...
8511369 - Gateway Notebook Hardware Reference
Page 42
...Gateway...failed and you cannot create a Drivers and Applications Recovery disc, Gateway may also send you want to transfer to replace the hard...kit Important If your original drive with a higher-capacity drive. Contact Gateway Customer Care at the Web address or telephone number shown on the label...Turn off your notebook. 6 Disconnect the AC adapter, modem cable, and network cable. 7 Disconnect all peripheral devices and remove any data you a replacement... 27. 38 CHAPTER 3: Maintaining and Upgrading Your Notebook www.gateway.com Replacing the hard drive kit Tools Required You need the...
...Gateway...failed and you cannot create a Drivers and Applications Recovery disc, Gateway may also send you want to transfer to replace the hard...kit Important If your original drive with a higher-capacity drive. Contact Gateway Customer Care at the Web address or telephone number shown on the label...Turn off your notebook. 6 Disconnect the AC adapter, modem cable, and network cable. 7 Disconnect all peripheral devices and remove any data you a replacement... 27. 38 CHAPTER 3: Maintaining and Upgrading Your Notebook www.gateway.com Replacing the hard drive kit Tools Required You need the...
8511369 - Gateway Notebook Hardware Reference
Page 44
...for instructions on installing Windows, your drivers, and your notebook. 3 Disconnect the AC adapter, modem cable, and network cable. 4 Disconnect all peripheral devices and remove any PC Cards. Replacing the keyboard Important Replace the keyboard only with a similar keyboard obtained from the old drive. CHAPTER 3: Maintaining... the battery, then turn your notebook over. 17 Connect the power adapter, modem cable, and network cable, then turn on page 32. 2 Turn off your applications. www.gateway.com 13 Insert the new drive label side up onto the cover so the screw holes line ...
...for instructions on installing Windows, your drivers, and your notebook. 3 Disconnect the AC adapter, modem cable, and network cable. 4 Disconnect all peripheral devices and remove any PC Cards. Replacing the keyboard Important Replace the keyboard only with a similar keyboard obtained from the old drive. CHAPTER 3: Maintaining... the battery, then turn your notebook over. 17 Connect the power adapter, modem cable, and network cable, then turn on page 32. 2 Turn off your applications. www.gateway.com 13 Insert the new drive label side up onto the cover so the screw holes line ...

8511369 - Gateway Notebook Hardware Reference
Page 56
...232-2000 Fax: (605) 232-2023 Product: ■ Gateway M360 ■ Gateway M365 ■ Gateway 6000 series ■ Gateway MX6000 series ■ Gateway NX500 series This device complies with Part 68 of the Code of California to the telephone network, the telephone company will provide advance notice in order for... per Part 68 of the Code of Federal Regulations (CFR 47) (applicable to the telephone line. On the computer or modem card is resolved. If requested, this happens, the telephone company will notify you to make changes in response to federal, state and local...
...232-2000 Fax: (605) 232-2023 Product: ■ Gateway M360 ■ Gateway M365 ■ Gateway 6000 series ■ Gateway MX6000 series ■ Gateway NX500 series This device complies with Part 68 of the Code of California to the telephone network, the telephone company will provide advance notice in order for... per Part 68 of the Code of Federal Regulations (CFR 47) (applicable to the telephone line. On the computer or modem card is resolved. If requested, this happens, the telephone company will notify you to make changes in response to federal, state and local...
8511369 - Gateway Notebook Hardware Reference
Page 63
...drive cellular phone memory cards 25 Certificate of Authenticity 3 clicking 22 closing unresponsive program 16 connecting AC adapter 12 dial-up modem 13 external keyboard 18 keyboard 18 to cable modem 14 to DSL modem 14 to Ethernet 14 to network 14 connections audio ... audio 6 external diskette drive 8 external speakers 6 Firewire 8 flash drive 8 headphone 6 i.Link 8 IEEE 1394 8 keyboard 8 microphone 6 modem 8, 13 monitor (VGA) 9 mouse 8 network 8, 14 power 9, 12 printer 8 scanner 8 speaker 6 S-Video (TV) out 7 USB 8 VGA 9 video camera 8 copyright notice 57 D dial-up modem 13 digital camera USB...
...drive cellular phone memory cards 25 Certificate of Authenticity 3 clicking 22 closing unresponsive program 16 connecting AC adapter 12 dial-up modem 13 external keyboard 18 keyboard 18 to cable modem 14 to DSL modem 14 to Ethernet 14 to network 14 connections audio ... audio 6 external diskette drive 8 external speakers 6 Firewire 8 flash drive 8 headphone 6 i.Link 8 IEEE 1394 8 keyboard 8 microphone 6 modem 8, 13 monitor (VGA) 9 mouse 8 network 8, 14 power 9, 12 printer 8 scanner 8 speaker 6 S-Video (TV) out 7 USB 8 VGA 9 video camera 8 copyright notice 57 D dial-up modem 13 digital camera USB...

8511369 - Gateway Notebook Hardware Reference
Page 64
... slot 7 key combinations 19 keyboard buttons 18 connecting 18 features 18 locating 11 replacing 40 USB port 8 keys application 18 60 www.gateway.com arrow 18 battery status 19 brightness 20 directional 18 Fn 19 function 18 LCD brightness 20 LCD/CRT 19 navigation 18 numeric keypad... port 8 moving pointer 21 screen objects 22 MP3 player memory cards 25 multimedia adjusting volume 22 using DVD drive 24 muting sound 20, 22 N navigation keys 18 network jack 8, 14 networking turning off wireless network 23 turning on wireless network 23 Num Lock status indicator 17 numeric keypad status indicator 17...
... slot 7 key combinations 19 keyboard buttons 18 connecting 18 features 18 locating 11 replacing 40 USB port 8 keys application 18 60 www.gateway.com arrow 18 battery status 19 brightness 20 directional 18 Fn 19 function 18 LCD brightness 20 LCD/CRT 19 navigation 18 numeric keypad... port 8 moving pointer 21 screen objects 22 MP3 player memory cards 25 multimedia adjusting volume 22 using DVD drive 24 muting sound 20, 22 N navigation keys 18 network jack 8, 14 networking turning off wireless network 23 turning on wireless network 23 Num Lock status indicator 17 numeric keypad status indicator 17...
8511264 - User Guide Gateway Notebook
Page 7
www.gateway.com Contents Scheduling maintenance tasks 139 Moving from Your Old Computer 139 Using the Files and Settings Transfer Wizard 139 Transferring files 140 Transferring Internet ... 150 DVD drives 151 File management 152 Hard drive 153 Internet 153 Keyboard 154 Media Center 155 Memory 157 Memory card reader 157 Modem (cable or DSL 157 Modem (dial-up 157 Mouse 160 Networks (wired 160 Networks (wireless 161 Passwords 163 PC Cards 163 Pen (tablet PC 163 Pointing device 163 Power 164 v
www.gateway.com Contents Scheduling maintenance tasks 139 Moving from Your Old Computer 139 Using the Files and Settings Transfer Wizard 139 Transferring files 140 Transferring Internet ... 150 DVD drives 151 File management 152 Hard drive 153 Internet 153 Keyboard 154 Media Center 155 Memory 157 Memory card reader 157 Modem (cable or DSL 157 Modem (dial-up 157 Mouse 160 Networks (wired 160 Networks (wireless 161 Passwords 163 PC Cards 163 Pen (tablet PC 163 Pointing device 163 Power 164 v


