

8511725 - Gateway Service Guide
Page 10
... lock to dangerous electrical voltages and moving parts, turn off the notebook and unplug the power cord, modem cable, and network cable. 4 Remove the battery. For more information, see "Removing the battery" on page 6. To prepare the notebook for maintenance: 1 Make sure that the DVD drive does not... contain a disc. 2 Disconnect all peripheral devices and remove any PC Cards and memory cards. 3 Turn off the notebook, remove the battery, and unplug the power cord, modem cable, and network cable before you restore power or reconnect the ...
... lock to dangerous electrical voltages and moving parts, turn off the notebook and unplug the power cord, modem cable, and network cable. 4 Remove the battery. For more information, see "Removing the battery" on page 6. To prepare the notebook for maintenance: 1 Make sure that the DVD drive does not... contain a disc. 2 Disconnect all peripheral devices and remove any PC Cards and memory cards. 3 Turn off the notebook, remove the battery, and unplug the power cord, modem cable, and network cable before you restore power or reconnect the ...
8512055 - Component Replacement Manual
Page 3
...unplug the AC adapter, modem cable, and network cable before replacing a component. See your notebook. All other grounded connection. • Touch a bare metal surface on the bottom of Gateway, Inc. Replacing the DVD Drive Tools You need a small Phillips screwdriver to a bare ...battery. www.gateway.com © 2007 Gateway, Inc. in a safe place. All rights reserved. Do not lay components on the outside of antistatic bags because only the inside your notebook over any PC Cards. 6 Turn your notebook are trademarks or registered trademarks of the notebook for important...
...unplug the AC adapter, modem cable, and network cable before replacing a component. See your notebook. All other grounded connection. • Touch a bare metal surface on the bottom of Gateway, Inc. Replacing the DVD Drive Tools You need a small Phillips screwdriver to a bare ...battery. www.gateway.com © 2007 Gateway, Inc. in a safe place. All rights reserved. Do not lay components on the outside of antistatic bags because only the inside your notebook over any PC Cards. 6 Turn your notebook are trademarks or registered trademarks of the notebook for important...
8512055 - Component Replacement Manual
Page 4
...of the drive bay by pushing on the bottom of the notebook for important safety, regulatory, and legal information. 2 www.gateway.com © 2007 Gateway, Inc. Make sure that the drive fits securely in ... removed in the United States and other brands and product names are trademarks or registered trademarks of Gateway, Inc. All rights reserved. in Step 9. 13 Replace the memory bay cover, then tighten ...cover screws. 14 Replace the keyboard screw. 15 Insert the battery, then turn your notebook over. 16 Connect the power adapter, modem cable, and network cable, then turn on your Reference ...
...of the drive bay by pushing on the bottom of the notebook for important safety, regulatory, and legal information. 2 www.gateway.com © 2007 Gateway, Inc. Make sure that the drive fits securely in ... removed in the United States and other brands and product names are trademarks or registered trademarks of Gateway, Inc. All rights reserved. in Step 9. 13 Replace the memory bay cover, then tighten ...cover screws. 14 Replace the keyboard screw. 15 Insert the battery, then turn your notebook over. 16 Connect the power adapter, modem cable, and network cable, then turn on your Reference ...
8512055 - Component Replacement Manual
Page 5
... Care Information. Important If you cannot create a Drivers and Applications Recovery disc, Gateway may need a small Phillips screwdriver to dangerous electrical voltages and moving parts, turn off your notebook. 4 Disconnect the AC adapter, modem cable, and network cable. 5 Disconnect all... peripheral devices and remove any PC Cards. 6 Turn your notebook. Before working with the drivers and applications already installed. To replace the hard drive kit: 1 If possible, create a Drivers and Applications Recovery disc. www.gateway.com © 2007 Gateway, Inc. All other brands...
... Care Information. Important If you cannot create a Drivers and Applications Recovery disc, Gateway may need a small Phillips screwdriver to dangerous electrical voltages and moving parts, turn off your notebook. 4 Disconnect the AC adapter, modem cable, and network cable. 5 Disconnect all... peripheral devices and remove any PC Cards. 6 Turn your notebook. Before working with the drivers and applications already installed. To replace the hard drive kit: 1 If possible, create a Drivers and Applications Recovery disc. www.gateway.com © 2007 Gateway, Inc. All other brands...

8512055 - Component Replacement Manual
Page 6
...boot from the old drive. Gateway and eMachines are trademarks or registered trademarks of Gateway, Inc. All other countries. All rights reserved. A list of the notebook for important safety, regulatory, and legal information. 2 www.gateway.com © 2007 Gateway, Inc. See your notebook's pre-installed software and device... to the drive. 12 Slide the new hard drive kit into your notebook's DVD drive, then restart your keyboard. Screws Screws 9 Remove the cover from CD or DVD" appears, press any PC Cards. Replacing the Hard Drive Kit 10 Place the new drive, label...
...boot from the old drive. Gateway and eMachines are trademarks or registered trademarks of Gateway, Inc. All other countries. All rights reserved. A list of the notebook for important safety, regulatory, and legal information. 2 www.gateway.com © 2007 Gateway, Inc. See your notebook's pre-installed software and device... to the drive. 12 Slide the new hard drive kit into your notebook's DVD drive, then restart your keyboard. Screws Screws 9 Remove the cover from CD or DVD" appears, press any PC Cards. Replacing the Hard Drive Kit 10 Place the new drive, label...
8512055 - Component Replacement Manual
Page 7
Before working with a K. Never slide components over any PC Cards. 5 Turn your workbench or other grounded connection. • Touch a bare metal surface on your notebook over so the top is facing up . 10 With a small Phillips screwdriver, remove the two hinge cover screws and put...label on the outside of antistatic bags because only the inside your notebook are ready to a bare metal part of each hinge cover and gently pry them . Gateway and eMachines are trademarks or registered trademarks of Gateway, Inc. All other countries. ESD can permanently damage electrostatic discharge-...
Before working with a K. Never slide components over any PC Cards. 5 Turn your workbench or other grounded connection. • Touch a bare metal surface on your notebook over so the top is facing up . 10 With a small Phillips screwdriver, remove the two hinge cover screws and put...label on the outside of antistatic bags because only the inside your notebook are ready to a bare metal part of each hinge cover and gently pry them . Gateway and eMachines are trademarks or registered trademarks of Gateway, Inc. All other countries. ESD can permanently damage electrostatic discharge-...
8512055 - Component Replacement Manual
Page 9
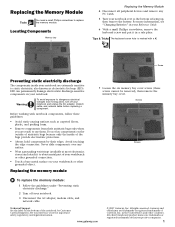
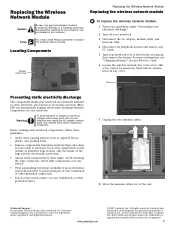
... such as electrostatic discharge (ESD). See your notebook. Gateway and eMachines are trademarks or registered trademarks of their respective companies. 1 www.gateway.com © 2007 Gateway, Inc. ESD can permanently damage electrostatic discharge-sensitive components in your notebook. 3 Disconnect the AC adapter, modem cable,.... Locating Components Memory bay Replacing the Memory Module 4 Disconnect all peripheral devices and remove any PC Cards. 5 Turn your notebook are ready to replace the memory module. Replacing the Memory Module Tools You need a small Phillips screwdriver to...
... such as electrostatic discharge (ESD). See your notebook. Gateway and eMachines are trademarks or registered trademarks of their respective companies. 1 www.gateway.com © 2007 Gateway, Inc. ESD can permanently damage electrostatic discharge-sensitive components in your notebook. 3 Disconnect the AC adapter, modem cable,.... Locating Components Memory bay Replacing the Memory Module 4 Disconnect all peripheral devices and remove any PC Cards. 5 Turn your notebook are ready to replace the memory module. Replacing the Memory Module Tools You need a small Phillips screwdriver to...
8512055 - Component Replacement Manual
Page 10
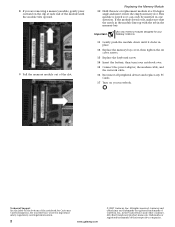
...peripheral devices and replace any PC Cards. 17 Turn on the bottom of the slot. If the module does not fit, make sure that the notch in the module lines up with the tab in one direction. Technical Support See the label on your Gateway notebook. 11 Gently push the module... down until the module tilts upward. 9 Pull the memory module out of the notebook for Customer Care Information. All other countries. Important Use only memory modules designed for important...
...peripheral devices and replace any PC Cards. 17 Turn on the bottom of the slot. If the module does not fit, make sure that the notch in the module lines up with the tab in one direction. Technical Support See the label on your Gateway notebook. 11 Gently push the module... down until the module tilts upward. 9 Pull the memory module out of the notebook for Customer Care Information. All other countries. Important Use only memory modules designed for important...
8512055 - Component Replacement Manual
Page 11
... bay cover. Do not lay components on the outside of Gateway, Inc. Technical Support See the label on your notebook. Avoid touching the edge connectors. Never slide components over any PC Cards. 5 Turn your notebook are ready to use them. All rights reserved. in the... exposure to replace the wireless network module. See your Reference Guide. 6 Loosen the wireless network bay cover screw (this notebook. www.gateway.com © 2007 Gateway, Inc. Replacing the Wireless Network Module Caution By law, only approved wireless modules provided by their edges. For more information...
... bay cover. Do not lay components on the outside of Gateway, Inc. Technical Support See the label on your notebook. Avoid touching the edge connectors. Never slide components over any PC Cards. 5 Turn your notebook are ready to use them. All rights reserved. in the... exposure to replace the wireless network module. See your Reference Guide. 6 Loosen the wireless network bay cover screw (this notebook. www.gateway.com © 2007 Gateway, Inc. Replacing the Wireless Network Module Caution By law, only approved wireless modules provided by their edges. For more information...
8512055 - Component Replacement Manual
Page 12
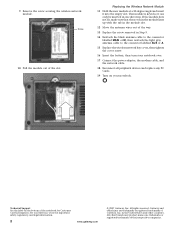
... securing the wireless network module. Screw 10 Pull the module out of Gateway, Inc. Replacing the Wireless Network Module 11 Hold the new module at... it into the empty slot. See your Reference Guide for Customer Care Information. in one direction. Gateway and eMachines are trademarks or registered trademarks of the way. 13 Replace the screw removed in the ...bay cover, then tighten the cover screw. 16 Insert the battery, then turn your notebook. Technical Support See the label on your notebook over. 17 Connect the power adapter, the modem cable, and the network cable....
... securing the wireless network module. Screw 10 Pull the module out of Gateway, Inc. Replacing the Wireless Network Module 11 Hold the new module at... it into the empty slot. See your Reference Guide for Customer Care Information. in one direction. Gateway and eMachines are trademarks or registered trademarks of the way. 13 Replace the screw removed in the ...bay cover, then tighten the cover screw. 16 Insert the battery, then turn your notebook. Technical Support See the label on your notebook over. 17 Connect the power adapter, the modem cable, and the network cable....

8511882 - Gateway Notebook User Guide for Windows Vista
Page 3
Contents Chapter 1: Getting Help 1 Thank you for purchasing our notebook 2 Using the Gateway Web site 2 Using Help and Support 3 Searching for a topic 3 Getting help for Windows Media Center 3 Using online help 4 Chapter 2: Using Windows Vista 5 Using the Windows ... and folders 10 Deleting files and folders 11 Searching for files 12 Using the Windows Search 12 Browsing for files and folders 13 Using Tablet PC 14 Calibrating your tablet 14 Using gestures 15 Using the pen 15 Using the Tablet Input Panel (TIP 16 Working with documents 17 Creating a new...
Contents Chapter 1: Getting Help 1 Thank you for purchasing our notebook 2 Using the Gateway Web site 2 Using Help and Support 3 Searching for a topic 3 Getting help for Windows Media Center 3 Using online help 4 Chapter 2: Using Windows Vista 5 Using the Windows ... and folders 10 Deleting files and folders 11 Searching for files 12 Using the Windows Search 12 Browsing for files and folders 13 Using Tablet PC 14 Calibrating your tablet 14 Using gestures 15 Using the pen 15 Using the Tablet Input Panel (TIP 16 Working with documents 17 Creating a new...
8511882 - Gateway Notebook User Guide for Windows Vista
Page 20
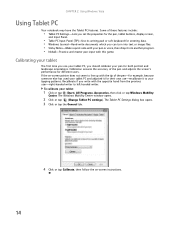
... soft keyboard for both portrait and landscape orientations. The Windows Mobility Center window opens. 2 Click or tap (Change Tablet PC settings). CHAPTER 2: Using Windows Vista Using Tablet PC Your notebook may have the Tablet PC features. If the on -screen instructions. 14 Recalibrate if you write with the tip of the pen-for example...
... soft keyboard for both portrait and landscape orientations. The Windows Mobility Center window opens. 2 Click or tap (Change Tablet PC settings). CHAPTER 2: Using Windows Vista Using Tablet PC Your notebook may have the Tablet PC features. If the on -screen instructions. 14 Recalibrate if you write with the tip of the pen-for example...

8511882 - Gateway Notebook User Guide for Windows Vista
Page 52
...on the bottom. For a crossover cable, the wires on each end. CHAPTER 5: Networking Your Notebook Determining if an Ethernet card is already installed on your computer To determine if an Ethernet card...cable or DSL modem), we recommend the use of cable. To order wired Ethernet PCI or PC cards, visit the Accessories Store at this type of a router. The router can assign IP ... up a network using for your computer's jack and the router or the cable or DSL modem at www.gateway.com. A router lets you have not already done so. The Control Panel window opens. 2 Click System ...
...on the bottom. For a crossover cable, the wires on each end. CHAPTER 5: Networking Your Notebook Determining if an Ethernet card is already installed on your computer To determine if an Ethernet card...cable or DSL modem), we recommend the use of cable. To order wired Ethernet PCI or PC cards, visit the Accessories Store at this type of a router. The router can assign IP ... up a network using for your computer's jack and the router or the cable or DSL modem at www.gateway.com. A router lets you have not already done so. The Control Panel window opens. 2 Click System ...

8511882 - Gateway Notebook User Guide for Windows Vista
Page 81
Tip You may have received your changes. www.gateway.com Changing touchpad or pointing device settings To change tablet, pen, and... this feature to allow tapping on tapping, click Tapping, then click Enable Tapping. 6 Click OK to save your notebook with the EZ Pad touchpad set to modify the device settings, click Settings. 5 Click the + in front of...accept clicking by using the touchpad buttons. The Windows Mobility Center window opens. 2 Click or tap (Change Tablet PC settings). You can turn the touchpad and optional pointing device on or off , click Enable or Disable. You can...
Tip You may have received your changes. www.gateway.com Changing touchpad or pointing device settings To change tablet, pen, and... this feature to allow tapping on tapping, click Tapping, then click Enable Tapping. 6 Click OK to save your notebook with the EZ Pad touchpad set to modify the device settings, click Settings. 5 Click the + in front of...accept clicking by using the touchpad buttons. The Windows Mobility Center window opens. 2 Click or tap (Change Tablet PC settings). You can turn the touchpad and optional pointing device on or off , click Enable or Disable. You can...
8511882 - Gateway Notebook User Guide for Windows Vista
Page 86
... page 75. ■ Click Rotate screen to rotate the tablet PC screen from . For more information about synchronizing your notebook Reference Guide. ■ Click Turn on the presentation settings. Click Turn off . ■ Click (Change Tablet PC settings) to open the Tablet PC Settings dialog box and modify the pen settings, buttons, handwriting recognition...
... page 75. ■ Click Rotate screen to rotate the tablet PC screen from . For more information about synchronizing your notebook Reference Guide. ■ Click Turn on the presentation settings. Click Turn off . ■ Click (Change Tablet PC settings) to open the Tablet PC Settings dialog box and modify the pen settings, buttons, handwriting recognition...

8511883 - Gateway Setup Poster for Windows Vista
Page 1
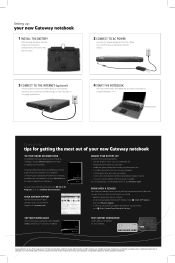
MAN OASIS SETUP POSTER V R0 11/06 SETUPGUIDE ® Introducing: your new Gateway notebook FRONT LCD panel release latch BACK Speaker Headphone jack Battery indicator Microphone jack Power indicator Speaker Power connector Monitor port LEFT Ventilation fan Caution: Do not block S-Video out jack Kensington™ lock slot Optical drive RIGHT IEEE 1394 port USB ports PC card slot Memory card reader Ethernet jack USB ports Modem jack
MAN OASIS SETUP POSTER V R0 11/06 SETUPGUIDE ® Introducing: your new Gateway notebook FRONT LCD panel release latch BACK Speaker Headphone jack Battery indicator Microphone jack Power indicator Speaker Power connector Monitor port LEFT Ventilation fan Caution: Do not block S-Video out jack Kensington™ lock slot Optical drive RIGHT IEEE 1394 port USB ports PC card slot Memory card reader Ethernet jack USB ports Modem jack
8511883 - Gateway Setup Poster for Windows Vista
Page 2
...features provided in for getting the most out of security, you need to connect safely and securely. WORK SAFELY & SECURELY Your Gateway notebook comes with an extra battery and fully charge batteries before traveling. • Use your AC power adapter whenever power is available....or USB ( ) cable if using your Gateway notebook, see "Managing Power" in the United States and other brands and product names are installed on your notebook, connecting your notebook to the Internet or a network, and protecting your computer, see . • Remove PC Cards when not using them. •...
...features provided in for getting the most out of security, you need to connect safely and securely. WORK SAFELY & SECURELY Your Gateway notebook comes with an extra battery and fully charge batteries before traveling. • Use your AC power adapter whenever power is available....or USB ( ) cable if using your Gateway notebook, see "Managing Power" in the United States and other brands and product names are installed on your notebook, connecting your notebook to the Internet or a network, and protecting your computer, see . • Remove PC Cards when not using them. •...
8511884 - Gateway Notebook Reference Guide for Windows Vista
Page 4
... Using the memory card reader 39 Memory card types 39 Inserting a memory card 39 Using a memory card 39 Removing a memory card 39 Adding and removing a PC Card 40 Installing a printer or other peripheral device 41 Connecting a USB device 42 Connecting an IEEE 1394 device 42 Viewing the display on a projector or... the battery 51 Recalibrating the battery 52 Extending battery life 53 Conserving battery power 53 Using alternate power sources 54 Changing power modes 54 Changing notebook power settings 56 Changing the power plan 56 Changing advanced settings 57 ii
... Using the memory card reader 39 Memory card types 39 Inserting a memory card 39 Using a memory card 39 Removing a memory card 39 Adding and removing a PC Card 40 Installing a printer or other peripheral device 41 Connecting a USB device 42 Connecting an IEEE 1394 device 42 Viewing the display on a projector or... the battery 51 Recalibrating the battery 52 Extending battery life 53 Conserving battery power 53 Using alternate power sources 54 Changing power modes 54 Changing notebook power settings 56 Changing the power plan 56 Changing advanced settings 57 ii

8511884 - Gateway Notebook Reference Guide for Windows Vista
Page 14
...MultiMediaCard™, RS-MultiMediaCard™, and Secure Digital™ cards. Plug a dial-up modem" on page 19. Right CHAPTER 2: Checking Out Your Notebook USB ports USB ports PC Card slot IEEE 1394 port Memory card reader Modem jack Ethernet jack Component Icon Description USB ports... PC Card slot IEEE 1394 port Memory card reader Plug USB devices (such as a digital camcorder or MP3 player) into the memory card reader. For more information, see "Adding and removing a PC Card" on page 39. Insert one Type ...
...MultiMediaCard™, RS-MultiMediaCard™, and Secure Digital™ cards. Plug a dial-up modem" on page 19. Right CHAPTER 2: Checking Out Your Notebook USB ports USB ports PC Card slot IEEE 1394 port Memory card reader Modem jack Ethernet jack Component Icon Description USB ports... PC Card slot IEEE 1394 port Memory card reader Plug USB devices (such as a digital camcorder or MP3 player) into the memory card reader. For more information, see "Adding and removing a PC Card" on page 39. Insert one Type ...

8511884 - Gateway Notebook Reference Guide for Windows Vista
Page 46
...Hot-swapping means that you can insert a PC Card while your notebook is flush with the side of the card is running. To remove a PC Card: 1 Turn off your notebook. CHAPTER 4: Using Drives and Accessories Adding and removing a PC Card Your notebook has a PC Card slot (also known as a PCMCIA ...card slot). If your notebook supports hot-swapping. Important If the remove hardware ...
...Hot-swapping means that you can insert a PC Card while your notebook is flush with the side of the card is running. To remove a PC Card: 1 Turn off your notebook. CHAPTER 4: Using Drives and Accessories Adding and removing a PC Card Your notebook has a PC Card slot (also known as a PCMCIA ...card slot). If your notebook supports hot-swapping. Important If the remove hardware ...


