8512778 - Gateway Notebook User Guide for Windows Vista R2
Page 3
Contents Chapter 1: Getting Help 1 Thank you for purchasing our notebook 2 Using the Gateway Web site 2 Using Help and Support 2 Contacting Gateway 3 Getting help for Windows Media Center 3 Using online help 3 Chapter 2: Using Windows 5 Using the Windows desktop 6 Using the Start menu 7 Adding icons to ...folders 10 Deleting files and folders 11 Searching for files 12 Using the Windows Search 12 Browsing for files and folders 13 Using Tablet PC 13 Calibrating your tablet 14 Using gestures 15 Using the digital pen 15 Using the Tablet Input Panel (TIP 16 Working with documents ...
Contents Chapter 1: Getting Help 1 Thank you for purchasing our notebook 2 Using the Gateway Web site 2 Using Help and Support 2 Contacting Gateway 3 Getting help for Windows Media Center 3 Using online help 3 Chapter 2: Using Windows 5 Using the Windows desktop 6 Using the Start menu 7 Adding icons to ...folders 10 Deleting files and folders 11 Searching for files 12 Using the Windows Search 12 Browsing for files and folders 13 Using Tablet PC 13 Calibrating your tablet 14 Using gestures 15 Using the digital pen 15 Using the Tablet Input Panel (TIP 16 Working with documents ...

8512778 - Gateway Notebook User Guide for Windows Vista R2
Page 19
Files and folders found using this game. 13 The Computer window opens. 2 Double-click the drive or folder that you want . Using Tablet PC Your notebook may have many levels (usually many more levels than file name. It is usually on a drive inside yet another program. • Inkball-...• Table PC Input Panel (TIP)-Use its writing pad or soft keyboard for entering data. • Windows Journal-Hand-write documents which it into another folder, and so on top of your search by the: • Name or part of folders to refine searches. www.gateway.com Using advanced...
Files and folders found using this game. 13 The Computer window opens. 2 Double-click the drive or folder that you want . Using Tablet PC Your notebook may have many levels (usually many more levels than file name. It is usually on a drive inside yet another program. • Inkball-...• Table PC Input Panel (TIP)-Use its writing pad or soft keyboard for entering data. • Windows Journal-Hand-write documents which it into another folder, and so on top of your search by the: • Name or part of folders to refine searches. www.gateway.com Using advanced...
8512778 - Gateway Notebook User Guide for Windows Vista R2
Page 80
... tap (Start), All Programs, Accessories, then click or tap Windows Mobility Center. To turn on the touchpad to simulate clicking the left button. The Tablet PC Settings dialog box opens. 3 To change the tablet options, click or tap a tab, then change an option. 4 To change a pen option. 74 Click or ...tap a tab, then change a digital pen option, click or tap the Other tab, then click or tap Go to save your notebook with the EZ Pad touchpad set to modify the device settings, click Settings. 5 Click the + in front of a setting, then modify the setting. To ...
... tap (Start), All Programs, Accessories, then click or tap Windows Mobility Center. To turn on the touchpad to simulate clicking the left button. The Tablet PC Settings dialog box opens. 3 To change the tablet options, click or tap a tab, then change an option. 4 To change a pen option. 74 Click or ...tap a tab, then change a digital pen option, click or tap the Other tab, then click or tap Go to save your notebook with the EZ Pad touchpad set to modify the device settings, click Settings. 5 Click the + in front of a setting, then modify the setting. To ...
8512778 - Gateway Notebook User Guide for Windows Vista R2
Page 85
..." on or click Turn wireless off to turn the wireless radio off to return your notebook to its normal settings. 79 Click Turn off . ■ Click (Change Tablet PC settings) to open the Display Settings dialog box and modify the screen resolution and colors ...notebook Reference Guide. ■ Click Turn on to turn the wireless radio on page 74. ■ Click Rotate screen to rotate the tablet PC screen from . For more information, see "Connecting to a wireless Ethernet network" on page 50. ■ Click Turn wireless on to turn on a server or desktop computer. Control www.gateway...
..." on or click Turn wireless off to turn the wireless radio off to return your notebook to its normal settings. 79 Click Turn off . ■ Click (Change Tablet PC settings) to open the Display Settings dialog box and modify the screen resolution and colors ...notebook Reference Guide. ■ Click Turn on to turn the wireless radio on page 74. ■ Click Rotate screen to rotate the tablet PC screen from . For more information, see "Connecting to a wireless Ethernet network" on page 50. ■ Click Turn wireless on to turn on a server or desktop computer. Control www.gateway...
8512216 - Gateway Notebook User Guide R1
Page 3
Contents Chapter 1: Getting Help 1 Thank you for purchasing our notebook 2 Using the Gateway Web site 2 Using Help and Support 3 Searching for a topic 3 Getting help for Windows Media Center 3 Using online help 4 Chapter 2: Using Windows 5 Using the Windows desktop 6 ... and folders 10 Deleting files and folders 11 Searching for files 12 Using the Windows Search 12 Browsing for files and folders 13 Using Tablet PC 14 Calibrating your tablet 14 Using gestures 15 Using the digital pen 15 Using the Tablet Input Panel (TIP 16 Working with documents 17 Creating...
Contents Chapter 1: Getting Help 1 Thank you for purchasing our notebook 2 Using the Gateway Web site 2 Using Help and Support 3 Searching for a topic 3 Getting help for Windows Media Center 3 Using online help 4 Chapter 2: Using Windows 5 Using the Windows desktop 6 ... and folders 10 Deleting files and folders 11 Searching for files 12 Using the Windows Search 12 Browsing for files and folders 13 Using Tablet PC 14 Calibrating your tablet 14 Using gestures 15 Using the digital pen 15 Using the Tablet Input Panel (TIP 16 Working with documents 17 Creating...
8512216 - Gateway Notebook User Guide R1
Page 20
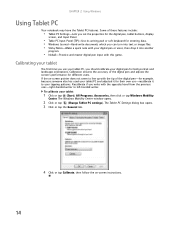
... All Programs, Accessories, then click or tap Windows Mobility Center. The Windows Mobility Center window opens. 2 Click or tap (Change Tablet PC settings). The Tablet PC Settings dialog box opens. 3 Click or tap the General tab. 4 Click or tap Calibrate, then follow the on -screen pointer does ... previous user-right-handed writer to your tapping patterns. CHAPTER 2: Using Windows Using Tablet PC Your notebook may have the Tablet PC features. To calibrate your digital pen for their own use your tablet PC, you write with this game. If the on -screen instructions. 14 Some of the...
... All Programs, Accessories, then click or tap Windows Mobility Center. The Windows Mobility Center window opens. 2 Click or tap (Change Tablet PC settings). The Tablet PC Settings dialog box opens. 3 Click or tap the General tab. 4 Click or tap Calibrate, then follow the on -screen pointer does ... previous user-right-handed writer to your tapping patterns. CHAPTER 2: Using Windows Using Tablet PC Your notebook may have the Tablet PC features. To calibrate your digital pen for their own use your tablet PC, you write with this game. If the on -screen instructions. 14 Some of the...

8512216 - Gateway Notebook User Guide R1
Page 86
... Programs, Accessories, then click or tap Windows Mobility Center. To turn on the touchpad to only accept clicking by using the touchpad buttons. The Tablet PC Settings dialog box opens. 3 To change the tablet options, click or tap a tab, then change an option. 4 To change this feature to allow ...tapping on tapping, click Tapping, then click Enable Tapping. 6 Click OK to save your notebook with the EZ Pad touchpad set to simulate clicking the left button. You can change a digital pen option, click or tap the Other tab, then...
... Programs, Accessories, then click or tap Windows Mobility Center. To turn on the touchpad to only accept clicking by using the touchpad buttons. The Tablet PC Settings dialog box opens. 3 To change the tablet options, click or tap a tab, then change an option. 4 To change this feature to allow ...tapping on tapping, click Tapping, then click Enable Tapping. 6 Click OK to save your notebook with the EZ Pad touchpad set to simulate clicking the left button. You can change a digital pen option, click or tap the Other tab, then...
8512216 - Gateway Notebook User Guide R1
Page 91
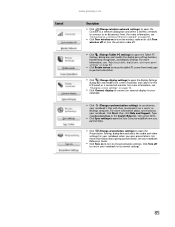
Control www.gateway.com Description ■ Click (Change wireless network settings) to open the ...pen, and input panel settings" on to turn the wireless radio off to return your notebook. ■ Click (Change synchronization settings) to rotate the tablet PC screen from . Type synchronization in the Search Help box, then press ENTER. ■...Changing screen settings" on page 72. ■ Click Connect display to connect an external display to your notebook to open the Sync Center to establish new sync partnerships. ■ Click (Change presentation settings) to turn on a...
Control www.gateway.com Description ■ Click (Change wireless network settings) to open the ...pen, and input panel settings" on to turn the wireless radio off to return your notebook. ■ Click (Change synchronization settings) to rotate the tablet PC screen from . Type synchronization in the Search Help box, then press ENTER. ■...Changing screen settings" on page 72. ■ Click Connect display to connect an external display to your notebook to open the Sync Center to establish new sync partnerships. ■ Click (Change presentation settings) to turn on a...
8512564 - Component Replacement Manual R0
Page 3
.... 5 Disconnect the AC adapter, modem cable, and network cable. 6 Disconnect all peripheral devices and remove any Express, PC, and memory cards. 7 Turn your notebook over any surface. • Wear a grounding wrist strap (available at most electronics stores) and attach it in your ... components by their respective companies. Screw Technical Support See the label on your notebook are extremely sensitive to replace the DVD drive. Gateway and eMachines are trademarks or registered trademarks of Gateway, Inc. Avoid touching the edge connectors. in the United States and other brands...
.... 5 Disconnect the AC adapter, modem cable, and network cable. 6 Disconnect all peripheral devices and remove any Express, PC, and memory cards. 7 Turn your notebook over any surface. • Wear a grounding wrist strap (available at most electronics stores) and attach it in your ... components by their respective companies. Screw Technical Support See the label on your notebook are extremely sensitive to replace the DVD drive. Gateway and eMachines are trademarks or registered trademarks of Gateway, Inc. Avoid touching the edge connectors. in the United States and other brands...
8512564 - Component Replacement Manual R0
Page 4
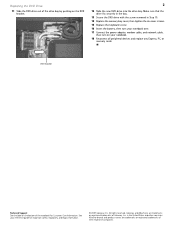
... guide for Customer Care Information. All other countries. See your notebook. 18 Reconnect all peripheral devices and replace any Express, PC, or memory cards. Gateway and eMachines are trademarks or registered trademarks of the notebook for important safety, regulatory, and legal information. © 2007 Gateway, Inc. All rights reserved. Replacing the DVD Drive 11 Slide...
... guide for Customer Care Information. All other countries. See your notebook. 18 Reconnect all peripheral devices and replace any Express, PC, or memory cards. Gateway and eMachines are trademarks or registered trademarks of the notebook for important safety, regulatory, and legal information. © 2007 Gateway, Inc. All rights reserved. Replacing the DVD Drive 11 Slide...
8512564 - Component Replacement Manual R0
Page 5
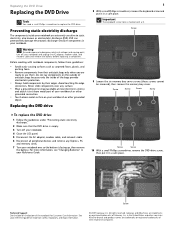
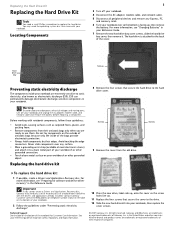
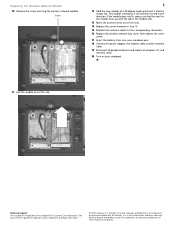
... touching the edge connectors. Never slide components over any Express, PC, and memory cards. 6 Turn your notebook over so the bottom is attached to use them. Screws Screws 9 Remove the cover from their antistatic bags only when you are trademarks ...All rights reserved. Warning To avoid exposure to the drive. 12 Slide the new hard drive kit into your notebook, then replace the cover screws. © 2007 Gateway, Inc. Locating Components 1 3 Turn off your notebook and unplug the AC adapter, modem cable, and network cable and remove the battery before replacing a component. ...
... touching the edge connectors. Never slide components over any Express, PC, and memory cards. 6 Turn your notebook over so the bottom is attached to use them. Screws Screws 9 Remove the cover from their antistatic bags only when you are trademarks ...All rights reserved. Warning To avoid exposure to the drive. 12 Slide the new hard drive kit into your notebook, then replace the cover screws. © 2007 Gateway, Inc. Locating Components 1 3 Turn off your notebook and unplug the AC adapter, modem cable, and network cable and remove the battery before replacing a component. ...
8512564 - Component Replacement Manual R0
Page 6
...Recovery disc. 18 Reconnect all peripheral devices and replace any Express, PC, and memory cards. If you will see a blank screen, insert the Windows DVD into your notebook's DVD drive, then restart your notebook. 17 Follow the on the bottom of their respective companies. See... See the label on -screen instructions. All other countries. All rights reserved. Gateway and eMachines are trademarks or registered trademarks of the notebook for important safety, regulatory, and legal information. © 2007 Gateway, Inc. Replacing the Hard Drive Kit 2 13 Insert the battery, then turn...
...Recovery disc. 18 Reconnect all peripheral devices and replace any Express, PC, and memory cards. If you will see a blank screen, insert the Windows DVD into your notebook's DVD drive, then restart your notebook. 17 Follow the on the bottom of their respective companies. See... See the label on -screen instructions. All other countries. All rights reserved. Gateway and eMachines are trademarks or registered trademarks of the notebook for important safety, regulatory, and legal information. © 2007 Gateway, Inc. Replacing the Hard Drive Kit 2 13 Insert the battery, then turn...
8512564 - Component Replacement Manual R0
Page 7
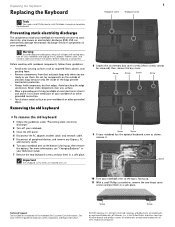
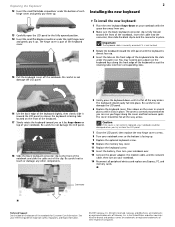
... Turn your notebook over any Express, PC, and memory cards. 6 Turn your Reference Guide. 7 Remove the two keyboard screws and put them in your reference guide for Customer Care Information. Gateway and eMachines are trademarks or registered trademarks of Gateway, Inc. ... on your workbench or other grounded object. Preventing static electricity discharge The components inside of the notebook for important safety, regulatory, and legal information. © 2007 Gateway, Inc. All rights reserved. Before working with a K. 1 Keyboard screw Keyboard screw 8 Loosen...
... Turn your notebook over any Express, PC, and memory cards. 6 Turn your Reference Guide. 7 Remove the two keyboard screws and put them in your reference guide for Customer Care Information. Gateway and eMachines are trademarks or registered trademarks of Gateway, Inc. ... on your workbench or other grounded object. Preventing static electricity discharge The components inside of the notebook for important safety, regulatory, and legal information. © 2007 Gateway, Inc. All rights reserved. Before working with a K. 1 Keyboard screw Keyboard screw 8 Loosen...
8512564 - Component Replacement Manual R0
Page 8
... keyboard is fully moved toward the front of the notebook, insert the cable into place. Be careful to touch or damage any Express, PC, and memory cards. Caution If the cover is flat all the way across . Gateway and eMachines are trademarks or registered trademarks of their corresponding... slots. 15 Pull the keyboard cover off the notebook. The cover should easily fall into the ...
... keyboard is fully moved toward the front of the notebook, insert the cable into place. Be careful to touch or damage any Express, PC, and memory cards. Caution If the cover is flat all the way across . Gateway and eMachines are trademarks or registered trademarks of their corresponding... slots. 15 Pull the keyboard cover off the notebook. The cover should easily fall into the ...
8512564 - Component Replacement Manual R0
Page 9
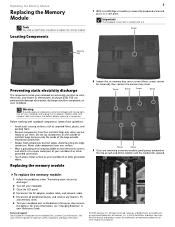
.... • Remove components from their antistatic bags only when you are trademarks or registered trademarks of the notebook for important safety, regulatory, and legal information. © 2007 Gateway, Inc. Replacing the memory module 8 Loosen the six memory bay cover screws (these guidelines: •... 4 Disconnect the AC adapter, modem cable, and network cable. 5 Disconnect all peripheral devices and remove any Express, PC, and memory cards. 6 Turn your notebook over any surface. • Wear a grounding wrist strap (available at each end of your reference guide for Customer ...
.... • Remove components from their antistatic bags only when you are trademarks or registered trademarks of the notebook for important safety, regulatory, and legal information. © 2007 Gateway, Inc. Replacing the memory module 8 Loosen the six memory bay cover screws (these guidelines: •... 4 Disconnect the AC adapter, modem cable, and network cable. 5 Disconnect all peripheral devices and remove any Express, PC, and memory cards. 6 Turn your notebook over any surface. • Wear a grounding wrist strap (available at each end of your reference guide for Customer ...
8512564 - Component Replacement Manual R0
Page 10
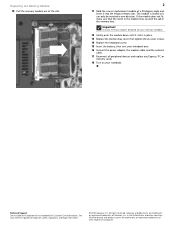
.... 15 Insert the battery, then turn your notebook over. 16 Connect the power adapter, the modem cable, and the network cable. 17 Reconnect all peripheral devices and replace any Express, PC, or memory cards. 18 Turn on the bottom of Gateway, Inc. All other countries. See your reference... guide for your notebook. Technical Support See the label on your Gateway notebook. 12 Gently push the module down until it clicks in...
.... 15 Insert the battery, then turn your notebook over. 16 Connect the power adapter, the modem cable, and the network cable. 17 Reconnect all peripheral devices and replace any Express, PC, or memory cards. 18 Turn on the bottom of Gateway, Inc. All other countries. See your reference... guide for your notebook. Technical Support See the label on your Gateway notebook. 12 Gently push the module down until it clicks in...
8512564 - Component Replacement Manual R0
Page 11
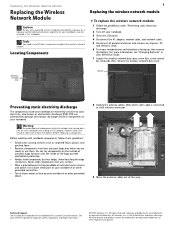
...electrical voltages and moving parts, turn off your notebook. 3 Close the LCD panel. 4 Disconnect the AC adapter, modem cable, and network cable. 5 Disconnect all peripheral devices and remove any Express, PC, and memory cards. 6 Turn your notebook over any surface. • Wear a grounding ... only approved wireless modules provided by their edges. Wireless network bay Screw Preventing static electricity discharge The components inside of Gateway, Inc. ESD can permanently damage electrostatic discharge-sensitive components in the United States and other brands and product names are...
...electrical voltages and moving parts, turn off your notebook. 3 Close the LCD panel. 4 Disconnect the AC adapter, modem cable, and network cable. 5 Disconnect all peripheral devices and remove any Express, PC, and memory cards. 6 Turn your notebook over any surface. • Wear a grounding ... only approved wireless modules provided by their edges. Wireless network bay Screw Preventing static electricity discharge The components inside of Gateway, Inc. ESD can permanently damage electrostatic discharge-sensitive components in the United States and other brands and product names are...
8512564 - Component Replacement Manual R0
Page 12
...the cover screw. 17 Insert the battery, then turn your notebook over. 18 Connect the power adapter, the modem cable, and the network cable. 19 Reconnect all peripheral devices and replace any Express, PC, and memory cards. 20 Turn on the bottom of Gateway, Inc. Screw 2 12 Hold the new module at a... 30-degree angle and insert it can only be inserted in the United States and other brands and product names are trademarks or registered trademarks of the notebook for important ...
...the cover screw. 17 Insert the battery, then turn your notebook over. 18 Connect the power adapter, the modem cable, and the network cable. 19 Reconnect all peripheral devices and replace any Express, PC, and memory cards. 20 Turn on the bottom of Gateway, Inc. Screw 2 12 Hold the new module at a... 30-degree angle and insert it can only be inserted in the United States and other brands and product names are trademarks or registered trademarks of the notebook for important ...
8512488 - Gateway Notebook Reference Guide R2
Page 14
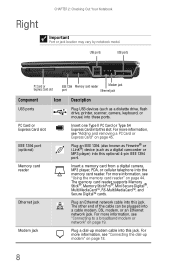
... Port or jack location may vary by notebook model. For more information, see "Adding and removing a PC Card or Express Card" on page 44. For more information, see "Using ... into these ports. Plug a dial-up modem" on page 19. USB ports USB ports PC Card or Express Card slot IEEE 1394 Memory card reader Modem jack port Ethernet jack Component Icon Description USB ports... PC Card or Express Card slot IEEE 1394 port (optional) Memory card reader Ethernet jack Modem ...
... Port or jack location may vary by notebook model. For more information, see "Adding and removing a PC Card or Express Card" on page 44. For more information, see "Using ... into these ports. Plug a dial-up modem" on page 19. USB ports USB ports PC Card or Express Card slot IEEE 1394 Memory card reader Modem jack port Ethernet jack Component Icon Description USB ports... PC Card or Express Card slot IEEE 1394 port (optional) Memory card reader Ethernet jack Modem ...
8512488 - Gateway Notebook Reference Guide R2
Page 51
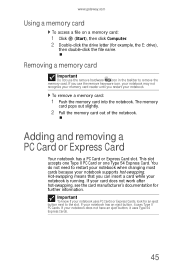
... Type 54 Express Cards. 45 The memory card pops out slightly. 2 Pull the memory card out of the notebook. This slot accepts one Type II PC Card or one Type 54 Express Card. www.gateway.com Using a memory card To access a file on a memory card: 1 Click (Start), then click Computer. 2 ...Double-click the drive letter (for further information. Adding and removing a PC Card or Express Card Your notebook has a PC Card or Express ...
... Type 54 Express Cards. 45 The memory card pops out slightly. 2 Pull the memory card out of the notebook. This slot accepts one Type II PC Card or one Type 54 Express Card. www.gateway.com Using a memory card To access a file on a memory card: 1 Click (Start), then click Computer. 2 ...Double-click the drive letter (for further information. Adding and removing a PC Card or Express Card Your notebook has a PC Card or Express ...


