
Component Replacement Manual
Page 2
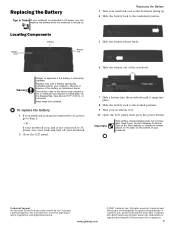
.... 9 Turn your notebook over so the bottom is facing up. 4 Slide the battery lock to the unlocked position. 5 Slide the battery release latch. Gateway and eMachines are trademarks or registered trademarks of explosion if the battery is incorrectly replaced. Replacing the Battery Tips & Tricks If your notebook is connected... the notebook is turned on the bottom of your notebook. Replace only with a battery specifically manufactured for your notebook over . 10 Open the LCD panel, then press the power button. Recycle or dispose of Gateway, Inc. www.gateway.com © 2007...
.... 9 Turn your notebook over so the bottom is facing up. 4 Slide the battery lock to the unlocked position. 5 Slide the battery release latch. Gateway and eMachines are trademarks or registered trademarks of explosion if the battery is incorrectly replaced. Replacing the Battery Tips & Tricks If your notebook is connected... the notebook is turned on the bottom of your notebook. Replace only with a battery specifically manufactured for your notebook over . 10 Open the LCD panel, then press the power button. Recycle or dispose of Gateway, Inc. www.gateway.com © 2007...
Component Replacement Manual
Page 6
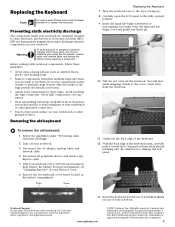
...a grounding wrist strap (available at most electronics stores) and attach it lies keys-down on the bottom of their respective companies. 1 Gateway and eMachines are trademarks or registered trademarks of the notebook for important safety, regulatory, and legal information. in your notebook and unplug the ... old keyboard: 1 Follow the guidelines under both the right and left hinge cover and gently pry them up . 8 Carefully open the LCD panel to the fully opened position. 9 Insert the small flat-blade screwdriver or non-marring tool under "Preventing static electricity discharge." 2...
...a grounding wrist strap (available at most electronics stores) and attach it lies keys-down on the bottom of their respective companies. 1 Gateway and eMachines are trademarks or registered trademarks of the notebook for important safety, regulatory, and legal information. in your notebook and unplug the ... old keyboard: 1 Follow the guidelines under both the right and left hinge cover and gently pry them up . 8 Carefully open the LCD panel to the fully opened position. 9 Insert the small flat-blade screwdriver or non-marring tool under "Preventing static electricity discharge." 2...
Component Replacement Manual
Page 7
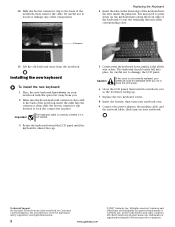
... companies. All rights reserved. Important The keyboard cable is correctly oriented if it is not twisted. 3 Rotate the keyboard toward the LCD panel until it is facing up . 5 Gently press the keyboard down on the front edge of their corresponding slots. Replacing the ...on the keyboard keys along the front edge of the notebook for important safety, regulatory, and legal information. 2 www.gateway.com © 2007 Gateway, Inc. Gateway and eMachines are trademarks or registered trademarks of the keyboard into place. See your notebook. 14 Slide the brown connector ...
... companies. All rights reserved. Important The keyboard cable is correctly oriented if it is not twisted. 3 Rotate the keyboard toward the LCD panel until it is facing up . 5 Gently press the keyboard down on the front edge of their corresponding slots. Replacing the ...on the keyboard keys along the front edge of the notebook for important safety, regulatory, and legal information. 2 www.gateway.com © 2007 Gateway, Inc. Gateway and eMachines are trademarks or registered trademarks of the keyboard into place. See your notebook. 14 Slide the brown connector ...


