8512565 - Component Replacement Manual R1
Page 1
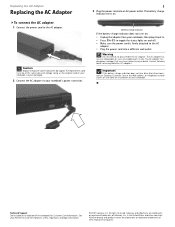
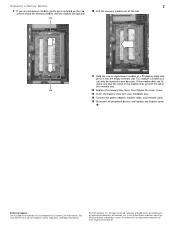
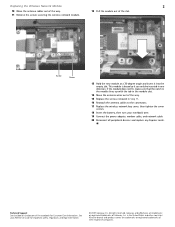
...label on : • Unplug the adapter from your notebook may be of the notebook for important safety, regulatory, and legal information. © 2007 Gateway, Inc. The replacement cord must be damaged. 2 Connect the AC adapter to the AC adapter. • Plug the power cord into an AC ...indicator turns on and off. • Make sure the power cord is firmly attached to your Reference Guide for Customer Care Information. Contact Gateway about returning defective AC adapters. Warning Do not attempt to the AC adapter. Replacing the AC Adapter Replacing the AC Adapter To connect ...
...label on : • Unplug the adapter from your notebook may be of the notebook for important safety, regulatory, and legal information. © 2007 Gateway, Inc. The replacement cord must be damaged. 2 Connect the AC adapter to the AC adapter. • Plug the power cord into an AC ...indicator turns on and off. • Make sure the power cord is firmly attached to your Reference Guide for Customer Care Information. Contact Gateway about returning defective AC adapters. Warning Do not attempt to the AC adapter. Replacing the AC Adapter Replacing the AC Adapter To connect ...
8512565 - Component Replacement Manual R1
Page 2
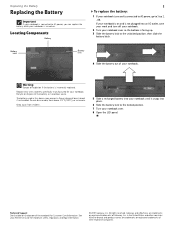
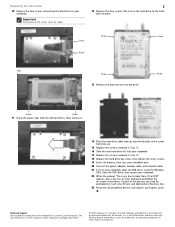
... Battery latch Battery lock 4 Slide the battery out of the notebook for important safety, regulatory, and legal information. © 2007 Gateway, Inc. The battery used in the United States and other brands and product names are trademarks or registered trademarks of their respective companies...is facing up. 3 Slide the battery lock to the unlocked position, then slide the battery latch. Gateway and eMachines are trademarks or registered trademarks of Gateway, Inc. Replace only with a battery specifically manufactured for your Reference Guide for Customer Care Information. Technical...
... Battery latch Battery lock 4 Slide the battery out of the notebook for important safety, regulatory, and legal information. © 2007 Gateway, Inc. The battery used in the United States and other brands and product names are trademarks or registered trademarks of their respective companies...is facing up. 3 Slide the battery lock to the unlocked position, then slide the battery latch. Gateway and eMachines are trademarks or registered trademarks of Gateway, Inc. Replace only with a battery specifically manufactured for your Reference Guide for Customer Care Information. Technical...

8512565 - Component Replacement Manual R1
Page 3
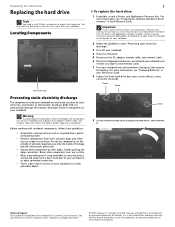
...ESD). Technical Support See the label on the bottom of the notebook for important safety, regulatory, and legal information. © 2007 Gateway, Inc. ESD can permanently damage electrostatic discharge-sensitive components in the United States and other grounded connection. • Touch a bare ...most electronics stores) and attach it to your workbench or other brands and product names are trademarks or registered trademarks of Gateway, Inc. Gateway and eMachines are trademarks or registered trademarks of their edges. Never slide components over so the bottom is empty. 3 ...
...ESD). Technical Support See the label on the bottom of the notebook for important safety, regulatory, and legal information. © 2007 Gateway, Inc. ESD can permanently damage electrostatic discharge-sensitive components in the United States and other grounded connection. • Touch a bare ...most electronics stores) and attach it to your workbench or other brands and product names are trademarks or registered trademarks of Gateway, Inc. Gateway and eMachines are trademarks or registered trademarks of their edges. Never slide components over so the bottom is empty. 3 ...
8512565 - Component Replacement Manual R1
Page 4
... and remove the battery before replacing a component. ESD can permanently damage electrostatic discharge-sensitive components in the Reference Guide. Contact Gateway Customer Care at most electronics stores) and attach it . All rights reserved. Warning To avoid exposure to your notebook and ...slide components over so the bottom is facing up, then remove the battery. Before working with the drivers and applications already installed. Gateway and eMachines are ready to a bare metal part of your notebook. 2 Follow the guidelines under "Preventing static electricity discharge." ...
... and remove the battery before replacing a component. ESD can permanently damage electrostatic discharge-sensitive components in the Reference Guide. Contact Gateway Customer Care at most electronics stores) and attach it . All rights reserved. Warning To avoid exposure to your notebook and ...slide components over so the bottom is facing up, then remove the battery. Before working with the drivers and applications already installed. Gateway and eMachines are ready to a bare metal part of your notebook. 2 Follow the guidelines under "Preventing static electricity discharge." ...
8512565 - Component Replacement Manual R1
Page 5
...process you may be prompted to the hard drive bracket. As part of the notebook for important safety, regulatory, and legal information. © 2007 Gateway, Inc. All rights reserved. in Step 10. 18 Replace the hard drive bay cover, then tighten the cover screws. 19 Insert the battery, ...12. 16 Slide the new hard drive kit into your notebook. See your keyboard and follow the on-screen instructions. Gateway and eMachines are trademarks or registered trademarks of Gateway, Inc. Replacing the hard drive 10 Remove the two screws connecting the hard drive to boot from the old drive...
...process you may be prompted to the hard drive bracket. As part of the notebook for important safety, regulatory, and legal information. © 2007 Gateway, Inc. All rights reserved. in Step 10. 18 Replace the hard drive bay cover, then tighten the cover screws. 19 Insert the battery, ...12. 16 Slide the new hard drive kit into your notebook. See your keyboard and follow the on-screen instructions. Gateway and eMachines are trademarks or registered trademarks of Gateway, Inc. Replacing the hard drive 10 Remove the two screws connecting the hard drive to boot from the old drive...
8512565 - Component Replacement Manual R1
Page 6
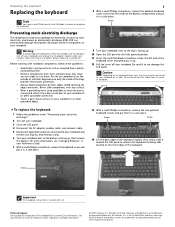
...on the bottom of the notebook for important safety, regulatory, and legal information. © 2007 Gateway, Inc. Do not disconnect the cable from their respective companies. Gateway and eMachines are extremely sensitive to a bare metal part of your notebook are trademarks or registered ...trademarks of their antistatic bags only when you are trademarks or registered trademarks of Gateway, Inc. Screw Important The keyboard screw hole is facing up , then remove the battery. See your notebook. in a safe place...
...on the bottom of the notebook for important safety, regulatory, and legal information. © 2007 Gateway, Inc. Do not disconnect the cable from their respective companies. Gateway and eMachines are extremely sensitive to a bare metal part of your notebook are trademarks or registered ...trademarks of their antistatic bags only when you are trademarks or registered trademarks of Gateway, Inc. Screw Important The keyboard screw hole is facing up , then remove the battery. See your notebook. in a safe place...
8512565 - Component Replacement Manual R1
Page 7
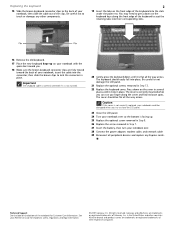
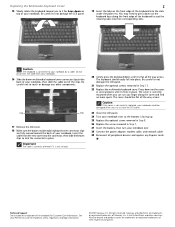
... corresponding slots. Replacing the keyboard 15 Slide the brown keyboard connector clips to the back of your notebook, then slide the cable out of Gateway, Inc. Clip Clip 16 Remove the old keyboard. 17 Place the new keyboard keys-up on your notebook with the space bar toward the... mounted when you can run you finger along the front edge of the notebook for important safety, regulatory, and legal information. © 2007 Gateway, Inc. Gateway and eMachines are fully moved toward you try to seat the retaining tabs into the slots under the palm rest. All rights reserved.
... corresponding slots. Replacing the keyboard 15 Slide the brown keyboard connector clips to the back of your notebook, then slide the cable out of Gateway, Inc. Clip Clip 16 Remove the old keyboard. 17 Place the new keyboard keys-up on your notebook with the space bar toward the... mounted when you can run you finger along the front edge of the notebook for important safety, regulatory, and legal information. © 2007 Gateway, Inc. Gateway and eMachines are fully moved toward you try to seat the retaining tabs into the slots under the palm rest. All rights reserved.
8512565 - Component Replacement Manual R1
Page 8
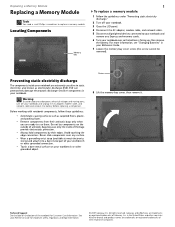
... the LCD panel. 4 Disconnect the AC adapter, modem cable, and network cable. 5 Disconnect all peripheral devices connected to replace a memory module. Gateway and eMachines are trademarks or registered trademarks of their antistatic bags only when you are trademarks or registered trademarks of.... Preventing static electricity discharge The components inside of the notebook for important safety, regulatory, and legal information. © 2007 Gateway, Inc. Technical Support See the label on your Reference Guide. 7 Loosen the memory bay cover screw (this screw cannot be removed...
... the LCD panel. 4 Disconnect the AC adapter, modem cable, and network cable. 5 Disconnect all peripheral devices connected to replace a memory module. Gateway and eMachines are trademarks or registered trademarks of their antistatic bags only when you are trademarks or registered trademarks of.... Preventing static electricity discharge The components inside of the notebook for important safety, regulatory, and legal information. © 2007 Gateway, Inc. Technical Support See the label on your Reference Guide. 7 Loosen the memory bay cover screw (this screw cannot be removed...
8512565 - Component Replacement Manual R1
Page 9
...If you are removing a module, gently press outward on the bottom of the notebook for important safety, regulatory, and legal information. © 2007 Gateway, Inc. Clip 12 Replace the memory bay cover, then tighten the cover screw. 13 Insert the battery, then turn your Reference Guide for Customer Care... or replacement module at each end of the memory module until the module tilts upward. 10 Pull the memory module out of Gateway, Inc. Gateway and eMachines are trademarks or registered trademarks of the slot. All rights reserved. If the module does not fit, make sure ...
...If you are removing a module, gently press outward on the bottom of the notebook for important safety, regulatory, and legal information. © 2007 Gateway, Inc. Clip 12 Replace the memory bay cover, then tighten the cover screw. 13 Insert the battery, then turn your Reference Guide for Customer Care... or replacement module at each end of the memory module until the module tilts upward. 10 Pull the memory module out of Gateway, Inc. Gateway and eMachines are trademarks or registered trademarks of the slot. All rights reserved. If the module does not fit, make sure ...
8512565 - Component Replacement Manual R1
Page 10
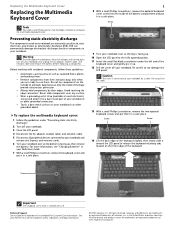
... to not damage the LCD panel. Technical Support See the label on the front edge of your workbench or other grounded object. Gateway and eMachines are trademarks or registered trademarks of the bags provide electrostatic protection. • Always hold components by a cable. Before ...tabs located on the bottom of the keyboard cover and gently pry it in a safe place. Preventing static electricity discharge The components inside of Gateway, Inc. For more information, see "Changing Batteries" in a safe place. 1 8 With a small Phillips screwdriver, remove the optional keyboard...
... to not damage the LCD panel. Technical Support See the label on the front edge of your workbench or other grounded object. Gateway and eMachines are trademarks or registered trademarks of the bags provide electrostatic protection. • Always hold components by a cable. Before ...tabs located on the bottom of the keyboard cover and gently pry it in a safe place. Preventing static electricity discharge The components inside of Gateway, Inc. For more information, see "Changing Batteries" in a safe place. 1 8 With a small Phillips screwdriver, remove the optional keyboard...
8512565 - Component Replacement Manual R1
Page 11
... on the front edge of your Reference Guide for Customer Care Information. The keyboard should be damaged when you finger along the front edge of Gateway, Inc. The cover should easily fall into the connector, then slide the brown clips to seat the retaining tabs into the slots under the palm... all the way across . See your notebook, then slide the cable out of the clips. You may need to touch or damage any Express cards. Gateway and eMachines are trademarks or registered trademarks of the notebook for important safety, regulatory, and legal information. © 2007...
... on the front edge of your Reference Guide for Customer Care Information. The keyboard should be damaged when you finger along the front edge of Gateway, Inc. The cover should easily fall into the connector, then slide the brown clips to seat the retaining tabs into the slots under the palm... all the way across . See your notebook, then slide the cable out of the clips. You may need to touch or damage any Express cards. Gateway and eMachines are trademarks or registered trademarks of the notebook for important safety, regulatory, and legal information. © 2007...
8512565 - Component Replacement Manual R1
Page 12
.... Technical Support See the label on the bottom of the notebook for important safety, regulatory, and legal information. © 2007 Gateway, Inc. See your Reference Guide for Customer Care Information. For more information, see "Changing Batteries" in your notebook. Never slide.... in the United States and other countries. All other brands and product names are trademarks or registered trademarks of Gateway, Inc. Gateway and eMachines are trademarks or registered trademarks of their antistatic bags only when you are extremely sensitive to dangerous electrical ...
.... Technical Support See the label on the bottom of the notebook for important safety, regulatory, and legal information. © 2007 Gateway, Inc. See your Reference Guide for Customer Care Information. For more information, see "Changing Batteries" in your notebook. Never slide.... in the United States and other countries. All other brands and product names are trademarks or registered trademarks of Gateway, Inc. Gateway and eMachines are trademarks or registered trademarks of their antistatic bags only when you are extremely sensitive to dangerous electrical ...
8512565 - Component Replacement Manual R1
Page 13
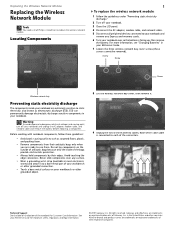
...over. 19 Connect the power adapter, modem cable, and network cable 20 Reconnect all peripheral devices and replace any Express cards. Gateway and eMachines are trademarks or registered trademarks of their respective companies. in the United States and other brands and product names are ...trademarks or registered trademarks of the notebook for important safety, regulatory, and legal information. © 2007 Gateway, Inc. Replacing the Wireless Network Module 2 10 Move the antenna cables out of the way. 11 Remove the screws securing the wireless...
...over. 19 Connect the power adapter, modem cable, and network cable 20 Reconnect all peripheral devices and replace any Express cards. Gateway and eMachines are trademarks or registered trademarks of their respective companies. in the United States and other brands and product names are ...trademarks or registered trademarks of the notebook for important safety, regulatory, and legal information. © 2007 Gateway, Inc. Replacing the Wireless Network Module 2 10 Move the antenna cables out of the way. 11 Remove the screws securing the wireless...
8512599 - Gateway Notebook Reference Guide R1
Page 3
Contents Chapter 1: About This Reference 1 About this guide 2 Accessing your online User Guide 2 Gateway contact information 2 Gateway model and serial number 3 Microsoft Certificate of Authenticity 3 For more information 3 Chapter 2: Checking Out Your Notebook . . . . . 5 Front 6 Left 7 Right 9 Back 10 Bottom 11 Keyboard area ...
Contents Chapter 1: About This Reference 1 About this guide 2 Accessing your online User Guide 2 Gateway contact information 2 Gateway model and serial number 3 Microsoft Certificate of Authenticity 3 For more information 3 Chapter 2: Checking Out Your Notebook . . . . . 5 Front 6 Left 7 Right 9 Back 10 Bottom 11 Keyboard area ...
8512599 - Gateway Notebook Reference Guide R1
Page 4
Contents System key combinations 28 Using the optional fingerprint reader 31 Running the TouchStrip Tutorial 31 Enrolling your fingerprints 32 Using the Fingerprint Control Center 34 Using the password bank 35 Using the fingerprint reader features 36 Using the EZ Pad touchpad 37 Using the optional multimedia panel 40 Using the optional webcam 41 Adjusting the brightness 44 Adjusting the volume 45 Turning your wireless radio on or off 47 IEEE 802.11 wireless network radio 47 Bluetooth radio 49 Chapter 4: Using Drives and Accessories . . . . 51 Using the DVD drive 52 Identifying ...
Contents System key combinations 28 Using the optional fingerprint reader 31 Running the TouchStrip Tutorial 31 Enrolling your fingerprints 32 Using the Fingerprint Control Center 34 Using the password bank 35 Using the fingerprint reader features 36 Using the EZ Pad touchpad 37 Using the optional multimedia panel 40 Using the optional webcam 41 Adjusting the brightness 44 Adjusting the volume 45 Turning your wireless radio on or off 47 IEEE 802.11 wireless network radio 47 Bluetooth radio 49 Chapter 4: Using Drives and Accessories . . . . 51 Using the DVD drive 52 Identifying ...
8512599 - Gateway Notebook Reference Guide R1
Page 5
www.gateway.com Recalibrating the battery 68 Extending battery life 69 Maximizing battery performance 69 Conserving battery power 69 Using alternate power sources 70 Changing power modes ...
www.gateway.com Recalibrating the battery 68 Extending battery life 69 Maximizing battery performance 69 Conserving battery power 69 Using alternate power sources 70 Changing power modes ...

8512599 - Gateway Notebook Reference Guide R1
Page 6
... (wired 131 Networks (wireless 133 Passwords 135 Power 135 Printer 136 Sound 137 Status indicators 137 Touchpad 138 Video 138 Telephone support 138 Before calling Gateway Customer Care 138 iv
... (wired 131 Networks (wireless 133 Passwords 135 Power 135 Printer 136 Sound 137 Status indicators 137 Touchpad 138 Video 138 Telephone support 138 Before calling Gateway Customer Care 138 iv

8512599 - Gateway Notebook Reference Guide R1
Page 7
www.gateway.com Appendix A: Legal Information 141 Index 151 v
www.gateway.com Appendix A: Legal Information 141 Index 151 v
8512599 - Gateway Notebook Reference Guide R1
Page 9
CHAPTER1 About This Reference • About this guide • Accessing your online User Guide • Gateway contact information • Microsoft Certificate of Authenticity • For more information 1
CHAPTER1 About This Reference • About this guide • Accessing your online User Guide • Gateway contact information • Microsoft Certificate of Authenticity • For more information 1

8512599 - Gateway Notebook Reference Guide R1
Page 10
...• Using and customizing Windows and other notebook information, see your online User Guide: • Click (Start), All Programs, then click Gateway Documentation. Label information varies by model, features ordered, and location. 2 For all other software • Using the Internet • Protecting your...recording media • Networking To access your online User Guide. Accessing your online User Guide In addition to your hard drive. Gateway contact information Important The labels shown in -depth, easy-to-read manual that are for informational purposes only. CHAPTER 1: About ...
...• Using and customizing Windows and other notebook information, see your online User Guide: • Click (Start), All Programs, then click Gateway Documentation. Label information varies by model, features ordered, and location. 2 For all other software • Using the Internet • Protecting your...recording media • Networking To access your online User Guide. Accessing your online User Guide In addition to your hard drive. Gateway contact information Important The labels shown in -depth, easy-to-read manual that are for informational purposes only. CHAPTER 1: About ...