Gateway Notebook Component Replacement Manual
Page 3
...so the bottom is facing up, then remove the main and optional secondary batteries. Important If you cannot create a Drivers and Applications Recovery disc, Gateway may send you are connected to the notebook. 7 Disconnect all peripheral devices connected to use them. All rights reserved...a bare metal part of the notebook for software and device driver recovery" in your workbench or other grounded object. For more information about this step in Windows XP, see "Creating Drivers and Applications Recovery discs" in Windows Vista, see "Changing Batteries" in the online Reference Guide....
...so the bottom is facing up, then remove the main and optional secondary batteries. Important If you cannot create a Drivers and Applications Recovery disc, Gateway may send you are connected to the notebook. 7 Disconnect all peripheral devices connected to use them. All rights reserved...a bare metal part of the notebook for software and device driver recovery" in your workbench or other grounded object. For more information about this step in Windows XP, see "Creating Drivers and Applications Recovery discs" in Windows Vista, see "Changing Batteries" in the online Reference Guide....
Gateway Notebook Component Replacement Manual
Page 4
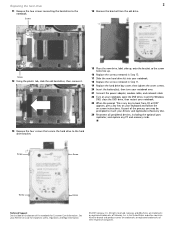
...notebook over. 21 Connect the power adapter, modem cable, and network cable 22 Turn on your notebook, open the DVD drive, insert the Windows DVD, close the DVD drive, then restart your notebook. 23 When the prompt "Press any key to the notebook. 14 Remove the bracket... drive. Screw Screw Screw Screw Technical Support See the label on the bottom of Gateway, Inc. Gateway and eMachines are trademarks or registered trademarks of the process you may be prompted to insert your Drivers and Applications Recovery disc. 24 Reconnect all peripheral devices, including the optional port replicator...
...notebook over. 21 Connect the power adapter, modem cable, and network cable 22 Turn on your notebook, open the DVD drive, insert the Windows DVD, close the DVD drive, then restart your notebook. 23 When the prompt "Press any key to the notebook. 14 Remove the bracket... drive. Screw Screw Screw Screw Technical Support See the label on the bottom of Gateway, Inc. Gateway and eMachines are trademarks or registered trademarks of the process you may be prompted to insert your Drivers and Applications Recovery disc. 24 Reconnect all peripheral devices, including the optional port replicator...

Gateway Notebook Reference Guide (Windows XP)
Page 97
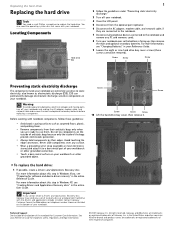
www.gateway.com Replacing the hard drive kit Tools You need a small Phillips screwdriver and the Windows XP CD to the notebook. 89 Hard drive bay To replace the hard drive kit: 1 Create a Drivers and Applications Recovery disc. Important Your notebook may have shipped with a higher-capacity drive. For more hard drive capacity, you...
www.gateway.com Replacing the hard drive kit Tools You need a small Phillips screwdriver and the Windows XP CD to the notebook. 89 Hard drive bay To replace the hard drive kit: 1 Create a Drivers and Applications Recovery disc. Important Your notebook may have shipped with a higher-capacity drive. For more hard drive capacity, you...
Gateway Notebook Reference Guide (Windows XP)
Page 101
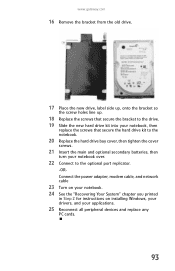
www.gateway.com 16 Remove the bracket from the old drive. 17 Place the new drive, label side up, onto the bracket so the screw holes line ..., modem cable, and network cable 23 Turn on your notebook. 24 See the "Recovering Your System" chapter you printed in Step 2 for instructions on installing Windows, your drivers, and your applications. 25 Reconnect all peripheral devices and replace any PC cards. 93
www.gateway.com 16 Remove the bracket from the old drive. 17 Place the new drive, label side up, onto the bracket so the screw holes line ..., modem cable, and network cable 23 Turn on your notebook. 24 See the "Recovering Your System" chapter you printed in Step 2 for instructions on installing Windows, your drivers, and your applications. 25 Reconnect all peripheral devices and replace any PC cards. 93
Gateway Notebook Reference Guide (Windows XP)
Page 108
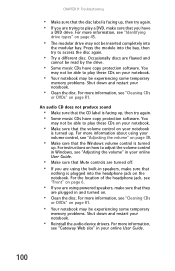
... "Cleaning CDs or DVDs" on your notebook. • Make sure that the volume control on page 38. • Make sure that the Windows volume control is facing up, then try to access the disc again. • Try a different disc. For more information, see "Adjusting the... information about using the built-in your notebook. • Reinstall the audio device drivers. For the location of the headphone jack, see "Gateway Web site" in speakers, make sure that they are plugged in Windows, see "Identifying drive types" on the notebook. Occasionally discs are using your notebook...
... "Cleaning CDs or DVDs" on your notebook. • Make sure that the volume control on page 38. • Make sure that the Windows volume control is facing up, then try to access the disc again. • Try a different disc. For more information, see "Adjusting the... information about using the built-in your notebook. • Reinstall the audio device drivers. For the location of the headphone jack, see "Gateway Web site" in speakers, make sure that they are plugged in Windows, see "Identifying drive types" on the notebook. Occasionally discs are using your notebook...
Gateway Notebook Reference Guide (Windows XP)
Page 127
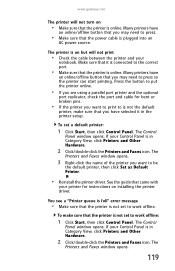
www.gateway.com The printer will not turn on but will not print • Check the ... a parallel port printer and the optional port replicator, check the port and cable for instructions on installing the printer driver. The Control Panel window opens. See the guide that came with your Control Panel is in Category View, click Printers and Other Hardware. ... to be the default printer, then click Set as Default Printer. • Reinstall the printer driver. The Printers and Faxes window opens. 119 The printer is on • Make sure that the printer is online. If your notebook.
www.gateway.com The printer will not turn on but will not print • Check the ... a parallel port printer and the optional port replicator, check the port and cable for instructions on installing the printer driver. The Control Panel window opens. See the guide that came with your Control Panel is in Category View, click Printers and Other Hardware. ... to be the default printer, then click Set as Default Printer. • Reinstall the printer driver. The Printers and Faxes window opens. 119 The printer is on • Make sure that the printer is online. If your notebook.


