
8513016 - Gateway Reference Guide 1.1 (with eRecovery)
Page 20
... day, and schedule a variety of electricity coming into your computer can enter your computer. During a power surge, the voltage level of tasks. Preparing power connections Protecting from reaching your computer through both the surge protector and the modem. Protect your eyes. ...an electrical storm, unplug both the power cord and the modem connection. An uninterruptible power supply (UPS) supplies battery power to save your work and shut down your computer during a power failure. Protect your computer by connecting them from power source problems Warning High voltages can ...
... day, and schedule a variety of electricity coming into your computer can enter your computer. During a power surge, the voltage level of tasks. Preparing power connections Protecting from reaching your computer through both the surge protector and the modem. Protect your eyes. ...an electrical storm, unplug both the power cord and the modem connection. An uninterruptible power supply (UPS) supplies battery power to save your work and shut down your computer during a power failure. Protect your computer by connecting them from power source problems Warning High voltages can ...

8513016 - Gateway Reference Guide 1.1 (with eRecovery)
Page 21
..., but you set the voltage to 115V or 230V. Connecting to a broadband modem or network Important Your computer may be damaged. The power supply's voltage selection for your location before turning on the back of your computer. 2 Insert the other areas of the network cable into the... The power supply, a component built into a cable modem, DSL modem, or network jack. 15 You can change it to match the electrical service available in your usage area (such as an opened paper clip to slide the voltage selection switch to the correct voltage position. www.gateway.com Checking...
..., but you set the voltage to 115V or 230V. Connecting to a broadband modem or network Important Your computer may be damaged. The power supply's voltage selection for your location before turning on the back of your computer. 2 Insert the other areas of the network cable into the... The power supply, a component built into a cable modem, DSL modem, or network jack. 15 You can change it to match the electrical service available in your usage area (such as an opened paper clip to slide the voltage selection switch to the correct voltage position. www.gateway.com Checking...

8513016 - Gateway Reference Guide 1.1 (with eRecovery)
Page 23
...Start). From that menu, you cannot use the Shut Down option in Windows to power down most system operations to "wake" it may enter a power-saving mode called Sleep. We recommend disconnecting the power cord and modem cable when your computer will not be used your online User Guide...modem cable from a Sleep state is the easiest way to turn off . 17 www.gateway.com 5 To open your computer. Turning off your computer's menus, see the "Customizing" chapter in the power supply and system board remain energized. For more information about five seconds, then release it. ...
...Start). From that menu, you cannot use the Shut Down option in Windows to power down most system operations to "wake" it may enter a power-saving mode called Sleep. We recommend disconnecting the power cord and modem cable when your computer will not be used your online User Guide...modem cable from a Sleep state is the easiest way to turn off . 17 www.gateway.com 5 To open your computer. Turning off your computer's menus, see the "Customizing" chapter in the power supply and system board remain energized. For more information about five seconds, then release it. ...
8513016 - Gateway Reference Guide 1.1 (with eRecovery)
Page 40
...discharge Warning To avoid exposure to dangerous electrical voltages and moving parts, turn off your computer and unplug the power cord and modem and network cables before opening the computer case, follow these guidelines: • Wear a ... your computer. • Touch a bare metal surface on the back of the computer. • Unplug the power cord and the modem and network cables. Caution ESD can permanently damage electrostatic discharge-sensitive components in your computer are... do not insert any surface. 34 The components inside of the power supply. Before opening the case.
...discharge Warning To avoid exposure to dangerous electrical voltages and moving parts, turn off your computer and unplug the power cord and modem and network cables before opening the computer case, follow these guidelines: • Wear a ... your computer. • Touch a bare metal surface on the back of the computer. • Unplug the power cord and the modem and network cables. Caution ESD can permanently damage electrostatic discharge-sensitive components in your computer are... do not insert any surface. 34 The components inside of the power supply. Before opening the case.

8513016 - Gateway Reference Guide 1.1 (with eRecovery)
Page 60
... an expansion card" on page 51. 3 Remove all memory modules by following the directions in "Installing memory" on page 41. 4 Disconnect all the power and data cables from the system board, noting their locations and orientation. (You will reconnect the cables after you wrote down in "Replacing the side...key. CHAPTER 4: Upgrading Your Computer 9 Make sure that the positive (+) side of the new battery is facing up (usually the side that secure the power supply to your computer, then slide it snaps into the socket until it out of the BIOS Setup utility opens. 14 In the BIOS Setup utility...
... an expansion card" on page 51. 3 Remove all memory modules by following the directions in "Installing memory" on page 41. 4 Disconnect all the power and data cables from the system board, noting their locations and orientation. (You will reconnect the cables after you wrote down in "Replacing the side...key. CHAPTER 4: Upgrading Your Computer 9 Make sure that the positive (+) side of the new battery is facing up (usually the side that secure the power supply to your computer, then slide it snaps into the socket until it out of the BIOS Setup utility opens. 14 In the BIOS Setup utility...
8513016 - Gateway Reference Guide 1.1 (with eRecovery)
Page 61
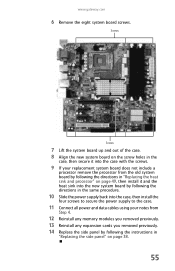
www.gateway.com 6 Remove the eight system board screws. Screws Screws 7 Lift the system board up and out of the case. 8 Align the new system board on ... into the new system board by following the directions in the same procedure. 10 Slide the power supply back into the case, then install the four screws to secure the power supply to the case. 11 Connect all power and data cables using your notes from Step 4. 12 Reinstall any memory modules you removed previously...
www.gateway.com 6 Remove the eight system board screws. Screws Screws 7 Lift the system board up and out of the case. 8 Align the new system board on ... into the new system board by following the directions in the same procedure. 10 Slide the power supply back into the case, then install the four screws to secure the power supply to the case. 11 Connect all power and data cables using your notes from Step 4. 12 Reinstall any memory modules you removed previously...

8513016 - Gateway Reference Guide 1.1 (with eRecovery)
Page 106
...8226; Make sure that is supplying power. If you ever reinstall Windows from Gateway, see the manufacturer's documentation and technical support resources. • If you have "how to" questions about using a program, see your setup poster. If you use a surge protector or power strip, make sure that ...software from the installation DVD, you will need to enter these recommendations before contacting Gateway Customer Care: • Make sure that your computer is connected correctly to an AC power outlet that your computer is nearby at the time of your computer contains information ...
...8226; Make sure that is supplying power. If you ever reinstall Windows from Gateway, see the manufacturer's documentation and technical support resources. • If you have "how to" questions about using a program, see your setup poster. If you use a surge protector or power strip, make sure that ...software from the installation DVD, you will need to enter these recommendations before contacting Gateway Customer Care: • Make sure that your computer is connected correctly to an AC power outlet that your computer is nearby at the time of your computer contains information ...
8513016 - Gateway Reference Guide 1.1 (with eRecovery)
Page 122
... 7 connector 8 Hibernate mode 7 indicator 7 source problems 14 Standby/Resume 7 troubleshooting 81 turning off computer 17 turning on computer 16 power button 7 power supply 15 printer installing 31 setting default 82 troubleshooting 82 USB port 7, 9 programs closing unresponsive 18 opening 23 re-installing 92, 95 PS/2 port keyboard 8 mouse 9 R ...
... 7 connector 8 Hibernate mode 7 indicator 7 source problems 14 Standby/Resume 7 troubleshooting 81 turning off computer 17 turning on computer 16 power button 7 power supply 15 printer installing 31 setting default 82 troubleshooting 82 USB port 7, 9 programs closing unresponsive 18 opening 23 re-installing 92, 95 PS/2 port keyboard 8 mouse 9 R ...
8513016 - Gateway Reference Guide 1.1 (with eRecovery)
Page 124
... area 81 screen resolution 81 technical support 100 telephone support 100 turning off computer 7, 17, 18 turning on computer 7, 16 TV tuner card 10 U uninterruptible power supply (UPS) 14 updating Windows 62 UPS 14 USB port 7, 9, 31 V video playing 26, 27 video jack 7 voltage checking selection 15 selection switch 15 volume adjusting...
... area 81 screen resolution 81 technical support 100 telephone support 100 turning off computer 7, 17, 18 turning on computer 7, 16 TV tuner card 10 U uninterruptible power supply (UPS) 14 updating Windows 62 UPS 14 USB port 7, 9, 31 V video playing 26, 27 video jack 7 voltage checking selection 15 selection switch 15 volume adjusting...
8513030 - Gateway Computer User Guide
Page 75
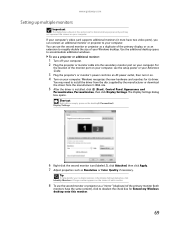
...monitor: 1 Turn off your computer. 2 Plug the projector or monitor cable into an AC power outlet, then turn it must have the same content), click to accommodate additional windows. You ...can connect an additional monitor or projector to install the driver from the disc supplied by the manufacturer or download the driver from the manufacturer's Web site. 5 After the driver...your computer, see the setup poster or your Reference Guide. 3 Plug the projector's or monitor's power cord into the secondary monitor port on the screen of each monitor. 8 To use the second monitor...
...monitor: 1 Turn off your computer. 2 Plug the projector or monitor cable into an AC power outlet, then turn it must have the same content), click to accommodate additional windows. You ...can connect an additional monitor or projector to install the driver from the disc supplied by the manufacturer or download the driver from the manufacturer's Web site. 5 After the driver...your computer, see the setup poster or your Reference Guide. 3 Plug the projector's or monitor's power cord into the secondary monitor port on the screen of each monitor. 8 To use the second monitor...

