
User Guide
Page 3
...driver updates, refer to 9pm (Central Time). 3 TRADEMARK INFORMATION ©2003 Gateway, Inc. registered trademarks of Gateway, Inc. Gateway, Gateway Country, the Gateway stylized logo, and the black-and-white spot design are trademarks or registered ...Please start by reading the important messages below first. 1. To contact Gateway Tech Support please visit the www.gateway.com/support website for any compensation arising from errors in descriptions in... to our website or contact Gateway. 3. The bundled driver, software, design, specifications and user's manual that were packaged with ...
...driver updates, refer to 9pm (Central Time). 3 TRADEMARK INFORMATION ©2003 Gateway, Inc. registered trademarks of Gateway, Inc. Gateway, Gateway Country, the Gateway stylized logo, and the black-and-white spot design are trademarks or registered ...Please start by reading the important messages below first. 1. To contact Gateway Tech Support please visit the www.gateway.com/support website for any compensation arising from errors in descriptions in... to our website or contact Gateway. 3. The bundled driver, software, design, specifications and user's manual that were packaged with ...
User Guide
Page 4
...these circumstances may fall or tip over and cause damage. 4 Do not continue to use the camera if any other abnormal state. Do not place the camera in any foreign objects have disconnected the camera.) After checking that smoke is no longer being emitted, contact your dealer or autorized service facility.... power adapter.) (If you are using the AC power adapter, unplug the adapter from the AC power outlet after you have entered the camera. WARNINGS Do not use the camera if it is emitting smoke, unusual odor or noise, becoming unusually hot to be touched, or if it is dangerous.
...these circumstances may fall or tip over and cause damage. 4 Do not continue to use the camera if any other abnormal state. Do not place the camera in any foreign objects have disconnected the camera.) After checking that smoke is no longer being emitted, contact your dealer or autorized service facility.... power adapter.) (If you are using the AC power adapter, unplug the adapter from the AC power outlet after you have entered the camera. WARNINGS Do not use the camera if it is emitting smoke, unusual odor or noise, becoming unusually hot to be touched, or if it is dangerous.

User Guide
Page 5
... an electrical shock. This may cause an electrical shock. 5 Do not expose the camera to modify the camera. Do not remove the camera casing. Do not attempt to moisture and avoid water gets into the camera. Internal inspection, maintenance and repairs should only be carried out by our authorized service ... may cause an electrical shock. Do not continue to your dealer or authorized service facility. If the camera has been dropped or if the camera case has been damaged, turn the camera off, and then disconnect the power source (batteries or AC power adapter.) (If you are using the...
... an electrical shock. This may cause an electrical shock. 5 Do not expose the camera to modify the camera. Do not remove the camera casing. Do not attempt to moisture and avoid water gets into the camera. Internal inspection, maintenance and repairs should only be carried out by our authorized service ... may cause an electrical shock. Do not continue to your dealer or authorized service facility. If the camera has been dropped or if the camera case has been damaged, turn the camera off, and then disconnect the power source (batteries or AC power adapter.) (If you are using the...
User Guide
Page 6
... in damp or dusty locations. Failure to build up, distort the case and cause a fire. This may cause a malfunction. Do not cover or wrap the camera or the AC power adapter with a cloth or quilt. This may damage the cords or cables and cause a fire or an electrical shock. 6 This may... cause heat to do not bump the camera into any connector cords or cables to other devices are disconnected before moving the camera. Do not move the camera while it is switched on. (If you are using the AC power adapter, unplug the adapter...
... in damp or dusty locations. Failure to build up, distort the case and cause a fire. This may cause a malfunction. Do not cover or wrap the camera or the AC power adapter with a cloth or quilt. This may damage the cords or cables and cause a fire or an electrical shock. 6 This may... cause heat to do not bump the camera into any connector cords or cables to other devices are disconnected before moving the camera. Do not move the camera while it is switched on. (If you are using the AC power adapter, unplug the adapter...
User Guide
Page 7
...leak, clean and wipe the battery compartment carefully and install new batteries. Incorrect battery polarity may result in a fire. When installing batteries into the camera, check the polarity markings on the battery (- and +) to do so could result in the batteries splitting or leaking and causing a fire, injury... for safety. (If you are using the AC power adapter, unplug the adapter from the AC power outlet after you have disconnected the camera.) Failure to ensure that you touch the battery fluid. 7 Do not use batteries other than those specified for use of unsuitable batteries may...
...leak, clean and wipe the battery compartment carefully and install new batteries. Incorrect battery polarity may result in a fire. When installing batteries into the camera, check the polarity markings on the battery (- and +) to do so could result in the batteries splitting or leaking and causing a fire, injury... for safety. (If you are using the AC power adapter, unplug the adapter from the AC power outlet after you have disconnected the camera.) Failure to ensure that you touch the battery fluid. 7 Do not use batteries other than those specified for use of unsuitable batteries may...
User Guide
Page 8
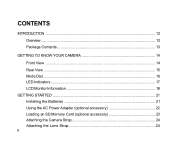
CONTENTS INTRODUCTION ...12 Overview ...12 Package Contents 13 GETTING TO KNOW YOUR CAMERA 14 Front View ...14 Rear View ...15 Mode Dial ...16 LED Indicators 17 LCD Monitor Information 18 GETTING STARTED 21 Installing the Batteries 21 Using the AC Power Adapter (optional accessory 22 Loading an SD Memory Card (optional accessory 23 Attaching the Camera Strap 24 Attaching the Lens Strap 24 8
CONTENTS INTRODUCTION ...12 Overview ...12 Package Contents 13 GETTING TO KNOW YOUR CAMERA 14 Front View ...14 Rear View ...15 Mode Dial ...16 LED Indicators 17 LCD Monitor Information 18 GETTING STARTED 21 Installing the Batteries 21 Using the AC Power Adapter (optional accessory 22 Loading an SD Memory Card (optional accessory 23 Attaching the Camera Strap 24 Attaching the Lens Strap 24 8
User Guide
Page 10
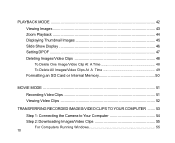
PLAYBACK MODE 42 Viewing Images 43 Zoom Playback 44 Displaying Thumbnail Images 45 Slide Show Display 46 Setting DPOF 47 Deleting Images/Video Clips 48 To Delete One Image/Video Clip At A Time 48 To Delete All Images/Video Clips At A Time 49 Formatting an SD Card or Internal Memory 50 MOVIE MODE ...51 Recording Video Clips 51 Viewing Video Clips 52 TRANSFERRING RECORDED IMAGES/VIDEO CLIPS TO YOUR COMPUTER ....... 53 Step 1: Connecting the Camera to Your Computer 54 Step 2: Downloading Images/Video Clips 55 For Computers Running Windows 55 10
PLAYBACK MODE 42 Viewing Images 43 Zoom Playback 44 Displaying Thumbnail Images 45 Slide Show Display 46 Setting DPOF 47 Deleting Images/Video Clips 48 To Delete One Image/Video Clip At A Time 48 To Delete All Images/Video Clips At A Time 49 Formatting an SD Card or Internal Memory 50 MOVIE MODE ...51 Recording Video Clips 51 Viewing Video Clips 52 TRANSFERRING RECORDED IMAGES/VIDEO CLIPS TO YOUR COMPUTER ....... 53 Step 1: Connecting the Camera to Your Computer 54 Step 2: Downloading Images/Video Clips 55 For Computers Running Windows 55 10
User Guide
Page 11
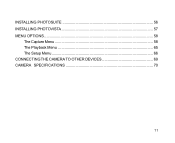
INSTALLING PHOTOSUITE 56 INSTALLING PHOTOVISTA 57 MENU OPTIONS ...58 The Capture Menu 58 The Playback Menu 65 The Setup Menu 66 CONNECTING THE CAMERA TO OTHER DEVICES 69 CAMERA SPECIFICATIONS 70 11
INSTALLING PHOTOSUITE 56 INSTALLING PHOTOVISTA 57 MENU OPTIONS ...58 The Capture Menu 58 The Playback Menu 65 The Setup Menu 66 CONNECTING THE CAMERA TO OTHER DEVICES 69 CAMERA SPECIFICATIONS 70 11
User Guide
Page 12
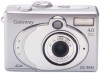
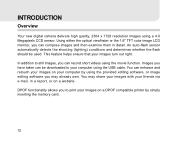
INTRODUCTION Overview Your new digital camera delivers high quality, 2304 x 1728 resolution images using the movie function. Using either the optical viewfinder or the 1.6" TFT color image LCD monitor, you can ...
INTRODUCTION Overview Your new digital camera delivers high quality, 2304 x 1728 resolution images using the movie function. Using either the optical viewfinder or the 1.6" TFT color image LCD monitor, you can ...
User Guide
Page 13
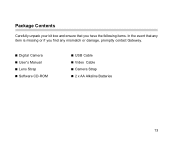
Digital Camera User's Manual Lens Strap Software CD-ROM USB Cable Video Cable Camera Strap 2 x AA Alkaline Batteries 13 Package Contents Carefully unpack your kit box and ensure that you have the following items. In the event that any item is missing or if you find any mismatch or damage, promptly contact Gateway.
Digital Camera User's Manual Lens Strap Software CD-ROM USB Cable Video Cable Camera Strap 2 x AA Alkaline Batteries 13 Package Contents Carefully unpack your kit box and ensure that you have the following items. In the event that any item is missing or if you find any mismatch or damage, promptly contact Gateway.
User Guide
Page 14
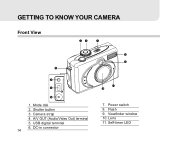
DC-in connector 14 7. Power switch 8. Self-timer LED Camera strap 4. USB digital terminal 6. Flash 9. Viewfinder window 10. Mode dial 2. A/V OUT (Audio/Video Out) terminal 5. Shutter button 3. Lens 11. GETTING TO KNOW YOUR CAMERA Front View 1.
DC-in connector 14 7. Power switch 8. Self-timer LED Camera strap 4. USB digital terminal 6. Flash 9. Viewfinder window 10. Mode dial 2. A/V OUT (Audio/Video Out) terminal 5. Shutter button 3. Lens 11. GETTING TO KNOW YOUR CAMERA Front View 1.
User Guide
Page 16
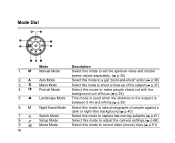
... photographs of people against a dark or night-time background.( p.40) Select this mode to capture fast-moving subjects.( p.41) Select this mode to adjust the camera settings.( p.66) Select this mode to record video (movie) clips.( p.51) Mode Dial 1.
... photographs of people against a dark or night-time background.( p.40) Select this mode to capture fast-moving subjects.( p.41) Select this mode to adjust the camera settings.( p.66) Select this mode to record video (movie) clips.( p.51) Mode Dial 1.
User Guide
Page 17
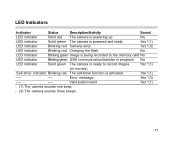
... ---- LED Indicators Indicator Status Description/Activity Sound LED indicator Solid red The camera is powering up No LED indicator Solid green The camera is powered and ready Yes *(1) LED indicator Blinking red Camera error Yes *(3) LED indicator Blinking red Charging the flash No LED indicator... is being recorded to the memory card No LED indicator Blinking green USB communication/transfer in progress No LED indicator Solid green The camera is ready to record images Yes *(1) (or movies) Self-timer indicator Blinking red The self-timer function is activated Yes *(1) ...
... ---- LED Indicators Indicator Status Description/Activity Sound LED indicator Solid red The camera is powering up No LED indicator Solid green The camera is powered and ready Yes *(1) LED indicator Blinking red Camera error Yes *(3) LED indicator Blinking red Charging the flash No LED indicator... is being recorded to the memory card No LED indicator Blinking green USB communication/transfer in progress No LED indicator Solid green The camera is ready to record images Yes *(1) (or movies) Self-timer indicator Blinking red The self-timer function is activated Yes *(1) ...
User Guide
Page 21
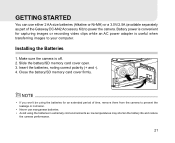
...convenient for an extended period of the Gateway DC-M42 Accessory Kit) to power the camera. Slide the battery/SD memory card cover open. 3. If you won't be using the batteries in extremely cold environments as part of time, remove them from the camera to your computer. Avoid using the... adapter is off. 2. Close the battery/SD memory card cover firmly. Insert the batteries, noting correct polarity (+ and -). 4. Make sure the camera is useful when transferring images to prevent the leakage or corrosion. Never use either 2 AA size batteries (Alkaline or Ni-MH) or a 3.0V...
...convenient for an extended period of the Gateway DC-M42 Accessory Kit) to power the camera. Slide the battery/SD memory card cover open. 3. If you won't be using the batteries in extremely cold environments as part of time, remove them from the camera to your computer. Avoid using the... adapter is off. 2. Close the battery/SD memory card cover firmly. Insert the batteries, noting correct polarity (+ and -). 4. Make sure the camera is useful when transferring images to prevent the leakage or corrosion. Never use either 2 AA size batteries (Alkaline or Ni-MH) or a 3.0V...
User Guide
Page 22
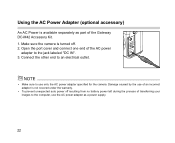
Make sure to an electrical outlet. Damage caused by the use of the AC power adapter to the jack labeled "DC IN". 3. Open the port cover and connect one end of an incorrect adapter is not covered under the warranty. Connect the other end to use ...only the AC power adapter specified for the camera. To prevent unexpected auto power off . 2. Make sure the camera is turned off resulting from no battery power left during the process of the Gateway DC-M42 Accessory Kit. 1. Using the AC Power Adapter (optional accessory) An AC Power is...
Make sure to an electrical outlet. Damage caused by the use of the AC power adapter to the jack labeled "DC IN". 3. Open the port cover and connect one end of an incorrect adapter is not covered under the warranty. Connect the other end to use ...only the AC power adapter specified for the camera. To prevent unexpected auto power off . 2. Make sure the camera is turned off resulting from no battery power left during the process of the Gateway DC-M42 Accessory Kit. 1. Using the AC Power Adapter (optional accessory) An AC Power is...
User Guide
Page 23
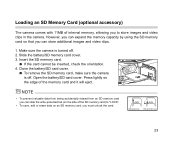
... the write-protected tab (on the edge of internal memory, allowing you must unlock the card. 23 Loading an SD Memory Card (optional accessory) The camera comes with 11MB of the memory card and it will eject. However, you can expand the memory capacity by using the SD memory card so... that you can store additional images and video clips. 1. Make sure the camera is off . 2. If the card cannot be inserted, check the orientation. 4. To remove the SD memory card, make sure the...
... the write-protected tab (on the edge of internal memory, allowing you must unlock the card. 23 Loading an SD Memory Card (optional accessory) The camera comes with 11MB of the memory card and it will eject. However, you can expand the memory capacity by using the SD memory card so... that you can store additional images and video clips. 1. Make sure the camera is off . 2. If the card cannot be inserted, check the orientation. 4. To remove the SD memory card, make sure the...
User Guide
Page 24
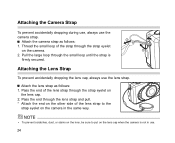
Pull the large loop through the lens strap and pull. * Attach the end on the other side of the lens strap to put on the camera in use. 24 Pass the end through the small loop until the strap is not in the same way. Attaching the Lens Strap To prevent ... follows: 1. Thread the small loop of the lens strap through the strap eyelet on the lens cap. 2. Attach the lens strap as follows: 1. Attaching the Camera Strap To prevent accidentally dropping during use, always use the lens strap. Pass the end of the strap through the strap eyelet on the...
Pull the large loop through the lens strap and pull. * Attach the end on the other side of the lens strap to put on the camera in use. 24 Pass the end through the small loop until the strap is not in the same way. Attaching the Lens Strap To prevent ... follows: 1. Thread the small loop of the lens strap through the strap eyelet on the lens cap. 2. Attach the lens strap as follows: 1. Attaching the Camera Strap To prevent accidentally dropping during use, always use the lens strap. Pass the end of the strap through the strap eyelet on the...
User Guide
Page 25
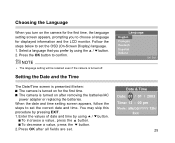
Follow the steps below to choose a language for displayed information and the LCD monitor. The language setting will be retained even if the camera is turned on after all fields are set the OSD (On-Screen Display) language. 1. You may skip this procedure by pressing EXIT. 1. Enter the.... To incraese a value, press the button. Select a language that you to set . 25 The camera is turned off. Setting the Date and the Time The Date/Time screen is presented if/when: The camera is turned on for the first time. When the date and time setting screen appears, follow...
Follow the steps below to choose a language for displayed information and the LCD monitor. The language setting will be retained even if the camera is turned on after all fields are set the OSD (On-Screen Display) language. 1. You may skip this procedure by pressing EXIT. 1. Enter the.... To incraese a value, press the button. Select a language that you to set . 25 The camera is turned off. Setting the Date and the Time The Date/Time screen is presented if/when: The camera is turned on for the first time. When the date and time setting screen appears, follow...
User Guide
Page 26
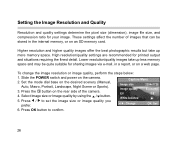
... in a report, or on the desired scenery (Manual, Auto, Macro, Portrait, Landscape, Night Scene or Sports). 3. Press the button on the camera. 2. These settings affect the number of the camera. 4. To change the image resolution or image quality, perform the steps below: 1. Press / to confirm. 26 Select Image size or Image quality...
... in a report, or on the desired scenery (Manual, Auto, Macro, Portrait, Landscape, Night Scene or Sports). 3. Press the button on the camera. 2. These settings affect the number of the camera. 4. To change the image resolution or image quality, perform the steps below: 1. Press / to confirm. 26 Select Image size or Image quality...
User Guide
Page 28
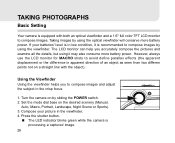
...line with both an optical viewfinder and a 1.6" full color TFT LCD monitor to compose images. The LED indicator blinks green while the camera is processing a captured image. 28 Taking images by using the optical viewfinder will conserve more battery power. Set the mode dial base... 2. Using the Viewfinder Using the viewfinder helps you accurately compose the pictures and examine all the details, but using the viewfinder. Turn the camera on the desired scenery (Manual, Auto, Macro, Portrait, Landscape, Night Scene or Sports). 3. Compose your batteries' level is in low condition...
...line with both an optical viewfinder and a 1.6" full color TFT LCD monitor to compose images. The LED indicator blinks green while the camera is processing a captured image. 28 Taking images by using the optical viewfinder will conserve more battery power. Set the mode dial base... 2. Using the Viewfinder Using the viewfinder helps you accurately compose the pictures and examine all the details, but using the viewfinder. Turn the camera on the desired scenery (Manual, Auto, Macro, Portrait, Landscape, Night Scene or Sports). 3. Compose your batteries' level is in low condition...