
User Guide
Page 3
... driver, software, design, specifications and user's manual that were packaged with the camera are U.S. READ THIS FIRST Please start by reading the important messages below first. 1. Microsoft® and Windows® are subject to change without notice. 2. For driver updates, refer to 9pm (Central Time). 3 All other countries. TRADEMARK INFORMATION ©2003 Gateway, Inc. All rights reserved. SDTM is not liable whatsoever for online and chat support...
... driver, software, design, specifications and user's manual that were packaged with the camera are U.S. READ THIS FIRST Please start by reading the important messages below first. 1. Microsoft® and Windows® are subject to change without notice. 2. For driver updates, refer to 9pm (Central Time). 3 All other countries. TRADEMARK INFORMATION ©2003 Gateway, Inc. All rights reserved. SDTM is not liable whatsoever for online and chat support...
User Guide
Page 10
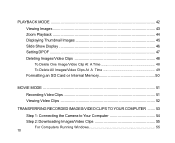
PLAYBACK MODE 42 Viewing Images 43 Zoom Playback 44 Displaying Thumbnail Images 45 Slide Show Display 46 Setting DPOF 47 Deleting Images/Video Clips 48 To Delete One Image/Video Clip At A Time 48 To Delete All Images/Video Clips At A Time 49 Formatting an SD Card or Internal Memory 50 MOVIE MODE ...51 Recording Video Clips 51 Viewing Video Clips 52 TRANSFERRING RECORDED IMAGES/VIDEO CLIPS TO YOUR COMPUTER ....... 53 Step 1: Connecting the Camera to Your Computer 54 Step 2: Downloading Images/Video Clips 55 For Computers Running Windows 55 10
PLAYBACK MODE 42 Viewing Images 43 Zoom Playback 44 Displaying Thumbnail Images 45 Slide Show Display 46 Setting DPOF 47 Deleting Images/Video Clips 48 To Delete One Image/Video Clip At A Time 48 To Delete All Images/Video Clips At A Time 49 Formatting an SD Card or Internal Memory 50 MOVIE MODE ...51 Recording Video Clips 51 Viewing Video Clips 52 TRANSFERRING RECORDED IMAGES/VIDEO CLIPS TO YOUR COMPUTER ....... 53 Step 1: Connecting the Camera to Your Computer 54 Step 2: Downloading Images/Video Clips 55 For Computers Running Windows 55 10
User Guide
Page 12
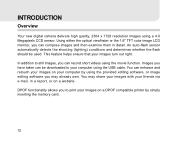
... already own. An auto-flash sensor automatically detects the shooting (lighting) conditions and determines whether the flash should be downloaded to print your computer by simply inserting the memory card. 12 This feature helps ensure that your friends via e-mail, in detail. Images you can record short videos using the provided editing software, or image editing software you can be used. In addition to still images, you have taken...
... already own. An auto-flash sensor automatically detects the shooting (lighting) conditions and determines whether the flash should be downloaded to print your computer by simply inserting the memory card. 12 This feature helps ensure that your friends via e-mail, in detail. Images you can record short videos using the provided editing software, or image editing software you can be used. In addition to still images, you have taken...
User Guide
Page 13
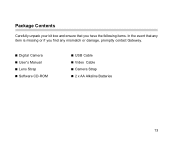
Digital Camera User's Manual Lens Strap Software CD-ROM USB Cable Video Cable Camera Strap 2 x AA Alkaline Batteries 13 Package Contents Carefully unpack your kit box and ensure that you have the following items. In the event that any item is missing or if you find any mismatch or damage, promptly contact Gateway.
Digital Camera User's Manual Lens Strap Software CD-ROM USB Cable Video Cable Camera Strap 2 x AA Alkaline Batteries 13 Package Contents Carefully unpack your kit box and ensure that you have the following items. In the event that any item is missing or if you find any mismatch or damage, promptly contact Gateway.
User Guide
Page 21
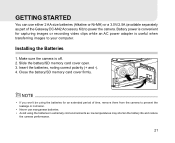
Close the battery/SD memory card cover firmly. Avoid using the batteries for capturing images or recording video clips while an AC power adapter is useful when transferring images to your computer. Battery power is off. 2. Insert the batteries, noting correct polarity (+ and -). 4. Slide the battery/SD memory card cover open. 3. If you won't be using the batteries in extremely cold environments as part of time, remove them from the camera to power the camera. Never use either 2 AA size batteries (Alkaline...
Close the battery/SD memory card cover firmly. Avoid using the batteries for capturing images or recording video clips while an AC power adapter is useful when transferring images to your computer. Battery power is off. 2. Insert the batteries, noting correct polarity (+ and -). 4. Slide the battery/SD memory card cover open. 3. If you won't be using the batteries in extremely cold environments as part of time, remove them from the camera to power the camera. Never use either 2 AA size batteries (Alkaline...
User Guide
Page 22
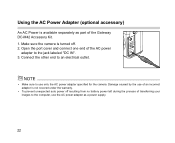
... use of an incorrect adapter is not covered under the warranty. To prevent unexpected auto power off . 2. Using the AC Power Adapter (optional accessory) An AC Power is turned off resulting from no battery power left during the process of transferring your images to the computer, use the AC power adapter as part of the Gateway DC-M42 Accessory Kit. 1. Damage caused by the use only the AC power adapter specified for the camera...
... use of an incorrect adapter is not covered under the warranty. To prevent unexpected auto power off . 2. Using the AC Power Adapter (optional accessory) An AC Power is turned off resulting from no battery power left during the process of transferring your images to the computer, use the AC power adapter as part of the Gateway DC-M42 Accessory Kit. 1. Damage caused by the use only the AC power adapter specified for the camera...
User Guide
Page 25
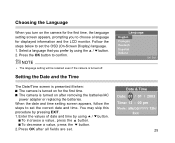
... displayed information and the LCD monitor. The camera is turned off. When the date and time setting screen appears, follow the steps to set the correct date and time. To incraese a value, press the button. To decrease a value, press the button. 2. Press OK after removing the batteries/AC power adapter or replacing the batteries. Follow the steps below to set the OSD (On-Screen Display) language. 1. Enter the values of date and time by using the / button...
... displayed information and the LCD monitor. The camera is turned off. When the date and time setting screen appears, follow the steps to set the correct date and time. To incraese a value, press the button. To decrease a value, press the button. 2. Press OK after removing the batteries/AC power adapter or replacing the batteries. Follow the steps below to set the OSD (On-Screen Display) language. 1. Enter the values of date and time by using the / button...
User Guide
Page 26
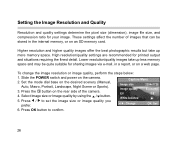
... on the desired scenery (Manual, Auto, Macro, Portrait, Landscape, Night Scene or Sports). 3. To change the image resolution or image quality, perform the steps below: 1. High resolution/quality settings are recommended for your image. Set the mode dial base on a web page. Press OK button to set the image size or image quality you prefer. 6. These settings affect the number of the camera. 4. Select Image size or Image quality by using the / button. 5.
... on the desired scenery (Manual, Auto, Macro, Portrait, Landscape, Night Scene or Sports). 3. To change the image resolution or image quality, perform the steps below: 1. High resolution/quality settings are recommended for your image. Set the mode dial base on a web page. Press OK button to set the image size or image quality you prefer. 6. These settings affect the number of the camera. 4. Select Image size or Image quality by using the / button. 5.
User Guide
Page 28
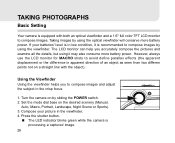
... use the LCD monitor for MACRO shots to compose images. Compose your batteries' level is processing a captured image. 28 Turn the camera on the desired scenery (Manual, Auto, Macro, Portrait, Landscape, Night Scene or Sports). 3. The LED indicator blinks green while the camera is in low condition, it may also consume more battery power. Press the shutter button. If your picture in the crisp focus. 1. Taking images by sliding the POWER switch. 2. Using the Viewfinder Using the viewfinder helps...
... use the LCD monitor for MACRO shots to compose images. Compose your batteries' level is processing a captured image. 28 Turn the camera on the desired scenery (Manual, Auto, Macro, Portrait, Landscape, Night Scene or Sports). 3. The LED indicator blinks green while the camera is in low condition, it may also consume more battery power. Press the shutter button. If your picture in the crisp focus. 1. Taking images by sliding the POWER switch. 2. Using the Viewfinder Using the viewfinder helps...
User Guide
Page 29
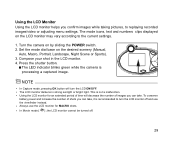
... the POWER switch. 2. Press the shutter button. The LED indicator blinks green while the camera is not a malfunction. To conserve battery power and increase the number of images you can take . In Capture mode, pressing OK button will decrease the number of shots you can take , it is recommended to replaying recorded images/video or adjusting menu settings. The LCD monitor darkens in the LCD monitor. 4. Using the LCD Monitor Using the LCD monitor helps you confirm images while taking pictures, to turn the LCD ON...
... the POWER switch. 2. Press the shutter button. The LED indicator blinks green while the camera is not a malfunction. To conserve battery power and increase the number of images you can take . In Capture mode, pressing OK button will decrease the number of shots you can take , it is recommended to replaying recorded images/video or adjusting menu settings. The LCD monitor darkens in the LCD monitor. 4. Using the LCD Monitor Using the LCD monitor helps you confirm images while taking pictures, to turn the LCD ON...
User Guide
Page 31
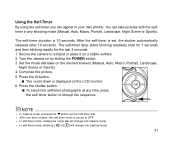
... the self-timer button to disrupt the sequence. Using the Self-Timer By using the self-timer you can take pictures with the selftimer in your own photos. After the self-timer is 10 seconds. The self-timer lamp starts blinking relatively slow for 7 seconds and then blinking rapidly for the last 3 seconds. 1. Turn the camera on the LCD monitor. 6. Set the mode dial base on a stable surface. 2. To cancel the self-timer photography at any shooting mode (Manual, Auto, Macro...
... the self-timer button to disrupt the sequence. Using the Self-Timer By using the self-timer you can take pictures with the selftimer in your own photos. After the self-timer is 10 seconds. The self-timer lamp starts blinking relatively slow for 7 seconds and then blinking rapidly for the last 3 seconds. 1. Turn the camera on the LCD monitor. 6. Set the mode dial base on a stable surface. 2. To cancel the self-timer photography at any shooting mode (Manual, Auto, Macro...
User Guide
Page 34
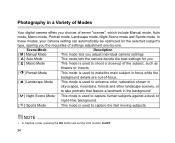
... OK button will set the LCD monitor On/Off. 34 In these modes, your camera setting can automatically be optimized for you. [ ] Macro Mode This mode is used to shoot a close-up of the subject, such as flowers or insects. [ ] Portrait Mode This mode is used to make the main subject in focus while the background details are out-of-focus. [ ] Landscape Mode This mode is used to enhance color, saturation...
... OK button will set the LCD monitor On/Off. 34 In these modes, your camera setting can automatically be optimized for you. [ ] Macro Mode This mode is used to shoot a close-up of the subject, such as flowers or insects. [ ] Portrait Mode This mode is used to make the main subject in focus while the background details are out-of-focus. [ ] Landscape Mode This mode is used to enhance color, saturation...
User Guide
Page 37
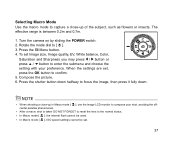
Press the Menu button. 4. Compose the picture. 6. Press the shutter button down . The effective range is taken DO NOT FORGET to reset the lens to confirm. 5. Rotate the mode dial to focus the image, then press it fully down halfway to [ ]. 3. In Macro mode [ ], the internal flash cannot be set. 37 When shooting a close -up in Macro mode [ ], use the image LCD monitor to compose your preference. After a macro shot is between 0.2m and...
Press the Menu button. 4. Compose the picture. 6. Press the shutter button down . The effective range is taken DO NOT FORGET to reset the lens to confirm. 5. Rotate the mode dial to focus the image, then press it fully down halfway to [ ]. 3. In Macro mode [ ], the internal flash cannot be set. 37 When shooting a close -up in Macro mode [ ], use the image LCD monitor to compose your preference. After a macro shot is between 0.2m and...
User Guide
Page 38
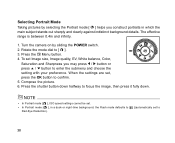
... mode dial to focus the image, then press it fully down halfway to [ ]. 3. Compose the picture. 6. Press the shutter button down . In Portrait mode [ ], ISO speed settings cannot be set to confirm. 5. When the settings are set Image size, Image quality, EV, White balance, Color, Saturation and Sharpness you construct portraits in a dusk or night-time background, the Flash mode defaults to [ Red-Eye Reduction). ](automatically set . The effective range is between 0.4m and infinity. 1. To set...
... mode dial to focus the image, then press it fully down halfway to [ ]. 3. Compose the picture. 6. Press the shutter button down . In Portrait mode [ ], ISO speed settings cannot be set to confirm. 5. When the settings are set Image size, Image quality, EV, White balance, Color, Saturation and Sharpness you construct portraits in a dusk or night-time background, the Flash mode defaults to [ Red-Eye Reduction). ](automatically set . The effective range is between 0.4m and infinity. 1. To set...
User Guide
Page 43
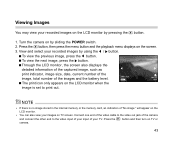
... POWER switch. 2. Turn the camera on TV or camera. 43 View and select your recorded images on TV screen. The print icon only appears on the LCD monitor when the image is no image stored in the internal memory or the memory card, an indication of the images and the battery level. Through the LCD monitor, the screen also displays the detailed information of the captured image, such as print indicator, image size, date, current number of the image, total number of "No image...
... POWER switch. 2. Turn the camera on TV or camera. 43 View and select your recorded images on TV screen. The print icon only appears on the LCD monitor when the image is no image stored in the internal memory or the memory card, an indication of the images and the battery level. Through the LCD monitor, the screen also displays the detailed information of the captured image, such as print indicator, image size, date, current number of the image, total number of "No image...
User Guide
Page 44
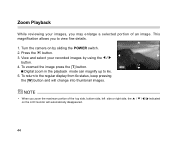
... right side, the / / / indicated on by using the / button. 4. Turn the camera on the LCD monitor will change into thumbnail images. To zoomed the image press the [T] button. When you to 6x. 5. Press the button. 3. To return to the regular display from 6x status, keep pressing the [W] button and will automatically disappeared. 44 Zoom Playback While reviewing your recorded images by sliding the POWER switch. 2. Digital zoom in the playback mode can magnify up to...
... right side, the / / / indicated on by using the / button. 4. Turn the camera on the LCD monitor will change into thumbnail images. To zoomed the image press the [T] button. When you to 6x. 5. Press the button. 3. To return to the regular display from 6x status, keep pressing the [W] button and will automatically disappeared. 44 Zoom Playback While reviewing your recorded images by sliding the POWER switch. 2. Digital zoom in the playback mode can magnify up to...
User Guide
Page 45
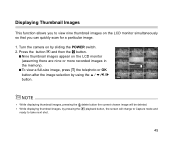
... shot. While displaying thumbnail images, by using the / / / button. playback button, the screen will be deleted. Displaying Thumbnail Images This function allows you can quickly scan for a particular image. 1. Press the button and then the button. Nine thumbnail images appear on by sliding the POWER switch. 2. While displaying thumbnail images, pressing the delete button the current chosen image will change to view nine thumbnail images on the LCD monitor simultaneously so that you to Capture mode and 45 Turn the camera...
... shot. While displaying thumbnail images, by using the / / / button. playback button, the screen will be deleted. Displaying Thumbnail Images This function allows you can quickly scan for a particular image. 1. Press the button and then the button. Nine thumbnail images appear on by sliding the POWER switch. 2. While displaying thumbnail images, pressing the delete button the current chosen image will change to view nine thumbnail images on the LCD monitor simultaneously so that you to Capture mode and 45 Turn the camera...
User Guide
Page 47
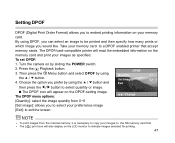
... camera on by using the / button. 4. Press the Playback button. 3. Then press the Menu button and select DPOF by sliding the POWER switch. 2. The DPOF icon will also display on your memory card. Setting DPOF DPOF (Digital Print Order Format) allows you to be printed and then specify how many prints or which image you would like. By using the / button and then press the / button to a DPOF enabled printer that accept memory cards. The DPOF/card-compatible printer...
... camera on by using the / button. 4. Press the Playback button. 3. Then press the Menu button and select DPOF by sliding the POWER switch. 2. The DPOF icon will also display on your memory card. Setting DPOF DPOF (Digital Print Order Format) allows you to be printed and then specify how many prints or which image you would like. By using the / button and then press the / button to a DPOF enabled printer that accept memory cards. The DPOF/card-compatible printer...
User Guide
Page 52
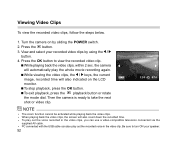
... to view the recorded video clip. When playing back the video clips, the screen will automatically play the whole movie recording again. PC connected with the USB cable can use a video-compatible television connected via the supplied AV cable. While playing back the video clips, within 2 sec. To stop playback, press the OK button. To exit playback, press the playback button or rotate the mode dial. The zoom function cannot be activated while playing back the video clips. Turn the camera...
... to view the recorded video clip. When playing back the video clips, the screen will automatically play the whole movie recording again. PC connected with the USB cable can use a video-compatible television connected via the supplied AV cable. While playing back the video clips, within 2 sec. To stop playback, press the OK button. To exit playback, press the playback button or rotate the mode dial. The zoom function cannot be activated while playing back the video clips. Turn the camera...

User Guide
Page 71
... batteries and the SD memory card) Design and specifications are subject to change without notice. 71 LCD monitor Self-timer 1.6" color TFT LCD 10-second delay Zoom Optical: 3X Digital: Capture mode: 4X/ Playback mode: 6X Exposure compensation Auto; Manual: Daylight, Cloudy, Sunset, Tungsten, Fluorescent Compressed format JPEG, MPEG 1 Level I for video clip Standards JPEG, EXIF 2.1, DPOF, DCF, MPEG 1 Level I Interface DC IN jack, USB connector, VIDEO OUT jack (NTSC or PAL) Operating environment Operation...
... batteries and the SD memory card) Design and specifications are subject to change without notice. 71 LCD monitor Self-timer 1.6" color TFT LCD 10-second delay Zoom Optical: 3X Digital: Capture mode: 4X/ Playback mode: 6X Exposure compensation Auto; Manual: Daylight, Cloudy, Sunset, Tungsten, Fluorescent Compressed format JPEG, MPEG 1 Level I for video clip Standards JPEG, EXIF 2.1, DPOF, DCF, MPEG 1 Level I Interface DC IN jack, USB connector, VIDEO OUT jack (NTSC or PAL) Operating environment Operation...