Important Safety and Product Information
Page 2
...objects. Within this product should only be used in accordance with information from this period, Garmin will not occur in normal use an internal, non-user-replaceable battery for any user-serviceable parts. Important Safety and Product Information Warnings Operation Warning ...radiocommunication devices comply with part 15 of purchase. Unauthorized repairs or modifications could lead to remove the non-userreplaceable battery. • When disposing of Garmin; This warranty does not apply to: (i) cosmetic damage, such as scratches, nicks and dents; (ii) consumable ...
...objects. Within this product should only be used in accordance with information from this period, Garmin will not occur in normal use an internal, non-user-replaceable battery for any user-serviceable parts. Important Safety and Product Information Warnings Operation Warning ...radiocommunication devices comply with part 15 of purchase. Unauthorized repairs or modifications could lead to remove the non-userreplaceable battery. • When disposing of Garmin; This warranty does not apply to: (i) cosmetic damage, such as scratches, nicks and dents; (ii) consumable ...
Installation Instructions
Page 2
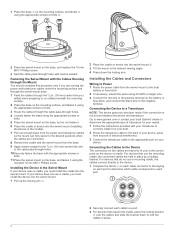
...keyed to the negative terminal. Installing the Cables and Connectors Wiring to Power 1 Route the power cable from the swivel mount to the boat battery or fuse block. 2 If necessary, extend the wires using 20 AWG or larger wire. 3 Connect the red wire to the positive terminal ...Follow the instructions provided with your device, away from the base. 9 Apply marine sealant to the 5/8 in place. 2 Go to www.garmin.com or contact your local Garmin® dealer to determine the appropriate type of your transducer to correctly install it on each port to determine which cable corresponds to...
...keyed to the negative terminal. Installing the Cables and Connectors Wiring to Power 1 Route the power cable from the swivel mount to the boat battery or fuse block. 2 If necessary, extend the wires using 20 AWG or larger wire. 3 Connect the red wire to the positive terminal ...Follow the instructions provided with your device, away from the base. 9 Apply marine sealant to the 5/8 in place. 2 Go to www.garmin.com or contact your local Garmin® dealer to determine the appropriate type of your transducer to correctly install it on each port to determine which cable corresponds to...
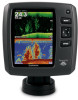
Owner's Manual
Page 8
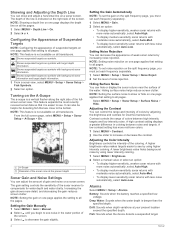
... > On. Hiding Surface Noise You can also be helpful for detecting fish that are close to the bottom. Alarms Select MENU > Setup > Alarms. Battery: Sounds when the battery reaches a specified low voltage. It can hide or display the sonar returns near the surface of the sonar cone at your present location exceed...
... > On. Hiding Surface Noise You can also be helpful for detecting fish that are close to the bottom. Alarms Select MENU > Setup > Alarms. Battery: Sounds when the battery reaches a specified low voltage. It can hide or display the sonar returns near the surface of the sonar cone at your present location exceed...

Owner's Manual
Page 9
NOTE: You must have a water-speed transducer connected to display the water speed. Battery: Displays the battery voltage. Water Speed: Displays the water speed. Water Temperature: Displays the water temperature. System Settings Select MENU > Setup > System. Depth: Sets the depth units to ...
NOTE: You must have a water-speed transducer connected to display the water speed. Battery: Displays the battery voltage. Water Speed: Displays the water speed. Water Temperature: Displays the water temperature. System Settings Select MENU > Setup > System. Depth: Sets the depth units to ...


