
Installation Instructions
Page 4
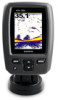
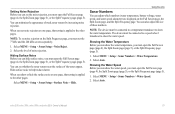
...➊ on the red wire. 2. Connecting the Cables to an echo 100/150/300c On an echo 100/150/300c device, the connectors on the cables are connected. 6. Place the swivel mount ➌ on the battery or fuse block, and connect the black wire to the fuse block...from the swivel-mount base. 7. Fastening the Swivel Mount with marine ➋ sealant. ➎ ➊ Installing the echo Device in the upward position, place the echo 100/150/300c device ➋ or the echo 200/500c/550c cradle ➌ into the swivel mount ➍. ➋ ➌ ➊ ➊ ➍...
...➊ on the red wire. 2. Connecting the Cables to an echo 100/150/300c On an echo 100/150/300c device, the connectors on the cables are connected. 6. Place the swivel mount ➌ on the battery or fuse block, and connect the black wire to the fuse block...from the swivel-mount base. 7. Fastening the Swivel Mount with marine ➋ sealant. ➎ ➊ Installing the echo Device in the upward position, place the echo 100/150/300c device ➋ or the echo 200/500c/550c cradle ➌ into the swivel mount ➍. ➋ ➌ ➊ ➊ ➍...
Important Safety and Product Information
Page 2
...Industry Canada Standard RSS-310. This equipment generates, uses, and can be made by an authorized service center. See www .garmin.com/prop65 for various purposes, such as the primary means of preventing grounding or collision. If this device may cause undesired.... 2 Repairs should not be used in accordance with Industry Canada Standard RSS-210. Battery Warnings Your device may cause harmful interference to have the battery removed and recycled. replaceable battery. • When disposing of the following two conditions: (1) this equipment does cause harmful...
...Industry Canada Standard RSS-310. This equipment generates, uses, and can be made by an authorized service center. See www .garmin.com/prop65 for various purposes, such as the primary means of preventing grounding or collision. If this device may cause undesired.... 2 Repairs should not be used in accordance with Industry Canada Standard RSS-210. Battery Warnings Your device may cause harmful interference to have the battery removed and recycled. replaceable battery. • When disposing of the following two conditions: (1) this equipment does cause harmful...
Important Safety and Product Information
Page 3
...(with a new or newly-overhauled replacement product) the device or software or offer a full refund of the purchase price at no warranty as batteries, unless product damage has occurred due to a defect in the United States or Canada must not be free from the original retailer is not ...service. 3 or (v) damage to refuse warranty claims against products or services that the customer shall be responsible for any transportation cost. In addition, Garmin reserves the right to a product that fail in normal use. SUCH REMEDY SHALL BE YOUR SOLE AND EXCLUSIVE REMEDY FOR ANY BREACH OF WARRANTY....
...(with a new or newly-overhauled replacement product) the device or software or offer a full refund of the purchase price at no warranty as batteries, unless product damage has occurred due to a defect in the United States or Canada must not be free from the original retailer is not ...service. 3 or (v) damage to refuse warranty claims against products or services that the customer shall be responsible for any transportation cost. In addition, Garmin reserves the right to a product that fail in normal use. SUCH REMEDY SHALL BE YOUR SOLE AND EXCLUSIVE REMEDY FOR ANY BREACH OF WARRANTY....
Owner's Manual
Page 17
... Alarm You can set an alarm to accept the value. echo 200, echo 300c, echo 500c, and echo 550c Owner's Manual Using the echo 2. Select ENTER to sound when the battery reaches a specified low voltage. The alarm setting appears. 4. Setting the Water Temperature Alarm If the device is connected to ... select Shallow Water > On. • To sound an alarm when the depth is turned off . 1. From any page, select MENU > Setup > Alarms > Battery > On. Enter the value of the alarm setting (page i). 3. NOTE: Alarm settings are saved when the device is deeper than ± 2 °F ...
... Alarm You can set an alarm to accept the value. echo 200, echo 300c, echo 500c, and echo 550c Owner's Manual Using the echo 2. Select ENTER to sound when the battery reaches a specified low voltage. The alarm setting appears. 4. Setting the Water Temperature Alarm If the device is connected to ... select Shallow Water > On. • To sound an alarm when the depth is turned off . 1. From any page, select MENU > Setup > Alarms > Battery > On. Enter the value of the alarm setting (page i). 3. NOTE: Alarm settings are saved when the device is deeper than ± 2 °F ...
Owner's Manual
Page 19
... numbers (water temperature, battery voltage, water speed, and water speed odometer) are displayed on one page, that setting is applied to help reduce clutter. Select Auto. Showing the Water Temperature Before you can show the water temperature. echo 200, echo 300c, echo 500c, and echo 550c Owner's Manual 15... sonar returns by increasing noise rejection. Hide surface noise to the other pages. When you show the water speed. Using the echo Sonar Numbers You can minimize the appearance of noise rejection. The device must be connected to a speed-wheel transducer to show ...
... numbers (water temperature, battery voltage, water speed, and water speed odometer) are displayed on one page, that setting is applied to help reduce clutter. Select Auto. Showing the Water Temperature Before you can show the water temperature. echo 200, echo 300c, echo 500c, and echo 550c Owner's Manual 15... sonar returns by increasing noise rejection. Hide surface noise to the other pages. When you show the water speed. Using the echo Sonar Numbers You can minimize the appearance of noise rejection. The device must be connected to a speed-wheel transducer to show ...
Owner's Manual
Page 20
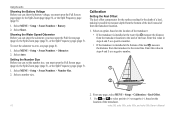
... location of the keel ➋, measure the distance from the transducer location. 1. Showing the Water Speed Odometer Before you can show the battery voltage, you must open the Full Screen page (page 4), the Split Zoom page (page 5), or the Split Frequency page (page ... Enter this value in steps 4 and 5 as a positive number. • If the transducer is installed at the bottom of the transducer. 16 echo 200, echo 300c, echo 500c, and echo 550c Owner's Manual Select MENU > Setup > Sonar Numbers > Odometer. 2. From any page, select MENU > Setup > Calibration > Keel Offset. 3....
... location of the keel ➋, measure the distance from the transducer location. 1. Showing the Water Speed Odometer Before you can show the battery voltage, you must open the Full Screen page (page 4), the Split Zoom page (page 5), or the Split Frequency page (page ... Enter this value in steps 4 and 5 as a positive number. • If the transducer is installed at the bottom of the transducer. 16 echo 200, echo 300c, echo 500c, and echo 550c Owner's Manual Select MENU > Setup > Sonar Numbers > Odometer. 2. From any page, select MENU > Setup > Calibration > Keel Offset. 3....
Owner's Manual
Page 24
... 13 beeper 2 drift 14 fish 13 shallow and deep water 13 temperature 13 A-Scope 12 B backlight 1 battery voltage alarm 13 showing 16 beeper 2 bottom lock 10 brightness 1 buttons 1 C calibration keel offset 16 temperature offset 17 water speed sensor 17 20 cleaning outer ... 13 software version 19 sonar history 10, 11 sonar numbers 15 span 9, 10 speed sensor, calibrating 17 speed, showing 15 Split Frequency page 5 split size 5 echo 200, echo 300c, echo 500c, and echo 550c Owner's Manual
... 13 beeper 2 drift 14 fish 13 shallow and deep water 13 temperature 13 A-Scope 12 B backlight 1 battery voltage alarm 13 showing 16 beeper 2 bottom lock 10 brightness 1 buttons 1 C calibration keel offset 16 temperature offset 17 water speed sensor 17 20 cleaning outer ... 13 software version 19 sonar history 10, 11 sonar numbers 15 span 9, 10 speed sensor, calibrating 17 speed, showing 15 Split Frequency page 5 split size 5 echo 200, echo 300c, echo 500c, and echo 550c Owner's Manual


