
Owner's Manual for European Units
Page 41
... 5. You need an A/V adapter cable available from the Menu page touch Settings > General > Video Input. Connect the red, white, and yellow connectors to show the video when you connect the video device, from Garmin or an electronics store. To automatically switch to the ...StreetPilot. 2. Apply external power to the video. Press Map on the right side of the A/V adapter cable to the A/V In on the remote control to the previous screen (such as the map and video. Touch anywhere on the screen to return to scroll through the pages, such as the map). 6. StreetPilot 7200...
... 5. You need an A/V adapter cable available from the Menu page touch Settings > General > Video Input. Connect the red, white, and yellow connectors to show the video when you connect the video device, from Garmin or an electronics store. To automatically switch to the ...StreetPilot. 2. Apply external power to the video. Press Map on the right side of the A/V adapter cable to the A/V In on the remote control to the previous screen (such as the map and video. Touch anywhere on the screen to return to scroll through the pages, such as the map). 6. StreetPilot 7200...
Owner's Manual for European Units
Page 56
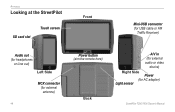
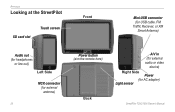
Appendix Looking at the StreetPilot SD card slot Touch screen Front Mini-USB connector (for USB cable or FM Traffic Receiver) Audio out (for headphones or Line out) Left Side MCX connector (for external antenna) 48 Power button (aim the remote here) Back A/V in (for external audio or video device) Right Side Power (for AC adapter) Light sensor StreetPilot 7200/7500 Owner's Manual
Appendix Looking at the StreetPilot SD card slot Touch screen Front Mini-USB connector (for USB cable or FM Traffic Receiver) Audio out (for headphones or Line out) Left Side MCX connector (for external antenna) 48 Power button (aim the remote here) Back A/V in (for external audio or video device) Right Side Power (for AC adapter) Light sensor StreetPilot 7200/7500 Owner's Manual
Owner's Manual for European Units
Page 58
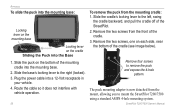
...power cable into the Base 1. Slide the cradle's locking lever to remove the puck and expose the 4-hole pattern. Slide the puck on the bottom of the cradle (see image below). Remove four screws to the left, swing the cradle backward, and pull the cradle off of the cradle. 3. StreetPilot 7200... on the cradle Sliding the Puck into a 12-Volt receptacle in your vehicle. 4. Slide the base's locking lever to mount the StreetPilot 7200/7500 using a standard AMPS 4-hole mounting system. The puck mounting adapter is now detached from the mount, allowing you to the right (locked). 3.
...power cable into the Base 1. Slide the cradle's locking lever to remove the puck and expose the 4-hole pattern. Slide the puck on the bottom of the cradle (see image below). Remove four screws to the left, swing the cradle backward, and pull the cradle off of the cradle. 3. StreetPilot 7200... on the cradle Sliding the Puck into a 12-Volt receptacle in your vehicle. 4. Slide the base's locking lever to mount the StreetPilot 7200/7500 using a standard AMPS 4-hole mounting system. The puck mounting adapter is now detached from the mount, allowing you to the right (locked). 3.
Owner's Manual for European Units
Page 62
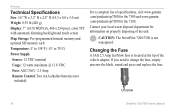
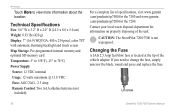
.... Changing the Fuse A 3AG 2.5 Amp fast blow fuse is not waterproof. Contact your local waste disposal department for the 7200. If you need to 70°C) Power Supply Source: 12 VDC nominal Usage: 12 watts maximum @ 13.8 VDC Fuse: AGC/3AG - 2.5 Amp Remote Control:... Two AAA alkaline batteries (not included) For a complete list of specifications, visit www.garmin .com/products/sp7500 for the 7500 and www.garmin .com/products/sp7200 for information on properly disposing of the vehicle adapter. Caution: The StreetPilot 7200/7500 is located at the tip of the unit.
.... Changing the Fuse A 3AG 2.5 Amp fast blow fuse is not waterproof. Contact your local waste disposal department for the 7200. If you need to 70°C) Power Supply Source: 12 VDC nominal Usage: 12 watts maximum @ 13.8 VDC Fuse: AGC/3AG - 2.5 Amp Remote Control:... Two AAA alkaline batteries (not included) For a complete list of specifications, visit www.garmin .com/products/sp7500 for the 7500 and www.garmin .com/products/sp7200 for information on properly disposing of the vehicle adapter. Caution: The StreetPilot 7200/7500 is located at the tip of the unit.
Owner's Manual for European Units
Page 67
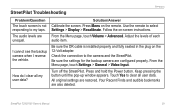
... adapter. Adjust the levels of each audio item. From the Menu page, touch Settings > General > Video Input. How do I reverse the vehicle. Turn off the StreetPilot. Press and hold the Power button. All original settings are also deleted. Your Recent Finds and audible bookmarks are restored. StreetPilot ...I cannot see the backup camera when I clear all user data. The audio levels are configured properly. Use the remote to my taps. StreetPilot 7200/7500 Owner's Manual 59 From the Menu page, touch Volume > Advanced. Be sure the settings for the backup camera are unequal. Follow ...
... adapter. Adjust the levels of each audio item. From the Menu page, touch Settings > General > Video Input. How do I reverse the vehicle. Turn off the StreetPilot. Press and hold the Power button. All original settings are also deleted. Your Recent Finds and audible bookmarks are restored. StreetPilot ...I cannot see the backup camera when I clear all user data. The audio levels are configured properly. Use the remote to my taps. StreetPilot 7200/7500 Owner's Manual 59 From the Menu page, touch Volume > Advanced. Be sure the settings for the backup camera are unequal. Follow ...
Owner's Manual for US
Page 41
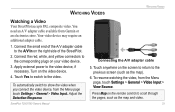
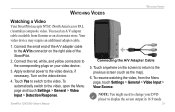
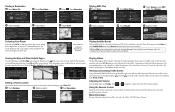
.... 5. StreetPilot 7200/7500 Owner's Manual 33 Watching Videos Watching Videos Watching a Video Your StreetPilot accepts NTSC (North America) or PAL (Australia) composite video. To resume watching the video, from Garmin or an electronics store. Connect the red, white, and yellow connectors to Connecting the A/V Adapter Cable the... A/V adapter cable to the A/V In connector on your DVD player to the previous screen (such as the map). 6. Turn on the screen to return to display the screen output in 16:9 mode. Touch anywhere on the video device. 4. Apply external power to ...
.... 5. StreetPilot 7200/7500 Owner's Manual 33 Watching Videos Watching Videos Watching a Video Your StreetPilot accepts NTSC (North America) or PAL (Australia) composite video. To resume watching the video, from Garmin or an electronics store. Connect the red, white, and yellow connectors to Connecting the A/V Adapter Cable the... A/V adapter cable to the A/V In connector on your DVD player to the previous screen (such as the map). 6. Turn on the screen to return to display the screen output in 16:9 mode. Touch anywhere on the video device. 4. Apply external power to ...
Owner's Manual for US
Page 58
Appendix Looking at the StreetPilot SD card slot Touch screen Front Mini-USB connector (for USB cable, FM Traffic Reciever, or XM Smart Antenna) Audio out (for headphones or line out) Left Side MCX connector (for external antenna) 50 Power button (aim the remote here) Back A/V in (for external audio or video device) Right Side Power (for AC adapter) Light sensor StreetPilot 7200/7500 Owner's Manual
Appendix Looking at the StreetPilot SD card slot Touch screen Front Mini-USB connector (for USB cable, FM Traffic Reciever, or XM Smart Antenna) Audio out (for headphones or line out) Left Side MCX connector (for external antenna) 50 Power button (aim the remote here) Back A/V in (for external audio or video device) Right Side Power (for AC adapter) Light sensor StreetPilot 7200/7500 Owner's Manual

Owner's Manual for US
Page 60
Plug the power cable into the Base 1. Remove the two screws, one on the bottom of the cradle (see image below). Slide the puck on each side, near ...: 1. Remove four screws to remove the puck and expose the 4-hole pattern The puck mounting adapter is now detached from the mount, allowing you to the right (locked). 3. Slide the base's locking lever to mount the StreetPilot 7200/7500 using a standard AMPS 4-hole mounting system. Slide the cradle's locking lever to the left...
Plug the power cable into the Base 1. Remove the two screws, one on the bottom of the cradle (see image below). Slide the puck on each side, near ...: 1. Remove four screws to remove the puck and expose the 4-hole pattern The puck mounting adapter is now detached from the mount, allowing you to the right (locked). 3. Slide the base's locking lever to mount the StreetPilot 7200/7500 using a standard AMPS 4-hole mounting system. Slide the cradle's locking lever to the left...
Owner's Manual for US
Page 64
... screen Map Storage: Pre-programmed internal memory and optional SD memory card Temperature: 5° to 158°F (-15° to 70°C) Power Supply Source: 12 VDC nominal Usage: 12 watts maximum @ 13.8 VDC Fuse: AGC/3AG - 2.5 Amp Remote Control: Two AAA alkaline batteries...complete list of specifications, visit www.garmin .com/products/sp7500 for the 7500 and www.garmin .com/products/sp7200 for information on properly disposing of the vehicle adapter. Caution: The StreetPilot 7200/7500 is located at the tip of the unit. Unscrew 56 StreetPilot 7200/7500 Owner's Manual If you need...
... screen Map Storage: Pre-programmed internal memory and optional SD memory card Temperature: 5° to 158°F (-15° to 70°C) Power Supply Source: 12 VDC nominal Usage: 12 watts maximum @ 13.8 VDC Fuse: AGC/3AG - 2.5 Amp Remote Control: Two AAA alkaline batteries...complete list of specifications, visit www.garmin .com/products/sp7500 for the 7500 and www.garmin .com/products/sp7200 for information on properly disposing of the vehicle adapter. Caution: The StreetPilot 7200/7500 is located at the tip of the unit. Unscrew 56 StreetPilot 7200/7500 Owner's Manual If you need...
Quick Reference Guide
Page 2
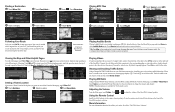
... Around. Playing XM Radio Using a Garmin GXM 30 Smart Antenna, your StreetPilot can receive and use the remote, aim it toward Power button on your StreetPilot guides you are available for the place...Playing MP3 Files ➊ Touch Tools. ➋ Touch Music Player. ➌ Touch Source to the StreetPilot 7200/7500 Owner's Manual. Touch Browse. ➍ Touch a category. ➎ Touch a place. &#...North America only. Touch Browse and touch the book you have purchased the accessory A/V adapter cable, connect the small end of the map. Playing Videos If you want to your...
... Around. Playing XM Radio Using a Garmin GXM 30 Smart Antenna, your StreetPilot can receive and use the remote, aim it toward Power button on your StreetPilot guides you are available for the place...Playing MP3 Files ➊ Touch Tools. ➋ Touch Music Player. ➌ Touch Source to the StreetPilot 7200/7500 Owner's Manual. Touch Browse. ➍ Touch a category. ➎ Touch a place. &#...North America only. Touch Browse and touch the book you have purchased the accessory A/V adapter cable, connect the small end of the map. Playing Videos If you want to your...
Quick Reference Guide for European units
Page 2
... scroll through the pages: Map page, Turns List (when you have purchased the accessory A/V adapter cable, connect the small end of the cable to the A/V In connector on the right ...MP3 Files ➊ Touch Tools. ➋ Touch Music Player. ➌ Touch Source to the StreetPilot 7200/7500 Owner's Manual. Your route is connected). Open the Music Player page and touch Source to ...Apply external power to adjust the volume of the map to playing an MP3 file, described above. Viewing and Avoiding Traffic Events Using a Garmin FM TMC Traffic Receiver, the StreetPilot can set...
... scroll through the pages: Map page, Turns List (when you have purchased the accessory A/V adapter cable, connect the small end of the cable to the A/V In connector on the right ...MP3 Files ➊ Touch Tools. ➋ Touch Music Player. ➌ Touch Source to the StreetPilot 7200/7500 Owner's Manual. Your route is connected). Open the Music Player page and touch Source to ...Apply external power to adjust the volume of the map to playing an MP3 file, described above. Viewing and Avoiding Traffic Events Using a Garmin FM TMC Traffic Receiver, the StreetPilot can set...


