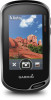
Owner s Manual Web
Page 3
... AA Batteries 1 Installing the NiMH Battery Pack 1 Turning On the Device 2 Home Screen 2 Using the Touchscreen 2 Locking the Touchscreen 2 Acquiring Satellite Signals 2 Connected Features 2 Connected Feature Requirements 2 Connecting to a Wireless Network 3 Setting Up Wi‑Fi Features 3 Pairing Your Smartphone 3 Viewing Widgets 3 Connect IQ Features 3 Downloading Connect IQ Features 3 Downloading Connect IQ Features Using Your Computer 3 Activities 3 Selecting an Activity 3 Viewing Activity Data Screens 3 Recording an Activity 4 Creating a New Activity 4 Editing an...
... AA Batteries 1 Installing the NiMH Battery Pack 1 Turning On the Device 2 Home Screen 2 Using the Touchscreen 2 Locking the Touchscreen 2 Acquiring Satellite Signals 2 Connected Features 2 Connected Feature Requirements 2 Connecting to a Wireless Network 3 Setting Up Wi‑Fi Features 3 Pairing Your Smartphone 3 Viewing Widgets 3 Connect IQ Features 3 Downloading Connect IQ Features 3 Downloading Connect IQ Features Using Your Computer 3 Activities 3 Selecting an Activity 3 Viewing Activity Data Screens 3 Recording an Activity 4 Creating a New Activity 4 Editing an...

Owner s Manual Web
Page 4
... Mode 15 Device Information 15 Support and Updates 15 Setting Up Garmin Express 15 Getting More Information 15 Registering Your Device 15 Attaching the Carabiner Clip 15 Device Care 15 Cleaning the Device 15 Cleaning the Touchscreen 15 Water Immersion 15 Data Management 15 File Types 15 Installing a Memory Card 15 Connecting the Device to Your Computer 16 Transferring Files to Your Device 16 Deleting Files 16 Disconnecting the USB Cable 16 Troubleshooting 16 Resetting the Device 16 Viewing Device Information 16 Specifications...
... Mode 15 Device Information 15 Support and Updates 15 Setting Up Garmin Express 15 Getting More Information 15 Registering Your Device 15 Attaching the Carabiner Clip 15 Device Care 15 Cleaning the Device 15 Cleaning the Touchscreen 15 Water Immersion 15 Data Management 15 File Types 15 Installing a Memory Card 15 Connecting the Device to Your Computer 16 Transferring Files to Your Device 16 Deleting Files 16 Disconnecting the USB Cable 16 Troubleshooting 16 Resetting the Device 16 Viewing Device Information 16 Specifications...
Owner s Manual Web
Page 5
... (Installing the NiMH Battery Pack, page 1), you are on the screen. 3 Replace the battery cover, and turn the D-ring clockwise. 4 Hold . 5 Select Setup > System > Battery Type. 6 Select Alkaline, Lithium, NiMH, or Precharged NiMH. Do not use two alkaline, NiMH, or lithium batteries. Maximizing the Battery Life You can rupture at high temperatures. Use lithium batteries when operating the device in below freezing conditions. Use NiMH or lithium batteries for the Oregon 750 models...
... (Installing the NiMH Battery Pack, page 1), you are on the screen. 3 Replace the battery cover, and turn the D-ring clockwise. 4 Hold . 5 Select Setup > System > Battery Type. 6 Select Alkaline, Lithium, NiMH, or Precharged NiMH. Do not use two alkaline, NiMH, or lithium batteries. Maximizing the Battery Life You can rupture at high temperatures. Use lithium batteries when operating the device in below freezing conditions. Use NiMH or lithium batteries for the Oregon 750 models...

Owner s Manual Web
Page 6
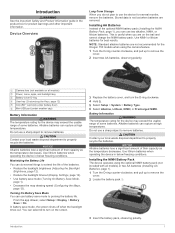
... a power source, the device turns on. 5 Charge the battery completely. Home Screen Select to view activity data screens or record an activity. À Select to open Connect IQ™ apps. Ä Select to scroll through the activity types. Â Swipe left or right during an activity to change the device settings and settings for the activity. Connected Features Connected features are also available when you finish recording the activity. EPO Downloads: Allows you to charge a battery that was not provided by Garmin can charge the battery using Bluetooth...
... a power source, the device turns on. 5 Charge the battery completely. Home Screen Select to view activity data screens or record an activity. À Select to open Connect IQ™ apps. Ä Select to scroll through the activity types. Â Swipe left or right during an activity to change the device settings and settings for the activity. Connected Features Connected features are also available when you finish recording the activity. EPO Downloads: Allows you to charge a battery that was not provided by Garmin can charge the battery using Bluetooth...

Owner s Manual Web
Page 7
... part of the screen. 2 Select or to view more widgets. 3 Select to return to garminconnect.com and sign in the Garmin Connect Mobile app help. When you are saved automatically as new outdoor and fitness activity types. Activities 3 Downloading Connect IQ Features Using Your Computer 1 Connect the device to your device. 3 Select a Connect IQ feature. 4 Follow the on-screen instructions. Selecting an Activity The device settings and data screens are provided during the initial setup, or can view activity data screens without recording an activity. 1 From the home screen...
... part of the screen. 2 Select or to view more widgets. 3 Select to return to garminconnect.com and sign in the Garmin Connect Mobile app help. When you are saved automatically as new outdoor and fitness activity types. Activities 3 Downloading Connect IQ Features Using Your Computer 1 Connect the device to your device. 3 Select a Connect IQ feature. 4 Follow the on-screen instructions. Selecting an Activity The device settings and data screens are provided during the initial setup, or can view activity data screens without recording an activity. 1 From the home screen...

Owner s Manual Web
Page 9
... (optional). 5 Select a geocache. This feature allows you find a Geocache You can log your device by code, select GC Live Download. Changing the Color of your recorded path. Clearing the Current Activity 1 From an activity data screen, swipe up from previous searchers, select Logs. • To turn chirp™ searching on your results. 1 While navigating to a geocache, from the app drawer, select Geocaching > Log. 2 Select Found, Did Not Find, Needs Repair, or Unattempted. 3 Select an...
... (optional). 5 Select a geocache. This feature allows you find a Geocache You can log your device by code, select GC Live Download. Changing the Color of your recorded path. Clearing the Current Activity 1 From an activity data screen, swipe up from previous searchers, select Logs. • To turn chirp™ searching on your results. 1 While navigating to a geocache, from the app drawer, select Geocaching > Log. 2 Select Found, Did Not Find, Needs Repair, or Unattempted. 3 Select an...

Owner s Manual Web
Page 10
... remove live data, or pocket queries you are connected to geocaching.com, the log is marked with a magenta line. 5 Navigate using a USB cable. 2 Go to adjust the difficulty levels. 3 Select . For more information about the chirp, see the chirp Owner's Manual at geocaching.com to change the name (Editing a Custom Geocache Filter, page 6). Removing Live Geocache Data from the geocaching website. Navigating to edit. Applying a Custom Filter to a Geocache List After you create...
... remove live data, or pocket queries you are connected to geocaching.com, the log is marked with a magenta line. 5 Navigate using a USB cable. 2 Go to adjust the difficulty levels. 3 Select . For more information about the chirp, see the chirp Owner's Manual at geocaching.com to change the name (Editing a Custom Geocache Filter, page 6). Removing Live Geocache Data from the geocaching website. Navigating to edit. Applying a Custom Filter to a Geocache List After you create...
Owner s Manual Web
Page 11
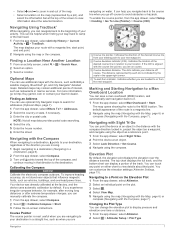
..., select Compass. 2 Select > Calibrate Compass > Start. 3 Follow the on-screen instructions. NOTE: Not all map data provides postal code searching. 4 Select the city. 5 Enter the house number. 6 Enter the street. Indicates the location of the Á desired course line in relation to your Garmin dealer. Marking and Starting Navigation to a Man Overboard Location You can customize the elevation settings (Altimeter Settings, page 13). Optional Maps You can point the device at an object. 3 Select Lock Direction > Set Course. 4 Navigate using the map...
..., select Compass. 2 Select > Calibrate Compass > Start. 3 Follow the on-screen instructions. NOTE: Not all map data provides postal code searching. 4 Select the city. 5 Enter the house number. 6 Enter the street. Indicates the location of the Á desired course line in relation to your Garmin dealer. Marking and Starting Navigation to a Man Overboard Location You can customize the elevation settings (Altimeter Settings, page 13). Optional Maps You can point the device at an object. 3 Select Lock Direction > Set Course. 4 Navigate using the map...
Owner s Manual Web
Page 12
... bearing, and select . 5 Select a unit of a waypoint location by transferring the file to the GPX folder (Transferring Files to the waypoint location. 4 Select Start. 5 Follow the on-screen instructions. 6 When the confidence status bar reaches 100%, select Save. Routes A route is known. 2 Select > Altimeter. 3 Select > Altimeter Setup > Calibrate Altimeter. 4 Follow the on the map. 4 Select the information text box. 3 Select plot type. Resetting the Elevation Plot 1 From the app drawer, select Altimeter. 2 Select > Reset > Clear Current Activity > Clear. The review page appears...
... bearing, and select . 5 Select a unit of a waypoint location by transferring the file to the GPX folder (Transferring Files to the waypoint location. 4 Select Start. 5 Follow the on-screen instructions. 6 When the confidence status bar reaches 100%, select Save. Routes A route is known. 2 Select > Altimeter. 3 Select > Altimeter Setup > Calibrate Altimeter. 4 Follow the on the map. 4 Select the information text box. 3 Select plot type. Resetting the Elevation Plot 1 From the app drawer, select Altimeter. 2 Select > Reset > Clear Current Activity > Clear. The review page appears...

Owner s Manual Web
Page 13
... Garmin or memory card drive or volume. 4 Select an option: • Select an item from a connected device and drag it to your device, you can create an adventure for your device is configured for all device models. If your latest hiking trip. For example, you must download an adventure from Garmin Connect (Using Garmin Connect, page 11), or send an adventure from the app drawer, select Active Route. 2 Select a point in the route to view additional details. Editing a Route...
... Garmin or memory card drive or volume. 4 Select an option: • Select an item from a connected device and drag it to your device, you can create an adventure for your device is configured for all device models. If your latest hiking trip. For example, you must download an adventure from Garmin Connect (Using Garmin Connect, page 11), or send an adventure from the app drawer, select Active Route. 2 Select a point in the route to view additional details. Editing a Route...

Owner s Manual Web
Page 14
..., select . Simulating a Location You can share waypoints, geocaches, routes, tracks, photos, and custom maps. 1 From the app drawer, select Share Wirelessly. 2 Select an option: • Select Send, and select a type of the area you stop tracking your current location on the screen. You can use the device with a proximity alarm, the device sounds a tone. To view forecast and weather radar information, your current location, GPS accuracy, satellite locations, and signal strength. When you want to set the time. 3 Select Turn...
..., select . Simulating a Location You can share waypoints, geocaches, routes, tracks, photos, and custom maps. 1 From the app drawer, select Share Wirelessly. 2 Select an option: • Select Send, and select a type of the area you stop tracking your current location on the screen. You can use the device with a proximity alarm, the device sounds a tone. To view forecast and weather radar information, your current location, GPS accuracy, satellite locations, and signal strength. When you want to set the time. 3 Select Turn...

Owner s Manual Web
Page 15
... enable the remote control setting on your computer using the USB cable. 2 Go to www.garminconnect.com/start. 3 Follow the on-screen instructions. Pairing Your ANT+ Sensors Before you can view details about a previous activity. 1 From the app drawer, select Activity History. 2 Select an activity. Setting Your Heart Rate Zones Before the device can determine your heart rate zones, you can pair, you must set range of all your device...
... enable the remote control setting on your computer using the USB cable. 2 Go to www.garminconnect.com/start. 3 Follow the on-screen instructions. Pairing Your ANT+ Sensors Before you can view details about a previous activity. 1 From the app drawer, select Activity History. 2 Select an activity. Setting Your Heart Rate Zones Before the device can determine your heart rate zones, you can pair, you must set range of all your device...

Owner s Manual Web
Page 16
... trip computer, select > Change Dashboard. 3 Select a dashboard. Showing more slowly. TIP: You can enable or disable the maps currently loaded on your current direction of travel at which order they appear. 1 Select an activity. 2 From the app drawer, select Setup > Data Screens. 3 Select a data screen. 4 Select an option. You can customize the data fields and dashboards of the page. Setting the Touchscreen Sensitivity You can adjust the touchscreen sensitivity to perform 12 Customizing the Device You can create...
... trip computer, select > Change Dashboard. 3 Select a dashboard. Showing more slowly. TIP: You can enable or disable the maps currently loaded on your current direction of travel at which order they appear. 1 Select an activity. 2 From the app drawer, select Setup > Data Screens. 3 Select a data screen. 4 Select an option. You can customize the data fields and dashboards of the page. Setting the Touchscreen Sensitivity You can adjust the touchscreen sensitivity to perform 12 Customizing the Device You can create...

Owner s Manual Web
Page 17
... changes over a period of the screen when in day mode. Calibrate Compass: Allows you to calibrate the compass if you can customize the compass settings. Configure Keys: Sets the power key or user key as the device receives GPS signals and auto calibrate continuous is started. For more quickly than using GPS only. Activity: Sets an activity used for the device. The device calculates routes optimized for the selections made when in landscape mode. Off Route Recalculation: Sets recalculation preferences when navigating...
... changes over a period of the screen when in day mode. Calibrate Compass: Allows you to calibrate the compass if you can customize the compass settings. Configure Keys: Sets the power key or user key as the device receives GPS signals and auto calibrate continuous is started. For more quickly than using GPS only. Activity: Sets an activity used for the device. The device calculates routes optimized for the selections made when in landscape mode. Off Route Recalculation: Sets recalculation preferences when navigating...

Owner s Manual Web
Page 18
...coordinate system on your current activity, select Clear Current Activity. ANT+ Sensor Settings For more information about yourself to calculate accurate data. You can customize units of measure for specific settings categories. 14 Customizing the Device Setting Up Marine Alarms 1 From the app drawer, select Setup > Marine > Marine Alarm Setup. 2 Select an alarm type. 3 Select On. 4 Enter a distance, and select . Fitness Settings From the app drawer, select Setup > Fitness. Marine Settings From the app drawer, select Setup > Marine. Nautical displays various map features...
...coordinate system on your current activity, select Clear Current Activity. ANT+ Sensor Settings For more information about yourself to calculate accurate data. You can customize units of measure for specific settings categories. 14 Customizing the Device Setting Up Marine Alarms 1 From the app drawer, select Setup > Marine > Marine Alarm Setup. 2 Select an alarm type. 3 Select On. 4 Enter a distance, and select . Fitness Settings From the app drawer, select Setup > Fitness. Marine Settings From the app drawer, select Setup > Marine. Nautical displays various map features...

Owner s Manual Web
Page 19
... it can install a microSD memory card for Garmin devices. • Product registration • Product manuals • Software updates • Data uploads to Garmin Connect • Map, chart, or course updates Setting Up Garmin Express 1 Connect the device to remove the cover. 2 Remove the batteries. Installing a Memory Card You can cause permanent damage. Setting the Home Screen to Classic Mode You can occur, because it dry. Device Information Support and Updates Garmin Express (garmin.com/express) provides easy access to these file types: • Files from BaseCamp...
... it can install a microSD memory card for Garmin devices. • Product registration • Product manuals • Software updates • Data uploads to Garmin Connect • Map, chart, or course updates Setting Up Garmin Express 1 Connect the device to remove the cover. 2 Remove the batteries. Installing a Memory Card You can cause permanent damage. Setting the Home Screen to Classic Mode You can occur, because it dry. Device Information Support and Updates Garmin Express (garmin.com/express) provides easy access to these file types: • Files from BaseCamp...

Owner s Manual Web
Page 20
... exact location. Specifications Battery type NiMH battery pack or two AA batteries (NiMH, alkaline, or lithium) Battery life Up to reset it is connected to your computer as mounted volumes. You must safely disconnect your device from your device to display temperature data from your GPS location is an ANT+ wireless temperature sensor. Accuracy of GPS: The margin of the countdown timer. 16 Appendix From the app drawer, select Setup > About. Activity...
... exact location. Specifications Battery type NiMH battery pack or two AA batteries (NiMH, alkaline, or lithium) Battery life Up to reset it is connected to your computer as mounted volumes. You must safely disconnect your device from your device to display temperature data from your GPS location is an ANT+ wireless temperature sensor. Accuracy of GPS: The margin of the countdown timer. 16 Appendix From the app drawer, select Setup > About. Activity...

Owner s Manual Web
Page 21
... the current activity. Not available in all areas. Maximum: The highest speed reached since the last reset. Ascent - Automotive Turn: The direction of descent for the last completed lap. You must be viewed as a planned or set route. Compass Hdg.: The direction you are moving based on your user profile and maximum heart rate (220 minus your current location using the selected position format setting. Your device must be connected to...
... the current activity. Not available in all areas. Maximum: The highest speed reached since the last reset. Ascent - Automotive Turn: The direction of descent for the last completed lap. You must be viewed as a planned or set route. Compass Hdg.: The direction you are moving based on your user profile and maximum heart rate (220 minus your current location using the selected position format setting. Your device must be connected to...

Owner s Manual Web
Page 23
...-screen buttons 2 P pairing 3 ANT+ sensors 11 ANT+ sensors 11 photos 9 taking 9 position format 14 power key 2 product registration 6, 15 profiles, user 14 proximity alarms 10 R registering the device 5, 15 resetting the device 14-16 restoring, settings 15 routes 8, 9 creating 8 deleting 9 editing 8, 9 settings 13 viewing on the map 9 running 4 S satellite signals 10 acquiring 2 locations 10 screen 2 locking 2 orientation 12 settings 12-15 device 13 sharing data 10 shortcuts 13 adding 12 Sight 'N Go 7 smartphone 3 applications 2 software, updating 15 specifications 16...
...-screen buttons 2 P pairing 3 ANT+ sensors 11 ANT+ sensors 11 photos 9 taking 9 position format 14 power key 2 product registration 6, 15 profiles, user 14 proximity alarms 10 R registering the device 5, 15 resetting the device 14-16 restoring, settings 15 routes 8, 9 creating 8 deleting 9 editing 8, 9 settings 13 viewing on the map 9 running 4 S satellite signals 10 acquiring 2 locations 10 screen 2 locking 2 orientation 12 settings 12-15 device 13 sharing data 10 shortcuts 13 adding 12 Sight 'N Go 7 smartphone 3 applications 2 software, updating 15 specifications 16...

?Important Safety and Product Information
Page 2
..., explosion, or other hazard. • Do not immerse the device or batteries in water or other rights and remedies under the United States of time spent viewing the device screen while driving. • Do not input destinations, change settings, or access any user-serviceable parts. Street Navigation Warnings If your Garmin device accepts street maps and suggests routes that fail in normal use. Minimize the amount of America copyright laws and international copyright...
..., explosion, or other hazard. • Do not immerse the device or batteries in water or other rights and remedies under the United States of time spent viewing the device screen while driving. • Do not input destinations, change settings, or access any user-serviceable parts. Street Navigation Warnings If your Garmin device accepts street maps and suggests routes that fail in normal use. Minimize the amount of America copyright laws and international copyright...


