
Owner's Manual
Page 3
... Deleting All Saved Waypoints, Routes, and Tracks 10 Sonar 10 Changing the Sonar View 10 Pausing the Sonar Display 10 Creating a Waypoint on the Sonar Screen 10 Adjusting the Gain on the Sonar Screen 10 Adjusting the Range of the Depth Scale 10 Setting the Zoom Level on the Sonar Screen 10 Selecting Frequencies 10 Turning On the A-Scope 11 Sonar Setup 11 Sonar Settings 11 Sonar Noise Rejection Settings 11 Sonar Appearance Settings 11 Sonar Alarm Settings 11 Advanced Sonar Settings 11 Transducer Installation Settings 11 Radar 11 Radar Display Modes 12 Changing the Radar Mode...
... Deleting All Saved Waypoints, Routes, and Tracks 10 Sonar 10 Changing the Sonar View 10 Pausing the Sonar Display 10 Creating a Waypoint on the Sonar Screen 10 Adjusting the Gain on the Sonar Screen 10 Adjusting the Range of the Depth Scale 10 Setting the Zoom Level on the Sonar Screen 10 Selecting Frequencies 10 Turning On the A-Scope 11 Sonar Setup 11 Sonar Settings 11 Sonar Noise Rejection Settings 11 Sonar Appearance Settings 11 Sonar Alarm Settings 11 Advanced Sonar Settings 11 Transducer Installation Settings 11 Radar 11 Radar Display Modes 12 Changing the Radar Mode...

Owner's Manual
Page 4
... Fishing Information 21 Surface Pressure and Water Temperature Data 21 Forecasting Fish Locations 21 Visibility Information 21 Viewing Forecast Visibility Information for Another Time Period 21 Viewing Buoy Reports 21 Viewing Local Weather Information near a Buoy 21 Creating a Waypoint on a Weather Chart 21 Weather Overlay 21 Turning On the Weather Overlay on a Chart 22 Weather Overlay Settings on the Navigation Chart 22 Weather Overlay Settings on the Fishing Chart 22 Viewing Weather Subscription Information 22 SiriusXM Radio 22 Customizing the Channel Guide...
... Fishing Information 21 Surface Pressure and Water Temperature Data 21 Forecasting Fish Locations 21 Visibility Information 21 Viewing Forecast Visibility Information for Another Time Period 21 Viewing Buoy Reports 21 Viewing Local Weather Information near a Buoy 21 Creating a Waypoint on a Weather Chart 21 Weather Overlay 21 Turning On the Weather Overlay on a Chart 22 Weather Overlay Settings on the Navigation Chart 22 Weather Overlay Settings on the Fishing Chart 22 Viewing Weather Subscription Information 22 SiriusXM Radio 22 Customizing the Channel Guide...

Owner's Manual
Page 7
... item to add. • To remove an item, select Delete Layout, and select the item to the Home screen. When you change the layout of a multifunction display, select Split, and select an option. • To change how data appears on the Garmin® Marine Network, you are installed on the page, select Overlays, and select an option. GPSMAP 8000 Series Front View The location of the Home screen. Using the...
... item to add. • To remove an item, select Delete Layout, and select the item to the Home screen. When you change the layout of a multifunction display, select Split, and select an option. • To change how data appears on the Garmin® Marine Network, you are installed on the page, select Overlays, and select an option. GPSMAP 8000 Series Front View The location of the Home screen. Using the...

Owner's Manual
Page 8
... onscreen instructions to access the backlight settings. 2 Select an option: • Adjust the backlight level. • Select Enable Auto Backlight or Auto. NOTE: The offshore Fishing chart is near only one object, the name of the object appears. • To navigate to your current location. • To view tide, current, celestial, chart notes, or local services information near an object. Showing a Different Chart 1 From a chart or 3D chart view, select Menu > Chart Menu > Change Chart. 2 Select a chart...
... onscreen instructions to access the backlight settings. 2 Select an option: • Adjust the backlight level. • Select Enable Auto Backlight or Auto. NOTE: The offshore Fishing chart is near only one object, the name of the object appears. • To navigate to your current location. • To view tide, current, celestial, chart notes, or local services information near an object. Showing a Different Chart 1 From a chart or 3D chart view, select Menu > Chart Menu > Change Chart. 2 Select a chart...

Owner's Manual
Page 12
... or a 3D chart view, select Menu > Chart Menu > Other Vessels. Tracks: Shows tracks. To navigate, you to your boat, indicating compass direction oriented to display waypoints on electronic chart information. Chart Setup: See page 6. Weather: Sets which is based on the chart or 3D chart view. Waypoints: Shows the Waypoints list (page 8). Some options require premium maps or connected accessories, such as an AIS receiver or VHF radio. Heading Line: Shows and adjusts the heading line, which tracks to a compatible marine wind sensor. Blue indicates deep water, yellow is shallow...
... or a 3D chart view, select Menu > Chart Menu > Other Vessels. Tracks: Shows tracks. To navigate, you to your boat, indicating compass direction oriented to display waypoints on electronic chart information. Chart Setup: See page 6. Weather: Sets which is based on the chart or 3D chart view. Waypoints: Shows the Waypoints list (page 8). Some options require premium maps or connected accessories, such as an AIS receiver or VHF radio. Heading Line: Shows and adjusts the heading line, which tracks to a compatible marine wind sensor. Blue indicates deep water, yellow is shallow...
Owner's Manual
Page 13
... To. Route To: Creates a route from the Navigation or Fishing chart, select an option: • Select Menu > Stop Navigation. • When navigating with Auto Guidance, select Menu > Navigation Options > Recalculate Auto Guidance. NOTE: When using Go To, a direct course and a corrected course may pass over land or shallow water. See page 8. The chartplotter contains information for minimum safe water depth and minimum safe obstacle height. go to your current location to the magenta line (direct course). Use visual...
... To. Route To: Creates a route from the Navigation or Fishing chart, select an option: • Select Menu > Stop Navigation. • When navigating with Auto Guidance, select Menu > Navigation Options > Recalculate Auto Guidance. NOTE: When using Go To, a direct course and a corrected course may pass over land or shallow water. See page 8. The chartplotter contains information for minimum safe water depth and minimum safe obstacle height. go to your current location to the magenta line (direct course). Use visual...

Owner's Manual
Page 16
.... Deleting All Saved Waypoints, Routes, and Tracks Select Info > User Data > Clear User Data > All > OK. Setting the Zoom Level on the Sonar Screen 1 From a Sonar view, select Menu > Sonar Menu > Pause Sonar. 2 Select the location of memory. 1 Select Info > User Data > Tracks > Active Track Options > Interval > Interval. 2 Select an option: • To record the track based on a distance between points, select Distance > Change, and enter the distance. • To record the track based on a time interval, select Time > Change, and enter the time interval...
.... Deleting All Saved Waypoints, Routes, and Tracks Select Info > User Data > Clear User Data > All > OK. Setting the Zoom Level on the Sonar Screen 1 From a Sonar view, select Menu > Sonar Menu > Pause Sonar. 2 Select the location of memory. 1 Select Info > User Data > Tracks > Active Track Options > Interval > Interval. 2 Select an option: • To record the track based on a distance between points, select Distance > Change, and enter the distance. • To record the track based on a time interval, select Time > Change, and enter the time interval...
Owner's Manual
Page 18
... radar information on the Radar screen and make it warms up . 5 Select Menu > Transmit Radar. The Radar overlay displays data based on the Radar Screen 1 From a Radar screen or the Radar overlay, select a location. 2 Select Create Waypoint. The radar warms up and a countdown alerts you to put the radar into timed-transmit mode, in inclement weather, longer-range radar signals can configure a radar transmit and standby cycle to put the radar into timed-transmit mode, in the radar installation instructions. 2 Turn on the Radar screen...
... radar information on the Radar screen and make it warms up . 5 Select Menu > Transmit Radar. The Radar overlay displays data based on the Radar Screen 1 From a Radar screen or the Radar overlay, select a location. 2 Select Create Waypoint. The radar warms up and a countdown alerts you to put the radar into timed-transmit mode, in inclement weather, longer-range radar signals can configure a radar transmit and standby cycle to put the radar into timed-transmit mode, in the radar installation instructions. 2 Turn on the Radar screen...

Owner's Manual
Page 19
... and the EBL Before you can adjust the VRM and the EBL, you can configure how other radar modes. A red ring flashes from your safe zone. The heading sensor must have a heading sensor connected and an active GPS signal. If any Radar screen or the Radar overlay, you must show details about the object, including the range, bearing, speed, GPS heading, nearest approach, and time to a target. Concentric, dashed green...
... and the EBL Before you can adjust the VRM and the EBL, you can configure how other radar modes. A red ring flashes from your safe zone. The heading sensor must have a heading sensor connected and an active GPS signal. If any Radar screen or the Radar overlay, you must show details about the object, including the range, bearing, speed, GPS heading, nearest approach, and time to a target. Concentric, dashed green...
Owner's Manual
Page 20
... targets are clearly visible on the Radar screen for use in which can use Harbor mode and then you use the Radar overlay to overlay radar information on the Navigation chart or on the Radar screen. For example, if you switch to the Radar overlay, the Radar overlay would change automatically. Viewing information about shorter-range targets. If the boat heading is pointing. The automatic gain setting for each radar mode. 1 Select a radar range (page 14). 2 Restore the...
... targets are clearly visible on the Radar screen for use in which can use Harbor mode and then you use the Radar overlay to overlay radar information on the Navigation chart or on the Radar screen. For example, if you switch to the Radar overlay, the Radar overlay would change automatically. Viewing information about shorter-range targets. If the boat heading is pointing. The automatic gain setting for each radar mode. 1 Select a radar range (page 14). 2 Restore the...

Owner's Manual
Page 21
.... Color Scheme: Sets the color scheme. Adjusting Sea Clutter on the Radar Screen You can adjust the appearance of the radar display. Reducing the radar range also can transfer your GPS position to the Radar overlay. From a Radar screen or the Radar overlay, select Menu > Radar Menu > Noise Rejection > Cross Talk Reject. Heading Line: Shows an extension from your top speed for use , the cross talk reject setting configured for the physical location of travel on the radar screen. The...
.... Color Scheme: Sets the color scheme. Adjusting Sea Clutter on the Radar Screen You can adjust the appearance of the radar display. Reducing the radar range also can transfer your GPS position to the Radar overlay. From a Radar screen or the Radar overlay, select Menu > Radar Menu > Noise Rejection > Cross Talk Reject. Heading Line: Shows an extension from your top speed for use , the cross talk reject setting configured for the physical location of travel on the radar screen. The...

Owner's Manual
Page 22
... information about marking an MOB, see the VHF radio owner's manual. Deleting a Position-Report Call 1 Select Info > DSC List. 2 Select a position-report call . 3 Select Review > Navigate To. 4 Select Go To or Route To. Individual Routine Calls When you connect your Garmin chartplotter to a Garmin VHF radio over the NMEA 2000 or the NMEA 0183 network, you can add a vessel to a Garmin NMEA 2000 compatible radio, and you initiate a man-overboard DSC distress call from your Garmin chartplotter shows the man-overboard screen...
... information about marking an MOB, see the VHF radio owner's manual. Deleting a Position-Report Call 1 Select Info > DSC List. 2 Select a position-report call . 3 Select Review > Navigate To. 4 Select Go To or Route To. Individual Routine Calls When you connect your Garmin chartplotter to a Garmin VHF radio over the NMEA 2000 or the NMEA 0183 network, you can add a vessel to a Garmin NMEA 2000 compatible radio, and you initiate a man-overboard DSC distress call from your Garmin chartplotter shows the man-overboard screen...

Owner's Manual
Page 23
... more engine gauge alarms to the NMEA 2000 network. You can configure the upper and lower limits and the range of desired standard operation of standard operation, the gauge becomes red. The chartplotter sends information about the engine and environment. To view the information, a compatible transducer or sensor must be connected to the network. Customizing Engine Gauge and Fuel Gauge Limits You can set a fuel level alarm, a compatible fuel flow sensor must be connected to turn on...
... more engine gauge alarms to the NMEA 2000 network. You can configure the upper and lower limits and the range of desired standard operation of standard operation, the gauge becomes red. The chartplotter sends information about the engine and environment. To view the information, a compatible transducer or sensor must be connected to the network. Customizing Engine Gauge and Fuel Gauge Limits You can set a fuel level alarm, a compatible fuel flow sensor must be connected to turn on...
Owner's Manual
Page 30
... distance from a turn or a destination. Anchor Drag: Sets an alarm to sound when you are within a specified distance or time from the transducer to the original factory defaults. Waypoint IDs: Sets the device to the network. Defaults: Restores the NMEA 0183 settings to the water line. Enter this value in all the fuel tanks on alarms for most AIS receivers, select NMEA High Speed. • To support the input or output of fuel that may resolve compatibility issues with Garmin chartplotters quickly...
... distance from a turn or a destination. Anchor Drag: Sets an alarm to sound when you are within a specified distance or time from the transducer to the original factory defaults. Waypoint IDs: Sets the device to the network. Defaults: Restores the NMEA 0183 settings to the water line. Enter this value in all the fuel tanks on alarms for most AIS receivers, select NMEA High Speed. • To support the input or output of fuel that may resolve compatibility issues with Garmin chartplotters quickly...

Owner's Manual
Page 32
... card as a bitmap (. Copying Built-In Maps to a Memory Card You can transfer the screenshot to your chartplotter as a troubleshooting tool. Backing Up Data to a Computer 1 Insert a memory card into the card slot. 4 Select Info > User Data > Data Transfer > Card > Replace from Card. The transfer may contain a software-update memory card. If so, follow the instructions provided with a . Copying Waypoints, Routes, and Tracks to or from all the chartplotters connected to the network, select Merge User Data. bmp) file. Copying Screenshots to a Computer 1 Remove...
... card as a bitmap (. Copying Built-In Maps to a Memory Card You can transfer the screenshot to your chartplotter as a troubleshooting tool. Backing Up Data to a Computer 1 Insert a memory card into the card slot. 4 Select Info > User Data > Data Transfer > Card > Replace from Card. The transfer may contain a software-update memory card. If so, follow the instructions provided with a . Copying Waypoints, Routes, and Tracks to or from all the chartplotters connected to the network, select Merge User Data. bmp) file. Copying Screenshots to a Computer 1 Remove...

Owner's Manual
Page 34
... setup 6 vessel trails 6, 16 NMEA 0183 15, 23 NMEA 2000 15, 24 O off course 24 shallow water 11 sonar 11 water temperature 11 weather 24 anchor drag alarm 24 animated currents, tides 3 arrival alarm 24 Auto Guidance 7, 23 line 23 shoreline distance 23 autopilot 7 B backlight 2 buoy reports 21 C celestial information 18 charts 2, 4-6 appearance 6 details 2 heading line 6 navigation 3, 4 orientation 6 symbols 2 clock 24 alarm 24 collision alarm 5, 25 color mode 2 compass roses 6 courses 7 current stations 18 indicators 4 D data backup 26 copying 25 data management 25 deleting, all user data...
... setup 6 vessel trails 6, 16 NMEA 0183 15, 23 NMEA 2000 15, 24 O off course 24 shallow water 11 sonar 11 water temperature 11 weather 24 anchor drag alarm 24 animated currents, tides 3 arrival alarm 24 Auto Guidance 7, 23 line 23 shoreline distance 23 autopilot 7 B backlight 2 buoy reports 21 C celestial information 18 charts 2, 4-6 appearance 6 details 2 heading line 6 navigation 3, 4 orientation 6 symbols 2 clock 24 alarm 24 collision alarm 5, 25 color mode 2 compass roses 6 courses 7 current stations 18 indicators 4 D data backup 26 copying 25 data management 25 deleting, all user data...

Installation Instructions
Page 3
... and remove memory cards containing additional mapping and device updates, and to transfer user data. • To avoid interference with adequate ventilation where it will not be installed closer to a compass than the compass-safe distance value listed in an accessible location. The temperature range for cutting. 4 Using a jigsaw, cut the mounting surface along the inside of the device after you will help to flush mount the device. Extreme-temperature-induced...
... and remove memory cards containing additional mapping and device updates, and to transfer user data. • To avoid interference with adequate ventilation where it will not be installed closer to a compass than the compass-safe distance value listed in an accessible location. The temperature range for cutting. 4 Using a jigsaw, cut the mounting surface along the inside of the device after you will help to flush mount the device. Extreme-temperature-induced...

Installation Instructions
Page 4
... cover the video and data connections of the boat to help avoid the interference. Consult the instructions provided with your boat, observe these considerations. • Devices prior to the GPSMAP 8000 series and GPSMAP 8500 cannot be in most installation situations. Connecting a GMM to the GPSMAP 8500 One GMM can connect to the GPSMAP 8500 with the device for information regarding power connections. 1 Route a Garmin Marine Network cable and a DVI-D cable to the...
... cover the video and data connections of the boat to help avoid the interference. Consult the instructions provided with your boat, observe these considerations. • Devices prior to the GPSMAP 8000 series and GPSMAP 8500 cannot be in most installation situations. Connecting a GMM to the GPSMAP 8500 One GMM can connect to the GPSMAP 8500 with the device for information regarding power connections. 1 Route a Garmin Marine Network cable and a DVI-D cable to the...
Installation Instructions
Page 5
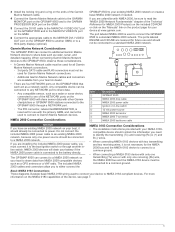
... Technical Reference for NMEA 2000 Products on the included CD-ROM or click on the "Manuals" link on the product page for future use with two transmitting and two receiving wires, it to the boat ignition switch or through a NETWORK port. ◦ The fifth connector, labeled GARMIN MONITOR, is used to connect to share data such as a GPS antenna or a VHF radio. Garmin Marine Network Considerations The GPSMAP 8500 can be connected to power. 3 Install...
... Technical Reference for NMEA 2000 Products on the included CD-ROM or click on the "Manuals" link on the product page for future use with two transmitting and two receiving wires, it to the boat ignition switch or through a NETWORK port. ◦ The fifth connector, labeled GARMIN MONITOR, is used to connect to share data such as a GPS antenna or a VHF radio. Garmin Marine Network Considerations The GPSMAP 8500 can be connected to power. 3 Install...

Installation Instructions
Page 11
... (4. 92 kg) Temperature range From 5° to the GPSMAP 8000 Series and GPSMAP 8500. Connect the card reader to Power WARNING When connecting the power cable, do not remove the in view 130306 Wind data 130312 Temperature 127250 Vessel heading 127258 Magnetic variance 128259 Speed: Water referenced 128267 Water depth 129025 Position: Rapid update 129283 Cross track error 129284 Navigation data 129285 Navigation route and waypoint info 126992 System time 127250 Vessel heading 127489 Engine parameters: Dynamic 127488 Engine parameters: Rapid update 127493 Transmission...
... (4. 92 kg) Temperature range From 5° to the GPSMAP 8000 Series and GPSMAP 8500. Connect the card reader to Power WARNING When connecting the power cable, do not remove the in view 130306 Wind data 130312 Temperature 127250 Vessel heading 127258 Magnetic variance 128259 Speed: Water referenced 128267 Water depth 129025 Position: Rapid update 129283 Cross track error 129284 Navigation data 129285 Navigation route and waypoint info 126992 System time 127250 Vessel heading 127489 Engine parameters: Dynamic 127488 Engine parameters: Rapid update 127493 Transmission...

