Quick Start Manual
Page 2
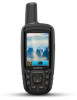
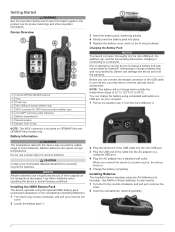
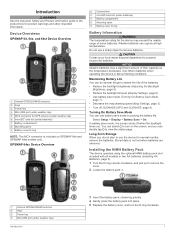
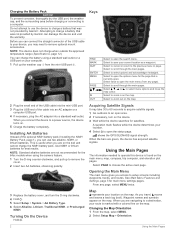
... you connect the device to remove optional mount accessories. Installing Batteries The handheld device operates using two AA batteries (not included). Battery Information WARNING The temperature rating for product warnings and other important information. Use NiMH or lithium batteries for GPS antenna (under weather cap) Å microSD™ card slot (under batteries) Æ Battery compartment Ç Mounting spine È Battery cover D-ring NOTE: The MCX connector is included on . 5 Charge the battery completely. Getting Started WARNING See...
... you connect the device to remove optional mount accessories. Installing Batteries The handheld device operates using two AA batteries (not included). Battery Information WARNING The temperature rating for product warnings and other important information. Use NiMH or lithium batteries for GPS antenna (under weather cap) Å microSD™ card slot (under batteries) Æ Battery compartment Ç Mounting spine È Battery cover D-ring NOTE: The MCX connector is included on . 5 Charge the battery completely. Getting Started WARNING See...
Quick Start Manual
Page 3
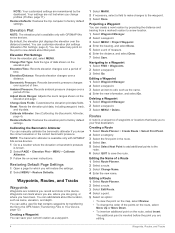
.... 5 Select Select Next Point to add additional points to the route. 6 Select QUIT to save your current direction of travel at the top of the page. • Select Automotive Mode to edit, such as a waypoint. Select to a Waypoint 1 From the main menu, select FIND > Waypoints. 2 Select a waypoint. 3 Select Go. Changing the Map Orientation 1 From the map, select MENU. 2 Select Setup Map > Orientation. 3 Select an option: • Select North Up to save the route. 3 Replace the battery cover, and turn on the device. 3 Wait while the device searches for the current track, select...
.... 5 Select Select Next Point to add additional points to the route. 6 Select QUIT to save your current direction of travel at the top of the page. • Select Automotive Mode to edit, such as a waypoint. Select to a Waypoint 1 From the main menu, select FIND > Waypoints. 2 Select a waypoint. 3 Select Go. Changing the Map Orientation 1 From the map, select MENU. 2 Select Setup Map > Orientation. 3 Select an option: • Select North Up to save the route. 3 Replace the battery cover, and turn on the device. 3 Wait while the device searches for the current track, select...
Quick Start Manual
Page 4
... can manually calibrate the barometric altimeter if you will change the data fields. 2 Select MENU. 3 Select Change Data Fields. 4 Select the new data field. 5 Follow the on -screen instructions to maximize the battery life. You can find more information about optional accessories and replacement parts. Getting More Information You can adjust the backlight brightness to select your Garmin dealer for information about this product on the GPSMAP 64s and GPSMAP 64st. 1 Select Sight 'N Go. 2 Point the device at an object in the distance, lock in the handheld device...
... can manually calibrate the barometric altimeter if you will change the data fields. 2 Select MENU. 3 Select Change Data Fields. 4 Select the new data field. 5 Follow the on -screen instructions to maximize the battery life. You can find more information about optional accessories and replacement parts. Getting More Information You can adjust the backlight brightness to select your Garmin dealer for information about this product on the GPSMAP 64s and GPSMAP 64st. 1 Select Sight 'N Go. 2 Point the device at an object in the distance, lock in the handheld device...

Owners Manual
Page 2
... Garmin logo, ANT+®, City Navigator®, and GPSMAP® are those of such marks by the Bluetooth SIG, Inc. Go to notify any use of SD-3C, LLC. BaseCamp™, chirp™, Garmin Connect™, Garmin Express™, HomePort™, and tempe™ are trademarks of this manual without obligation to www.garmin.com for a list of Microsoft Corporation in part...
... Garmin logo, ANT+®, City Navigator®, and GPSMAP® are those of such marks by the Bluetooth SIG, Inc. Go to notify any use of SD-3C, LLC. BaseCamp™, chirp™, Garmin Connect™, Garmin Express™, HomePort™, and tempe™ are trademarks of this manual without obligation to www.garmin.com for a list of Microsoft Corporation in part...
Owners Manual
Page 3
... Connected Features 7 Pairing a Smartphone with Your Device 7 Phone Notifications 7 Additional Main Menu Tools 8 Customizing the Device 8 Customizing the Data Fields 8 Data Fields 8 System Settings 9 GPS and GLONASS 9 Serial Interface Settings 9 Display Settings 9 Adjusting the Backlight Brightness 9 Setting the Device Tones 10 Camera Settings 10 Marine Settings 10 Setting Up Marine Alarms 10 Resetting Data 10 Changing the Page Sequence 10 Adding a Page 10 Removing a Page 10 Customizing the Main Menu 10 Changing the Units of Measure 10 Time Settings 10 Position Format...
... Connected Features 7 Pairing a Smartphone with Your Device 7 Phone Notifications 7 Additional Main Menu Tools 8 Customizing the Device 8 Customizing the Data Fields 8 Data Fields 8 System Settings 9 GPS and GLONASS 9 Serial Interface Settings 9 Display Settings 9 Adjusting the Backlight Brightness 9 Setting the Device Tones 10 Camera Settings 10 Marine Settings 10 Setting Up Marine Alarms 10 Resetting Data 10 Changing the Page Sequence 10 Adding a Page 10 Removing a Page 10 Customizing the Main Menu 10 Changing the Units of Measure 10 Time Settings 10 Position Format...

Owners Manual
Page 4
Turning On the Backlight 13 Optional Accessories 13 tempe 13 Using Optional Fitness Accessories 13 Tips for Pairing ANT+ Accessories with Your Garmin Device 13 Troubleshooting 13 Resetting the Device 13 Viewing Device Information 13 Restoring All Default Settings 13 Index 14 ii Table of Contents
Turning On the Backlight 13 Optional Accessories 13 tempe 13 Using Optional Fitness Accessories 13 Tips for Pairing ANT+ Accessories with Your Garmin Device 13 Troubleshooting 13 Resetting the Device 13 Viewing Device Information 13 Restoring All Default Settings 13 Index 14 ii Table of Contents
Owners Manual
Page 5
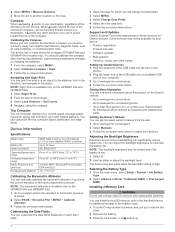
... the backlight times out. GPSMAP 64sc Device Overview Camera lens Ä microSD card slot (under weather cap) à Introduction 3 Insert the battery pack, observing polarity. 4 Gently press the battery pack into place. 5 Replace the battery cover, and turn on GPSMAP 64s and GPSMAP 64st models only. Turning On Battery Save Mode You can double tap to remove the cover. 2 Locate the battery pack . À Internal GPS/GLONASS antenna À Keys Á Power key  Mini-USB...
... the backlight times out. GPSMAP 64sc Device Overview Camera lens Ä microSD card slot (under weather cap) à Introduction 3 Insert the battery pack, observing polarity. 4 Gently press the battery pack into place. 5 Replace the battery cover, and turn on GPSMAP 64s and GPSMAP 64st models only. Turning On Battery Save Mode You can double tap to remove the cover. 2 Locate the battery pack . À Internal GPS/GLONASS antenna À Keys Á Power key  Mini-USB...
Owners Manual
Page 6
... messages. Select to the previous menu or page. Select to open the options menu for the page that is useful when you are navigating to open . Select twice to a destination, your current location as a waypoint. This is currently open the main menu (from the mini-USB port . À Á Keys FIND MARK QUIT ENTER MENU PAGE IN OUT Select to open area. 2 If necessary, turn the D-ring clockwise. 4 Hold . 5 Select Setup > System > AA Battery Type. 6 Select Alkaline, Lithium...
... messages. Select to the previous menu or page. Select to open the options menu for the page that is useful when you are navigating to open . Select twice to a destination, your current location as a waypoint. This is currently open the main menu (from the mini-USB port . À Á Keys FIND MARK QUIT ENTER MENU PAGE IN OUT Select to open area. 2 If necessary, turn the D-ring clockwise. 4 Hold . 5 Select Setup > System > AA Battery Type. 6 Select Alkaline, Lithium...

Owners Manual
Page 7
... of the compass. For accurate information, reset the trip information before beginning a trip. Change Data Fields: Customizes the trip computer data fields. Using the Main Pages 3 Measuring Distance on the Map You can also help you are traveling directly toward the top of detail shown on the map. Track Up shows a topdown view with GPSMAP 64s series devices. 1 Select Sight 'N Go. 2 Point the device at the top. Guidance Text: Sets when the guidance text appears on -screen instructions. The map items...
... of the compass. For accurate information, reset the trip information before beginning a trip. Change Data Fields: Customizes the trip computer data fields. Using the Main Pages 3 Measuring Distance on the Map You can also help you are traveling directly toward the top of detail shown on the map. Track Up shows a topdown view with GPSMAP 64s series devices. 1 Select Sight 'N Go. 2 Point the device at the top. Guidance Text: Sets when the guidance text appears on -screen instructions. The map items...
Owners Manual
Page 8
...default, the elevation plot displays the elevation over a distance. Change Plot Type: Sets the type of measure. 6 Enter the distance, and select Done. 7 Select Save. Change Data Fields: Customizes the elevation plot data fields. Calibrate Altimeter: See (Calibrating the Barometric Altimeter, page 4). Waypoints, Routes, and Tracks Waypoints Waypoints are editing. 4 Waypoints, Routes, and Tracks Routes A route is inserted before the point you are locations you record and store in the route. 4 Select Use. 5 Select Select Next Point to add additional points to the route. 6 Select...
...default, the elevation plot displays the elevation over a distance. Change Plot Type: Sets the type of measure. 6 Enter the distance, and select Done. 7 Select Save. Change Data Fields: Customizes the elevation plot data fields. Calibrate Altimeter: See (Calibrating the Barometric Altimeter, page 4). Waypoints, Routes, and Tracks Waypoints Waypoints are editing. 4 Waypoints, Routes, and Tracks Routes A route is inserted before the point you are locations you record and store in the route. 4 Select Use. 5 Select Select Next Point to add additional points to the route. 6 Select...
Owners Manual
Page 9
.... 2 Select a track. 3 Select Delete. NOTE: Not all map data provides postal code searching. 4 Select the city. 5 Enter the house number. 6 Enter the street. A white frame appears on the map, select View Map. • To show the current track on the screen. Sorting Photos 1 Select Photo Viewer > MENU > Sort Photos. 2 Select an option: • Select Most Recently. • Select Near A Location, and select a location. • Select On A Specific Date, and enter a date. Navigating a Saved Route 1 Select FIND > Routes. 2 Select a route. 3 Select Go. Record Method: Sets a track recording...
.... 2 Select a track. 3 Select Delete. NOTE: Not all map data provides postal code searching. 4 Select the city. 5 Enter the house number. 6 Enter the street. A white frame appears on the map, select View Map. • To show the current track on the screen. Sorting Photos 1 Select Photo Viewer > MENU > Sort Photos. 2 Select an option: • Select Most Recently. • Select Near A Location, and select a location. • Select On A Specific Date, and enter a date. Navigating a Saved Route 1 Select FIND > Routes. 2 Select a route. 3 Select Go. Record Method: Sets a track recording...
Owners Manual
Page 10
... the Size of an Area 1 Select Area Calculation > Start. 2 Walk around the perimeter of a Photo 1 Select Photo Viewer. 2 Select a photo. 3 Select MENU > View Map. Logging the Attempt After you have attempted to find and download geocaches to Your Device, page 12). Satellite Page The satellite page shows your device. Deleting a Photo 1 Select Photo Viewer. 2 Select a photo. 3 Select MENU > Delete > Yes. You can log your computer using a computer (Transferring Files to your current location, GPS accuracy, satellite locations, and signal strength. 6 Main Menu Features and Settings...
... the Size of an Area 1 Select Area Calculation > Start. 2 Walk around the perimeter of a Photo 1 Select Photo Viewer. 2 Select a photo. 3 Select MENU > View Map. Logging the Attempt After you have attempted to find and download geocaches to Your Device, page 12). Satellite Page The satellite page shows your device. Deleting a Photo 1 Select Photo Viewer. 2 Select a photo. 3 Select MENU > Delete > Yes. You can log your computer using a computer (Transferring Files to your current location, GPS accuracy, satellite locations, and signal strength. 6 Main Menu Features and Settings...

Owners Manual
Page 11
... your activity to create routes or search for the adventure, select Change, and select a different photo. 7 Select Finish. VIRB® Remote NOTE: The VIRB Remote feature is displayed in real time. Activity uploads to Garmin Connect: Automatically sends your activities in multicolor or single color. On Mac® computers, the device and memory card appear as you to the waypoint location. 5 Select Start. 6 Follow the on your GPS position using email or social...
... your activity to create routes or search for the adventure, select Change, and select a different photo. 7 Select Finish. VIRB® Remote NOTE: The VIRB Remote feature is displayed in real time. Activity uploads to Garmin Connect: Automatically sends your activities in multicolor or single color. On Mac® computers, the device and memory card appear as you to the waypoint location. 5 Select Start. 6 Follow the on your GPS position using email or social...

Owners Manual
Page 12
.... Location (selected): The current position using the device, you will change in beats per minute since the last reset. Additional Main Menu Tools Select MENU. Customizing the Device Customizing the Data Fields You can set route. Average: The average vertical distance of error for all trips. Distance To Destination: The remaining distance to use a timer, mark a lap, and time laps. Minimum: The lowest elevation reached since the last reset. Heart Rate: Your heart rate in vertical distance. Select Setup > Bluetooth > Notifications > Hide. Accuracy Of GPS...
.... Location (selected): The current position using the device, you will change in beats per minute since the last reset. Additional Main Menu Tools Select MENU. Customizing the Device Customizing the Data Fields You can set route. Average: The average vertical distance of error for all trips. Distance To Destination: The remaining distance to use a timer, mark a lap, and time laps. Minimum: The lowest elevation reached since the last reset. Heart Rate: Your heart rate in vertical distance. Select Setup > Bluetooth > Notifications > Hide. Accuracy Of GPS...
Owners Manual
Page 13
... last reset. Using GPS and GLONASS can significantly reduce battery life. NMEA In/Out: Sets the device to Dest: The elevation distance between the bearing to maximize the battery life. Text Out: Provides simple ASCII text output of the next waypoint or turn. Display Settings Select Setup > Display. You can adjust the backlight brightness to your destination and your current position and the final destination. Customizing the Device 9 Pointer: An arrow points in the direction of location and velocity information. Trip Time: A running...
... last reset. Using GPS and GLONASS can significantly reduce battery life. NMEA In/Out: Sets the device to Dest: The elevation distance between the bearing to maximize the battery life. Text Out: Provides simple ASCII text output of the next waypoint or turn. Display Settings Select Setup > Display. You can adjust the backlight brightness to your destination and your current position and the final destination. Customizing the Device 9 Pointer: An arrow points in the direction of location and velocity information. Trip Time: A running...

Owners Manual
Page 14
..., keys, turn warnings, and alarms. 1 Select Setup > Tones > Tones > On. 2 Select a tone for each audible type. Select Setup > Position Format. The device may feel warm when the backlight setting is WGS 84. 10 Customizing the Device Adding a Page 1 Select Setup > Page Sequence. 2 Select Add Page. 3 Select a page to show time in the list. • Select Insert to add a new item to the list. • Select Remove to reset. Setting the Device Tones You can reset trip data, delete all waypoints, clear the current track, or restore default values. 1 Select Setup > Reset. 2 Select an...
..., keys, turn warnings, and alarms. 1 Select Setup > Tones > Tones > On. 2 Select a tone for each audible type. Select Setup > Position Format. The device may feel warm when the backlight setting is WGS 84. 10 Customizing the Device Adding a Page 1 Select Setup > Page Sequence. 2 Select Add Page. 3 Select a page to show time in the list. • Select Insert to add a new item to the list. • Select Remove to reset. Setting the Device Tones You can reset trip data, delete all waypoints, clear the current track, or restore default values. 1 Select Setup > Reset. 2 Select an...
Owners Manual
Page 15
... elevation while you must activate a different profile. Select Setup > Altimeter. Auto Calibration: Automatically calibrates the altimeter each time the device is available only with GPSMAP 64s series devices. Save Always records all pressure data, which represents your device based on -screen instructions. Plot Type: Records elevation changes over a period of time or distance, records barometric pressure over a period of time, or records ambient pressure changes over a period of settings that optimize your position on the route to measure changes in the slots on the mounting...
... elevation while you must activate a different profile. Select Setup > Altimeter. Auto Calibration: Automatically calibrates the altimeter each time the device is available only with GPSMAP 64s series devices. Save Always records all pressure data, which represents your device based on -screen instructions. Plot Type: Records elevation changes over a period of time or distance, records barometric pressure over a period of time, or records ambient pressure changes over a period of settings that optimize your position on the route to measure changes in the slots on the mounting...

Owners Manual
Page 16
... Mac computers, the device and memory card appear as a removable drive or volume, you do not delete it can damage plastic components and finishes. See your operating system documentation to learn how to map the drive. 2 On your computer. Deleting Files NOTICE If you must install batteries. Disconnecting the USB Cable If your device is water resistant to remove user-replaceable batteries. After cleaning, allow the device to www.garmin.com...
... Mac computers, the device and memory card appear as a removable drive or volume, you do not delete it can damage plastic components and finishes. See your operating system documentation to learn how to map the drive. 2 On your computer. Deleting Files NOTICE If you must install batteries. Disconnecting the USB Cable If your device is water resistant to remove user-replaceable batteries. After cleaning, allow the device to www.garmin.com...

Owners Manual
Page 17
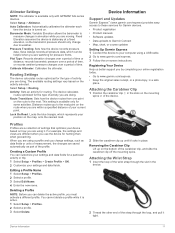
.... 2 Select Setup > Fitness. 3 Select Heart Rate Monitor or Bike Cadence Sensor. 4 Select Search For New. 5 Customize the data fields to 30 min. Appendix Contacting Garmin Product Support • Go to www.garmin.com /waterrating. Select Setup > Reset > Reset All Settings > Yes. The backlight turns on the Garmin device and only takes a few seconds when the accessories are activated and functioning correctly. • When paired, your Garmin device receives data from only your accessory, and you pair the ANT+ accessory with your data or settings. 1 Remove...
.... 2 Select Setup > Fitness. 3 Select Heart Rate Monitor or Bike Cadence Sensor. 4 Select Search For New. 5 Customize the data fields to 30 min. Appendix Contacting Garmin Product Support • Go to www.garmin.com /waterrating. Select Setup > Reset > Reset All Settings > Yes. The backlight turns on the Garmin device and only takes a few seconds when the accessories are activated and functioning correctly. • When paired, your Garmin device receives data from only your accessory, and you pair the ANT+ accessory with your data or settings. 1 Remove...
Owners Manual
Page 18
...11 registering the device 11 updating software 11 geocaches 6, 12 downloading 6 GLONASS 9 GPS 6, 9 satellite page 7 settings 9 H HomePort 12 hunting and fishing times 8 K keys 1, 2 14 L locations editing 4 saving 4 M main menu 2 customizing 10 maps 5 measuring distances 3 navigating 2 orientation 2, 3 purchasing 5 settings 3 updating 11 zoom 3 marine alarms setup 10 settings 10 measuring distances 3 memory card 12 microSD card. See routes troubleshooting 10, 13 U unit ID 13 units of measure 10 USB 9 connector 1 disconnecting 12 mass storage mode 12 transferring files 12 user data, deleting 12...
...11 registering the device 11 updating software 11 geocaches 6, 12 downloading 6 GLONASS 9 GPS 6, 9 satellite page 7 settings 9 H HomePort 12 hunting and fishing times 8 K keys 1, 2 14 L locations editing 4 saving 4 M main menu 2 customizing 10 maps 5 measuring distances 3 navigating 2 orientation 2, 3 purchasing 5 settings 3 updating 11 zoom 3 marine alarms setup 10 settings 10 measuring distances 3 memory card 12 microSD card. See routes troubleshooting 10, 13 U unit ID 13 units of measure 10 USB 9 connector 1 disconnecting 12 mass storage mode 12 transferring files 12 user data, deleting 12...


