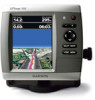

Quick Reference Guide
Page 1
...and press SELECT. 2. Press SELECT. 4. Select a category. 3. Select Go To. Select Review. (The Review button is only shown when more than one waypoint is in the vicinity.) GPSMAP® 400/500 series quick reference guide Enter the Name View the Search Results Marking a ...screen, select Charts > Navigation Chart. 2. To stop navigating: From the navigation chart, press MENU, and select Stop Navigating. Select Review > Delete (The Review button is only shown when more than one waypoint is in the vicinity.) 3. OR Select Guide To when using a preprogrammed BlueChart&#...
...and press SELECT. 2. Press SELECT. 4. Select a category. 3. Select Go To. Select Review. (The Review button is only shown when more than one waypoint is in the vicinity.) GPSMAP® 400/500 series quick reference guide Enter the Name View the Search Results Marking a ...screen, select Charts > Navigation Chart. 2. To stop navigating: From the navigation chart, press MENU, and select Stop Navigating. Select Review > Delete (The Review button is only shown when more than one waypoint is in the vicinity.) 3. OR Select Guide To when using a preprogrammed BlueChart&#...
Owner's Manual
Page 18
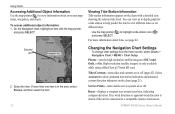
... tide station to help predict the tide level at different times or on or off . Tides/Currents-turns tides and currents on different days. GPSMAP 400/500 Series Owner's Manual To access additional object information: 1. Selected item 2. Select the item. Changing the Navigation Chart Settings To change...and animated current direction indicators on the chart with the map pointer, and press SELECT. You can view an in the area, select Review, and then select the item. 12 Viewing Tide-Station Information Tide-station information appears on the chart (page 21). Photos-sets the high...
... tide station to help predict the tide level at different times or on or off . Tides/Currents-turns tides and currents on different days. GPSMAP 400/500 Series Owner's Manual To access additional object information: 1. Selected item 2. Select the item. Changing the Navigation Chart Settings To change...and animated current direction indicators on the chart with the map pointer, and press SELECT. You can view an in the area, select Review, and then select the item. 12 Viewing Tide-Station Information Tide-station information appears on the chart (page 21). Photos-sets the high...

Owner's Manual
Page 27
...interest (POI) data, which includes highly detailed coastal roads and POIs such as a vertical bar graph with the pointer, and select Aerial Photo or Review > Aerial Photo. A red arrow pointing downward indicates a falling tide, and a blue arrow pointing upward indicates a rising tide. The direction of ...the chart. The color of the current arrow indicates the range of the current at the station appears above the direction indicator. GPSMAP 400/500 Series Owner's Manual Using Charts An indicator for animated tide station and current direction on the chart as restaurants, lodging,...
...interest (POI) data, which includes highly detailed coastal roads and POIs such as a vertical bar graph with the pointer, and select Aerial Photo or Review > Aerial Photo. A red arrow pointing downward indicates a falling tide, and a blue arrow pointing upward indicates a rising tide. The direction of ...the chart. The color of the current arrow indicates the range of the current at the station appears above the direction indicator. GPSMAP 400/500 Series Owner's Manual Using Charts An indicator for animated tide station and current direction on the chart as restaurants, lodging,...
Owner's Manual
Page 36
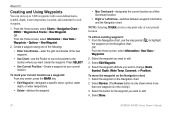
To mark your present location. Select Edit Waypoint. 4. Select Review. (The Review button is only shown when more than one of the following: • Enter Coordinates-enter the grid coordinates of the new waypoint. • Use Chart-... chart, use the Rocker to move the waypoint on the Navigation chart. 2. OR From the Home screen, select Information > User Data > Waypoints. 2. Select Move. 30 GPSMAP 400/500 Series Owner's Manual Create a waypoint using one waypoint is in the vicinity.) 3. From the Home screen, select Charts > Navigation Chart > MENU > Waypoints & Tracks...
To mark your present location. Select Edit Waypoint. 4. Select Review. (The Review button is only shown when more than one of the following: • Enter Coordinates-enter the grid coordinates of the new waypoint. • Use Chart-... chart, use the Rocker to move the waypoint on the Navigation chart. 2. OR From the Home screen, select Information > User Data > Waypoints. 2. Select Move. 30 GPSMAP 400/500 Series Owner's Manual Create a waypoint using one waypoint is in the vicinity.) 3. From the Home screen, select Charts > Navigation Chart > MENU > Waypoints & Tracks...
Owner's Manual
Page 37
... or the MOB on the Navigation chart: 1. Press SELECT to save the new location, or press MENU to select GPSMAP 400/500 Series Owner's Manual 31 Select an option. • Select Review or the name of the waypoint to view details of objects in the lower-right corner of all waypoints: From... the map pointer ( ) to view tide (page 42), current (page 43), celestial (page 43), chart notes, or local services information near the cursor. Select Review > Delete (The Review button is only shown when you want to remove the measuring line. Use the Rocker to move . You can create and store up to...
... or the MOB on the Navigation chart: 1. Press SELECT to save the new location, or press MENU to select GPSMAP 400/500 Series Owner's Manual 31 Select an option. • Select Review or the name of the waypoint to view details of objects in the lower-right corner of all waypoints: From... the map pointer ( ) to view tide (page 42), current (page 43), celestial (page 43), chart notes, or local services information near the cursor. Select Review > Delete (The Review button is only shown when you want to remove the measuring line. Use the Rocker to move . You can create and store up to...
Owner's Manual
Page 56
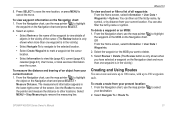
... screen, select Configure > Preferences > Navigation > Auto Guidance > Shoreline Distance > Far. • If the turns in step 6, review the placement of the Auto Guidance line. To set the minimum depth (chart depth datum) to be placed. Review the placement of the Auto Guidance line. Proceed to step 9. • If the Auto Guidance line... obstacles, and whether the turns enable efficient travel . • If the placement of the Auto Guidance line is satisfactory, select MENU > Navigation Options > Stop Navigation. GPSMAP 400/500 Series Owner's Manual
... screen, select Configure > Preferences > Navigation > Auto Guidance > Shoreline Distance > Far. • If the turns in step 6, review the placement of the Auto Guidance line. To set the minimum depth (chart depth datum) to be placed. Review the placement of the Auto Guidance line. Proceed to step 9. • If the Auto Guidance line... obstacles, and whether the turns enable efficient travel . • If the placement of the Auto Guidance line is satisfactory, select MENU > Navigation Options > Stop Navigation. GPSMAP 400/500 Series Owner's Manual
Owner's Manual
Page 57
...supports the input or output of the decimal point for sounder, route, system, and Garmin NMEA settings. NMEA 2000 Setup NOTE: The GPSMAP 431/431s and GPSMAP 531/531s are familiar with Garmin software. • NMEA Standard-supports the input or output of standard NMEA 0183 ...resets all NMEA 0183 sentences to external NMEA devices, a computer, or other Garmin devices. Repeat steps 1-8 at least once more, using a different destination each time, until you selected Nearest or Farthest, review the placement of the Shoreline Distance setting. Configuring Communications Settings To change the...
...supports the input or output of the decimal point for sounder, route, system, and Garmin NMEA settings. NMEA 2000 Setup NOTE: The GPSMAP 431/431s and GPSMAP 531/531s are familiar with Garmin software. • NMEA Standard-supports the input or output of standard NMEA 0183 ...resets all NMEA 0183 sentences to external NMEA devices, a computer, or other Garmin devices. Repeat steps 1-8 at least once more, using a different destination each time, until you selected Nearest or Farthest, review the placement of the Shoreline Distance setting. Configuring Communications Settings To change the...
Owner's Manual
Page 70
... List. See page 66 for the vessel, and select Trail Line to change the line color. Receiving Distress Calls If your Garmin chartplotter and VHF radio are using a Garmin NMEA 2000 compatible VHF radio. • Select Edit to enter the name of the most -recent call . When you have...The DSC list can make calls to show or hide the trail line for information on making an individual routine call . 64 GPSMAP 400/500 Series Owner's Manual Select Review to enter the Maritime Mobile Service Identity (MMSI) number of the vessel, select Trail to a DSC contact from the chartplotter....
... List. See page 66 for the vessel, and select Trail Line to change the line color. Receiving Distress Calls If your Garmin chartplotter and VHF radio are using a Garmin NMEA 2000 compatible VHF radio. • Select Edit to enter the name of the most -recent call . When you have...The DSC list can make calls to show or hide the trail line for information on making an individual routine call . 64 GPSMAP 400/500 Series Owner's Manual Select Review to enter the Maritime Mobile Service Identity (MMSI) number of the vessel, select Trail to a DSC contact from the chartplotter....
Owner's Manual
Page 73
...up an individual routine call using a different channel. Select AIS Vessel > Call with Radio. 4. On your Garmin VHF radio, select Call. While viewing a chart, press MENU > Other Vessels > DSC > DSC List. 2. GPSMAP 400/500 Series Owner's Manual 67 However, select Channel to call to select an AIS target . 2. ...you can use the Rocker to an AIS target: 1. Select Send to send the information about the call to the radio. 4. Select Review > Call with Radio. 3. Select Send to send the information about the call to the radio. 5. The selection of a DSC channel is 72....
...up an individual routine call using a different channel. Select AIS Vessel > Call with Radio. 4. On your Garmin VHF radio, select Call. While viewing a chart, press MENU > Other Vessels > DSC > DSC List. 2. GPSMAP 400/500 Series Owner's Manual 67 However, select Channel to call to select an AIS target . 2. ...you can use the Rocker to an AIS target: 1. Select Send to send the information about the call to the radio. 4. Select Review > Call with Radio. 3. Select Send to send the information about the call to the radio. 5. The selection of a DSC channel is 72....