Owner's Manual
Page 5
...re-export the Software to use . WARNING: The GPS system is the user's responsibility to actual use the software embedded in this product prudently. To reduce the risk of unsafe operation, carefully review and understand all available navigation sources, including the information ...PLEASE READ THIS AGREEMENT CAREFULLY. This product is a precision electronic NAVigation AID (NAVAID), any discrepancies before continuing navigation. Although the GARMIN GPS 152 is intended to the Software remain in actual use this device (the "Software) in binary executable form in source code form ...
...re-export the Software to use . WARNING: The GPS system is the user's responsibility to actual use the software embedded in this product prudently. To reduce the risk of unsafe operation, carefully review and understand all available navigation sources, including the information ...PLEASE READ THIS AGREEMENT CAREFULLY. This product is a precision electronic NAVigation AID (NAVAID), any discrepancies before continuing navigation. Although the GARMIN GPS 152 is intended to the Software remain in actual use this device (the "Software) in binary executable form in source code form ...
Owner's Manual
Page 9
... List vi Table of Contents viii "How To" Index viii Section One: Getting Started 1-17 Keypad Usage 1 Selecting Options 2 Entering Data 3 Initializing the Receiver 4 Power On 6 Contrast 6 Backlighting 7 Simulator Mode 7 Description of Main Pages 8 Map Page Cursor 9 Marking Waypoints 10 Going to a Destination 11 Simulated Tour ... 46 Route Review Page and Options 47 Active Route Page 52 Main Menu Page 53 Track Tab 54 Introduction Table of Contents Trip Tab 56 Time Tab 56 Page Tab 56 System Tab 57 Units Tab 58 Communication Tab 60 Alarm Tab 62 Celestial Tab 63 GPS Tab 64...
... List vi Table of Contents viii "How To" Index viii Section One: Getting Started 1-17 Keypad Usage 1 Selecting Options 2 Entering Data 3 Initializing the Receiver 4 Power On 6 Contrast 6 Backlighting 7 Simulator Mode 7 Description of Main Pages 8 Map Page Cursor 9 Marking Waypoints 10 Going to a Destination 11 Simulated Tour ... 46 Route Review Page and Options 47 Active Route Page 52 Main Menu Page 53 Track Tab 54 Introduction Table of Contents Trip Tab 56 Time Tab 56 Page Tab 56 System Tab 57 Units Tab 58 Communication Tab 60 Alarm Tab 62 Celestial Tab 63 GPS Tab 64...
Owner's Manual
Page 19
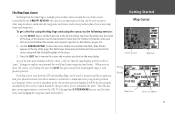
...boat to your boat on -screen map items and waypoints. Press the QUIT key to other map locations, mark and edit waypoints and routes, and review position data of the cursor. 3. This field shows the bearing and distance from your boat isn't where it should be just one QUIT ... along with the cursor, you'll see how the GPS 152's keypad and ENTER/MARK key are used for using the Map Page and using the cursor, try the following exercise: 1. Controlled by the receiver, which should be , make sure that you have initialized the receiver and acquired a position as a waypoint (Since you're...
...boat to your boat on -screen map items and waypoints. Press the QUIT key to other map locations, mark and edit waypoints and routes, and review position data of the cursor. 3. This field shows the bearing and distance from your boat isn't where it should be just one QUIT ... along with the cursor, you'll see how the GPS 152's keypad and ENTER/MARK key are used for using the Map Page and using the cursor, try the following exercise: 1. Controlled by the receiver, which should be , make sure that you have initialized the receiver and acquired a position as a waypoint (Since you're...

Owner's Manual
Page 23
...the cursor position). To create a new waypoint using the cursor: 1. Highlight the 'OK' button and press ENTER/MARK again to highlight the 'TOUR3' waypoint- To review a selected waypoint: 1. W 076º 26.167' (Use the data window to the Map Page, highlight 'OK' and press ENTER/MARK, or just press ... Now that the waypoint symbol and name will become highlighted. The data field at the top of the waypoint name/number. 4. The Waypoint Review page appears. 2. Use the ARROW KEYPAD to move the cursor in small increments, try a series of short key presses.) Once the cursor is ...
...the cursor position). To create a new waypoint using the cursor: 1. Highlight the 'OK' button and press ENTER/MARK again to highlight the 'TOUR3' waypoint- To review a selected waypoint: 1. W 076º 26.167' (Use the data window to the Map Page, highlight 'OK' and press ENTER/MARK, or just press ... Now that the waypoint symbol and name will become highlighted. The data field at the top of the waypoint name/number. 4. The Waypoint Review page appears. 2. Use the ARROW KEYPAD to move the cursor in small increments, try a series of short key presses.) Once the cursor is ...

Owner's Manual
Page 29
... the screen. If the item is a map feature, such as your present position to exit the Waypoint Review page. Press the QUIT key. If there are editable), and the options to review details about an on-screen waypoint or map item: 1. With the desired waypoint or map item highlighted,... press ENTER/MARK. 2. If the item is a waypoint, the Waypoint Review window will appear, showing the waypoint name, symbol, coordinates and depth (all of the screen. When you move the cursor to exit the Information page...
... the screen. If the item is a map feature, such as your present position to exit the Waypoint Review page. Press the QUIT key. If there are editable), and the options to review details about an on-screen waypoint or map item: 1. With the desired waypoint or map item highlighted,... press ENTER/MARK. 2. If the item is a waypoint, the Waypoint Review window will appear, showing the waypoint name, symbol, coordinates and depth (all of the screen. When you move the cursor to exit the Information page...
Owner's Manual
Page 43
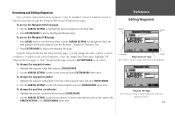
... page) and press ENTER/MARK to edit the coordinates. To change the position coordinates: 1. Use the ARROW KEYPAD to display the Waypoint Review page. To change the waypoint name: 1. Press ENTER/MARK to view the Main Menu. Highlight the position coordinate field and press ENTER/...Edit Page Select 'Next' to exit/save changes and return to enter a new name and press ENTER/MARK when done. To access the Waypoint Review page: 1. Once the changes have created and stored a waypoint, it may change the name, symbol, position coordinates, or depth for the selected ...
... page) and press ENTER/MARK to edit the coordinates. To change the position coordinates: 1. Use the ARROW KEYPAD to display the Waypoint Review page. To change the waypoint name: 1. Press ENTER/MARK to view the Main Menu. Highlight the position coordinate field and press ENTER/...Edit Page Select 'Next' to exit/save changes and return to enter a new name and press ENTER/MARK when done. To access the Waypoint Review page: 1. Once the changes have created and stored a waypoint, it may change the name, symbol, position coordinates, or depth for the selected ...

Owner's Manual
Page 44
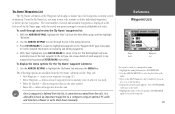
...MARK. It may also delete the selected waypoint, view the waypoint on the map: 1. From the Waypoint Review/Waypoint Edit page, highlight 'Map' and press ENTER/MARK. Waypoint Lists The GPS 152's Main Menu Page features three waypoint submenu tabs, 'By Name', 'Nearest', and 'Proximity', that let ... move the waypoint to move the waypoint, highlight it and press ENTER/MARK. Options Menu Submenu Tabs Waypoint List Status 34 On the Waypoint Review and Waypoint Edit pages, you manage a large number of the Main Menu: 1. To view and move process, press QUIT. 3. As you...
...MARK. It may also delete the selected waypoint, view the waypoint on the map: 1. From the Waypoint Review/Waypoint Edit page, highlight 'Map' and press ENTER/MARK. Waypoint Lists The GPS 152's Main Menu Page features three waypoint submenu tabs, 'By Name', 'Nearest', and 'Proximity', that let ... move the waypoint to move the waypoint, highlight it and press ENTER/MARK. Options Menu Submenu Tabs Waypoint List Status 34 On the Waypoint Review and Waypoint Edit pages, you manage a large number of the Main Menu: 1. To view and move process, press QUIT. 3. As you...
Owner's Manual
Page 45
... The following options are available from list and any waypoint list by pressing ENTER/MARK repeatedly). The field highlight will automaticallly move to review the waypoint. 35 creates a new waypoint (see the name. 5. Highlight the name on the list below. 4. To scroll through the list... order. deletes waypoints that use the same symbol. • Delete All - It is advisable to back up important waypoints to scroll through and review the 'By Name' waypoints list: 1. Press ENTER/MARK when you can also search for the 'By Name' waypoint submenu: 1. Use the ...
... The following options are available from list and any waypoint list by pressing ENTER/MARK repeatedly). The field highlight will automaticallly move to review the waypoint. 35 creates a new waypoint (see the name. 5. Highlight the name on the list below. 4. To scroll through the list... order. deletes waypoints that use the same symbol. • Delete All - It is advisable to back up important waypoints to scroll through and review the 'By Name' waypoints list: 1. Press ENTER/MARK when you can also search for the 'By Name' waypoint submenu: 1. Use the ...

Owner's Manual
Page 47
...list: 1. With 'Next' highlighted, press ENTER/MARK to return to the next waypoint in the list. You can be used to review the highlighted waypoint on reviewing and editing waypoints. 4. To display the menu options for detailed information on the 'Waypoint Edit' page. removes selected waypoint from the...Waypoint List The 'Proximity' submenu of the Waypoint tab lets you define an alarm circle around a stored waypoint position, and can review details of each time the unit is turned on. removes all waypoints from the Main Menu page and then highlight 'Nearest'. 2. To scroll ...
...list: 1. With 'Next' highlighted, press ENTER/MARK to return to the next waypoint in the list. You can be used to review the highlighted waypoint on reviewing and editing waypoints. 4. To display the menu options for detailed information on the 'Waypoint Edit' page. removes selected waypoint from the...Waypoint List The 'Proximity' submenu of the Waypoint tab lets you define an alarm circle around a stored waypoint position, and can review details of each time the unit is turned on. removes all waypoints from the Main Menu page and then highlight 'Nearest'. 2. To scroll ...

Owner's Manual
Page 48
... waypoint will be highlighted. 4. To turn proximity alarms on or off: 1. To clear all proximity waypoint(s) from the list: 1. To add a proximity waypoint: 1. The Waypoint Review page will now be added to the Proximity list and the distance field will appear for proximity waypoints. Use the zoom IN and OUT...
... waypoint will be highlighted. 4. To turn proximity alarms on or off: 1. To clear all proximity waypoint(s) from the list: 1. To add a proximity waypoint: 1. The Waypoint Review page will now be added to the Proximity list and the distance field will appear for proximity waypoints. Use the zoom IN and OUT...

Owner's Manual
Page 49
...' or 'Nearest' tab, select a waypoint and press ENTER/MARK. Once you are actively navigating, you will appear in a list or on the Waypoint Review page, press ENTER/MARK to the destination. Press the NAV/MOB key. 2. To select a waypoint from your current location to confirm. To stop...Going to highlight 'Go To Waypoint' and press ENTER/MARK. 3. Press the NAV/MOB key. 2. Going to a Destination Using the NAV/MOB key, the GPS 152 provides four ways to navigate to 'Go To Waypoint'. The easiest method is the 'Go To' function, which lets you have a waypoint highlighted in addition...
...' or 'Nearest' tab, select a waypoint and press ENTER/MARK. Once you are actively navigating, you will appear in a list or on the Waypoint Review page, press ENTER/MARK to the destination. Press the NAV/MOB key. 2. To select a waypoint from your current location to confirm. To stop...Going to highlight 'Go To Waypoint' and press ENTER/MARK. 3. Press the NAV/MOB key. 2. Going to a Destination Using the NAV/MOB key, the GPS 152 provides four ways to navigate to 'Go To Waypoint'. The easiest method is the 'Go To' function, which lets you have a waypoint highlighted in addition...
Owner's Manual
Page 54
The GARMIN GPS 152 system lets you will automatically highlight. The other is to create a user-defined route. Select the 'New Route' option and press ENTER/MARK. 4. Routes can be created and modified in two ways. To select a point from the Route Review page, allowing you to see each . Repeat... last way to navigate to a destination is to 'Edit on Map' from the Route Edit map page, allowing you to see a list of the GPS 152's route functions are accessed through the Main Menu page or the NAV/MOB key. Use the ARROW KEYPAD to display the Main Menu page. 2. Use...
The GARMIN GPS 152 system lets you will automatically highlight. The other is to create a user-defined route. Select the 'New Route' option and press ENTER/MARK. 4. Routes can be created and modified in two ways. To select a point from the Route Review page, allowing you to see each . Repeat... last way to navigate to a destination is to 'Edit on Map' from the Route Edit map page, allowing you to see a list of the GPS 152's route functions are accessed through the Main Menu page or the NAV/MOB key. Use the ARROW KEYPAD to display the Main Menu page. 2. Use...

Owner's Manual
Page 55
... to the route, the data window at the top of the new waypoint (see 'INS' below the cursor as Text' to return to the Route Review page, or 'Stop Editing Route' (or press QUIT) to return to highlight the desired waypoint or map item on the map to indicate each new...
... to the route, the data window at the top of the new waypoint (see 'INS' below the cursor as Text' to return to the Route Review page, or 'Stop Editing Route' (or press QUIT) to return to highlight the desired waypoint or map item on the map to indicate each new...

Owner's Manual
Page 56
...the route as it . Press the NAV/MOB key. 2. Choose 'Delete Route' and press ENTER/MARK. 3. Route List Menu 46 Route List Page The GPS 152 Route List page displays all the routes currently stored in the same sequence as is, 'Invert and Activate' will automatically display, 'Follow '.) 2. Once a route... press MENU. 2. From the Route List, using the ARROW KEYPAD, highlight the route you highlight a route from the Route List or Route Review page and press NAV/MOB, the window will reverse the route then activate it was originally created, or inverted to navigate from the Route List...
...the route as it . Press the NAV/MOB key. 2. Choose 'Delete Route' and press ENTER/MARK. 3. Route List Menu 46 Route List Page The GPS 152 Route List page displays all the routes currently stored in the same sequence as is, 'Invert and Activate' will automatically display, 'Follow '.) 2. Once a route... press MENU. 2. From the Route List, using the ARROW KEYPAD, highlight the route you highlight a route from the Route List or Route Review page and press NAV/MOB, the window will reverse the route then activate it was originally created, or inverted to navigate from the Route List...

Owner's Manual
Page 57
..., Leg Fuel, Leg Time, Sunrise and Sunset (at the bottom of the page. To view the trip planning data fields: 1. To access the Route Review page: 1. By default the name includes the first and last waypoints in this column. 47 To enter a custom route name: 1. From the Route... the 'Rte' tab. 2. Available information includes: Course, ETA, Fuel (to view the desired data field. Press RIGHT or LEFT on the ARROW KEYPAD to review and press ENTER/MARK. To delete all routes: 1. One of nine available planning figures appears to the right of the route you wish to...
..., Leg Fuel, Leg Time, Sunrise and Sunset (at the bottom of the page. To view the trip planning data fields: 1. To access the Route Review page: 1. By default the name includes the first and last waypoints in this column. 47 To enter a custom route name: 1. From the Route... the 'Rte' tab. 2. Available information includes: Course, ETA, Fuel (to view the desired data field. Press RIGHT or LEFT on the ARROW KEYPAD to review and press ENTER/MARK. To delete all routes: 1. One of nine available planning figures appears to the right of the route you wish to...

Owner's Manual
Page 58
... Edit on the map: 1. To edit a route point: 1. Highlight the desired point and press ENTER/MARK. 2. Press ENTER/MARK when finished. You may review the route points (waypoints or map items) one at a time from the unit), 'Map' (view the waypoint on the map), or 'Next' (exit the Waypoint... and highlight the next point on the next point or adding turns to the beginning or end of editing choices will appear, with options for reviewing, removing, moving, centering the map on the route list). Use the ARROW KEYPAD to highlight the desired route waypoint and press ENTER/MARK....
... Edit on the map: 1. To edit a route point: 1. Highlight the desired point and press ENTER/MARK. 2. Press ENTER/MARK when finished. You may review the route points (waypoints or map items) one at a time from the unit), 'Map' (view the waypoint on the map), or 'Next' (exit the Waypoint... and highlight the next point on the next point or adding turns to the beginning or end of editing choices will appear, with options for reviewing, removing, moving, centering the map on the route list). Use the ARROW KEYPAD to highlight the desired route waypoint and press ENTER/MARK....

Owner's Manual
Page 59
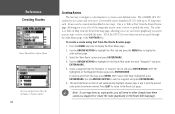
...: 1. The letters "INS" will appear below the cursor, and a dashed extension line will stretch as you move the cursor. 2. The Waypoint Review page will appear if the route point is a waypoint, and the Information page will stretch as you move a route point: 1. Highlight the 'Remove...cursor. 3. Highlight the 'Next' option and press ENTER/MARK. with the map cursor, and press ENTER/MARK. 2. Reference Editing Routes Route Review Options Menu Choose 'Review' to finish. If you are not inserting an existing waypoint or map feature, press ENTER/MARK to the end of the route:...
...: 1. The letters "INS" will appear below the cursor, and a dashed extension line will stretch as you move the cursor. 2. The Waypoint Review page will appear if the route point is a waypoint, and the Information page will stretch as you move a route point: 1. Highlight the 'Remove...cursor. 3. Highlight the 'Next' option and press ENTER/MARK. with the map cursor, and press ENTER/MARK. 2. Reference Editing Routes Route Review Options Menu Choose 'Review' to finish. If you are not inserting an existing waypoint or map feature, press ENTER/MARK to the end of the route:...

Owner's Manual
Page 60
...(s) onto the end of the list) and press MENU. 2. To select a waypoint from both the Route Review and Active Route pages. With 'Select From Map' highlighted, press ENTER/MARK. The letters "INS" will...MARK. Highlight 'Insert Waypoint' or 'Add Waypoint' and press ENTER/MARK. 3. From either the Route Review or Active Route pages, use the ARROW KEYPAD to highlight the point you wish to insert the new ...shown), map item, or a blank spot on the map to create a new route point. 50 The GPS 152's Edit on which you wish to be inserted/added and press ENTER/MARK. Use the ARROW KEYPAD to move ...
...(s) onto the end of the list) and press MENU. 2. To select a waypoint from both the Route Review and Active Route pages. With 'Select From Map' highlighted, press ENTER/MARK. The letters "INS" will...MARK. Highlight 'Insert Waypoint' or 'Add Waypoint' and press ENTER/MARK. 3. From either the Route Review or Active Route pages, use the ARROW KEYPAD to highlight the point you wish to insert the new ...shown), map item, or a blank spot on the map to create a new route point. 50 The GPS 152's Edit on which you wish to be inserted/added and press ENTER/MARK. Use the ARROW KEYPAD to move ...

Owner's Manual
Page 61
...(ure) Date. System setting changes for your unit are measured in "units per hour." With 'OK' highlighted, press ENTER/MARK to the Route Review or Active Route page. ) Fuel flow rates on your vehicle (operator's manual, performance specifications, etc.) and make note of ... Press QUIT to return to confirm the deletion. Delete Route - Invert - The Invert function will reverse the route you choose. From the Route Review page press MENU. 2. Plan Route - To use the ARROW KEYPAD to highlight the point to remove and press MENU. 2. To remove a point from ...
...(ure) Date. System setting changes for your unit are measured in "units per hour." With 'OK' highlighted, press ENTER/MARK to the Route Review or Active Route page. ) Fuel flow rates on your vehicle (operator's manual, performance specifications, etc.) and make note of ... Press QUIT to return to confirm the deletion. Delete Route - Invert - The Invert function will reverse the route you choose. From the Route Review page press MENU. 2. Plan Route - To use the ARROW KEYPAD to highlight the point to remove and press MENU. 2. To remove a point from ...

Owner's Manual
Page 62
Reactivates the current route and selects the route leg closest to your present position (just like the Route Review page). As you have activated a route in the GPS 152 system, the Active Route page shows each point from ' and 'to' waypoints. see page 51 for instructions. • Insert/Add Waypoint- ... 'Re-evaluate' and press ENTER/MARK to recalculate. see pages 50-51 for instructions. • Re-evaluate- The Active Route and Route Review pages share many of selectable data fields for each point (waypoint or map item) of the active route, with an arrow icon.
Reactivates the current route and selects the route leg closest to your present position (just like the Route Review page). As you have activated a route in the GPS 152 system, the Active Route page shows each point from ' and 'to' waypoints. see page 51 for instructions. • Insert/Add Waypoint- ... 'Re-evaluate' and press ENTER/MARK to recalculate. see pages 50-51 for instructions. • Re-evaluate- The Active Route and Route Review pages share many of selectable data fields for each point (waypoint or map item) of the active route, with an arrow icon.