

Installation Instructions
Page 1
... wire to ground the radar housing (and voltage converter, if applicable). • Marine sealant Mounting Considerations When selecting a mounting location, observe these instructions. Shims can be used only as VHF radios, cables, and antennas. • The device should not be mounted ...support the device's weight. GMR™ 420/620/1220/2520 xHD2 Series Installation Instructions To obtain the best performance and to avoid damage to your boat, install the device according to these considerations. • It is highly recommended that is parallel to the vessel's water line and is mounted...
... wire to ground the radar housing (and voltage converter, if applicable). • Marine sealant Mounting Considerations When selecting a mounting location, observe these instructions. Shims can be used only as VHF radios, cables, and antennas. • The device should not be mounted ...support the device's weight. GMR™ 420/620/1220/2520 xHD2 Series Installation Instructions To obtain the best performance and to avoid damage to your boat, install the device according to these considerations. • It is highly recommended that is parallel to the vessel's water line and is mounted...
Installation Instructions
Page 2
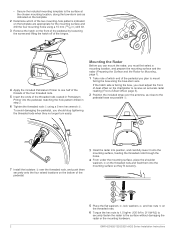
...in step 2. 6 Tighten the threaded rods using a 5 mm hex wrench . À Á To avoid damaging the pedestal, you should stop tightening the threaded rods when they no longer turn easily. Mounting the Radar Before you can mount the radar, you must adjust the frontof-boat offset ...pedestal, matching the hole pattern drilled in . [11 lbf-ft.]) to securely fasten the radar to the surface without damaging the radar or the mounting hardware. 2 GMR 420/620/1220/2520 xHD2 Series Installation Instructions • Secure the included mounting template to the surface at the chosen mounting ...
...in step 2. 6 Tighten the threaded rods using a 5 mm hex wrench . À Á To avoid damaging the pedestal, you should stop tightening the threaded rods when they no longer turn easily. Mounting the Radar Before you can mount the radar, you must adjust the frontof-boat offset ...pedestal, matching the hole pattern drilled in . [11 lbf-ft.]) to securely fasten the radar to the surface without damaging the radar or the mounting hardware. 2 GMR 420/620/1220/2520 xHD2 Series Installation Instructions • Secure the included mounting template to the surface at the chosen mounting ...

Installation Instructions
Page 3
... the pedestal with the socket on . Item Description To the Garmin Marine Network 7.5 A fuse holder Red (+) Black (-) To the boat battery (10 to 32 Vdc) Water ground connection 1 Route the power cable to the radar and the voltage converter. 2 Use crimp connectors and heat-shrink tubing to connect the power cable to properly power the device. GMR 420/620/1220/2520 xHD2 Series Installation Instructions 3 Some radar models...
... the pedestal with the socket on . Item Description To the Garmin Marine Network 7.5 A fuse holder Red (+) Black (-) To the boat battery (10 to 32 Vdc) Water ground connection 1 Route the power cable to the radar and the voltage converter. 2 Use crimp connectors and heat-shrink tubing to connect the power cable to properly power the device. GMR 420/620/1220/2520 xHD2 Series Installation Instructions 3 Some radar models...

Installation Instructions
Page 4
... the power cable directly to the battery is not included, you can update the software, you install the device or add an accessory to the device. Garmin Marine Network Considerations This device connects to Garmin Marine Network devices to share radar data with your model is necessary to extend the cable, the appropriate gauge of wire must use a field- To download the latest manual, go...
... the power cable directly to the battery is not included, you can update the software, you install the device or add an accessory to the device. Garmin Marine Network Considerations This device connects to Garmin Marine Network devices to share radar data with your model is necessary to extend the cable, the appropriate gauge of wire must use a field- To download the latest manual, go...

Installation Instructions
Page 5
....2 mm (9 5/16 in one radar on -screen instructions. 4 Wait several minutes while the software update process completes. The device returns to normal operation after the software update process is being powered on the connected chartplotters. GMR 420/620/1220/2520 xHD2 Series Installation Instructions 5 You must mount the radar, connect it to power, and connect it is part of the pedestal. Front-of-Boat Offset...
....2 mm (9 5/16 in one radar on -screen instructions. 4 Wait several minutes while the software update process completes. The device returns to normal operation after the software update process is being powered on the connected chartplotters. GMR 420/620/1220/2520 xHD2 Series Installation Instructions 5 You must mount the radar, connect it to power, and connect it is part of the pedestal. Front-of-Boat Offset...

Installation Instructions
Page 6
Item Measurement Description À 4 ft. Physical Specifications Electrical Specifications Specification Measurement Pedestal weight 21.4 kg (47.1 lb) Antenna weight 4 ft. antenna: 7.7 kg (16.9 lb.) Power cable length 15 m (49 ft. 3 in.) Network cable length 15 m (49 ft. 3 in.) Antenna rotation...in.) Æ 140 mm (5 1/2 in.) Ç 200 mm (7 7/8 in.) Description Center of the pedestal. Center of rotation to the inner rear mounting holes. models: 132.7 cm (4 ft. 4 1/4 in .) 6 GMR 420/620/1220/2520 xHD2 Series Installation Instructions antenna: 5.5 kg (12.2 lb.) 6 ft.
Item Measurement Description À 4 ft. Physical Specifications Electrical Specifications Specification Measurement Pedestal weight 21.4 kg (47.1 lb) Antenna weight 4 ft. antenna: 7.7 kg (16.9 lb.) Power cable length 15 m (49 ft. 3 in.) Network cable length 15 m (49 ft. 3 in.) Antenna rotation...in.) Æ 140 mm (5 1/2 in.) Ç 200 mm (7 7/8 in.) Description Center of the pedestal. Center of rotation to the inner rear mounting holes. models: 132.7 cm (4 ft. 4 1/4 in .) 6 GMR 420/620/1220/2520 xHD2 Series Installation Instructions antenna: 5.5 kg (12.2 lb.) 6 ft.

Installation Instructions
Page 7
... LED. GMR™ is being updated. Check the available on the connected to the Garmin Marine Network. Check the connector. Installation Troubleshooting Symptom Possible Causes The radar does • The power cable may be powering on. correctly to the device or to the specifications tab for your radar model on www.garmin.com. *The radar should only stay red briefly before changing to the battery. Check...
... LED. GMR™ is being updated. Check the available on the connected to the Garmin Marine Network. Check the connector. Installation Troubleshooting Symptom Possible Causes The radar does • The power cable may be powering on. correctly to the device or to the specifications tab for your radar model on www.garmin.com. *The radar should only stay red briefly before changing to the battery. Check...

Flush Mount Template
Page 1
... paper and printer. Notice Garmin is larger than the template. Printing a Mounting Template Notice It is not recommended that is not responsible for Page Scaling ➊. 3 Ensure the check mark is next to Auto-Rotate and Center ➋. 4 Drag the arrow ➌ to the right, to follow these instructions. To print large templates...
... paper and printer. Notice Garmin is larger than the template. Printing a Mounting Template Notice It is not recommended that is not responsible for Page Scaling ➊. 3 Ensure the check mark is next to Auto-Rotate and Center ➋. 4 Drag the arrow ➌ to the right, to follow these instructions. To print large templates...

Flush Mount Template
Page 2
GMR® 400/600/1200/2500 Series Mounting Template 180° forskydning 180°-forskyvning 180° förskjutning Décalage = 0° Scostamento 0° Versatz von 0° Variación de 0° 180° .... (200 mm) Printed in . (140 mm) Décalage = 180° Scostamento 180° Versatz von 180° Variación de 180° © 2009-15 Garmin Ltd.
GMR® 400/600/1200/2500 Series Mounting Template 180° forskydning 180°-forskyvning 180° förskjutning Décalage = 0° Scostamento 0° Versatz von 0° Variación de 0° 180° .... (200 mm) Printed in . (140 mm) Décalage = 180° Scostamento 180° Versatz von 180° Variación de 180° © 2009-15 Garmin Ltd.

?Declaration of Conformity
Page 1
Methods of Equipment: Marine Radar Model Number(s): GMR 42X xHD2 GMR 62X xHD2 GMR 122X xHD2 (x can be 4 or 6) The undersigned does hereby declare that the equipment complies with the above Directives Jamie Wiltshire Quality Supervisor Garmin (Europe) Ltd. Liberty House, Hounsdown Business Park, Southampton, ... 1:2009+Am 2:2013 Information technology equipment - Safety EN 302 248 V1.2.0 Electromagnetic compatibility and Radio spectrum Matters (ERM);Navigation radar for use on non-SOLAS vessels;Harmonized EN covering the essential requirements of article 3.2 of Council Directive:...
Methods of Equipment: Marine Radar Model Number(s): GMR 42X xHD2 GMR 62X xHD2 GMR 122X xHD2 (x can be 4 or 6) The undersigned does hereby declare that the equipment complies with the above Directives Jamie Wiltshire Quality Supervisor Garmin (Europe) Ltd. Liberty House, Hounsdown Business Park, Southampton, ... 1:2009+Am 2:2013 Information technology equipment - Safety EN 302 248 V1.2.0 Electromagnetic compatibility and Radio spectrum Matters (ERM);Navigation radar for use on non-SOLAS vessels;Harmonized EN covering the essential requirements of article 3.2 of Council Directive:...


