Installation Instructions
Page 1
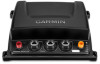
... the cable can be in the product box for the safe and prudent operation of observing the water around your boat, install the Garmin® GCV 10 device according to the transducer. Tools Needed • Drill and drill bits • #2 Phillips screwdriver • Cable ties (optional) • Marine sealant (optional) Mounting the Sounder Mounting...
... the cable can be in the product box for the safe and prudent operation of observing the water around your boat, install the Garmin® GCV 10 device according to the transducer. Tools Needed • Drill and drill bits • #2 Phillips screwdriver • Cable ties (optional) • Marine sealant (optional) Mounting the Sounder Mounting...
Installation Instructions
Page 2
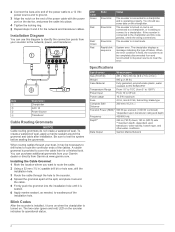
... and this diagram to identify the connection points from 5° to 158°F) Power Input From 10 to clear the error. Item À Á Â Ã Description Chartplotter GCV 10 Power Source Transducer Cable Routing Grommets NOTICE Cable routing grommets do not create a waterproof seal. A rubber grommet is ...resistant to IEC 60529-IPX7 Temperature Range From -15° to 70°C (from your boat, it may be completely disconnected from Garmin at the split, and place it around the grommet and cable after installation. The sounder is connected to cover the cable hole for...
... and this diagram to identify the connection points from 5° to 158°F) Power Input From 10 to clear the error. Item À Á Â Ã Description Chartplotter GCV 10 Power Source Transducer Cable Routing Grommets NOTICE Cable routing grommets do not create a waterproof seal. A rubber grommet is ...resistant to IEC 60529-IPX7 Temperature Range From -15° to 70°C (from your boat, it may be completely disconnected from Garmin at the split, and place it around the grommet and cable after installation. The sounder is connected to cover the cable hole for...

